As a big fan of Sublime Text, I was excited to find out that somebody made a port of the Monokai theme for macOS and OSX’s Terminal. Originally developed by Wimer Hazenberg, Monokai is a great color scheme available for a variety of text-based applications. This short guide will show you how to get Monokai into Terminal.
1 – Download monokai.terminal
Download Stephen Way’s monokai.terminal port from the project’s Github page. Unzip the file.
2 – Install monokai.terminal
Double-click Monokai.terminal to open it. This will automatically install the color scheme into Terminal.
3 – Allow installation from unidentified developers
You may see a message similar to this:
“Monokai.terminal” can’t be opened because it is from an unidentified developer
If you see this message, navigate to System Preferences > Security & Privacy > General and ensure that the App store and identified developers option is checked.
Then, click “Open Anyway”.
4 – Make Monokai your default Terminal color scheme
With Terminal open, navigate to Terminal > Preferences. Select the Profiles tab (MacOS) or Settings tab (OS X) and then click Monokai in the side pane. Finally, click the Default button.
You’re all done!
NEXT UP
How to Enable the “Popping” Sound When Adjusting the Volume on Your Mac
Starting with MacOS Sierra and High Sierra, your Mac will no longer play a “pop” sound when you adjust your volume. If you prefer to have this sound when you adjust volume up and down (as I do), this guide will teach you how to reenable it. 1 – Open Sound System Preferences Navigate to System
Introducing Howchoo, an enigmatic author whose unique pen name reflects their boundless curiosity and limitless creativity. Mysterious and multifaceted, Howchoo has emerged as a captivating storyteller, leaving readers mesmerized by the uncharted realms they craft with their words.
With an insatiable appetite for knowledge and a love for exploration, Howchoo’s writing transcends conventional genres, blurring the lines between fantasy, science fiction, and the surreal. Their narratives are a kaleidoscope of ideas, weaving together intricate plots, unforgettable characters, and thought-provoking themes that challenge the boundaries of imagination.
Home automation is growing in popularity, but one of the biggest hurdles is compatibility between devices. Many manufacturers insist on using a branded app to configure and control smart home tech, with patchy compatibility with voice-activated systems like Siri, Google Home, or Amazon Alexa.
Apple users are left behind, with Apple’s own automation system (Apple HomeKit) costing more and with more stringent requirements for hardware developers to consider implementing. With this in mind, enter Homebridge, an open-source, third-party solution for Apple HomeKit-friendly devices (as well as others), allowing you to control and operate them without another Apple device.
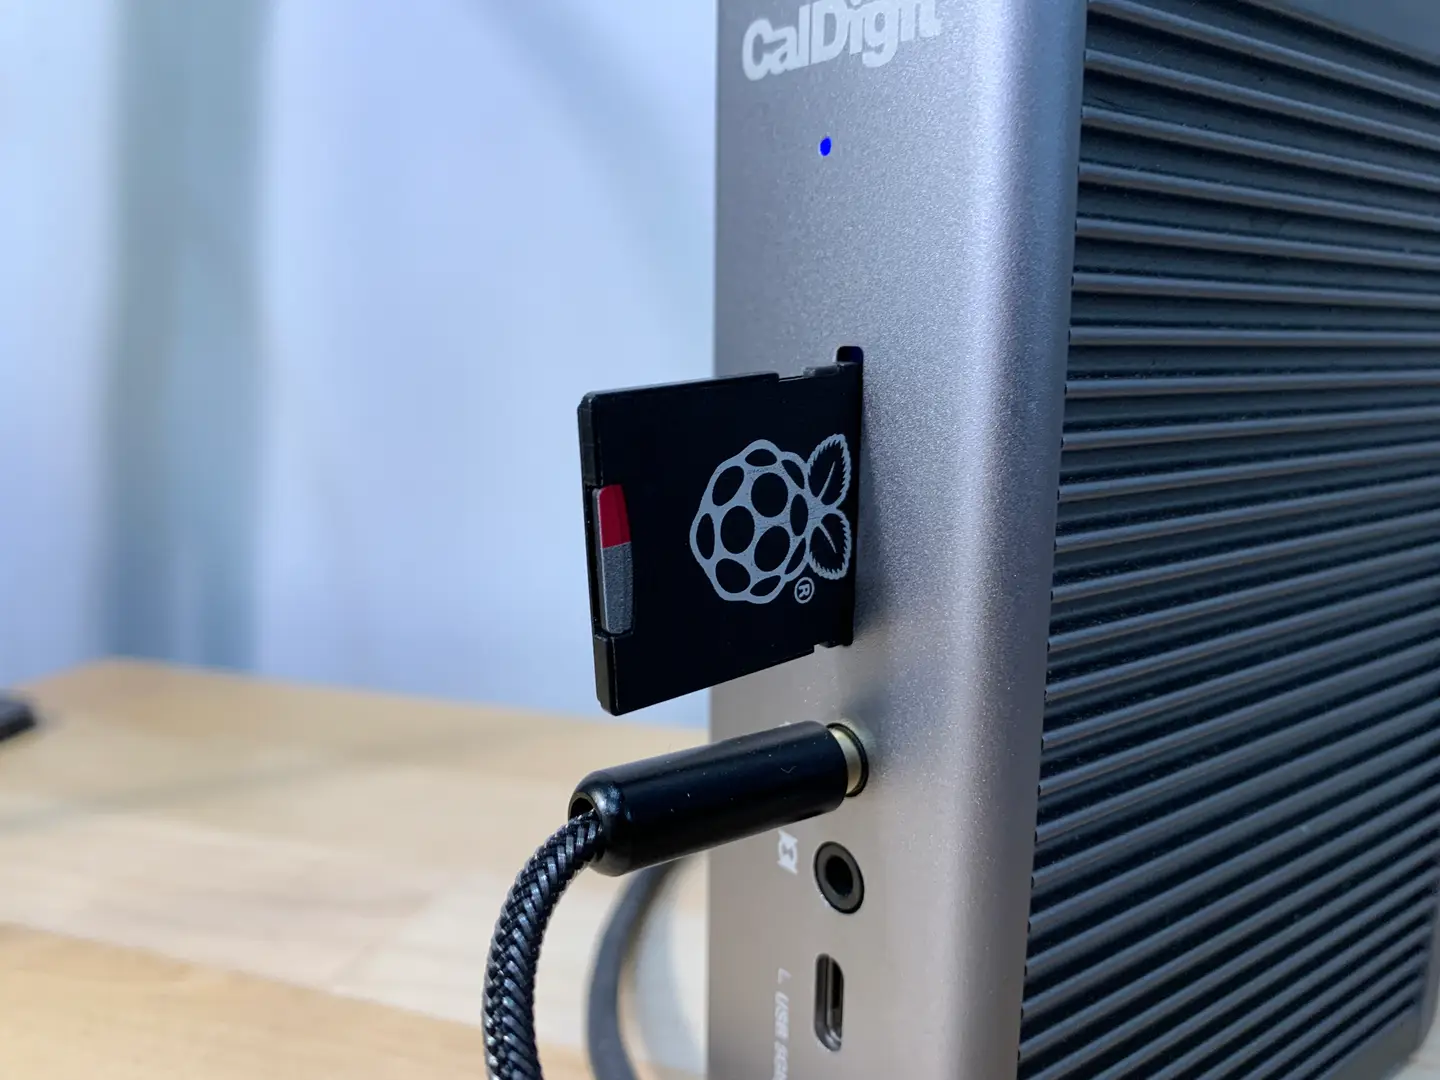
Combine Homebridge with the low-powered Raspberry Pi microcomputer and you’re free to build an Apple-friendly automated home at a fraction of the cost. If you want to set up Homebridge on a Raspberry Pi, here’s what you’ll need to do.
1 – Before you begin
What you’ll need
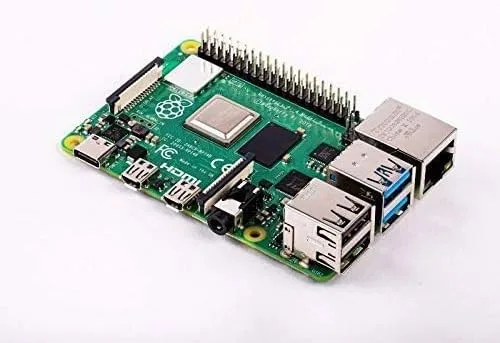
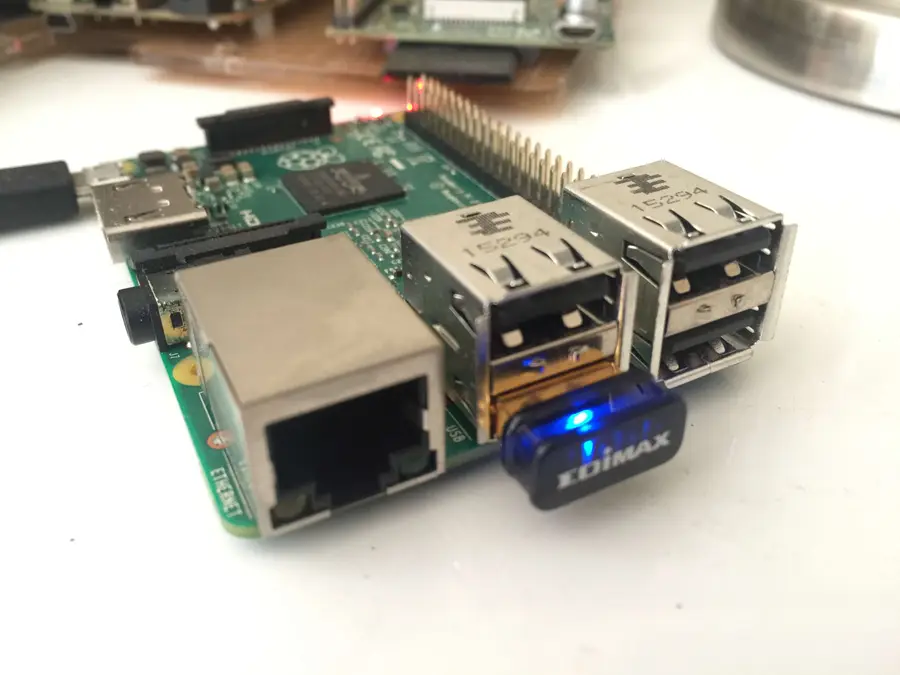
Raspberry Pi
Like all home automation setups, Homebridge needs to be ready to respond to queries and commands 24/7. A Raspberry Pi is perfect for the task, but we’d recommend using a Raspberry Pi 3 + or a Raspberry Pi 4 for the latest hardware.
While other Raspberry Pi models may work (including a Raspberry Pi Zero), this isn’t guaranteed, especially if you have many smart home devices in your home.
Optional: Monitor, keyboard, and mouse
You can run Homebridge headless (without a monitor, keyboard, or mouse connected), but make sure that SSH is enabled before you do this.
Raspberry Pi OS
It’s also recommended that you’re running the latest version of Raspberry Pi OS. The instructions below have been written with this in mind.
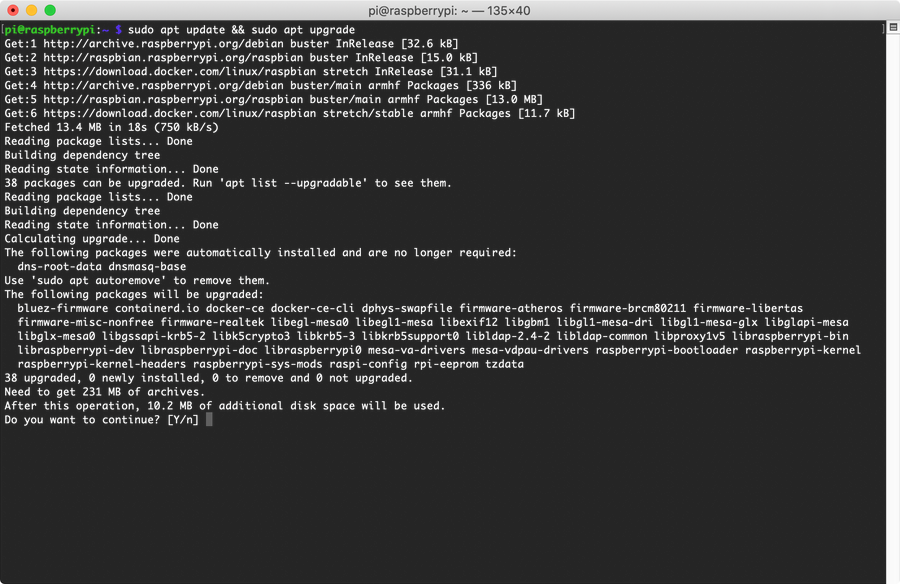
You’ll also need to open a terminal (or SSH connection) and run the following commands to ensure your Pi is up-to-date before you begin:
sudo apt update && sudo apt upgrade
Restart your Raspberry Pi once the update process is complete.
2 – Installing Node
Homebridge uses Node.js, a platform for running Javascript apps on a local machine, so you’ll need to install it before you can install Homebridge. We also need to install a few other development environments first, such as Python or C++, as additional Homebridge plugins may require these to work properly.
Installing Node
To start, open a terminal window (or an SSH connection) and run the following command to begin configuring your Pi for Node:
Once this process is complete, you can begin the Node installation by running the following command:
sudo apt install -y nodejs gcc g++ make python net-tools
Update Node Package Manager
Allowing the process to complete. Once it’s done, you’ll need to update npm (the Node Package Manager) by running the following:
sudo npm install -g npm
You can begin the Homebridge installation process once Node is installed and fully updated.
3 – Installing Homebridge
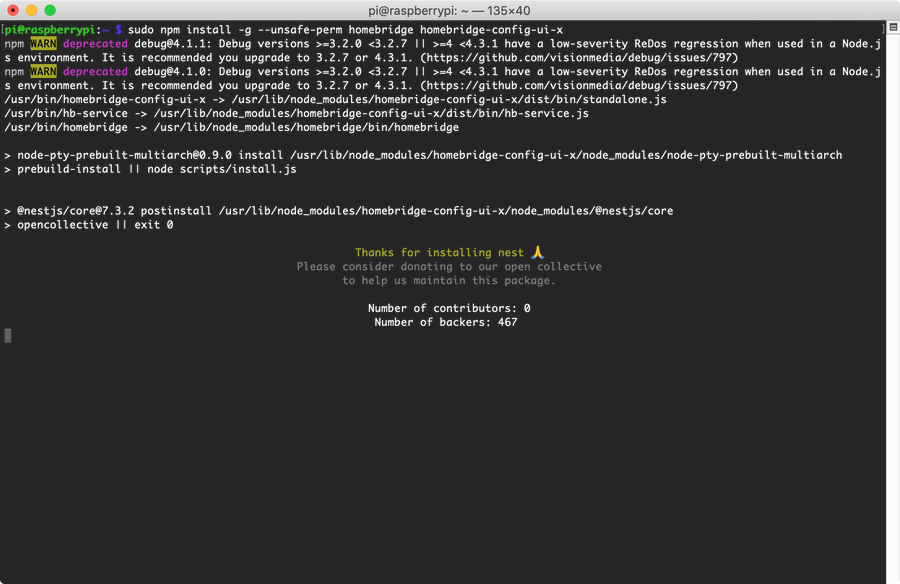
At this point, we’re ready for the main act. Homebridge itself is actually a daemon, a service that runs in the background. To be able to configure it after it’s installed, you’ll need to install a web-based user interface, allowing you to easily configure and handle it while it’s running.
To install Homebridge with the web interface components, run the following command from a terminal window or over SSH:
Using the Node Package Manager (npm), Homebridge (along with the web interface module) will be installed. This could take some time to complete, as npm will fetch and install several dependencies needed by the main packages. You may also see a few warnings about deprecated packages, but don’t let them scare you, as Homebridge should still work correctly (and upcoming Homebridge releases should hopefully resolve the issue for Pi users).
At some point, the installer will output a “thanks for installing” message. Don’t panic—the installation isn’t frozen at this point. You’ll need to wait a few more minutes to allow the Homebridge installation to finish.
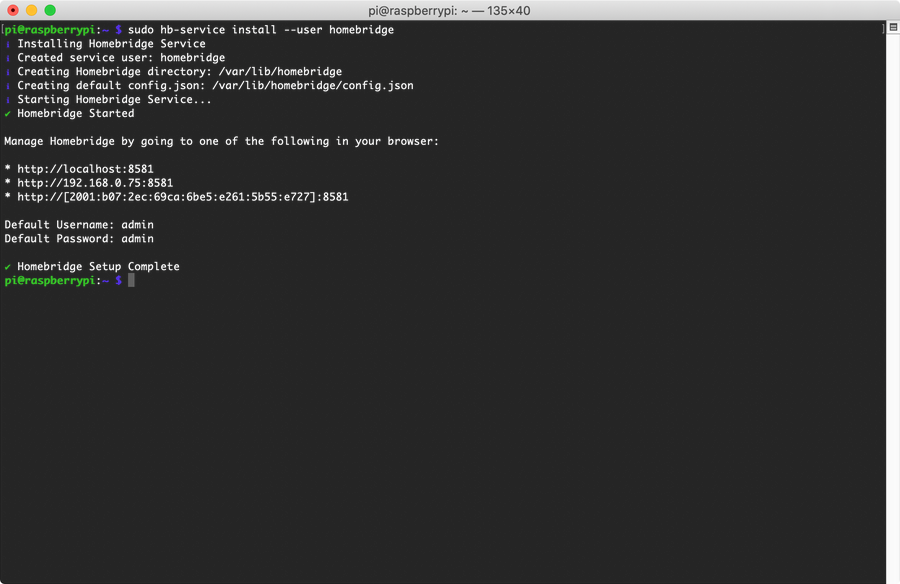
Start Homebridge service
Once this is completed, you can start the Homebridge service. This takes a bit longer on Homebridge’s first run, as it needs to generate its initial configuration.
To do this, run the following command from a terminal or SSH window:
sudo hb-service install --user homebridge
Allow some time for this to complete. Once it’s done, you’ll see a list of IP addresses you can use to connect to the web interface, allowing you to add devices and configure them further. You’ll also see the default username and password (both admin) for use with the admin portal page.
4 – Configuring Homebridge and iOS
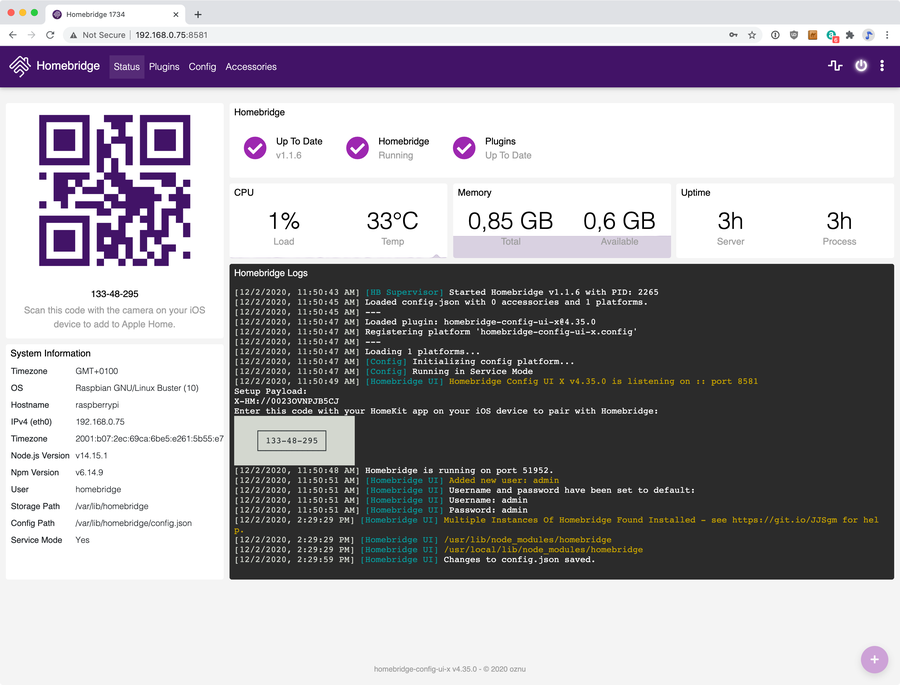
If Homebridge is installed and set up to run correctly, you can configure it using the IP address output in the terminal window at the final set up stage above.
Open the address given in the previous step (i.e. your Pi’s address on port 8581, by default) in your web browser, and sign in using admin for both the username and the password. A screen like this will welcome you.
While it isn’t necessary to change the default username and password at this stage, it is highly recommended that you do once you’ve finished configuring your Homebridge set up. Otherwise, you may leave your smart devices at risk.
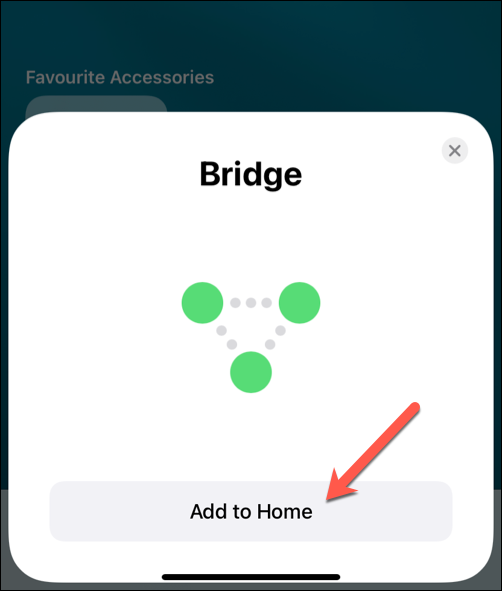
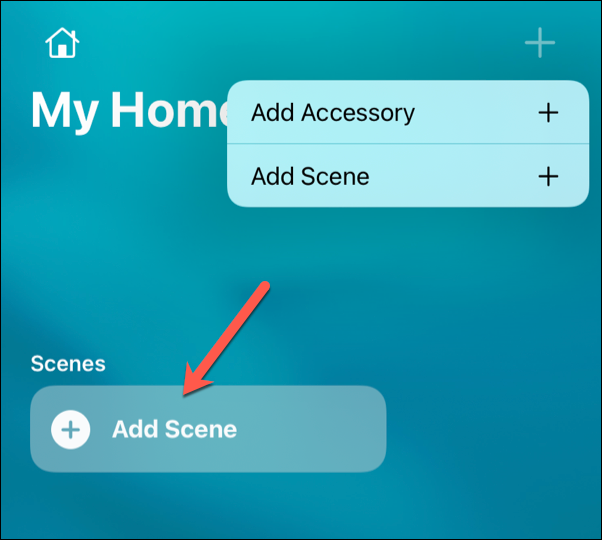
Next, open the Home app on a suitable iPhone or iPad device.
In the top right, tap the + (plus) button, then choose Add Accessory from the available options.
You’ll be given options to add a device (including scanning a QR code or manually typing in a code), but your Bridge device (your Raspberry Pi) should also appear (assuming you’re on the same local network).
Tap Add to Home to add this to your HomeKit setup.
Apple will warn you that you’re trying to add an uncertified accessory, but tap Add Anyway to ignore this.
Select a location, then give it a name (for instance, Homebridge Pi) to distinguish it from other HomeKit devices.
Accessories usually appear on the Home front page but, if it doesn’t, you should be able to see your Pi by pressing the Home icon in the top-left, then selecting Home Settings. You’ll see the device listed under the Hubs & Bridges section, confirming that it’s connected and ready to use.
5 – Setting up accessories
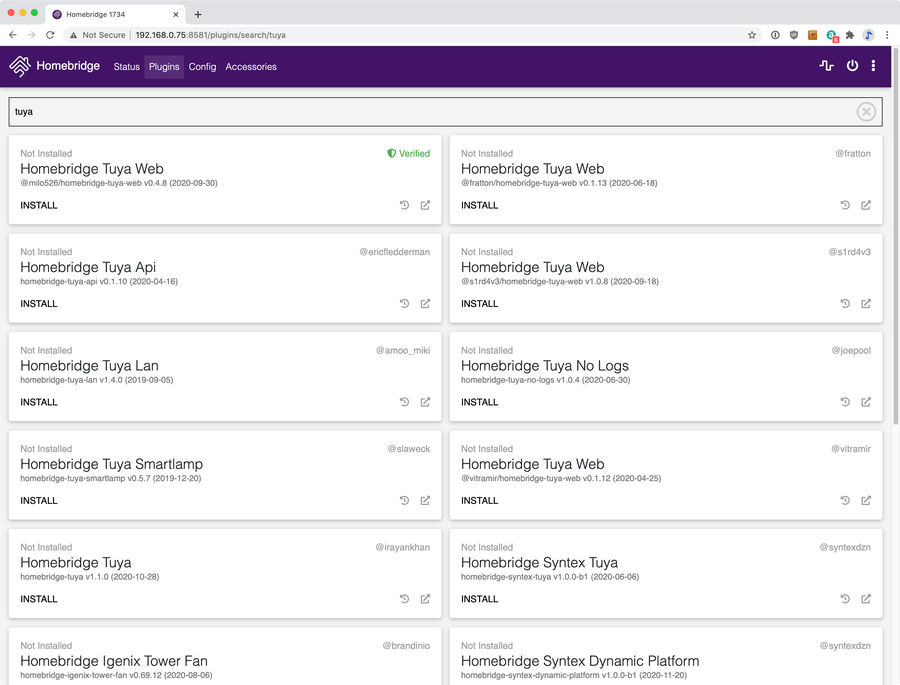
From this point on, the configuration will vary depending on what devices you actually plan on using with your Homebridge Pi. Regardless of brand and devices, however, you’ll generally need to install an appropriate plugin first to allow Homebridge to interface and control it. In the HomeKit/Homebridge environment, a device is called an “accessory.”
Our test system uses Tuya-branded devices, but other well-known brands (such as TP-Link and Homebridge) are available. To add appropriate plugins for these platforms, open the Homebridge web interface in your web browser, then search for the brand (for instance, Tuya) in the Plugins tab.
Various Tuya plugins are available for us to install, but only one is marked as verified (meaning that it’s been certified by the Homebridge developers), so that’s the one we’ll select.
After providing our account data (and a quick restart) during the configuration process, our connected Tuya smart home devices will appear in the web app (under the Accessories tab) and should be listed in the Home app on an iPhone and iPad, too.
Additional configuration may also be necessary. depending on your setup. For instance, if you need to recreate rooms in the Home app, you can do this by long-tapping the device in Home, then tapping the gear icon. This will allow you to make further changes to the individual devices you’ve connected to your HomeKit set up using Homebridge.
6 – Adding Scenes
Once your accessories (devices) are set up, you can create Scenes inside the Home app.
What is a scene?
Scenes allow you to change the status of multiple accessories with a single Siri command. The more accessories you have, the more scenes become useful in automating your home.
Add a new scene
To add a new Scene, tap Add Scenes in the Home app, then follow the on-screen instructions.
Example of a scene
For instance, you may say “Hey Siri, I’m home” to instruct Siri to automatically turn up the thermostat, switch the TV on, and configure the lights to a pleasant combination of color and intensity.
Alternatively, you may decide you want to sleep, telling Siri “Hey Siri, let’s head to bed.” Doing this could switch the lights off and set the house alarm for you automatically.
7 – Using Homebridge on a Raspberry Pi
Setting up Homebridge on a Raspberry Pi may require some extra configuration, but if you’re looking to expand your home automation without paying for pricy Apple products, a Raspberry Pi running Homebridge is a great option.
Homebridge doesn’t replicate all HomeKit’s features, but it should allow you to connect devices to the HomeKit ecosystem (so long as they’re supported and have relevant plugins).
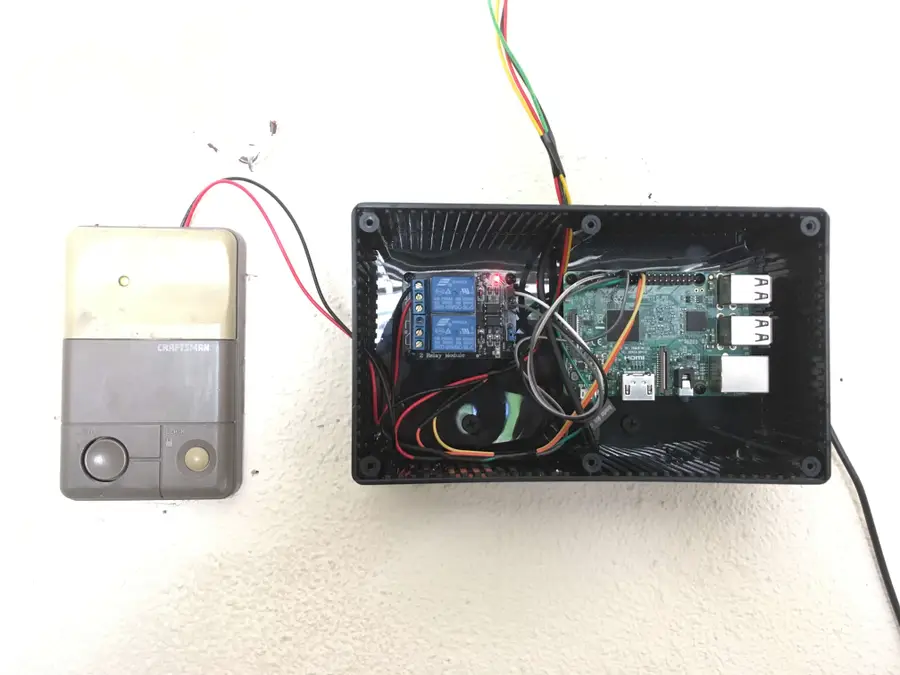
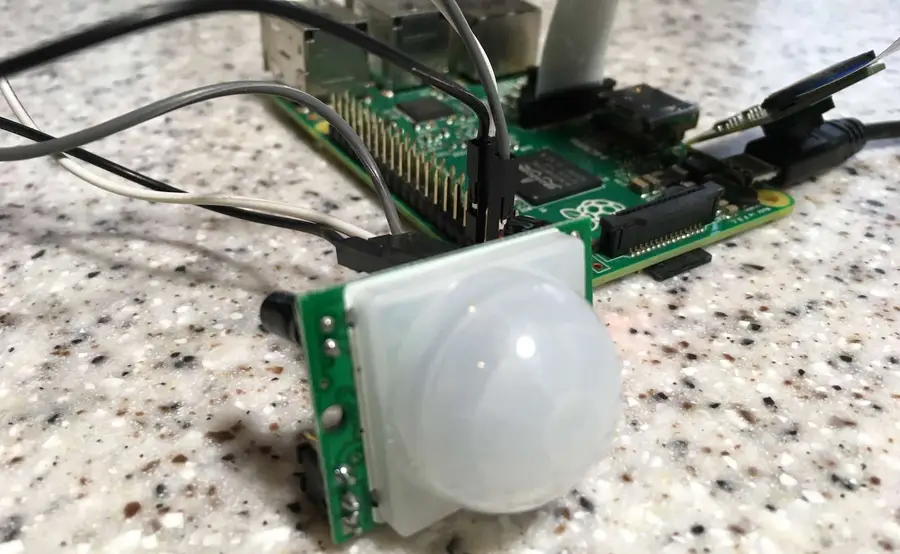
Some home automation ideas
Homebridge isn’t the only home automation project you can try out with your Raspberry Pi, though. For instance, you could build a Raspberry Pi garage door opener to secure your garage, or use a PIR motion sensor on a Raspberry Pi to create a DIY home-alarm system.
There are several ways to go about running a Minecraft server on the Raspberry Pi. In this guide, I’ll cover how to install Nukkit—a cross-platform Minecraft server that’s super easy to set up on the Raspberry Pi. This server should work with PCs, consoles, and tablets running Minecraft 1.14. I’ll be using a Raspberry Pi
Introducing Howchoo, an enigmatic author whose unique pen name reflects their boundless curiosity and limitless creativity. Mysterious and multifaceted, Howchoo has emerged as a captivating storyteller, leaving readers mesmerized by the uncharted realms they craft with their words.
With an insatiable appetite for knowledge and a love for exploration, Howchoo’s writing transcends conventional genres, blurring the lines between fantasy, science fiction, and the surreal. Their narratives are a kaleidoscope of ideas, weaving together intricate plots, unforgettable characters, and thought-provoking themes that challenge the boundaries of imagination.
Starting with MacOS Sierra and High Sierra, your Mac will no longer play a “pop” sound when you adjust your volume. If you prefer to have this sound when you adjust volume up and down (as I do), this guide will teach you how to reenable it. 1 – Open Sound System Preferences Navigate to System
Introducing Howchoo, an enigmatic author whose unique pen name reflects their boundless curiosity and limitless creativity. Mysterious and multifaceted, Howchoo has emerged as a captivating storyteller, leaving readers mesmerized by the uncharted realms they craft with their words.
With an insatiable appetite for knowledge and a love for exploration, Howchoo’s writing transcends conventional genres, blurring the lines between fantasy, science fiction, and the surreal. Their narratives are a kaleidoscope of ideas, weaving together intricate plots, unforgettable characters, and thought-provoking themes that challenge the boundaries of imagination.
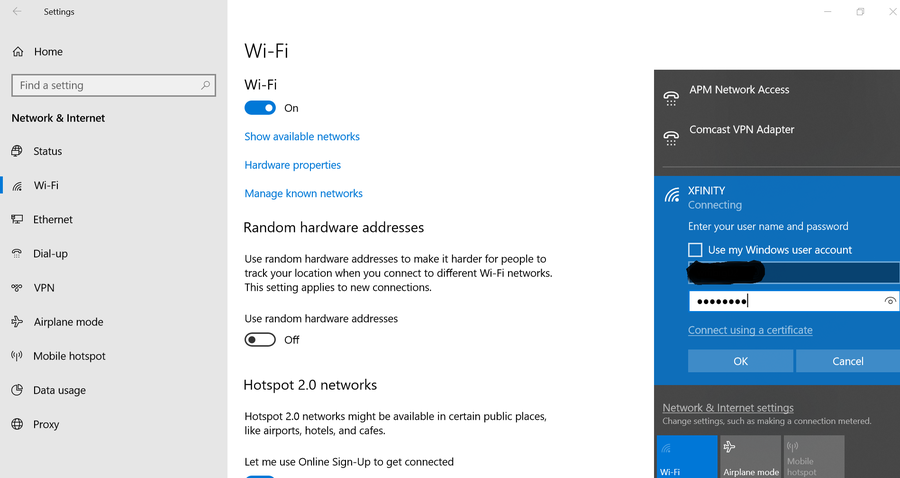
Most Xfinity routers use a default WiFi network name (SSID) that is hard to identify and remember. Changing the WiFi name allows you to personalize your network and make it easier for friends and family to connect.
This guide will show you three ways to change your WiFi network name on your Comcast Xfinity router.
Laptops, smartphones, tablets, even lightbulbs—an endless number of devices now have the ability to connect to your local network and the wider internet. Keeping an eye on network-capable devices is important, especially if you’re worried about network security or you’re trying to troubleshoot bandwidth issues. This is where a network monitor can prove useful. There
Introducing Howchoo, an enigmatic author whose unique pen name reflects their boundless curiosity and limitless creativity. Mysterious and multifaceted, Howchoo has emerged as a captivating storyteller, leaving readers mesmerized by the uncharted realms they craft with their words.
With an insatiable appetite for knowledge and a love for exploration, Howchoo’s writing transcends conventional genres, blurring the lines between fantasy, science fiction, and the surreal. Their narratives are a kaleidoscope of ideas, weaving together intricate plots, unforgettable characters, and thought-provoking themes that challenge the boundaries of imagination.
Today I’m going to show you how to build your own 3D-printed Nintendo Switch arcade cabinet!
Simply print all the parts, glue them together, and then install the optional electronics. These electrical bits will charge your Switch while you play, as well as provide additional cooling to help keep your Switch nice and chill.
You can even connect USB controllers to the front of the cabinet since all of these electronics connect directly to a powered USB hub. If you don’t want to install the electronics, that’s okay — this thing is still really great as a non-electronic device.
In either case, just remove the top of the cabinet, insert your Switch, and play!
Don’t have a 3D printer? No problem! Read on and I’ll show you some options for getting your parts printed.
Here’s a special shoutout to concavechest who designed this amazing arcade cabinet and uploaded it to Thingiverse. Thanks concavechest!
Watch the video:
I created a step-by-step video that will show you how to assemble your arcade cabinet and install all the electronics inside. The video does a bit more justice to the project than this written guide can. 🙂
The rest of this guide will focus on specific features of the build, so be sure to check it out too when you’re done with the video.
Obligatory disclaimer: As with anything DIY, certain risks are inherent. I’m not responsible if you damage or brick your Switch. 🙂 Since I wrote this guide in April 2019 (firmware 7.0.1), the arcade cabinet is still going strong! However, Nintendo updates their firmware all the time so anything can happen. If you’re concerned about this, you can also build the non-electronic version of the cabinet.
1 – The completed project
Just as the prophecy prophesied, first a final photo!
2 – And the back
Here’s a photo of the back of the arcade cabinet, showing the optional USB fan, fan speed controller, and power input.
3 – The completed electronics
These electronics are optional. 🙂 There are two ways to build the arcade cabinet:
Just 3D print it and drop your Switch in place.
Add some electronics that will charge your Switch while you play and allow you to connect USB controllers.
Because I love building things and this entire project can be done for about $50, I decided to go with option #2.
4 – Inserting the switch
After removing the Joy-Con controllers from your Switch, slide off the top of the arcade cabinet and slide your Switch into place. If you install the charging/data electronics into the cabinet, as I did, your Switch will also charge while in the cabinet — and you can even connect a USB controller!
5 – Printing the parts
First you’ll need to print all the parts. This will take a while. I think it took 18 hours of total printing on my old ANET A8, but I think this would be much faster on my new Creality Ender 3. This time can be reduced further by adjusting the print quality.
The models
There are two versions of the models available on Thingiverse: the “simple” version, which contains no openings/ports for the electronics, and the “electronic” version, which is what we’re building here.
For the electronic version, there are 8 parts to print:
Top
Simple Bottom and Front
Simple Cradle
Simple Back
Left Side
Right Side
Filler
The fan shroud
If your print bed is too small to print the sides, there’s also a “cut” version included so that you can print the sides as halves.
🛈 I printed all the parts without supports. If you orient things properly, they aren’t necessary.
6 – Don’t have a 3D printer?
No problem. A lot of people don’t know there are tons of ways to get a 3D model printed without having a printer. Here are a few of the ways:
Use an online 3D printing service
Online services like Sculpteo will print your model and ship it to you for a fee.
Find your local hackerspace/makerspace
There’s a good chance you have a nearby Hackerspace, and most of them have some sort of “Open Make Night” where you can come in and use the equipment without needing a membership. You can find your local hackerspace using this tool, which lists over 2,000 hackerspaces.
Ask a friend
Post on Facebook; you might be surprised that someone you know has a 3D printer. And in true maker fashion, they’ll probably be happy to help you out while teaching you a bit about 3D printing.
Check your local library
Tons of libraries now have 3D printers available for their patrons to use. Additionally, if you’re a student your university can likely provide you with access to one. Call your university library’s information desk and they can direct you to the college/department that can give you access.
Check Craigslist
Many people advertise 3D printing services on Craigslist for a fee.
Buy a 3D printer
In the last few years, 3D printers have become extremely affordable. I picked up my Creality Ender 3 around $200 on GearBest. I also wrote a full Ender 3 review if you want to check it out!
An “exploded view” of the parts needed to assemble the arcade cabinet. concavechest on. Thingiverse
The cabinet assembly itself is pretty self-explanatory: just use super glue or 2-part epoxy to put everything together. I used a few books to add weight to the parts while they set.
Do not glue the top into place! This is supposed to slide off so you can insert your Switch.
🛈 As mentioned in the video, I recommend connecting the hub before gluing the cradle in place.
8 – Powering everything
Power and data for the Switch and cooling fan are provided by a powered USB-C hub. This small USB-C extension lives in the back of the unit, where a power adapter is plugged in. The hub I used connects to a 90-degree USB-C adapter which lives at the bottom of the cradle — so when you slide your Switch into place, it connects to the hub automatically.
The default Nintendo Switch AC adapter won’t work — when you use it, the Switch thinks it’s in its charging dock and the screen turns off. This is because Nintendo added an extra data pin/signal. Thus, you’ll need to use a separate AC adapter. I recommend one that provides at least 3A.
9 – Adding a fan for cooling
I added this 5V USB fan that draws power from the hub. The fan’s speed controls are accessible from the back of the cabinet. To be honest, I question whether the fan is necessary… It’s extremely inexpensive so I added it, but I don’t think the Switch will get that hot — especially considering all the natural ventilation that the case provides.
10 – Ready player two!
Because this project uses a powered data hub, you can connect any USB device that you’d normally connect to your Switch dock. This dual USB extension cable makes the power ports accessible on the front of the cabinet, which is super handy!
11 – All done
This has been a super fun, super easy project. I love having this thing on my desk so I can pop in to play a game or two when I need a break.
This cabinet is a testament to the spirit of the maker community, blending mainstream gaming with 3D printing and hobby electronics, and I’m very happy that it exists.
If you haven’t already, be sure to check out the build video for this project.
Questions? Comments?
Post in the comments section below, I’d love to hear from you!
Blender is one of the most popular open-source 3D creation suites today. It doesn’t cost a dime to use and everything you create is yours to own for good. The community is robust and the dev team still releases new updates on the regular. If you want to get the latest version, you may have
Introducing Howchoo, an enigmatic author whose unique pen name reflects their boundless curiosity and limitless creativity. Mysterious and multifaceted, Howchoo has emerged as a captivating storyteller, leaving readers mesmerized by the uncharted realms they craft with their words.
With an insatiable appetite for knowledge and a love for exploration, Howchoo’s writing transcends conventional genres, blurring the lines between fantasy, science fiction, and the surreal. Their narratives are a kaleidoscope of ideas, weaving together intricate plots, unforgettable characters, and thought-provoking themes that challenge the boundaries of imagination.
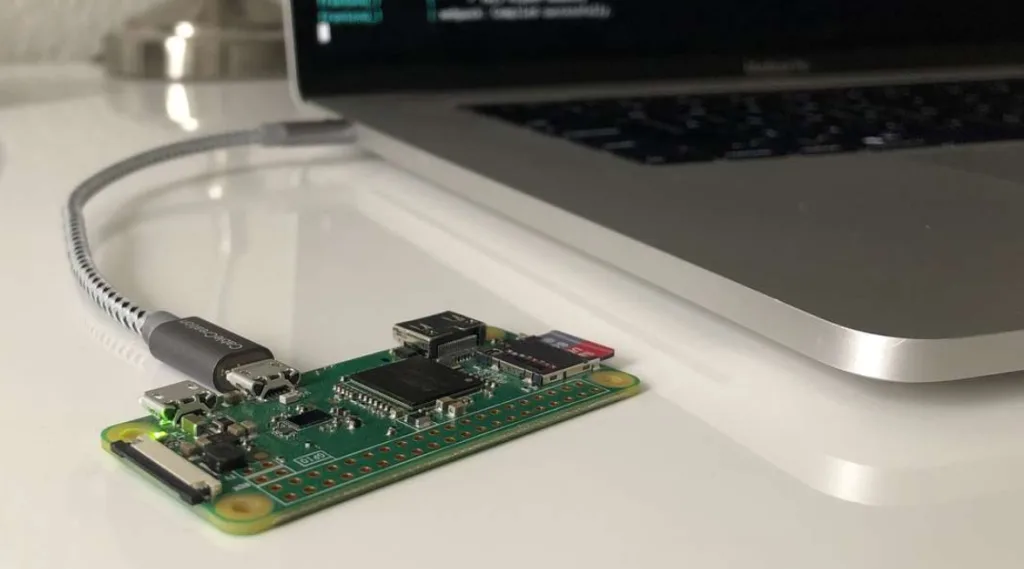
There are many reasons you may want to connect your Raspberry Pi to your computer, and there are a few methods of doing so. We’ll explore the various use cases for connecting your Pi to your computer.
Question
How do I connect my Raspberry Pi to my computer?
Answer
Connect using SSH
One of the more common ways of connecting to your Raspberry Pi is via SSH (Secure Shell). To connect to your Raspberry Pi using SSH, you’ll first need to enable SSH. Then with your Raspberry Pi connected to the same network as your computer, you can connect using the following command on your computer:
Using SSH is one of the most general-purpose methods for connecting to your Pi. The downside is that it requires some comfort with operating on the command line. But it’s powerful. Using SSH you can do just about anything you need to do on your Pi.
Connect using VNC
If you’re running a graphical (GUI) version of Raspberry Pi OS, you can access your Raspberry Pi Desktop from your computer using VNC. To do this, you’ll need to install a package called tightvncserver on your Raspberry Pi, then use a VNC client to connect.
This method is useful if you don’t have enough peripherals for your Pi (or too many Raspberry Pi’s). The only downside is that the VNC connection is often a little bit slower than a direct connection. For detailed instructions, refer to our guide on installing and configuring VNC on your Raspberry Pi.
A less common (but awesome) way to connect your computer to your Raspberry Pi is to enable gadget mode on your Pi and connect directly using USB. With gadget mode, you won’t even need a network connection or a power adapter. Just get a USB cable, connect your Pi to your computer, and log in using SSH. The computer provides the power and network connection.
This is one of the more complicated methods, but its especially useful if you’re intending to use your Pi as a USB gadget. To learn how to use this process, check out our guide on connecting to your Pi over USB using gadget mode.
There are several ways to go about running a Minecraft server on the Raspberry Pi. In this guide, I’ll cover how to install Nukkit—a cross-platform Minecraft server that’s super easy to set up on the Raspberry Pi. This server should work with PCs, consoles, and tablets running Minecraft 1.14. I’ll be using a Raspberry Pi
Introducing Howchoo, an enigmatic author whose unique pen name reflects their boundless curiosity and limitless creativity. Mysterious and multifaceted, Howchoo has emerged as a captivating storyteller, leaving readers mesmerized by the uncharted realms they craft with their words.
With an insatiable appetite for knowledge and a love for exploration, Howchoo’s writing transcends conventional genres, blurring the lines between fantasy, science fiction, and the surreal. Their narratives are a kaleidoscope of ideas, weaving together intricate plots, unforgettable characters, and thought-provoking themes that challenge the boundaries of imagination.
Recently, Apple’s been pushing their AirPods Pro hard, offering steep discounts for the holiday season. This leaves many people wondering whether they are worth the investment for themselves or as a gift for someone else. In fact, I received the AirPods Pro as a gift and wanted to share my thoughts on them for anyone else considering purchasing these.
What I look for in a good review of a product like the AirPods Pro are honest ratings on the most important aspects of wireless headphones—things like:
Sound quality
Ease of use
Features
Battery life
Workout use
Etc.
So you can be sure that we’ll touch on those and other aspects in our comprehensive review of the Apple AirPods Pro. Note that we are not getting paid for this review and even purchased the AirPods Pro ourselves.
What are wireless Bluetooth earbuds like the AirPods Pro?
Just like traditional headphones, the AirPods Pro play music and sounds from a supported device, such as a laptop, phone, or tablet. Because they are Bluetooth headphones, the AirPods do not need to be plugged into the device to which they are connected (or “paired”). The AirPods Pro are completely wireless and do not even need to be connected to one another to operate as a whole pair.
How do we know about them?
I always like to include this in my reviews. I’ve been using the Apple AirPods Pro for a few weeks now, after switching over from the Beats Powerbeats Pro (the AirPods Pro closest competitor). So I can give you my take on the good and bad about the AirPods Pro, as well as help you make your decision between these and the Beats version.
Maybe you don’t want to read a lengthy review before making your decision on the AirPods Pro. If the only thing you read is this section, then you should have plenty of information on whether the latest Apple earbuds are worth the investment or not.
Pros
Good sound quality (noticeably so)
Noise cancellation (that isn’t bad)
Size (easy to travel with)
Fit (comfortable to wear)
Cons
Price (though Apple has been offering sale prices on these of late)
Awkward to learn for first-time owners
Average battery life
Pick these up on sale
That’s where we’ve landed on the AirPods Pro. The next time Apple has a big sale on these, then definitely scoop them up. This seems to be the one Apple product that Apple is actually willing to discount during the holidays—so keep your eyes out. Otherwise, I’m just not sure they are worth the steep price over say the Amazon Echo Buds at half the cost — or over other comparable models. Of course, if you absolutely have to have the Apple products, then the AirPods Pro are a good wireless earbud that aspires to greatness at times.
2 – Specs
Spec
Apple AirPods Pro
Weight of earbuds
0.19 ounce (5.4 grams)
Weight of case
1.61 ounces (45.6 grams)
Size of earbuds
1.22 inches (30.9 mm) x 0.86 inch (21.8 mm) x 0.94 inch (24.0 mm)
Size of case
1.78 inches (45.2 mm) x 2.39 inches (60.6 mm) x 0.85 inch (21.7 mm)
Battery life of earbuds
4.5 hrs listening time / 3.5 hrs talking time
Battery life of charging case
24 hrs charging capacity / 5 minutes in case = ~1 hr of earbud time
Connectivity
Bluetooth 5.0
Compatability
iPhone 6s + / Apple Watch all models / iPad 2nd generation + / Mac all models 2012 +
Sweat and Water Resistant
Yes (IPX4)
Active noise cancellation
Yes
Chip
Apple H1
3 – What’s in the box?
Included when you buy the Apple AirPods Pro:
AirPods Pro
Wireless Charging Case
Silicone ear tips (three sizes)
Lightning to USB-C Cable
Documentation
4 – Who are the AirPods Pro best for?
I wouldn’t recommend these to just everyone. But I would recommend the AirPods Pro for people who are looking for specific uses of the earbuds.
1. Exercisers
The AirPods Pro stay in your ear really well. This is important for those looking to do any kind of strenuous activity while wearing these. I’ve worn these lifting weights, running, and doing a variety of calisthenics. They never fell out of my ear, nor did the AirPods Pro get damaged by my sweat. And the relatively low battery life of 4-5 hours shouldn’t be an issue for most workout routines. (I mean…who has time to work out for 6 + hours at a time.)
2. Multitaskers
Okay. You know what I mean here. If you’re someone who calls your parents while also wanting to get some chores done, then these are perfect. They are just really comfortable to wear while taking on the phone—so much so that you’ll likely forget you’re wearing them at all. And no judgment if you multi-task while on the phone with your parents. (I only mention it because I do it myself!)
3. The video conference attendee
The AirPods Pro are actually perfect for use with video conferencing like Zoom or Meet. You won’t have the embarrassing wires hanging across your face while talking to your boss, and you’ll hear and speak clearly through the advanced microphone. And the low battery life shouldn’t be a problem for work uses like these.
Who are they not best for?
If you are the kind of person to leave Bluetooth earbuds in your ears for long periods of time, then these are decidedly not going to work for you. Maybe you like to listen to music with them while working all day? Or maybe you listen to Youtube with them for long stretches? Either way, you’re going to run out of juice and have to charge the AirPods Pro.
Also keep in mind that if you’re using the AirPods Pro on a long flight, you’ll likely run out of battery power after about 4-5 hours. If that’s an issue, then look elsewhere for your next pair of earbuds.
5 – How do the AirPods Pro work?
Great question! (I should know because I asked it.) It’s a good question because the actual functionality of the Apple AirPods Pro (how they work) tend to be the biggest hurdle to overcome with these. Seriously…for a while, I barely used these because I was so used to the simpler functionality of the PowerBeats Pro. I would simply choose not to deal with the complexity of using the AirPods Pro.
Luckily, I’m over that now and have a deeper understanding of how to use these.
Charging
The case itself holds a charge that can be used to charge the Apple AirPods Pro earbuds. You can either just charge the case, which can then be used to charge the earbuds—or you can charge the case with the earbuds inside. Apple claims that the case holds around 24 hours of battery life that can be transferred to the earbuds, which seems about right in our testing.
Syncing
I found this relatively easy. With the AirPods Pro earbuds in the case, you simply hold down on the back button of the case until the light flashes white. Then, you search for the AirPods Pro on your device—and connect the AirPods Pro to your Android phone or iPhone.
Listening
When you put the earbuds of the AirPods Pro into your ears, they will automatically connect to the last device that is nearby enough to use. If you need to, you’ll have to disconnect them from one device to move to another. I found this can be a hassle sometimes, and I wish that Apple would add just one more feature that allows these to be switched between devices.
We’ve written guides on using the audio features of the AirPods Pro, such as:
So check those out for further information on the functionality of the Apple AirPods Pro.
Phone calls
If you need to answer the phone with the AirPods Pro, you can do that by simply pressing the “force sensor” or small white button on the AirPods Pro themselves.
6 – Noise cancellation
Wikipedia
The active noise cancellation feature in the Apple AirPods Pro are one of its biggest draws. So does it work?
Yes! When you have active noise cancellation activated, you will notice that the external sounds in your environment will be effectively neutralized. You’ll find yourself in a comfy, noiseless meadow listening to your music (even if that music is not so comfy).
I’ve tried a few different headphones and earbuds with active noise cancellation, and I can say that the AirPods Pro do a great job for earbuds of canceling external sound. The over-ear Bose headphones, for example, will certainly be noticeably better at this—but they are 10x the size of the AirPods Pro earbuds.
How does active noise cancellation work?
Essentially, a small external microphone on the earbuds of the AirPods Pro will detect the external sound waves around you. They will match that noise with active anti-noise to cancel your ability to hear the sound from those waves. In the above image, you can see how the combination of sound waves can result in a nearly neutralized wave.
7 – Sound Quality
Most of the best wireless earbuds on the market are actually using Apple’s H1 chip to power their audio, so Apple is setting the industry standard when comes to over sound quality for earbuds.
I know what you’re likely thinking…so are the AirPods Pro better than competitors when it comes to this? Yes. And No. What I mean is that they are a very pleasant earbud in terms of sound quality, which many (like me) actually prefer over the kind of raw sound quality you’ll get from say…Bose. But, honestly, the quality is good, and I found it better than the PowerBeats Pro.
Bud fitting
For one, Apple has worked hard to make sure that the earbuds of the AirPods Pro fit properly in your ear by adding dynamic earbud tips that adapt to the shape of your ears. You can even test to make sure that your earbuds aren’t improperly fit on your iPhone or Mac. This greatly affects sounds loss and quality.
Microphone quality
In our own testing with the microphone, the quality was really good for an earbud microphone. The AirPods Pro might not get the job done if you’re needing professional-level sound for videos or projects, but they’ll certainly be a nice upgrade for phone conversations and Zoom usage.
8 – Spatial Audio
Apple
Spatial Audio is Apple’s version of surround sound. I wanted to mention this feature of the AirPods Pro because it’s finally a thing now that Apple has released its Big Sur OS.
When you turn on Spatial Audio when viewing content that supports it, such as Netflix, Prime, or HBO shows, then you can feel like you’re right in the middle of the action. Apple actually did a pretty good job of simulating this in a pair of earbuds. As a runner, I’m interested in the ways that virtual running can be simulated…because when I’m virtually running in Paris, I’d love to be immersed in the sounds of the street!
This feature is still in its infancy on the AirPods Pro, so we’ll have to see how this develops.
9 – Battery life
True wireless earbuds, like the Apple AirPods Pro, will have noticeably less battery life than wired earbuds/earphones. Still, this has to be a major consideration when deciding to invest in a pair of earbuds. (It doesn’t make sense to use these if they run out of juice an hour after using them.)
4.5 hours of battery life when listening
That’s Apple’s figure. In practice, I found this to be a little closer to 4 hours. And if you’re using these to talk on the phone, then that number will be a little less still—closer to 3.5 hours. That’s not bad. Compare that to the PowerBeats Pro, however, which have around 9 hours of battery life—and it feels a little disappointing.
10 – Bottom line
Not for the budget-conscious
If you’re a budget-conscious consumer for whom spending more than $200 will be a huge investment, then I actually recommend you go with a less expensive alternative to the AirPods Pro that will give you plenty of sound quality at a far less expensive price. I mentioned the Amazon Echo Buds earlier as a nice alternative that cost only $79.
Good for those who are sound enthusiasts, movie watchers, and music lovers
The overall quality of the AirPods Pro is very high, and with the H1 chip, Apple can continue to offer updates to these to improve overall sound quality and add features. The sound itself is great, and I can imagine these being great for solo-watching a movie with surround sound or really wanting a great listening experience while checking out that new album.
They also would be a great gift for anyone in the hospital, as they will allow them to talk on the phone without needing to use their hands or have wires hanging down. (They’ll already have a bunch of those!)
Note the battery life
Note that the battery life of the Apple AirPods Pro is around 4-5 hours. So if you need them for extended periods, then you should definitely look to something like the PowerBeats Pro, which last almost 9 hours before needing to be charged.
NEXT UP
How to Enable the “Popping” Sound When Adjusting the Volume on Your Mac
Starting with MacOS Sierra and High Sierra, your Mac will no longer play a “pop” sound when you adjust your volume. If you prefer to have this sound when you adjust volume up and down (as I do), this guide will teach you how to reenable it. 1 – Open Sound System Preferences Navigate to System
Introducing Howchoo, an enigmatic author whose unique pen name reflects their boundless curiosity and limitless creativity. Mysterious and multifaceted, Howchoo has emerged as a captivating storyteller, leaving readers mesmerized by the uncharted realms they craft with their words.
With an insatiable appetite for knowledge and a love for exploration, Howchoo’s writing transcends conventional genres, blurring the lines between fantasy, science fiction, and the surreal. Their narratives are a kaleidoscope of ideas, weaving together intricate plots, unforgettable characters, and thought-provoking themes that challenge the boundaries of imagination.
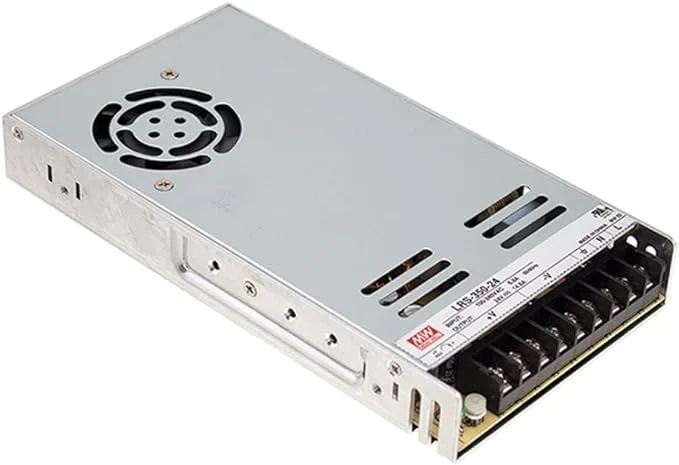
In this guide, I’ll show you how to upgrade your Ender 3 to the MeanWell LRS-3500-25 PSU. This is the same power supply used on the Ender 3 Pro.
Why upgrade?
There are several reasons to upgrade your Ender 3’s PSU to a Mean Well:
Noise: The PSU fan only runs when needed (usually <20% of the time), meaning a much quieter printer.
Safety: MeanWell power supplies are more reliable and safer than the cheap stock unit. They use higher-quality components that provide consistent, clean power with fewer spikes and sags.
Reduce bed-leveling issues: By providing consistent power the MeanWell reduces issues with EZABL and other bed-leveling kits related to power ripples and grounding.
Compact form factor: The MeanWell PSU is noticeably thinner and more compact than the stock unit; this is especially handy if you’re using an enclosure and want to keep your setup as compact as possible.
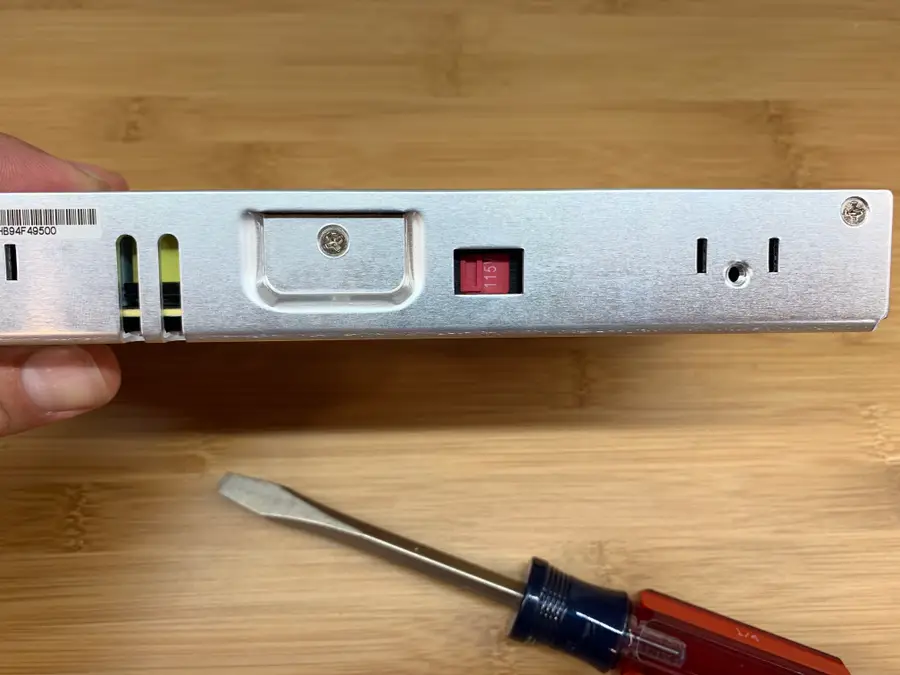
1 – Set the correct input voltage
If you forget to do this, you’re going to have a bad time.
Use a flathead screwdriver to slide the input voltage switch to either 115V or 230V, depending on your country. I’m in the US so I switched it to 115V.
🛈 I put this step first because forgetting to do this could be catastrophic to both the PSU and your printer!
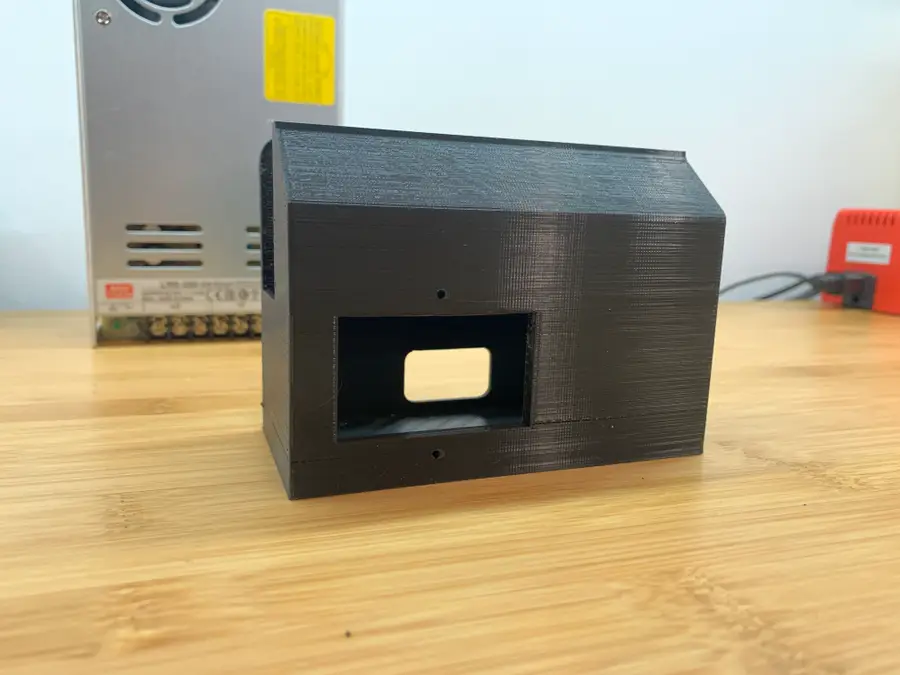
2 – Print a MeanWell PSU cover
Your MeanWell PSU probably didn’t come with a PSU cover, the bottom portion that holds the AC plug inlet and protects your terminal block from dangerous shorts (and fingers).
Since the MeanWell PSU is smaller than the stock one, the old cover won’t fit; therefore, you’ll need to print a new one. You can find tons of designs on Thingiverse, but I recommend this excellent model from TH3D Studio.
Download and print that model. I was able to print mine standing up without supports. My Ender 3 was more than capable of “bridging the gap” without stringing.
3 – Remove the old PSU
Unplug your printer’s power cable and disconnect the XT60 connector that connects the PSU to your printer.
Then, use an M3 hex key to remove the two front cap screws that secure the stock PSU to your printer’s right Z-axis vertical support.
Finally, set the old PSU aside.
4 – Transfer the AC inlet
Here you can really see how much slimmer the MeanWell PSU is!
We’ll need to disassemble the old PSU and transfer the AC inlet (plug) and wiring to the new MeanWell PSU.
Remove the two M3 screws from the bottom cover. Then, use a Phillips screwdriver to remove the two inlet screws.
Take a photo of the wiring (or reference my photo in the step below). Then, unscrew each screw to remove the 5 wires from the PSU terminal block.
Finally, insert the AC plug inlet into the new PSU bottom cover and secure it using the two Phillips screws.
🛈 I recommend letting the PSU sit unplugged for at least 30 minutes before taking it apart so that the capacitors have time to discharge.
5 – Wire up the new MeanWell PSU
Wire up the PSU the same as the old one. In addition to the photo I took, here’s a handy table I made to help you with your wiring:
MeanWell PSU wiring
From
Color
To
XT60 cable
Red
+V
XT60 cable
Black
-V
AC inlet
Yellow
GND
AC inlet
Black
N
AC inlet
Red
L
6 – Secure the new cover
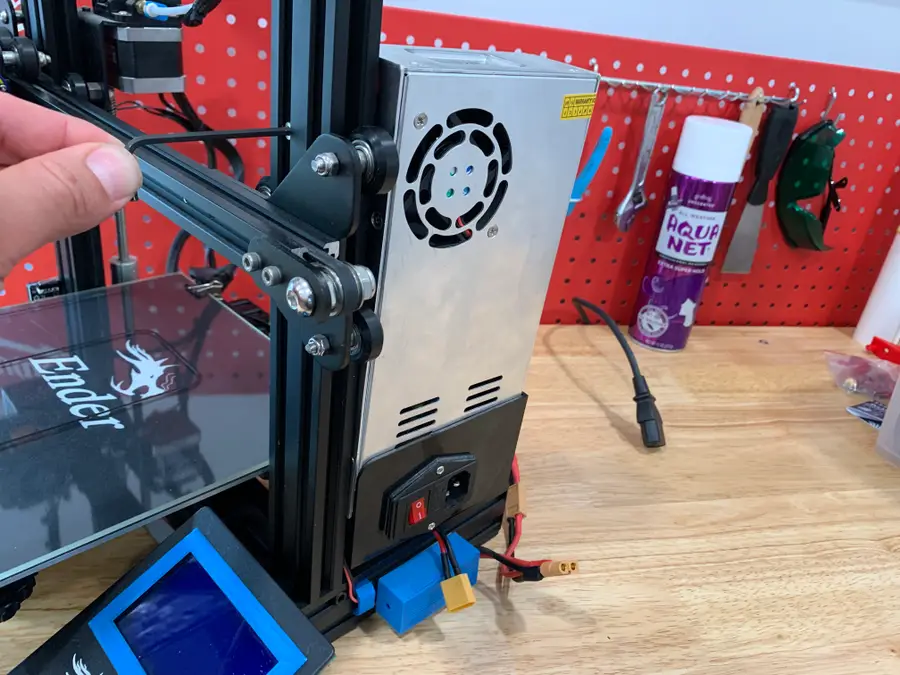
On the left, my upgraded MeanWell PSU; on the right, the stock Ender 3 PSU.
Route the XT60 cable through the back opening of the MeanWell PSU cover. Slide the cover into place, and secure it using the two M3 screws you removed from the old cover.
7 – Mount the new MeanWell PSU assembly
Fits like a glove!
Mount your brand-new PSU to your Ender 3’s Z-axis support using the same screws that secured the old one.
Reconnect your cables and you’re good to go! Next, check out my Ender 3 mainboard upgrade guide—an upgraded mainboard gives you better prints while making your printer eerily silent.
Blender is one of the most popular open-source 3D creation suites today. It doesn’t cost a dime to use and everything you create is yours to own for good. The community is robust and the dev team still releases new updates on the regular. If you want to get the latest version, you may have
Introducing Howchoo, an enigmatic author whose unique pen name reflects their boundless curiosity and limitless creativity. Mysterious and multifaceted, Howchoo has emerged as a captivating storyteller, leaving readers mesmerized by the uncharted realms they craft with their words.
With an insatiable appetite for knowledge and a love for exploration, Howchoo’s writing transcends conventional genres, blurring the lines between fantasy, science fiction, and the surreal. Their narratives are a kaleidoscope of ideas, weaving together intricate plots, unforgettable characters, and thought-provoking themes that challenge the boundaries of imagination.
Sendmail is an open source smtp server. Many different languages and frameworks interface with sendmail, and when debugging it’s good to be able to quickly test whether or not sendmail is working.
The following is a quick way to verify that sendmail is working.
This guide will show you how to install SSHFS on various operating systems. 1 – On macOS Using brew, install FUSE. Now install SSHFS: 2 – On Ubuntu/Debian 3 – On Windows Find the desired version of win-sshfs from this page and download it.
Introducing Howchoo, an enigmatic author whose unique pen name reflects their boundless curiosity and limitless creativity. Mysterious and multifaceted, Howchoo has emerged as a captivating storyteller, leaving readers mesmerized by the uncharted realms they craft with their words.
With an insatiable appetite for knowledge and a love for exploration, Howchoo’s writing transcends conventional genres, blurring the lines between fantasy, science fiction, and the surreal. Their narratives are a kaleidoscope of ideas, weaving together intricate plots, unforgettable characters, and thought-provoking themes that challenge the boundaries of imagination.
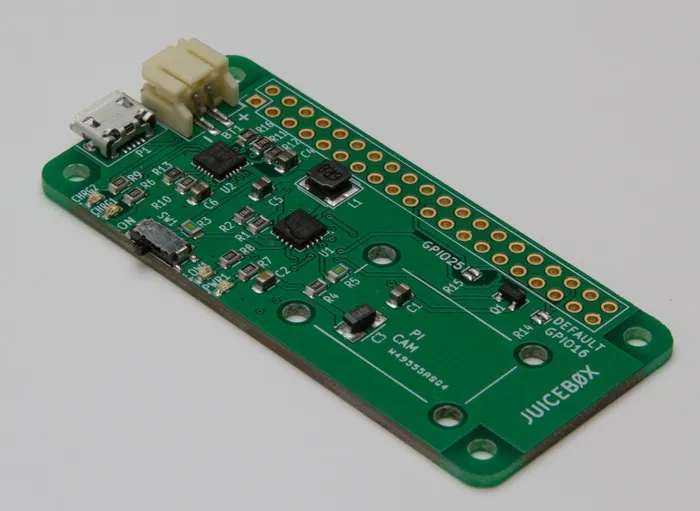
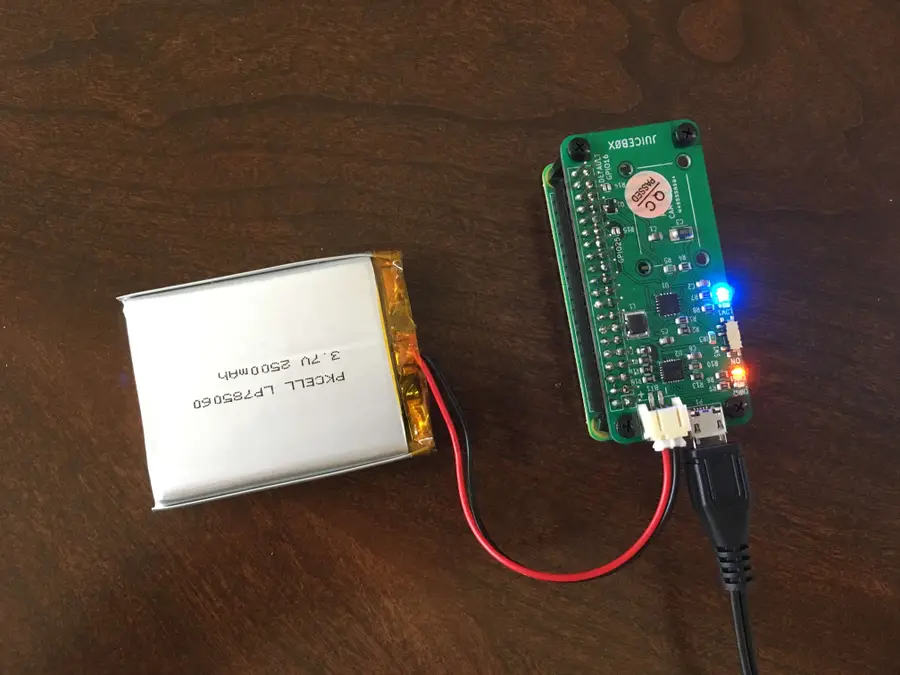
The Raspberry Pi Zero is an incredible tool for building a wide variety of IoT devices. And until lately, many projects I’ve worked on have been limited due to power supply constraints. Then I stumbled across the JuiceBox Zero, a battery management board for the Raspberry Pi Zero. This board provides portable power for your Pi Zero with a Li-Ion single cell battery, as well as charge the battery. In this guide, I’m going to show you how to assemble and use the JuiceBox Zero.
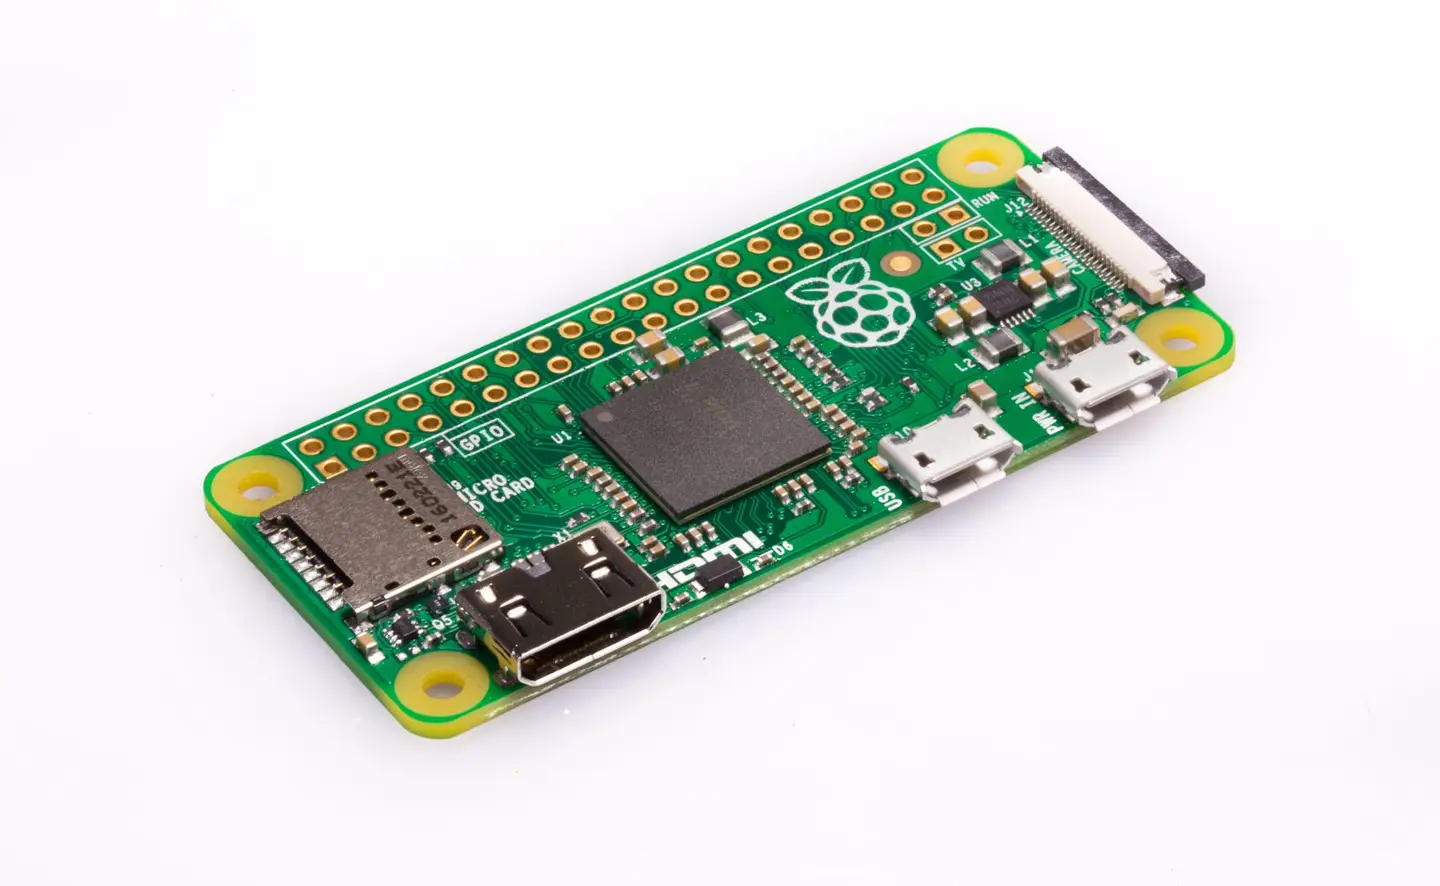
2 – Put the stacking header and standoffs on the Pi Zero
Start by placing the stacking header onto the Pi Zero, then place four standoffs. Make sure the standoffs you use are the same size as the stacking header.
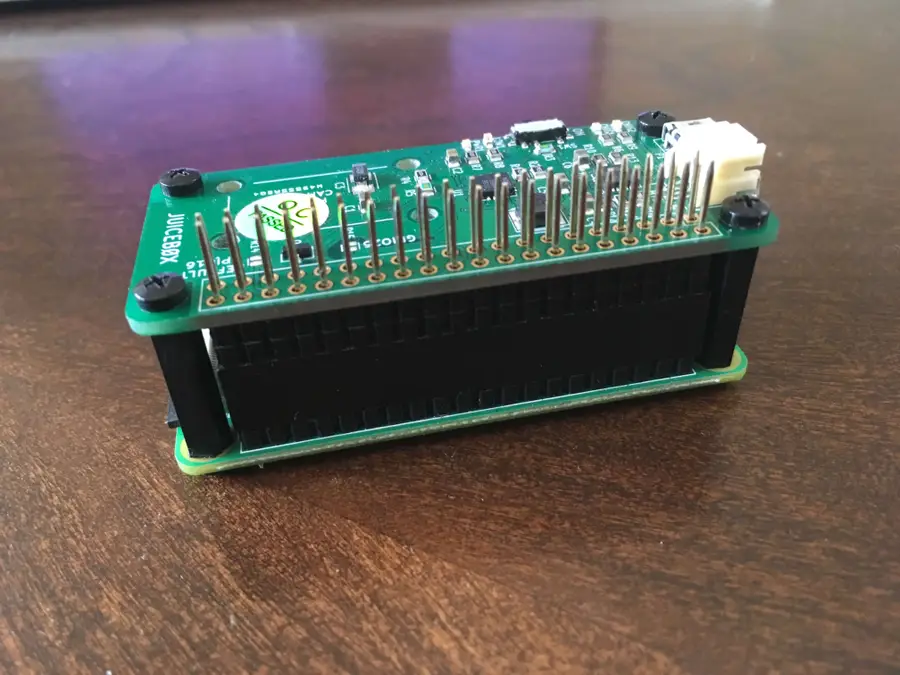
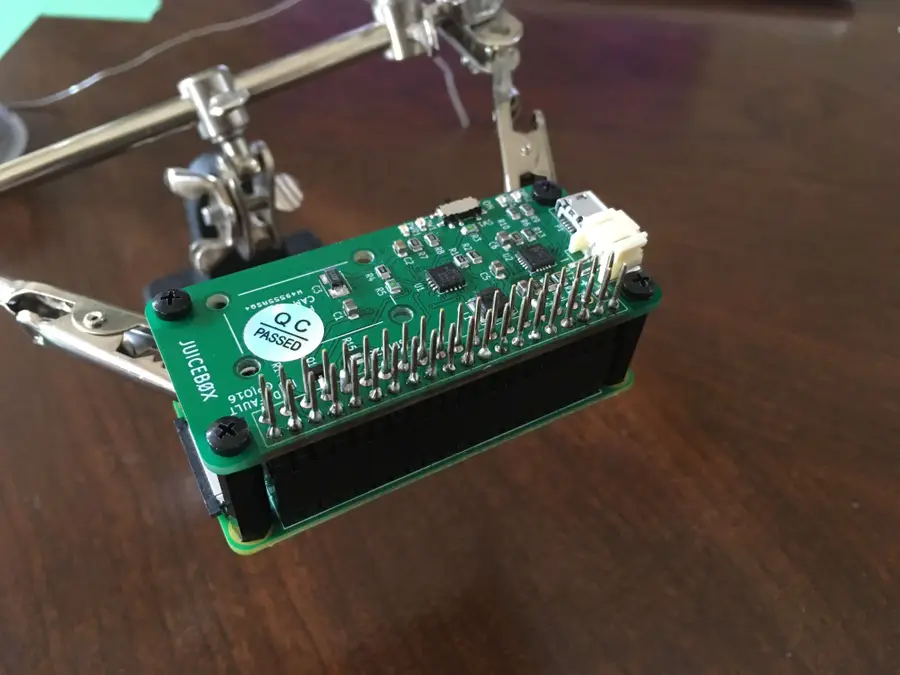
3 – Place the JuiceBox Zero onto the header and secure with screws
Put the JuiceBox Zero in place, and fasten to the standoffs down with screws.
4 – Solder the header to the JuiceBox Zero
Again, refer to the raspberrypi.org video from Step 1 to learn how to solder.
🛈 If you don’t have much experience, practice. And do a better job than I did.
5 – Plug the battery into the JuiceBox Zero
Make sure you use a JST‑compatible, single‑cell lithium‑ion battery.
6 – Cover the Micro USB port on the Pi Zero
When you’re using a JuiceBox Zero with your Pi, you need to stop using the micro usb port on the Pi. Trying to power the Pi Zero directly could damage the Pi Zero or the JuiceBox Zero. So place a USB cover (or kapton) tape over the USB charging port on the Pi.
🛈 You can also use electrical tape.
7 – Turn the power switch on
Now you’re ready to test it out! The JuiceBox Zero comes with a slide switch to power the Pi on or off. Simply slide the switch into the ON position.
8 – Charge the battery
Connecting the JuiceBox Zero to a power supply will both power the Pi and charge the battery. This allows your project to run continuously.
9 – Perform a safe shutdown when the battery is low
The low battery LED will light up when the battery voltage reaches 3.2V. At this time, the GPIO16 pin will go HIGH. So in order to safely shutdown the Pi when the battery is low, we’ll run a script in the background that listens for a rising edge on pin 16, then shuts down the Pi.
So first, use your editor to create a new file called safeshutdown.py in the /home/pi directory. Add the following:
Now, edit the crontab by typing the following in a shell:
sudo crontab -e
And add the following to the end of the file:
@reboot python /home/pi/safeshutdown.py &
This will cause the safeshutdown.py script to run in the background when the system boots. It will listen for a rising edge on pin 16, and then shutdown the Pi safely!
There are several ways to go about running a Minecraft server on the Raspberry Pi. In this guide, I’ll cover how to install Nukkit—a cross-platform Minecraft server that’s super easy to set up on the Raspberry Pi. This server should work with PCs, consoles, and tablets running Minecraft 1.14. I’ll be using a Raspberry Pi
Introducing Howchoo, an enigmatic author whose unique pen name reflects their boundless curiosity and limitless creativity. Mysterious and multifaceted, Howchoo has emerged as a captivating storyteller, leaving readers mesmerized by the uncharted realms they craft with their words.
With an insatiable appetite for knowledge and a love for exploration, Howchoo’s writing transcends conventional genres, blurring the lines between fantasy, science fiction, and the surreal. Their narratives are a kaleidoscope of ideas, weaving together intricate plots, unforgettable characters, and thought-provoking themes that challenge the boundaries of imagination.