Home Interests iPhone

How to Block a Website with Screen Time on Your iPhone

Block inappropriate or spammy websites with screen time!
howchoo   (467)
November 30, 2023
7 minutes

Share

You’ll Need 1

What you’ll need
Interests
iPhone x 1
Howchoo is reader-supported. As an Amazon Associate, we may earn a small affiliate commission at no cost to you when you buy through our links.
Posted in these interests:
 
apple • 18 guides

iOS

ios • 5 guides
iphone • 9 guides

Screen time gives iPhone users the opportunity to track and manage their iPhone usage, making staying productive easier than ever before. Since screen time holds iPhone users accountable for their iPhone use, it’s become increasingly popular among those who want and need to unplug during various time frames.

However, that’s not all screen time is capable of. There are many features available to those who set up screen time so that they can restrict purchases, restrict changes within the Settings app, or even restrict web content. To be honest, this isn’t even half of it. There is so much screen time can do to help you manage your device or even manage your child’s device.

For the purpose of this guide, we will get into blocking those spammy, inappropriate, and annoying websites. Sometimes, you just want to block that website that allows seems to pop up, or maybe you want to avoid your child seeing certain types of content. You can block websites and other web content on your own iPhone or on a child’s managed device. Either way, the steps are pretty much the same!

Let’s block those websites!

1 – Open Settings

First, go to your home screen and find the Setting app, then give it a click. It can often be found in the utilities folder.

2 – Click “Screen Time”

Then, select “Screen Time.”

3 – Click “Content & Privacy Restrictions”

Now, choose “Content & Privacy Restrictions.”

4 – Click “Content Restrictions”

Click “content restrictions,” so that you can specify the restrictions you want to create. If you don’t already have content and privacy restrictions enabled, you will have to first click the toggle to the right of “Content & Privacy Restrictions.”

5 – Enter in Your Screen Time Passcode

You will be prompted for your screen time passcode here. Enter your passcode in to move to the next step.

6 – Click “Web Content”

Click “Web Content.” By default, this will be set to “Unrestricted access.” Don’t worry. We are about to change this.

7 – Choose “Limit Adult Websites”

There are three separate options as to how you can restrict web content. Let’s dive into them briefly before choosing the one best for the purposes of this guide.

Web content restriction options:

  • Unrestricted access- This one is pretty self-explanatory. Everything is accessible.
  • Limit adult websites- Don’t let the wording of “adult websites” scare you. This just means you can choose to limit or restrict certain, specific sites. You can also make sure some are always allowed in this same category.
  • Allowed websites only- Here you have to specify the sites that are allowed to be visited on this device. This means, if you haven’t added it to the list, you cannot visit it. So, it can be pretty restrictive in terms of being able to browse the web. All websites will be blocked that are not manually allowed by you.

To block a specific website, choose “Limit Adult Websites.”

8 – Click “Add Website”

Click “Add Website” so we can enter the website we no longer want to be able to access.

9 – Add the Website

Now, type in your website and you are good to go! That’s it.

You can add as many websites as you want but try to add only websites you truly want to block for an extended timeframe.

NEXT UP

How to Enable the “Popping” Sound When Adjusting the Volume on Your Mac

howchoo
howchoo   (467)
December 13, 2023

Starting with MacOS Sierra and High Sierra, your Mac will no longer play a “pop” sound when you adjust your volume. If you prefer to have this sound when you adjust volume up and down (as I do), this guide will teach you how to reenable it. 1 – Open Sound System Preferences Navigate to System

Continue Reading

howchoo

 467 guides

Introducing Howchoo, an enigmatic author whose unique pen name reflects their boundless curiosity and limitless creativity. Mysterious and multifaceted, Howchoo has emerged as a captivating storyteller, leaving readers mesmerized by the uncharted realms they craft with their words. With an insatiable appetite for knowledge and a love for exploration, Howchoo’s writing transcends conventional genres, blurring the lines between fantasy, science fiction, and the surreal. Their narratives are a kaleidoscope of ideas, weaving together intricate plots, unforgettable characters, and thought-provoking themes that challenge the boundaries of imagination.

Home Interests Google

How to Create a CSV From a Google Spreadsheet

howchoo   (467)
November 29, 2023
2 minutes

Share

You’ll Need 1

What you’ll need
Interests
Howchoo is reader-supported. As an Amazon Associate, we may earn a small affiliate commission at no cost to you when you buy through our links.
Posted in these interests:
google • 9 guides
googledocs • 4 guides
googlesheets • 2 guides

CSV (Comma Separated Values) file is the default file format for importing and exporting data between various applications. The default file extension for a Google spreadsheet is .gsheet. Often, after you create your spreadsheet in Google Sheets, you’ll need to download the file as a .csv file in order to make use of it.

Fortunately, downloading a Google spreadsheet as a file is easy! Here are the three easy steps to download a Google spreadsheet as a CSV file.

1 – Open your Google spreadsheet

Either from Google Drive or Google Sheets, double-click on the file you wish to open.

2 – Download the file as a CSV

  • Go to File > Dowload.
  • Click Comma-separated values to download as a CSV.
NEXT UP

How to Search in Google Docs (Find Words)

Try ⌘ + F.
howchoo   (467)
December 13, 2023

If you just need to search and find a single word or multiple words in Google Docs, press ⌘ + F. If you want to find and replace words in your Google Doc, then we’ll show you how to do that too! 1 – Press cmd + F To find a word (or words) in

Continue Reading

howchoo

 467 guides

Introducing Howchoo, an enigmatic author whose unique pen name reflects their boundless curiosity and limitless creativity. Mysterious and multifaceted, Howchoo has emerged as a captivating storyteller, leaving readers mesmerized by the uncharted realms they craft with their words. With an insatiable appetite for knowledge and a love for exploration, Howchoo’s writing transcends conventional genres, blurring the lines between fantasy, science fiction, and the surreal. Their narratives are a kaleidoscope of ideas, weaving together intricate plots, unforgettable characters, and thought-provoking themes that challenge the boundaries of imagination.

Home Interests Raspberry Pi

HeaterMeter: Control your Grill Using a Raspberry Pi!

Fire up the summer with a new Pi project.
howchoo   (467)
November 28, 2023
9 minutes

Share

You’ll Need 4

What you’ll need
Interests
Howchoo is reader-supported. As an Amazon Associate, we may earn a small affiliate commission at no cost to you when you buy through our links.
Posted in these interests:

BBQ

bbq • 1 guides
food • 7 guides
pi • 92 guides

With summer right around the corner, it’s time to fire up the grill! But who will watch the grill while you’re beating the heat?

This year, kick things up a notch with your own Raspberry Pi-powered HeaterMeter. Don’t just throw a BBQ, be a part of it. HeaterMeter lets you keep a close eye on your grill and food temperature no matter where you are. Just pull out your phone, check the status of your grill, and make temperature adjustments in real-time.

What’s a HeaterMeter?

HeaterMeter is an open-source BBQ platform. This project uses heat probes to monitor the temperature of your grill and even posts the current status information in a web-based interface.

How does it work?

Heat sensors relay information to the HeaterMeter box. This is a 3D-printed box with buttons and an LCD screen. You can use it to check the current temperature status and make manual adjustments to things like fan speed to keep the grill temperature where you want it. You can add additional probes to monitor the meat you’re cooking. More components can be added like a servo-controlled damper.

The Raspberry Pi makes it possible to monitor your food from a distance. You can also trigger custom notifications, texts, or emails when certain temperatures are reached.

1 – The final product: HeaterMeter

This project was created by Bryan Mayland. He’s worked on this project for years, perfecting this heat-sensing project.

Now you can get in on the action. Bryan sells HeaterMeter kits on his website to help others who are interested in the same project. He’s saved us all a great deal of time by consolidating these resources together. More time for grilling, right?

2 – Gather tools

First things first, you’re going to need a couple of tools. Even if you start off with the official Heater Meter kit, you’ll probably need a few extra items.

The kit doesn’t include:

  • Raspberry Pi
  • Wifi adapter (if you’re not using a Pi 3B or Pi Zero W)
  • SD card
  • 12V Power supply
  • Pit probes
  • 3D printed case

3 – Build the pit probe(s)

This is where things get hot! Unfortunately, the puns also get worse.

The pit probes need to be built to spec. If you’re not sure where to get started, check out this amazing pit probe tutorial by Dave Selinger. He does a great job walking you through the construction process from start to finish. The pit probes are crucial to the project. Definitely don’t skip over any details.

4 – Install HeaterMeter on your Pi

HeaterMeter will run on any Raspberry Pi. But not every Pi is the same, some have serious benefits that make all the difference in a project like this. If you can, aim for a newer model—these often perform better and some come with built-in wifi adapters which are really useful for this project.

To install the HeaterMeter software, visit the HeaterMeter downloads page and find the appropriate image for your Pi. The image needs to be flashed to the SD card with an imaging program like Etcher.

5 – Assemble everything together

Once you have your components created, it’s time to gather them together! Your pit probes should be installed and connected to the HeaterMeter. There are thorough instructions available on the HeaterMeter wiki. I highly recommend this resource, especially if you’re using extra components like multiple pit probes or a damper.

6 – Time to get grilling!

Congratulations! Once everything is assembled, it’s time to fire up the grill.

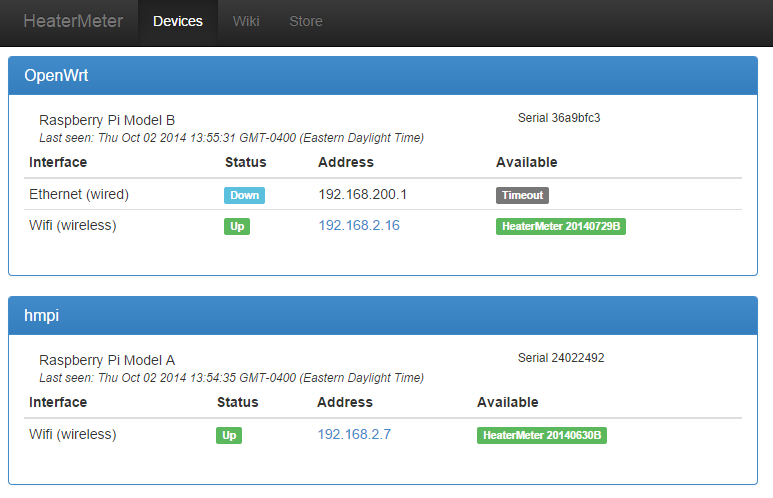
Don’t worry about what’s going on across the yard, now you can check it out for yourself. This is your time to grill with mobility. Want to check on those steaks you put on a moment ago? Just take out your phone and load up HeaterMeter in the browser. Does it feel like the future yet? I think so.

NEXT UP

How to Run a Minecraft Server on the Raspberry Pi

A whole world trapped inside your Pi.
howchoo   (467)
December 7, 2023

There are several ways to go about running a Minecraft server on the Raspberry Pi. In this guide, I’ll cover how to install Nukkit—a cross-platform Minecraft server that’s super easy to set up on the Raspberry Pi. This server should work with PCs, consoles, and tablets running Minecraft 1.14. I’ll be using a Raspberry Pi

Continue Reading

howchoo

 467 guides

Introducing Howchoo, an enigmatic author whose unique pen name reflects their boundless curiosity and limitless creativity. Mysterious and multifaceted, Howchoo has emerged as a captivating storyteller, leaving readers mesmerized by the uncharted realms they craft with their words. With an insatiable appetite for knowledge and a love for exploration, Howchoo’s writing transcends conventional genres, blurring the lines between fantasy, science fiction, and the surreal. Their narratives are a kaleidoscope of ideas, weaving together intricate plots, unforgettable characters, and thought-provoking themes that challenge the boundaries of imagination.

Home Interests Guides

How to Connect Your Child’s Messenger Kids account to a Classroom, Team, or Group

howchoo (467)
November 27, 2023
5 minutes

Share

Interests
Posted in these interests:
guides • 10 guides
Facebook’s Messenger Kids is a free app that allows children to make video calls and send messages on smartphones and tablets, but with more control than just giving your child access to a phone. With Messenger Kids, parents can control their child’s online experience through a variety of functions that allow them to have a safe and secure online experience. Part of that online experience through Messenger Kids can include being a part of a classroom or a team. The groups feature in Messenger Kids allows kids to connect with classmates, teammates, and friends in a safe and secure way online. This guide will show you how to add your child’s Messenger Kids account to a group.

1 – Approved Adults

In order for your child to connect with a group or class, parents and guardians can approve a teacher or adult to connect their child with other children through Messenger Kids. An important aspect of this feature is that the approved adult can only connect your child with other children whose parents have also approved this adult to connect their child. This approved adult will be added as a contact in your child’s Messenger Kids, and will be able to add your child to group conversations with other kids, even if they are not in your child’s contacts. That being said, you can feel safe knowing that every child in that group had to approve the adult just like you did. Once in the group, all members of the group will be automatically added as contacts in your child’s contact list and will also be able to chat individually. If you have concerns about a contact, parents and guardians will still be able to manage these contacts in the Parent Dashboard.

2 – Approving a request from an approved adult

  1. You will receive a generated link from the adult seeking to add your child to a group.
  2. Click the shared link.
  3. Select ‘Allow.’
  4. Select your child’s name.
  5. Using the dropdown arrow, you can set a duration of time for your child to be allowed in the group. Once the duration has ended, the adult will no longer be able to add your child to groups or add contacts to your child’s contact list.
  6. Select ‘Next.’
NEXT UP

How to Change the Windows 11 Start Menu and Button

howchoo (467)
December 13, 2023
As with every update, Microsoft has changed Windows 11 to look different than its predecessors, and while the update looks modern and clean there are some interesting changes. Arguably the most jarring of all the changes is the one made to the Windows 11 Start Menu, which looks completely different. Instead of a clean, easy-to-navigate
Continue Reading

howchoo

 467 guides
Introducing Howchoo, an enigmatic author whose unique pen name reflects their boundless curiosity and limitless creativity. Mysterious and multifaceted, Howchoo has emerged as a captivating storyteller, leaving readers mesmerized by the uncharted realms they craft with their words. With an insatiable appetite for knowledge and a love for exploration, Howchoo’s writing transcends conventional genres, blurring the lines between fantasy, science fiction, and the surreal. Their narratives are a kaleidoscope of ideas, weaving together intricate plots, unforgettable characters, and thought-provoking themes that challenge the boundaries of imagination.
Home Interests Mac

How to Disable Local Time Machine Backups in macOS

howchoo (467)
November 27, 2023
3 minutes

Share

Interests
Posted in these interests:
 
apple • 18 guides

Mac

mac • 24 guides
timemachine • 2 guides
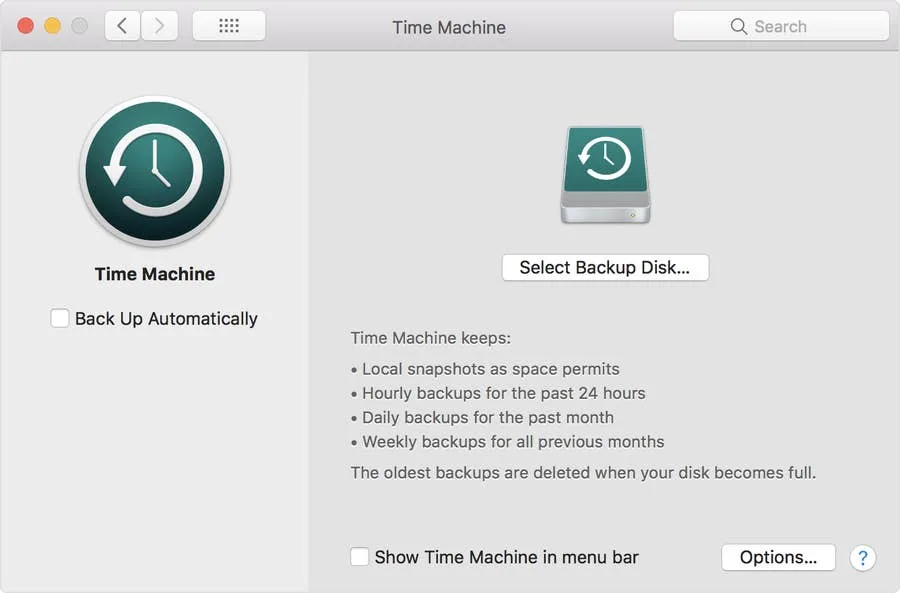
Your Mac has a “feature” that will put time machine backups on your local disk if your primary Time Machine drive isn’t available. I’m not sure the details about how often it writes to your local drive, but I don’t know that you can’t delete it easily. This short guide will show you how to disable local Time Machine backups in macOS and OS X. Looking to disable other annoyances on your Mac? Check out our guide on disabling the Mac touchbar, disabling Mac messages, and disabling the Mac empty trash warning.

1 – Open Terminal

You can open Terminal but navigating to Applications->Utilities in Finder. Or, you can type cmd + spacebar which will open Spotlight. Then, search for Terminal.

2 – Use ‘tmutil’ to disable local backups

There is a handy feature on your mac called tmutil that stands for Time Machine Utility. To disable the local backups, in Terminal type tmutil disablelocal and you should see your local backups are gone.

3 – More on ‘tmutil’

In order to read more about tmutil open Terminal and type man tmutil which will open the manual for tmutil. Here you can find out to restore local backups if you’d like. If your machine has already backed up data, you can browse for individual files in Time Machine. Check out our guide to get started.
NEXT UP

How to Enable the “Popping” Sound When Adjusting the Volume on Your Mac

howchoo
howchoo (467)
December 13, 2023
Starting with MacOS Sierra and High Sierra, your Mac will no longer play a “pop” sound when you adjust your volume. If you prefer to have this sound when you adjust volume up and down (as I do), this guide will teach you how to reenable it. 1 – Open Sound System Preferences Navigate to System
Continue Reading

howchoo

 467 guides
Introducing Howchoo, an enigmatic author whose unique pen name reflects their boundless curiosity and limitless creativity. Mysterious and multifaceted, Howchoo has emerged as a captivating storyteller, leaving readers mesmerized by the uncharted realms they craft with their words. With an insatiable appetite for knowledge and a love for exploration, Howchoo’s writing transcends conventional genres, blurring the lines between fantasy, science fiction, and the surreal. Their narratives are a kaleidoscope of ideas, weaving together intricate plots, unforgettable characters, and thought-provoking themes that challenge the boundaries of imagination.
Home Interests Git

How to Set up Git Tab Completion

howchoo
howchoo   (467)
November 26, 2023
3 minutes

Share

Interests
Posted in these interests:

Git

git • 5 guides

Tab completion, or auto-completion, is essential if you’re using Git on the command line. Tab completion is a nice feature of many shells that allows you to complete a word by hitting tab. In this case, we want to be able to use tab completion for things like branches and tags in git. Fortunately, setting it up is pretty simple.

1 – Download the git completion shell script

First, open a shell and navigate to your home directory because that’s where the script will reside.

cd

Now download the git completion script using one of the following methods.

Using curl:

curl -O https://raw.githubusercontent.com/git/git/master/contrib/completion/git-completion.bash

Using wget:

wget https://raw.githubusercontent.com/git/git/master/contrib/completion/git-completion.bash

2 – Source the git completion file

source ~/git-completion.bash

In most cases, you’ll want to source this file automatically whenever you start a new shell. To do so, open your ~/.bashrc file and append the command from above. Once you save the file, all new shells will automatically source the file.

Note: The tilde (~) refers to your home directory.

3 – Try it out

Move to a git controlled directory and type:

git checkout 

You should see a list of all of the possible branches that can be checked out!

NEXT UP

How to Display the Current git Branch on the Command Line

howchoo   (467)
August 24, 2023

When you’re using git routinely, it’s helpful to know which branch you’re currently on without having to type git status or git branch. Fortunately, there’s a convenient way to add your current git branch to your command line prompt. For help with remote branches, check out this guide on how to check out a remote branch. 1 – Open

Continue Reading

howchoo

 467 guides

Introducing Howchoo, an enigmatic author whose unique pen name reflects their boundless curiosity and limitless creativity. Mysterious and multifaceted, Howchoo has emerged as a captivating storyteller, leaving readers mesmerized by the uncharted realms they craft with their words. With an insatiable appetite for knowledge and a love for exploration, Howchoo’s writing transcends conventional genres, blurring the lines between fantasy, science fiction, and the surreal. Their narratives are a kaleidoscope of ideas, weaving together intricate plots, unforgettable characters, and thought-provoking themes that challenge the boundaries of imagination.

Home Interests Kubernetes

Secure Your Sensitive Data with Kubernetes Secrets

Learn how to create and use Kubernetes secrets.
howchoo   (467)
November 26, 2023
13 minutes

Share

Interests
Posted in these interests:
code • 11 guides
devops • 3 guides
kubernetes • 6 guides

Kubernetes secrets are objects that store and manage sensitive data inside your Kubernetes cluster. One mistake developers often make is storing sensitive information like database passwords, API credentials, etc in a settings file in their codebase. This is very bad practice (hopefully for obvious reasons). Most developers know this, but still choose the option because it’s easy.

Fortunately, if you’re running your application in a Kubernetes cluster, managing that sensitive data the right way is easy. This guide will provide an overview to Kubernetes Secrets, including how to create, store, and use secrets in your applications.

1 – Create a Kubernetes secret

Creating secrets, like most Kubernetes operations, is accomplished using the kubectl command. Fortunately, there are a few ways to create secrets, and each are useful in different circumstances.

Let’s first look at the secret we want to create. Remember that the secret is an object that contains one or more pieces of sensitive data. For our example, let’s imagine we want to create a secret, called database, that contains our database credentials. It will be constructed like this:

database
  - username
  - password

Create a secret from files

Suppose you have the following files: username and password. They might have been created like this:

echo -n 'databaseuser' > ./username
echo -n '1234567890' > ./password

We can use these files to construct our secret:

kubectl create secret generic database --from-file=./username --from-file=./password

Create a secret from string literals

If you’d prefer, you can skip the files altogether and create the secret from string literals:

kubectl create secret generic database --from-literal=username=databaseuser --from-literal=password=databaseuser

Examine the new secret

Both of the above examples will create identical secrets that look like this:

$ kubectl get secret database
NAME          TYPE      DATA      AGE
database      Opaque    2         1h

And let’s example the secret:

$ kubectl describe secret database
Name:         database
Namespace:    default
Labels:       
Annotations:  
Type:         Opaque

Data
====
username: 12 bytes
password:  10 bytes

Copy secrets from another cluster or namespace

While this is directly applicable, I’ll add this as a note because it could be useful. Sometimes we’ll need to copy secrets from one cluster or namespace to another. Here’s a quick example:

kubectl get secret database --context source_context --export -o yaml | kubectl apply --context destination_context -f -

For an explanation and more details, see our guide on copying Kubernetes secrets from one cluster to another.

2 – Attach secrets to your pod

Secrets aren’t all that helpful until they’re attached to a pod. In order to actually use the secrets they must be configured in the pod definition.

There are two primary ways two use secrets: as files and as environment variables.

Attaching secrets as files

See the following pod config:

apiVersion: v1
kind: Pod
metadata:
  name: web
spec:
  containers:
  - name: web
    image: web:1.0.0
    volumeMounts:
    - name: database-volume
      mountPath: "/etc/secrets/database"
      readOnly: true
  volumes:
  - name: database-volume
    secret:
      secretName: database

There are two important blocks to take note of. First, let’s look at the volumes block. We set the name of the volume and specify which secret we want to use. Note that this is set at the pod level, so it could be used in multiple containers if the pod were to define them.

volumes:
- name: database-volume
  secret:
    secretName: database

Next we’ll look at how the volume is mounted onto the container using volumeMounts. We’ll specify which volume we want to use, and set the mount path to /etc/secrets/database.

volumeMounts:
- name: database-volume
  mountPath: "/etc/secrets/database"
  readOnly: true

Inside of the container, we can run an ls on /etc/secrets/database and find that both the username and password files exist.

Attaching secrets as environment variables

Secrets can also be used inside of containers as environment variables. Check out the same config but with secrets attached as environment variables instead of volumes:

apiVersion: v1
kind: Pod
metadata:
  name: web
spec:
  containers:
  - name: web
    image: web:1.0.0
    env:
    - name: DATABASE_USERNAME
      valueFrom:
        secretKeyRef:
          name: database
          key: username
    - name: DATABASE_PASSWORD
      valueFrom:
        secretKeyRef:
          name: database
          key: password

Summary

Both volumes and environment variables are perfectly acceptable ways to access secrets from inside your containers. The major difference is that environment variables can only hold a single value, while volumes can hold any number of files—even nested directories. So if your application requires access to many secrets, a volume is a better choice for organization and to keep the configs manageable.

3 – Accessing secrets from within the container (using Python)

I know some readers will not be using Python containers, but the purpose of this step is to provide a conceptual understanding of how secrets can be used from within the container.

Assuming you’ve followed the first two steps, you should now have a database secret that contains a username and password.

Reading secrets from a volume

If we’ve mounted the secret as a volume, we can read the secret like this:

with open('/etc/secrets/database/password, 'r') as secret_file:
    database_password = secret_file.read()

Grabbing the secret file is as easy reading from a file. Of course, you’d probably abstract this code and add error handling and defaults. After all, this is much more pleasant: get_secret('database/password').

Reading secrets from environment variables

This is even more straight forward, at least in Python. You can read the secret just as you would any other environment variable:

import os

database_password = os.environ.get('DATABASE_PASSWORD')

4 – Conclusion

I hope this overview of Kubernetes secrets was helpful. By now, you should have a good understand of what Kubernetes secrets are and how to use them. If you have questions, please ask in the comments below or head over to the Kubernetes secrets documentation.

NEXT UP

Class Vs. Instance Variables in Python 3

howchoo
howchoo   (467)
November 22, 2023

When learning object oriented programming in Python, there can be a few gotchas when it comes to distinguishing between class and instance variables. In this guide I’ll explain the difference between class and instance variables and provide examples demonstrating various use cases. 1 – Class vs. instance variables First, a quick review if you’re new

Continue Reading

howchoo

 467 guides

Introducing Howchoo, an enigmatic author whose unique pen name reflects their boundless curiosity and limitless creativity. Mysterious and multifaceted, Howchoo has emerged as a captivating storyteller, leaving readers mesmerized by the uncharted realms they craft with their words. With an insatiable appetite for knowledge and a love for exploration, Howchoo’s writing transcends conventional genres, blurring the lines between fantasy, science fiction, and the surreal. Their narratives are a kaleidoscope of ideas, weaving together intricate plots, unforgettable characters, and thought-provoking themes that challenge the boundaries of imagination.

Home Interests Coffee

How to adjust and calibrate Nespresso Inissia cup size/volume

howchoo   (467)
November 25, 2023
3 minutes

Share

You’ll Need 1

What you’ll need
Interests
Howchoo is reader-supported. As an Amazon Associate, we may earn a small affiliate commission at no cost to you when you buy through our links.
Posted in these interests:
coffee • 3 guides

By default, the Nespresso Inissia dispenses only a small amount of coffee. If you read the manual rather than throwing it away, it states that you’re meant to calibrate the cup size yourself to match your individual taste.

This short guide will show you how to program the volume of coffee that your Nespresso machine outputs for both the espresso and lungo sizes. Coffee is awesome.

1 – Top off your water tank

Fill your tank up fully with fresh water.

2 – Place a pod in the machine

Add a fresh Nespresso pod to the mix and close the machine.

3 – Preheat the machine

To do this, press either of the top buttons once to turn the machine on. They will begin to flash. After they stop flashing, the machine is preheated.

4 – Hold down one of the buttons to calibrate

Choose which coffee size you’d like to calibrate first (espresso or lungo). I started with espresso.

Hold down the espresso button and continue to hold it until the desired level of coffee is in your cup. Then, release the button. After releasing it, your Nespresso machine is programmed to dispense that same level of coffee!

Repeat with the other button for the other size coffee.

5 – Enjoy your coffee!

Now you have the perfect strength and volume.

NEXT UP

How to Deep Clean Your Moka Pot

howchoo   (467)
September 18, 2023

The aluminum moka pot can become oxidized over time and need a deep cleaning. For normal cleaning, soap and water is fine, but you’ll want to get a little more aggressive when it gets more nasty. If you need to clean more than just your moka pot, check out this guide on how to make doing

Continue Reading

howchoo

 467 guides

Introducing Howchoo, an enigmatic author whose unique pen name reflects their boundless curiosity and limitless creativity. Mysterious and multifaceted, Howchoo has emerged as a captivating storyteller, leaving readers mesmerized by the uncharted realms they craft with their words. With an insatiable appetite for knowledge and a love for exploration, Howchoo’s writing transcends conventional genres, blurring the lines between fantasy, science fiction, and the surreal. Their narratives are a kaleidoscope of ideas, weaving together intricate plots, unforgettable characters, and thought-provoking themes that challenge the boundaries of imagination.

Home Interests Frontier

How to Change Your Frontier WiFi Password

howchoo
howchoo   (467)
November 25, 2023
5 minutes

Share

You’ll Need 2

What you’ll need
Interests
Series
Howchoo is reader-supported. As an Amazon Associate, we may earn a small affiliate commission at no cost to you when you buy through our links.
Posted in these interests:
frontier • 2 guides
internet • 36 guides
router • 32 guides

There are a few reasons you might want to update or reset your WiFi password: making your network more secure, and making your password easier to remember and type.

Improved network security

You can add an extra layer of security to your network by changing the WiFi password. As long as your new password is secure, a regular update will help protect your wireless network. It can help to use security parameters (or rules) when creating a new password. Here’s a common guideline for password security.

A secure password…

  • is not a dictionary word
  • contains uppercase letters
  • contains lowercase letters
  • contains numbers
  • contains special characters.

Easier to remember

Now, a password that is easy to remember is necessary less secure. But if you’re not too concerned about network security, it can be helpful to choose a password that you’ll remember and that’s easy to type. This way you won’t have to struggle every time you connect a new device to the network, and it will be easier for your guests to connect.

If you want to update the WiFi password on your Frontier network, connect a machine to your Frontier router with an ethernet cable.

This guide will work for both Frontier Internet and Frontier FiOS routers.

1 – Log into your Frontier router

First, you’ll need to log into the Frontier router. Visit our guide for details on how to log into a Frontier device.

2 – Identify your router model

Using the Frontier Help Center, identify your router model. Visit the Help Center website and select the appropriate router model from the list.

3 – Set a new password

The Help Center will display instructions for resetting your WiFi password. Follow the steps carefully and consider using secure password parameters when making a new one.

4 – Save the changes

Save your new WiFi password change. Once the information is set, you can disconnect the ethernet cable and test the new wireless login.

NEXT UP

How to Clear Your Browser Cache for Any Browser

Trouble loading web pages? Try clearing your cache!
howchoo   (467)
November 22, 2023

Clearing your browser cache is a great way to solve common internet issues. If a webpage isn’t loading properly, one of the first things you should try is clearing your browser cache. This guide includes steps for the most common internet browsers—Chrome, Firefox, Safari, Internet Explorer, and Edge. If your browser isn’t listed, visit the

Continue Reading

howchoo

 467 guides

Introducing Howchoo, an enigmatic author whose unique pen name reflects their boundless curiosity and limitless creativity. Mysterious and multifaceted, Howchoo has emerged as a captivating storyteller, leaving readers mesmerized by the uncharted realms they craft with their words. With an insatiable appetite for knowledge and a love for exploration, Howchoo’s writing transcends conventional genres, blurring the lines between fantasy, science fiction, and the surreal. Their narratives are a kaleidoscope of ideas, weaving together intricate plots, unforgettable characters, and thought-provoking themes that challenge the boundaries of imagination.

Home Interests Amazon

How to See If I’m Eligible for Amazon Prime Free Same-Day Delivery

howchoo
howchoo   (467)
November 24, 2023
2 minutes

Share

Interests
Posted in these interests:
 
amazon • 5 guides
home • 7 guides

So Amazon just announced free same-day delivery in 14 different metro areas. How do you know if you apply?

1 – Check your zip code

Go to this page. Wait for the page to finish loading completely, scroll down, and enter your zip code. This will tell you if you live in an area that is eligible for free same-day delivery.

2 – Or simply try to check out on Amazon

If you add at least $35 of eligible products to your cart, you should see same-day delivery as a shipping option. Also, eligible items will display “Prime FREE Same-Day” or “Prime FREE One-Day” on their detail page. If you don’t see this, it doesn’t apply!

NEXT UP

How to Properly Dispose of a Worn or Damaged American Flag

howchoo   (467)
December 7, 2023

Since our country was conceived, the U.S. Flag has been a symbol of our country’s freedom. Our country’s Flag Code provides specific guidelines for how to “retire” a damaged or worn-out American flag. When should my American flag be retired? The US Flag Code (4 USC Sec 8 Para (k) Amended 7 July 1976) dictates that a flag

Continue Reading

howchoo

 467 guides

Introducing Howchoo, an enigmatic author whose unique pen name reflects their boundless curiosity and limitless creativity. Mysterious and multifaceted, Howchoo has emerged as a captivating storyteller, leaving readers mesmerized by the uncharted realms they craft with their words. With an insatiable appetite for knowledge and a love for exploration, Howchoo’s writing transcends conventional genres, blurring the lines between fantasy, science fiction, and the surreal. Their narratives are a kaleidoscope of ideas, weaving together intricate plots, unforgettable characters, and thought-provoking themes that challenge the boundaries of imagination.