If you’ve ever hit the heart icon on a song during your Peloton workout and wondered where you can view it, this guide is for you.
Peloton automatically creates a playlist for the tracks you like during your workouts. Follow these easy steps to connect your Spotify or Apple Music accounts and access the list off of the bike.
You can sync just about everything nowadays, even your Apple watch!
1 – View your music on the Peloton Bike
Go to your profile on the Peloton Bike and select “Music” on the left navigation column. This page will show a list of all songs you have saved during your workouts.
2 – Enter Spotify credentials on the Peloton Bike
From the “Music” tab, click the “Connect” button on the top right of the page to link to your Spotify or Apple Music account. Enter your Spotify username and password, and agree to the terms to proceed.
3 – View your Peloton playlist on the Spotify app
In your Spotify player, open “Your Library” to view your playlists. A new playlist titled “My Peloton Music” should appear in your playlists. If it does not appear, simply refresh the Spotify player by closing and reopening the app.
Get prepped for your next Peloton cycling ride with these accessories.
NEXT UP
How to Clean Vibram Five Finger Toe Shoes Without Ruining Them
Vibram Five Finger shoes are awesome pieces of running gear. But you can also use them for hiking and looking weird around town. Unfortunately, toe shoes start to smell if you don’t wear socks with them every time you wear them. While Vibram claims that the shoes are machine washable, you will ruin them if you wash
Introducing Howchoo, an enigmatic author whose unique pen name reflects their boundless curiosity and limitless creativity. Mysterious and multifaceted, Howchoo has emerged as a captivating storyteller, leaving readers mesmerized by the uncharted realms they craft with their words.
With an insatiable appetite for knowledge and a love for exploration, Howchoo’s writing transcends conventional genres, blurring the lines between fantasy, science fiction, and the surreal. Their narratives are a kaleidoscope of ideas, weaving together intricate plots, unforgettable characters, and thought-provoking themes that challenge the boundaries of imagination.
This short guide will show you how to check how much free space your Raspberry Pi has.
1 – Get to the command line/terminal
Open a new command line/terminal session.
If you’re using Jessie Lite, this is the default state that your Pi boots into.
If you’re using RetroPie, you can get here by pressing F4 on a keyboard or by exiting to the command line through the RetroPie UI.
If you’re using Raspberry Pi OS (formerly Raspbian), simply open a new Terminal.
2 – Run the following command
Run the following command and press enter:
df
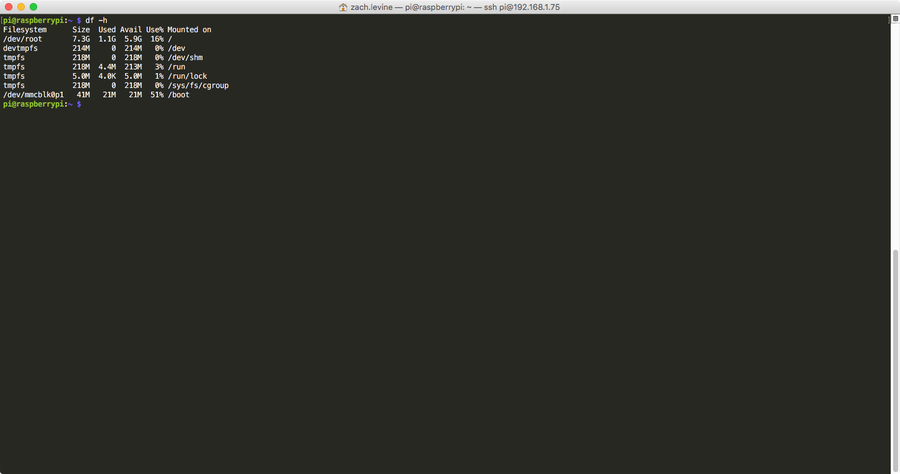
This will display the total disk usage for your SD card in columns. If you’d like to make it more readable, you can add the -h flag, which will add G and M units for gigabytes and megabytes:
df -h
🛈 You can see here that I’m using 16% of my available SD card space.
There are several ways to go about running a Minecraft server on the Raspberry Pi. In this guide, I’ll cover how to install Nukkit—a cross-platform Minecraft server that’s super easy to set up on the Raspberry Pi. This server should work with PCs, consoles, and tablets running Minecraft 1.14. I’ll be using a Raspberry Pi
Introducing Howchoo, an enigmatic author whose unique pen name reflects their boundless curiosity and limitless creativity. Mysterious and multifaceted, Howchoo has emerged as a captivating storyteller, leaving readers mesmerized by the uncharted realms they craft with their words.
With an insatiable appetite for knowledge and a love for exploration, Howchoo’s writing transcends conventional genres, blurring the lines between fantasy, science fiction, and the surreal. Their narratives are a kaleidoscope of ideas, weaving together intricate plots, unforgettable characters, and thought-provoking themes that challenge the boundaries of imagination.
Whenever a new Raspbian version comes out, the Raspberry Pi Foundation removes the previous version from the Raspbian Downloads page. But sometimes for a project you just need an older version. This short guide provides you with links to download Raspbian Jessie directly from the Raspberry Pi Foundation Image Archive.
1 – Download ZIP file
Download Raspbian Jessie as a ZIP archive directly from RaspberryPi.org:
You can access older versions of Raspbian Jessie in TORRENT format from the Raspberry Pi Image Archives and choosing a date from 2015-09-28 to 2017-07-05.
There are several ways to go about running a Minecraft server on the Raspberry Pi. In this guide, I’ll cover how to install Nukkit—a cross-platform Minecraft server that’s super easy to set up on the Raspberry Pi. This server should work with PCs, consoles, and tablets running Minecraft 1.14. I’ll be using a Raspberry Pi
Introducing Howchoo, an enigmatic author whose unique pen name reflects their boundless curiosity and limitless creativity. Mysterious and multifaceted, Howchoo has emerged as a captivating storyteller, leaving readers mesmerized by the uncharted realms they craft with their words.
With an insatiable appetite for knowledge and a love for exploration, Howchoo’s writing transcends conventional genres, blurring the lines between fantasy, science fiction, and the surreal. Their narratives are a kaleidoscope of ideas, weaving together intricate plots, unforgettable characters, and thought-provoking themes that challenge the boundaries of imagination.
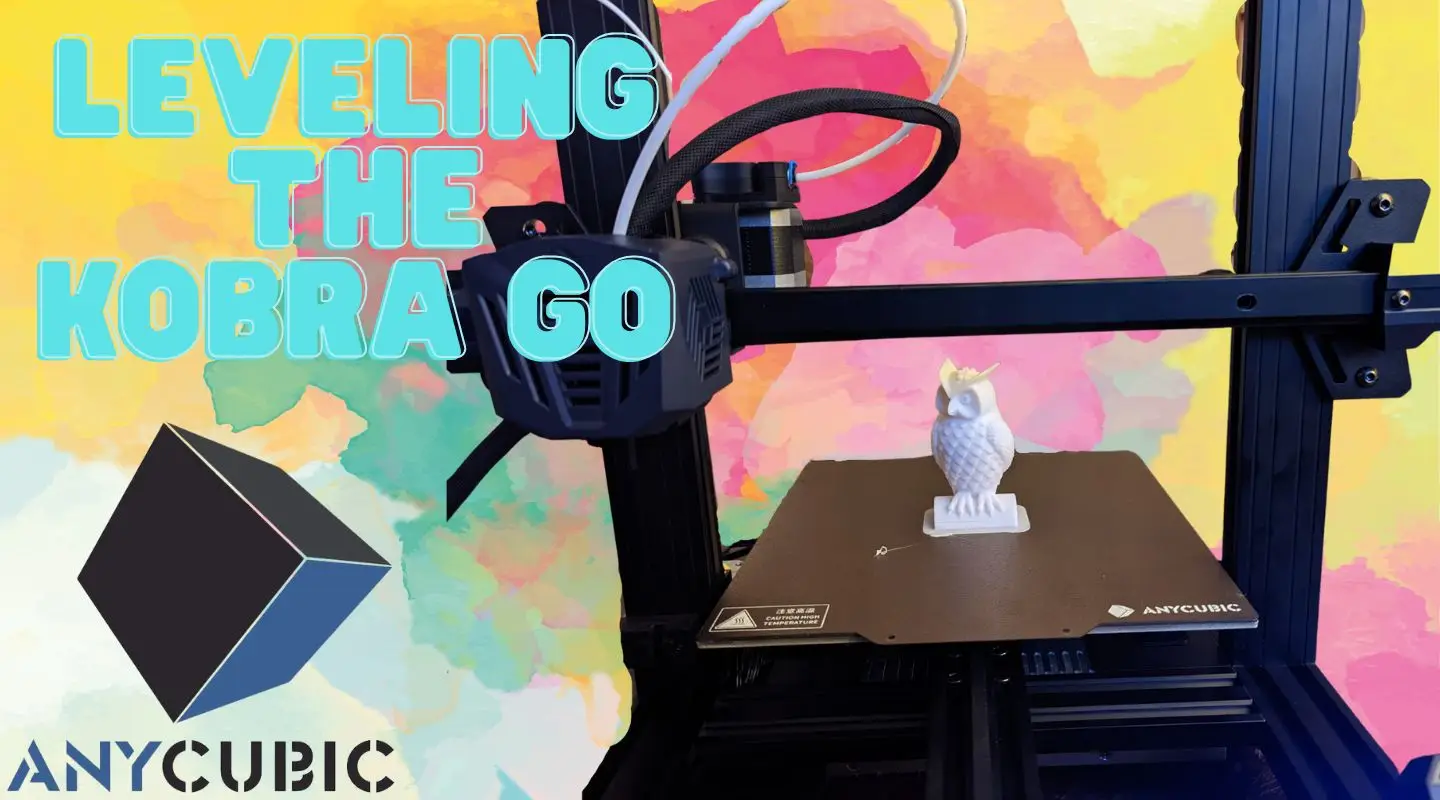
I’ve been a pretty die-hard fan of Anycubic’s Kobra series and the 25-point automatic leveling is a huge part of the reason. Of course, many printers can be modified to have automatic leveling, but not many entry-level DIY kit printers come with this feature. That’s what makes the Anycubic Kobra Go so darned unique.
Anycubic’s Kobra Go 3D Printer Hands-On Review
A detailed review on the Anycubic Kobra Go DIY 3D printer
There might still be times when you need to manually adjust the z-distance, but for the most part, the Kobra Go handles itself as smoothly as a dream. Just run the automatic leveling program, wait, and profit!
1 – Turn on the Kobra Go and select the Menu
Turn on the Kobra Go and select the Menu
You make selections on the Kobra Go’s small screen by turning the control knob to the left or right, delightfully familiar for Ender 3 users.
2 – Scroll down and select leveling
Scroll down and select leveling
The menu is easy to navigate, and the screen on the Kobra Go is surprisingly high quality for a kit FDM printer.
3 – Select the Auto Leveling option from the Kobra Go menu
Select the Auto Leveling option from the Kobra Go menu
If you need to adjust the Z Offset, you can do that here, or you can do it from the main page during a print by turning the knob left or right to adjust down or up.
4 – Allow the automatic leveling program to complete
Allow the automatic leveling program to complete
This program runs through 25 points across the print bed, so it can take a few minutes to complete. Go make yourself a smoothie.
5 – Complete!
And that’s it: your automatic leveling is complete!
And that’s it: your automatic leveling is complete! You’re now ready to load in some filament and watch the printer do its thing.
NEXT UP
Blender is one of the most popular open-source 3D creation suites today. It doesn’t cost a dime to use and everything you create is yours to own for good. The community is robust and the dev team still releases new updates on the regular. If you want to get the latest version, you may have
Introducing Howchoo, an enigmatic author whose unique pen name reflects their boundless curiosity and limitless creativity. Mysterious and multifaceted, Howchoo has emerged as a captivating storyteller, leaving readers mesmerized by the uncharted realms they craft with their words.
With an insatiable appetite for knowledge and a love for exploration, Howchoo’s writing transcends conventional genres, blurring the lines between fantasy, science fiction, and the surreal. Their narratives are a kaleidoscope of ideas, weaving together intricate plots, unforgettable characters, and thought-provoking themes that challenge the boundaries of imagination.
You probably use your backspace [delete] key quite a bit. If you have a Macbook Pro, you probably also hit the Open Siri button quite a bit, as it is (in)conveniently located adjacent to the backspace key.
This is quite annoying.
This short guide will show you how to remove the Siri button from your Macbook Pro’s touch bar, or Control Strip, disabling the button without disabling Siri.
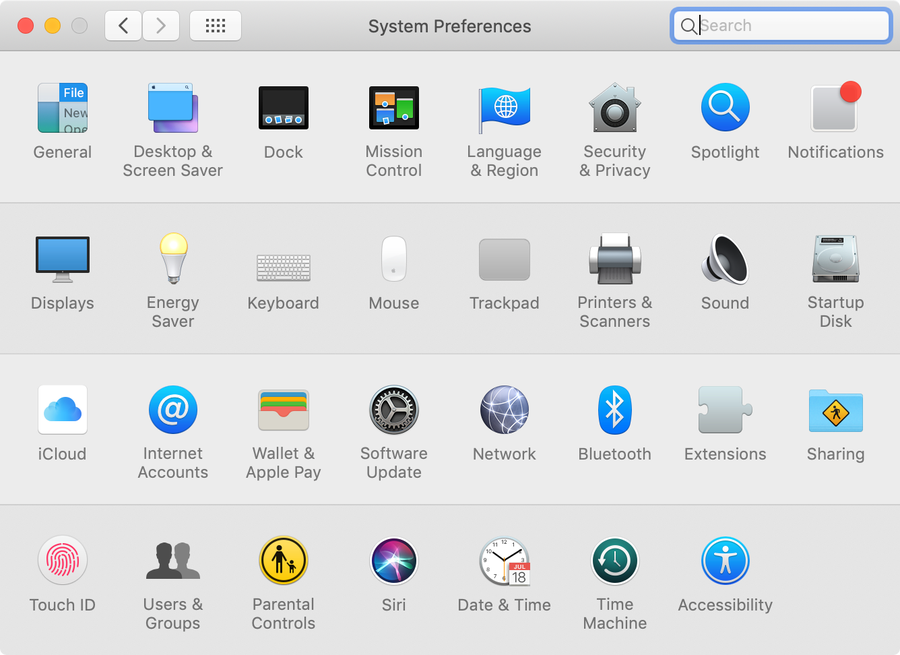
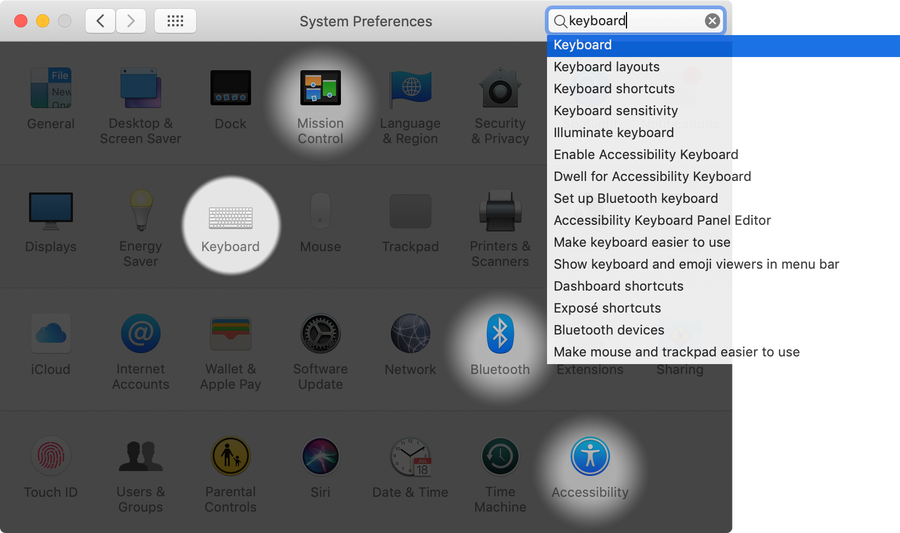
Click on the Apple icon and select System Preferences.
🛈 You can also use Spotlight to open System Preferences.
2 – Open Keyboard Settings
Click the Keyboard system preference icon.
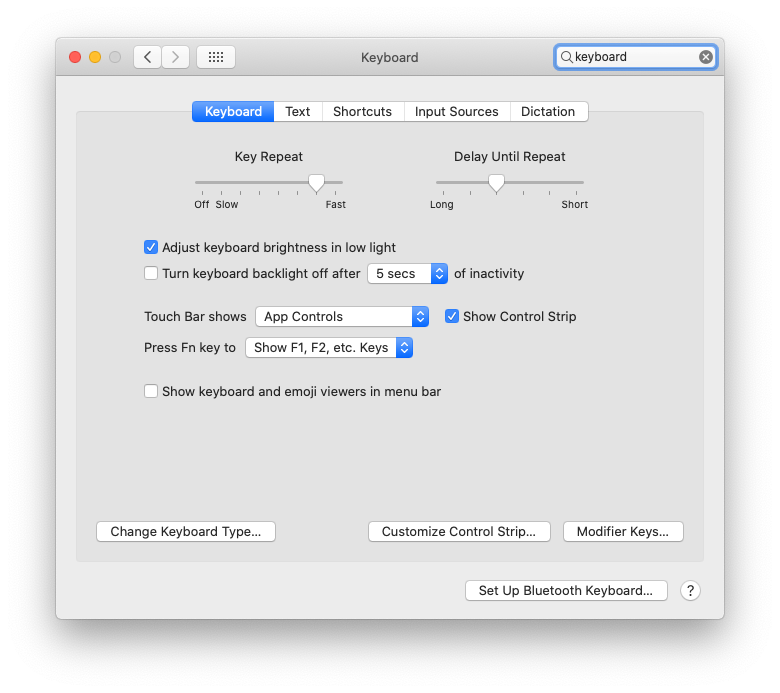
3 – Customize the Touch Bar
Click the Customize Control Strip... button.
🛈 In older versions of macOS, the button is labeled “Customize Touch Bar…” instead.
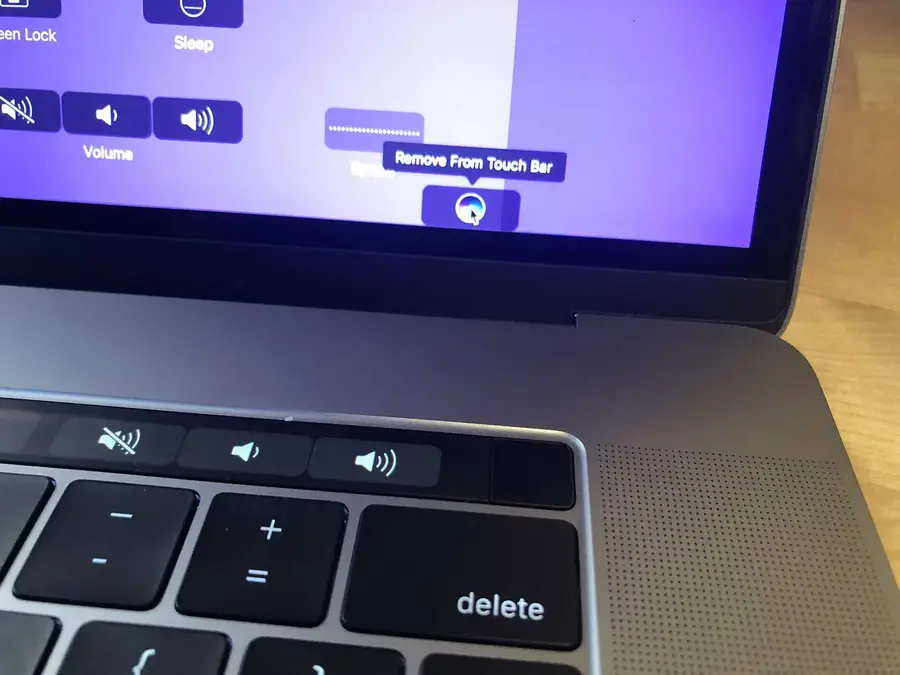
4 – Remove or replace the Touch Bar Siri button
Move your mouse down, off your screen and INTO the touch bar. This will highlight each menu item. Highlight the Siri button, click, and drag the Siri button upward and out of the Touch Bar. It will now disappear.
You can optionally add a new button to replace the Siri button, but I chose to leave it empty because I inadvertently click in the space all the time.
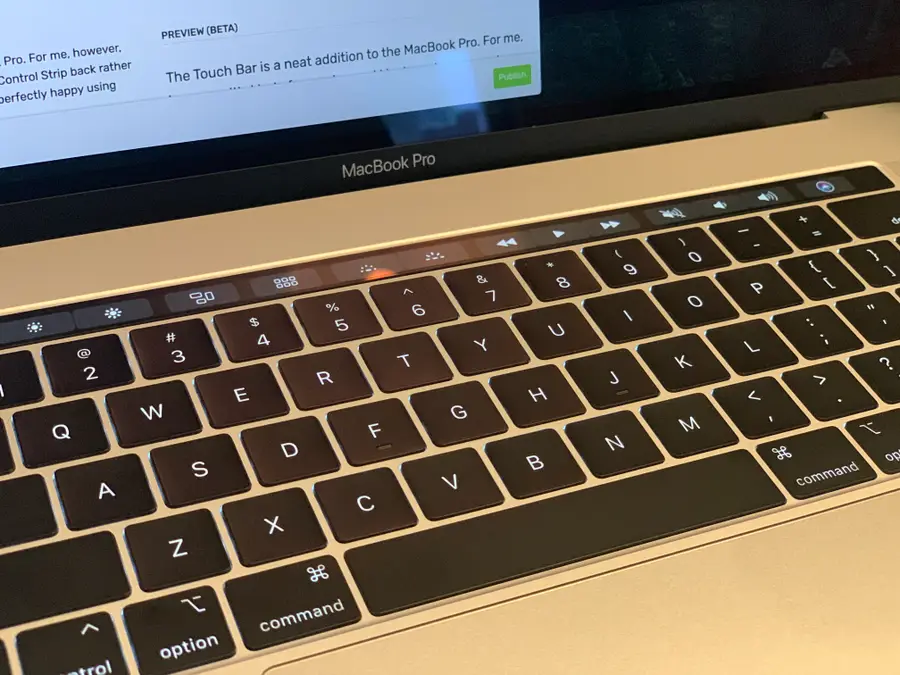
5 – You’re all done!
You go to hell Siri and you die there. Now that you’ve disabled Siri, perhaps you’d like to disable the MacBook Pro Touch Bar and revert it to its former Control Strip glory!
How to Disable the MacBook Pro Touch Bar
NEXT UP
How to Enable the “Popping” Sound When Adjusting the Volume on Your Mac
Starting with MacOS Sierra and High Sierra, your Mac will no longer play a “pop” sound when you adjust your volume. If you prefer to have this sound when you adjust volume up and down (as I do), this guide will teach you how to reenable it. 1 – Open Sound System Preferences Navigate to System
Introducing Howchoo, an enigmatic author whose unique pen name reflects their boundless curiosity and limitless creativity. Mysterious and multifaceted, Howchoo has emerged as a captivating storyteller, leaving readers mesmerized by the uncharted realms they craft with their words.
With an insatiable appetite for knowledge and a love for exploration, Howchoo’s writing transcends conventional genres, blurring the lines between fantasy, science fiction, and the surreal. Their narratives are a kaleidoscope of ideas, weaving together intricate plots, unforgettable characters, and thought-provoking themes that challenge the boundaries of imagination.
The setup process has changed over recent years, but it’s still relatively easy to follow. You will need a mobile device with WiFi capability to set up your new Chromecast. You can also set up a Raspberry Pi Chromecast.
1 – Create a Google account (if you don’t have one)
If you haven’t already, create a Google account. You will need one to use and set up the Google Chromecast device.
Enter your first and last name in the respective fields.
Enter a username—this will also be your email address. You can also choose to use an existing email address instead.
Enter a password to use and confirm it in the password field.
Click next and follow the prompts to complete the sign-up process.
2 – Connect the Chromecast to the TV
Your Chromecast device connects to TVs and screens using an HDMI cable. Plug the Chromecast into your TV’s HDMI port. Be sure to set the TV input to the appropriate HDMI channel.
3 – Install Chromecast software
In order to set up and use the Chromecast, you will need to load some software on the devices you want to stream media from.
Mobile Devices
If you’re using an Android device, open the Google Play store. If you’re using an Apple device, open iTunes.
Search for Google Home.
Download and install the app.
Desktops and Laptops
Open Chrome on your PC.
Open the Chrome Settings menu in the upper right corner—it has an icon that looks like three dots.
Select Cast….
When the Chrome icon appears in the browser toolbar, right-click it and choose Always show icon to pin it in place.
4 – Verify your network connection
You can only stream to a Chromecast device if you’re on the same network. Verify the network you want to use has an internet connection and the device you plan to stream from is connected to it.
5 – Set up the Chromecast
Note: Google no longer supports the Chromecast setup process on PC. You will need a mobile device to set up the Chromecast.
How to set up Chromecast
Open Google Home using a mobile device.
You should receive a setup prompt for your new Chromecast. If you don’t see it, tap the Add + button.
Go to Set up device.
Choose Set up new devices.
Follow the prompts to complete the setup.
6 – How to cast something to the Chromecast
Now it’s time to stream! There are a few ways to go about sending media to your TV.
Stream to Chromecast from a mobile device
Open the media you want to stream. It could be anything compatible with Chromecast—YouTube, Netflix, Spotify, etc.
Tap the Chromecast icon. It looks like a TV (or rectangle) with WiFi waves coming off of it.
Select the Chromecast device you want to send the media stream to.
Stream to Chromecast from PC
Open the media you want to stream in the Chrome web browser.
Tap the Chromecast icon in the upper right. It looks like a TV (or rectangle) with WiFi waves coming off of it.
Choose a Chromecast device to send the media to.
Congratulations! You’re ready to go. Sit back, relax, and enjoy the magic of streaming media across your home network.
NEXT UP
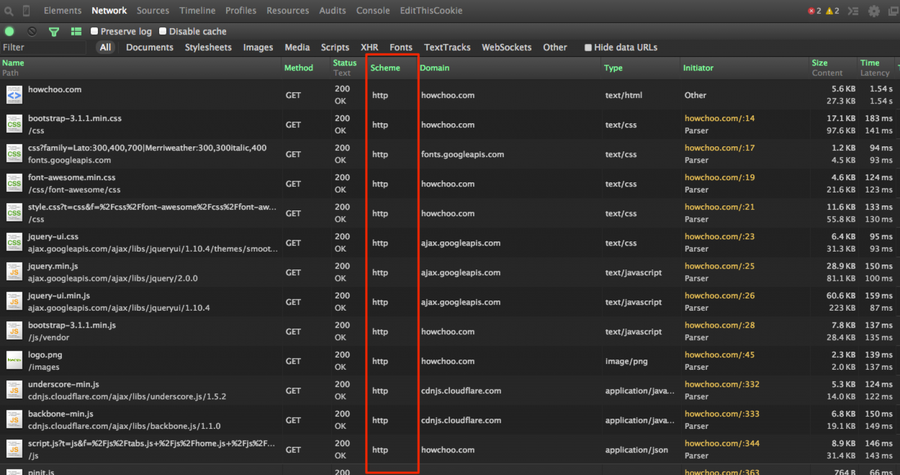
How to Clear Your Browser Cache for Any Browser
Trouble loading web pages? Try clearing your cache!
Clearing your browser cache is a great way to solve common internet issues. If a webpage isn’t loading properly, one of the first things you should try is clearing your browser cache. This guide includes steps for the most common internet browsers—Chrome, Firefox, Safari, Internet Explorer, and Edge. If your browser isn’t listed, visit the
Introducing Howchoo, an enigmatic author whose unique pen name reflects their boundless curiosity and limitless creativity. Mysterious and multifaceted, Howchoo has emerged as a captivating storyteller, leaving readers mesmerized by the uncharted realms they craft with their words.
With an insatiable appetite for knowledge and a love for exploration, Howchoo’s writing transcends conventional genres, blurring the lines between fantasy, science fiction, and the surreal. Their narratives are a kaleidoscope of ideas, weaving together intricate plots, unforgettable characters, and thought-provoking themes that challenge the boundaries of imagination.
Have you ever found program management on a Windows system to be a bit of a pain? Well, no longer! Chocolatey is a powerful PowerShell-based software management solution that allows you to manage every aspect of your Windows software environment, including using Chocolatey to install programs. Via simple PowerShell commands, you gain a great level of control over your installed programs: Chocolatey can even handle batch installations, updates, and uninstallations (as we’ll explore in this article).
Chocolatey only manages that software that you installed through Chocolatey. But once you’ve installed a program using Chocolatey, you can then manage all aspects of your software environment easily.
There are two ways to uninstall a program managed by Chocolatey: either via PowerShell commands or Chocolatey’s GUI (graphical user interface) should you have it installed, which is really easy to do.
1 – Uninstalling a program with Chocolatey using PowerShell
Open PowerShell by searching for it in Windows search. Make sure to open it via Run as Administrator.
The first PowerShell command we’ll be using today is: choco uninstall which allows you to uninstall programs really quickly and easily.
For instance, you could use this to remove a single program: choco uninstall googlechrome
Or you could use this to uninstall a selection of programs all at once: choco uninstall googlechrome notepadplusplus 7zip
Or even uninstall everything managed by Chocolatey in one glorious shot with: choco uninstall all
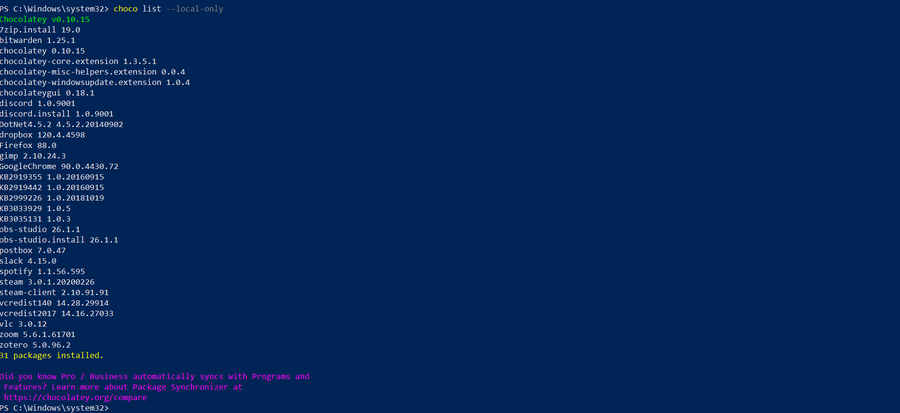
To find a list of all your Chocolatey-installed software, use the following command in PowerShell: choco list --local-only
Finally, to ensure that your uninstallation process slides through without hassle, append your command with -y (for “yes”), which will automatically select the affirmative option from the software’s uninstallation prompts should any exist. See the example below.
choco uninstall googlechrome -y
🛈 You should always double-check in Programs to ensure that the software is uninstalled properly. It may not show up as uninstalled until you do a system reboot.
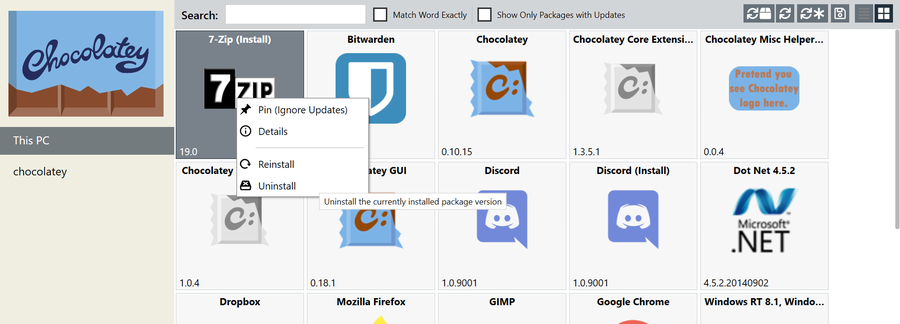
2 – Uninstalling a program through the Chocolatey GUI
If you are using the Chocolatey graphical user interface, you can also use it to uninstall any Chocolatey-managed programs you desire. The process here is as simple as right-clicking on the item in question and choosing “Uninstall” from the drop-down menu.
The GUI isn’t as handy for uninstalling a large selection of software in one go, however, so I’d stick to PowerShell for big operations.
Blender is one of the most popular open-source 3D creation suites today. It doesn’t cost a dime to use and everything you create is yours to own for good. The community is robust and the dev team still releases new updates on the regular. If you want to get the latest version, you may have
Introducing Howchoo, an enigmatic author whose unique pen name reflects their boundless curiosity and limitless creativity. Mysterious and multifaceted, Howchoo has emerged as a captivating storyteller, leaving readers mesmerized by the uncharted realms they craft with their words.
With an insatiable appetite for knowledge and a love for exploration, Howchoo’s writing transcends conventional genres, blurring the lines between fantasy, science fiction, and the surreal. Their narratives are a kaleidoscope of ideas, weaving together intricate plots, unforgettable characters, and thought-provoking themes that challenge the boundaries of imagination.
Resetting your CenturyLink router or modem is a common troubleshooting step for network latency. It’s also an easy way to start over with fresh settings on your network.
Factory resetting your device will wipe all of your custom settings—this includes things like your WiFi password and network name. Be certain you’re ready to proceed before initiating a factory reset.
If you aren’t happy with your CenturyLink service, you may want to check out Xfinity.
Howchoo may earn a small commission when you order products and services through our affiliate links.
1 – Locate the Reset Button
Look for the factory reset button on the back of your modem or router—it’s likely red. This button is usually the smallest and may require a pen to press it all the way.
2 – Use the Reset Button
To initiate the factory reset, press and hold the button for at least 15 seconds. The reset will begin when the modem lights begin to flash.
3 – Wait
Wait for at least 3-5 minutes for the factory reset to finish.
The Internet light will shine green when the process is complete.
There are a few reasons you might want to update or reset your WiFi password: making your network more secure, and making your password easier to remember and type. Improved network security You can add an extra layer of security to your network by changing the WiFi password. As long as your new password is
Introducing Howchoo, an enigmatic author whose unique pen name reflects their boundless curiosity and limitless creativity. Mysterious and multifaceted, Howchoo has emerged as a captivating storyteller, leaving readers mesmerized by the uncharted realms they craft with their words.
With an insatiable appetite for knowledge and a love for exploration, Howchoo’s writing transcends conventional genres, blurring the lines between fantasy, science fiction, and the surreal. Their narratives are a kaleidoscope of ideas, weaving together intricate plots, unforgettable characters, and thought-provoking themes that challenge the boundaries of imagination.
Note that the first line, $(function() { is shorthand for $(document).ready(function() {. This simply means we are passing a callback function to the document ready event. It’s necessary to do this when our code is expecting DOM elements to exist.
Next we are creating a click event handler for our button, $(“#top”).on(‘click’, function() {. First we specify which element we are listening to, which in our case is #top. The on(‘click’ is very readable – simple means when the user clicks on the #top element. And as before, the anonymous function we create is being passing in as a callback function. So whenever the user clicks on the #top element this function will get fired.
Now for the animation. First it should be noted that we are targeting both HTML and BODY for browser compatibility. Some browsers scroll by settings scrollTop on BODY and other on HTML. No, I don’t know which ones, and it will probably be unnecessary soon if it isn’t already. jQuery provides an animate function that takes a dictionary of CSS properties and values as the first parameter, and an integer representing the animation duration in milliseconds as the second parameter. In our case we are passing in only one css property: scrollTop. And since we are scrolling to the top, we’ll set scrollTop to 0.
Then as the second parameter we’re setting the duration to 1000 milliseconds or if you’re really good at math: 1 second. This should give us plenty of time to watch our animation.
🛈 Keep in mind that if you’re going to use this code, you’ll need to add enough content to your page to enable scrolling otherwise the button will do nothing!
2 – Scroll to the top of an element
Now suppose we have an element on the page and we want to scroll to the top of it.
We first need to find out the offset of the image.
var position = $("#image").offset().top;
jQuery’s offset() function returns an object containing properties top and left. We’re only interested in top because we want to scroll to the top of this element. So using what we’ve already learned about scroll, we can use our new position as the value of scrollTop:
$(function() {
    $("#top").on('click', function() {
        var position = $("#image").offset().top;
        $("HTML, BODY").animate({
            scrollTop: position
        }, 1000);
    });
});
This will scroll you to the top of the element with the animation lasting 1 second.
3 – Scroll to the bottom of the page
Since scrollTop is the position on the page that should land at the top of the window, scrolling to the bottom of the page requires a little bit of math. The position we want to know is the document height – window height. document height will give us the height of the entire web page, while window height just gives us the height of the scrollable area.
var bottom = $(document).height() - $(window).height();
If you’ve been experimenting with animating scroll, you’ve probably noticed that if the scroll distance is small it scrolls very slowly and if the scroll distance is large is scrolls more quickly. This is because we are specifying a duration for the animation, and it doesn’t care about distance. In most cases, when your scroll distance can vary you’ll want to normalize the scroll rate. So instead of always passing in 1000 for the duration, we want to take our scroll distance into account. First, we have to decide the rate we want to scroll. Let’s pick something easy – 1000px/500ms or 1000px/0.5s. We need to write a function that takes the target scroll position, that is the position we are scrolling to, and returns the new duration in milliseconds.
First we set our variables. We need to get our current scrollTop position and store that value as currentTop. This allows us to properly calculate the distance between our current position and the target position.
Then we specify our rate, which in our case is 0.5 or 1000px/500ms.
Finally, we declare our distance variable which will be set soon. Calculating the distance is as simple as subtracting the target from the currentTop. We need to take the absolute value of the result to ensure this works for both directions. Finally we return the new distance we calculated multiplied by the rate.
Now let’s put our function to use in an example that scrolls us to the bottom of the page at our newly calculated rate.
As you can see the only changes are calling the getDuration function and using the newly calculated duration as the second parameter of the animate function. This method is beneficial because if all of your scrolls will animate at the same speed. If you want to change the speed, all you have to do is modify the rate in our getDuration function. Adjusting the rate to 0.2 will make it go much faster, whereas changing it to 1.5 will slow it down significantly.
NEXT UP
Secure Your Sensitive Data with Kubernetes Secrets
Kubernetes secrets are objects that store and manage sensitive data inside your Kubernetes cluster. One mistake developers often make is storing sensitive information like database passwords, API credentials, etc in a settings file in their codebase. This is very bad practice (hopefully for obvious reasons). Most developers know this, but still choose the option because it’s easy.
Introducing Howchoo, an enigmatic author whose unique pen name reflects their boundless curiosity and limitless creativity. Mysterious and multifaceted, Howchoo has emerged as a captivating storyteller, leaving readers mesmerized by the uncharted realms they craft with their words.
With an insatiable appetite for knowledge and a love for exploration, Howchoo’s writing transcends conventional genres, blurring the lines between fantasy, science fiction, and the surreal. Their narratives are a kaleidoscope of ideas, weaving together intricate plots, unforgettable characters, and thought-provoking themes that challenge the boundaries of imagination.
Your ASUS router login can be used to perform common setup tasks, secure your wireless network, and more. This guide will show you how to log into your ASUS router using the router’s IP address and login credentials, including the default username and password.
1 – Connect to your network
Use your computer, phone, or tablet to connect to your network using WiFi or an Ethernet cable.
2 – Visit the ASUS router IP in your browser
In your web browser, visit the ASUS router IP address: http://192.168.1.1
If you don’t see the login screen, try visiting http://router.asus.com instead.
3 – Use the ASUS router default login info
Use the ASUS router default password and username below to access your router:
Username: admin
Password: admin
Once logged in you can change your admin password to one that’s more secure.
4 – Need help?
If you can’t log in, post in the comments section below and I’ll do my best to help you out!
There are a few reasons you might want to update or reset your WiFi password: making your network more secure, and making your password easier to remember and type. Improved network security You can add an extra layer of security to your network by changing the WiFi password. As long as your new password is
Introducing Howchoo, an enigmatic author whose unique pen name reflects their boundless curiosity and limitless creativity. Mysterious and multifaceted, Howchoo has emerged as a captivating storyteller, leaving readers mesmerized by the uncharted realms they craft with their words.
With an insatiable appetite for knowledge and a love for exploration, Howchoo’s writing transcends conventional genres, blurring the lines between fantasy, science fiction, and the surreal. Their narratives are a kaleidoscope of ideas, weaving together intricate plots, unforgettable characters, and thought-provoking themes that challenge the boundaries of imagination.