Home Interests iPhone

The Difference Between iCloud and Internal Storage

howchoo
howchoo   (467)
August 14, 2023
18 minutes

Share

You’ll Need 1

What you’ll need
Interests
iPhone x 1
Howchoo is reader-supported. As an Amazon Associate, we may earn a small affiliate commission at no cost to you when you buy through our links.
Posted in these interests:
 
apple • 18 guides

iOS

ios • 5 guides
iphone • 9 guides

During many years of working in the tech industry, one of the biggest problems I dealt with was the dreaded and confusing: storage. Most of us have been there, you go to save a picture only to get a notification that your phone doesn’t have enough storage or a random popup appears telling you that you have no storage left, but you aren’t sure what that means or how to fix it.

More often than not, iPhone users are taking a lot of pictures, screenshots, and videos that are responsible for the bulk of their storage issues. In my experience, there is a lot of confusion between what could be defined as internal storage, meaning part of their physical phone’s storage capacity, and what was external storage, meaning in iCloud.

In this guide, I will demystify the difference between your iPhone’s internal storage and iCloud storage. I will also delve into how to fix internal storage issues on your iPhone, and clarify the purpose of iCloud storage.

1 – The Difference Between Internal and iCloud Storage

While many iPhone users believe iCloud storage is additional storage, as in an extension of the iPhone’s already allotted storage, this is not the case. An iPhone’s storage capacity cannot be extended or increased. These two types of storage differ greatly, and here’s how:

Internal storage

Your iPhone’s internal storage is simply the amount of storage that came with your iPhone. If you bought an iPhone 11 with 64 GB, then the internal storage on your iPhone is 64 GB and that amount of storage is not something you will be able to alter in the future. This storage type is something to be extremely mindful of when purchasing an iPhone, because it isn’t extendable. If you are someone who takes a lot of pictures, and think this may not be enough storage for you, you might want to consider getting an iPhone with more storage.

When your iPhone’s internal storage is full, that cannot be fixed by using iCloud, unless you are getting creative and using features like optimizing the photo library or offloading data into iCloud when iCloud is not being used on the iPhone, so that it isn’t taking up physical space on the iPhone.

iCloud storage

iCloud is meant to act as an external storage facility for your data, not an extension of your internal storage. iCloud can be used for its intended purposes by backing up to iCloud or syncing different data types and apps to iCloud via wifi. iCloud is also there to create opportunities for continuity features like handoff, universal clipboard, text message forwarding, iPhone cellular calls, instant hotspot, and auto-unlock. If data is in iCloud, your products meet the continuity requirements, you are using the same Apple ID across your devices, and your settings are as required, you can access these features and data types across all your Apple devices.

If you are wondering, there are benefits to using iCloud storage versus backing up to iTunes, but I will get into those differences in another guide.

2 – All About the iCloud

Main purpose of iCloud

What is the iCloud for if it isn’t to extend the iPhone’s internal storage?

  • Backing up manually to iCloud.
  • Automatic backups to iCloud.
  • Syncing data to iCloud such as pictures, app data, and more.
  • Providing convenient continuity features along with other convenient iCloud related features.

What’s in iCloud

iCloud is meant to store the data you personally choose to include within your iCloud settings. If you go to settings > click your name > and click iCloud, you will see that there is an entire list of data types and apps labeled “Apps Using iCloud.” Whatever is turned on in that list, is taking up space in your iCloud.

However, there are most likely other data types in iCloud that are not on this list. This list is specific to data that is syncing to iCloud via wifi instantaneously. If apps or data are on in this list, they are not being backed up to iCloud (even if you set up automatic backups); instead, that app and data are being synced to iCloud via wifi. If data is not in the “Apps Using iCloud” list and you back up to the cloud, it is backing up to the iCloud instead of syncing.

With iCloud, you are always either syncing your data or backing it up (you are never doing both consecutively). If you are not doing either, you need to consider setting up automatic backup or start doing manual backups to a Mac or PC using iTunes in order to avoid data loss.

Are you using iCloud?

In short, yes. Even if you decide you do not want to use the storage features and don’t back up to the iCloud, or put any data manually into the iCloud, your Apple ID is an iCloud account, which is there to be used to whatever capacity you would like. You do not have to back up your iPhone or store your app data in the iCloud. Alternatively, you can back up your phone to iTunes.

However, there are many features within your iPhone, and other Apple products for that matter, that require iCloud to some capacity, and if you are not using iCloud (maybe you aren’t even signed in to iCloud), you may not have access to those many features, including continuity features.

iCloud storage options

Whenever you set up an Apple ID for your Apple products, that Apple ID is allotted a free 5 GB of iCloud storage. If you plan on using the iCloud, this 5 GB will not be enough and you will eventually need to upgrade your storage to the 50 GB (.99 USD), 200 GB (2.99 USD), or 2 TB (9.99 USD) iCloud storage plans available.

3 – How To Check Your iPhone’s Internal Storage

If you are having a storage issue, the first thing you want to do is see what data is taking up space and where. Is it an internal storage issue, or an iCloud issue? What data is the bulk of the problem? Once you can answer these questions, you can fix the issue easily. To check your iPhone’s internal storage follow these steps:

  1. Open the settings app.
  2. Navigate to “general.”
  3. Click “iPhone Storage.”

Here you can see what is taking up space on the physical iPhone, what is getting you too close to the iPhone’s storage capacity. The golden rule is that you want to have a minimum of 500 GB available on your iPhone at all times. This is simply for your iPhone to be able to function properly. If you have less than 500 GB of space, you may experience extreme performance issues on your iPhone including unexpected shutdowns and the inability to open applications. You will want to have at least an additional 4 GB of space allotted for upcoming updates.

If you have reached your iPhone’s storage capacity try the following:

  1. Consider any of the “recommendations” listed (in this spot is usually: “review large attachments” and “optimize the photo library.”
  2. Scroll through the list of apps below the recommendations. To the right of each app is how much space it’s taking up. Consider deleting any of those applications and their app data to create more space (the further down the list you go, the less space the app is taking up).
  3. Follow our guide on how to free up iPhone storage space.

How to Free Up iPhone Storage Space

4 – How to Check Your iCloud Storage

Since an iPhone’s internal storage and iCloud storage need to be handled separately and have their separate homes within the settings app, here’s how to navigate to your iCloud storage settings so you can check out your iCloud storage and see if you’ve reached its capacity:

  1. Open the settings app.
  2. Click on your name up top.
  3. Select “iCloud.”

Here you can see what apps are taking up what space, if your iCloud is full, and what apps are syncing to iCloud. If iCloud is at the end of its capacity (or getting close), follow my guide for clearing up iCloud storage.

How To Clear Up iCloud Storage
Clear up your iCloud storage today!

NEXT UP

How to Enable the “Popping” Sound When Adjusting the Volume on Your Mac

howchoo
howchoo   (467)
December 13, 2023

Starting with MacOS Sierra and High Sierra, your Mac will no longer play a “pop” sound when you adjust your volume. If you prefer to have this sound when you adjust volume up and down (as I do), this guide will teach you how to reenable it. 1 – Open Sound System Preferences Navigate to System

Continue Reading

howchoo

 467 guides

Introducing Howchoo, an enigmatic author whose unique pen name reflects their boundless curiosity and limitless creativity. Mysterious and multifaceted, Howchoo has emerged as a captivating storyteller, leaving readers mesmerized by the uncharted realms they craft with their words. With an insatiable appetite for knowledge and a love for exploration, Howchoo’s writing transcends conventional genres, blurring the lines between fantasy, science fiction, and the surreal. Their narratives are a kaleidoscope of ideas, weaving together intricate plots, unforgettable characters, and thought-provoking themes that challenge the boundaries of imagination.

Home Interests Webdev

How to Set Up a LAMP server in macOS

howchoo
howchoo   (467)
August 14, 2023
9 minutes

Share

Interests
Posted in these interests:
linux • 12 guides
macos • 20 guides
webdev • 10 guides

This guide will show you how to set up a LAMP environment in macOS and OS X.

1 – L is for Linux

To start off, it might be odd to call it a LAMP server on Mac OSX, but that’s what it’s called. OSX is actually built off of BSD, not Linux. Either way, the “L” refers to the operating system that will be running our web server.

2 – A is for Apache

Apache is a very popular web server software, and it’s already install on your Mac! It’s easy to configure and quick to get started with. On your Mac, you’ll need to get familiar with a command to manage your web server: apachectl. This command requires root to run so you’ll actually run it like this:

sudo apachectl 

The basic commands you’ll use are:

start

sudo apachectl start

stop

sudo apachectl stop

restart

sudo apachectl restart

3 – M is for MySQL

MySQL is a very popular open source database software. Unfortunately, MySQL does not come install on the Mac so you’ll have to install it. I recommend using homebrew (a great Mac package manager) to install it. First, install homebrew. To install go to Brew.sh and follow the instructions. Next use homebrew to install MySQL. Open the Terminal application – Applications > Utilities > Terminal and type:

brew install mysql

Now get familiar with some basic MySQL commands:

start

mysql.server start

restart

mysql.server restart

stop

mysql.server stop

4 – P is for PHP

PHP is already installed on your Mac! This is the programming language used to perform logical operations on user input, interact with the database, and build the response to send back to the user.

5 – Get familiar with the apache configuration

In order to get started no configuration changes are necessary, but you will benefit from learning about the apache configuration files. The primary configuration file you should find is httpd.confhttpd is the name of the apache daemon (don’t worry if you don’t know what a daemon is) so the configuration file is called httpd.conf and it’s usually found in /etc/apache2/httpd.conf. Another file you’ll wanted to find is httpd-vhosts.conf. This is the file where you can set up virtual hosts. A virtual host lets you setup multiple domain names for this web server. A basic vhost configuration lets you specify the hostname and the document root. Again, no changes are required to get started.

6 – The document root

The document root is where you put your application. On your Mac, the default document root is /Library/WebServer/Documents. If you don’t believe me, open up your httpd.conf file and search for DocumentRoot.

7 – Your first web page

Now that you’ve got the basics, we’ll build a basic web page. Use Finder (or Terminal) to navigate to your document root /Library/WebServer/Documents. Create a file called index.php and edit it. Keep in mind that you will have to use sudo to edit this file. One way to do this is to open Terminal and type:

sudo open -a TextEdit /Library/WebServer/Documents/index.php

Add the following to this file:


    My first web page


echo date("F jS, Y"); ?>

Apache will look in the document root for a file called index.html or index.php. So you may have to delete or rename any other files in this folder that start with index. Now, restart the web server.

sudo apachectl restart

And open your browser and go to:

http://localhost

Our web page is a little boring as it only prints the current date, but this is all we need to get started!

NEXT UP

How to Enable the “Popping” Sound When Adjusting the Volume on Your Mac

howchoo
howchoo   (467)
December 13, 2023

Starting with MacOS Sierra and High Sierra, your Mac will no longer play a “pop” sound when you adjust your volume. If you prefer to have this sound when you adjust volume up and down (as I do), this guide will teach you how to reenable it. 1 – Open Sound System Preferences Navigate to System

Continue Reading

howchoo

 467 guides

Introducing Howchoo, an enigmatic author whose unique pen name reflects their boundless curiosity and limitless creativity. Mysterious and multifaceted, Howchoo has emerged as a captivating storyteller, leaving readers mesmerized by the uncharted realms they craft with their words. With an insatiable appetite for knowledge and a love for exploration, Howchoo’s writing transcends conventional genres, blurring the lines between fantasy, science fiction, and the surreal. Their narratives are a kaleidoscope of ideas, weaving together intricate plots, unforgettable characters, and thought-provoking themes that challenge the boundaries of imagination.

Home Interests MacOS

How to Disable the Giant “Shake to Find” Cursor in MacOS

howchoo   (467)
August 14, 2023
3 minutes

Share

Interests
Posted in these interests:

Mac

mac • 24 guides
osx • 6 guides
macos • 20 guides

At this point, we could make a whole series here on Howchoo on removing distractions like the Creative Cloud icon or the start screen in Adobe Illustrator. We hate them that much! The giant cursor is another one.

By default, the cursor in macOS and OS X gets really big when you shake the mouse or when you move it too quickly. This feature allows you to find your cursor by shaking the mouse but mostly it’s just distracting.

This short guide will show you how to disable the giant cursor.

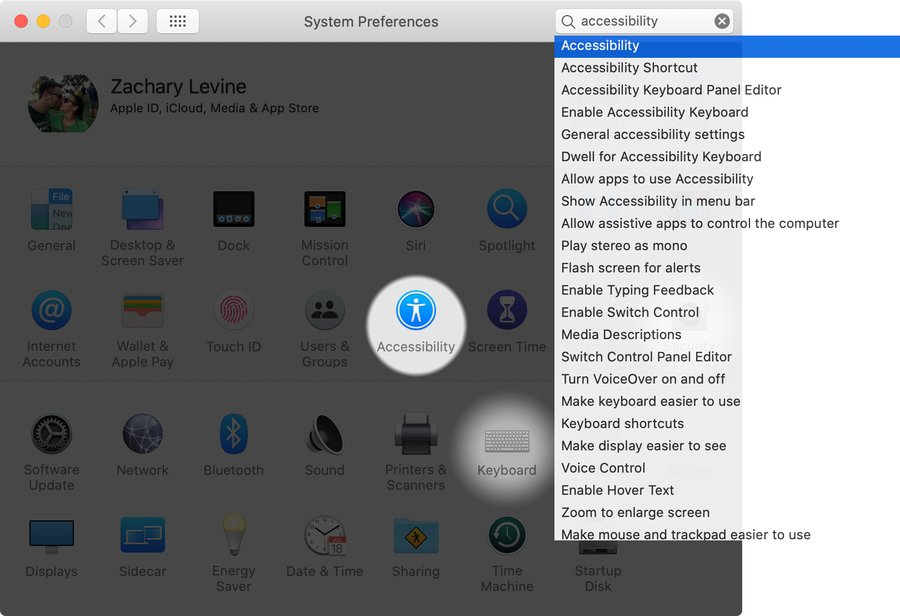
1 – Open Accessibility settings

Open System Preferences and click on Accessibility.

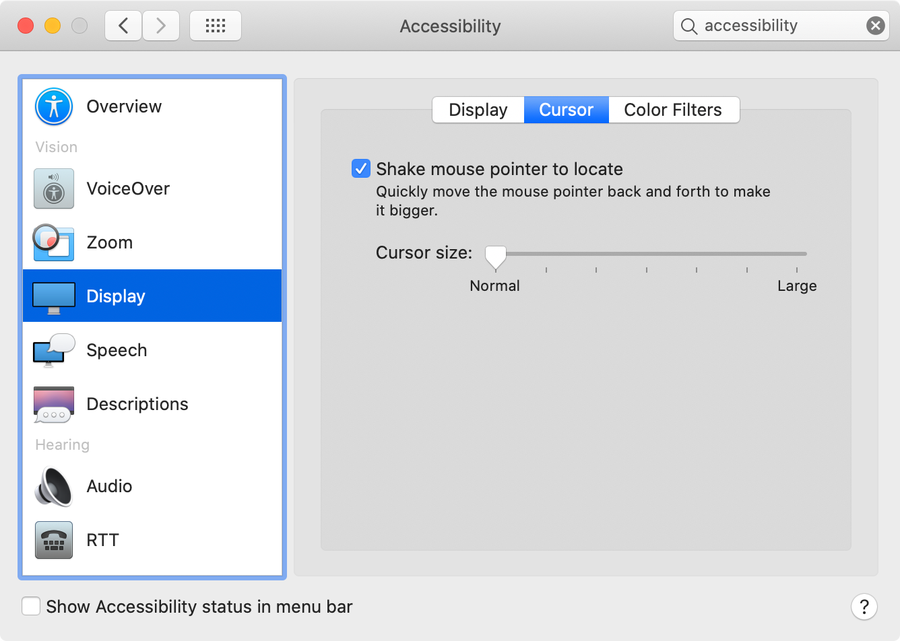
2 – Access Cursor settings

Select Display in the sidebar and then select the Cursor tab.

🛈 In older versions of macOS and OS X, there is no Cursor tab and you can continue to the next step.

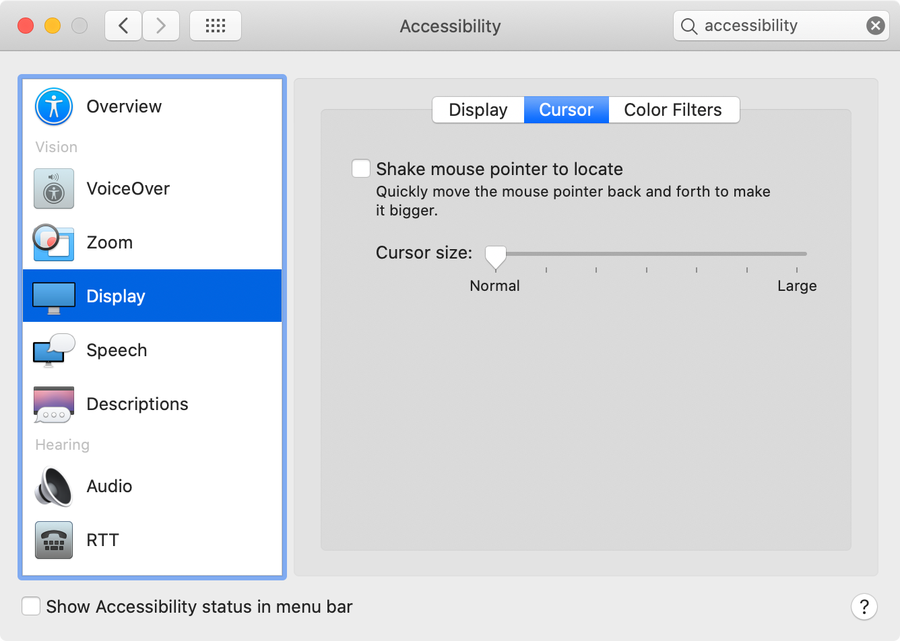
3 – Disable the giant cursor

Uncheck the Shake mouse pointer to locate checkbox to prevent the cursor from getting bigger when you shake your mouse.

NEXT UP

How to Enable the “Popping” Sound When Adjusting the Volume on Your Mac

howchoo
howchoo   (467)
December 13, 2023

Starting with MacOS Sierra and High Sierra, your Mac will no longer play a “pop” sound when you adjust your volume. If you prefer to have this sound when you adjust volume up and down (as I do), this guide will teach you how to reenable it. 1 – Open Sound System Preferences Navigate to System

Continue Reading

howchoo

 467 guides

Introducing Howchoo, an enigmatic author whose unique pen name reflects their boundless curiosity and limitless creativity. Mysterious and multifaceted, Howchoo has emerged as a captivating storyteller, leaving readers mesmerized by the uncharted realms they craft with their words. With an insatiable appetite for knowledge and a love for exploration, Howchoo’s writing transcends conventional genres, blurring the lines between fantasy, science fiction, and the surreal. Their narratives are a kaleidoscope of ideas, weaving together intricate plots, unforgettable characters, and thought-provoking themes that challenge the boundaries of imagination.

Home Interests Raspberry Pi

How to Rotate Raspberry Pi Screen or Display (and Touchscreen) Output

Screen upside down? No problem.
howchoo   (467)
August 14, 2023
7 minutes

Share

You’ll Need 1

What you’ll need
Interests
Howchoo is reader-supported. As an Amazon Associate, we may earn a small affiliate commission at no cost to you when you buy through our links.
Posted in these interests:
pi • 92 guides

So you’ve just finished setting up your Raspberry Pi touchscreen, and it’s upside-down. This guide will show you how to rotate or flip your Raspberry Pi’s display and touchscreen output between landscape and portrait modes. This is useful if you want to display your Raspberry Pi screen output in portrait mode or if your screen is upside down!

This guide will also show you how to flip your screen (as if you’re looking at it in a mirror), which is an odd request but might be necessary for some projects.

This should work for any display or touchscreen you might be using, including those on our list of the best touchscreens for the Raspberry Pi. If you need to know what resolution your Pi is outputting, check out this guide to look up your Raspberry Pi display resolution.

1 – Edit boot/config.txt

There are two methods for editing the boot/config.txt file required to change screen rotation:

SD card method

Put your Pi’s SD card in your computer and open the /boot/config.txt file in a plain-text editor such as Notepad or Sublime Text.

Connect remotely

From your computer, open Terminal (Mac) or Command Prompt (Windows) and connect to your Raspberry Pi via SSH.

How to Connect to a Raspberry Pi Remotely via SSH
The preferred (and most common) method of connecting to your Pi to run commands.

Then, run the following command to edit the file:

sudo nano /boot/config.txt

2 – Rotate the Raspberry Pi display

If you’re using a touchscreen, skip this step.

If you have a value for dtoverlay that contains the rotate=90 command, change that value to your desired rotation:

dtoverlay=pitft35-resistive,rotate=90,speed=20000000,fps=20

Note: The dtoverlay value likely won’t be the same as the lcd_rotate value. For example, the default “normal” screen rotation would be rotate=90lcd_rotate=0. Therefore, you may need to test multiple configurations.

If you have no dtoverlay “rotate” value, insert one of the following values instead:

display_rotate=0 # Normal (landscape)
display_rotate=1 # 90 degrees (portrait, upside down)
display_rotate=2 # 180 degrees (landscape)
display_rotate=3 # 270 degrees (portrait, upside down)
display_rotate=0x10000 # horizontal flip
display_rotate=0x20000 # vertical flip
🛈 If a value is already set for display_rotate (WITHOUT a # before it), you can edit that value instead.

3 – Rotate the Raspberry Pi touchscreen

If you’re using a touchscreen, you’ll also need to adjust touchscreen rotation. Otherwise, your taps will all be on the wrong part of the screen! This will adjust both display and touchscreen rotation.

Insert one of the following values at the end of the file:

lcd_rotate=0 # default (normal landscape)
lcd_rotate=1 # 90 degrees (portrait, upside down)
lcd_rotate=2 # 180 degrees (landscape)
lcd_rotate=3 # 270 degrees (portrait, upside down)

4 – Restart your Pi

Restart your Pi for things to take effect:

sudo reboot
NEXT UP

How to Run a Minecraft Server on the Raspberry Pi

A whole world trapped inside your Pi.
howchoo   (467)
December 7, 2023

There are several ways to go about running a Minecraft server on the Raspberry Pi. In this guide, I’ll cover how to install Nukkit—a cross-platform Minecraft server that’s super easy to set up on the Raspberry Pi. This server should work with PCs, consoles, and tablets running Minecraft 1.14. I’ll be using a Raspberry Pi

Continue Reading

howchoo

 467 guides

Introducing Howchoo, an enigmatic author whose unique pen name reflects their boundless curiosity and limitless creativity. Mysterious and multifaceted, Howchoo has emerged as a captivating storyteller, leaving readers mesmerized by the uncharted realms they craft with their words. With an insatiable appetite for knowledge and a love for exploration, Howchoo’s writing transcends conventional genres, blurring the lines between fantasy, science fiction, and the surreal. Their narratives are a kaleidoscope of ideas, weaving together intricate plots, unforgettable characters, and thought-provoking themes that challenge the boundaries of imagination.

Home Interests Illustrator

How to Embed Images in Illustrator

Storing image files in Illustrator projects.
howchoo   (467)
August 14, 2023
4 minutes

Share

You’ll Need 1

What you’ll need
Interests
Series
Howchoo is reader-supported. As an Amazon Associate, we may earn a small affiliate commission at no cost to you when you buy through our links.
Posted in these interests:
 
adobe • 7 guides
illustrator • 3 guides

Embedding an image in Illustrator will store a copy of the image file within the AI project. This will make the project size bigger, as it now accommodates the whole image rather than linking to it.

Any version of Illustrator will work, but I’ll be using Illustrator 2020 for this guide.

1 – Start a new project

Open the project you need to embed an image in, or start a new project in Illustrator.

You can import an image by dragging and dropping an image file on to the workspace or using the File > Open menu. Place the image inside the artboard.

How to Add and Use an Artboard in Illustrator
Everything you need to master artboards in Illustrator.

2 – Open the links window

To embed an image, we need to use the Links window. To access it, open the Window tab, and select Links.

3 – Select an image to embed

This window will show a list of images used in your Adobe Illustrator document. Select the image you want to embed by clicking on it in this list.

4 – Embed the image

There is a drop-down menu in the Links window that can be accessed in the upper right-hand corner. Open this menu and choose Embed Image(s). Congratulations! The image is now embedded.

5 – How to unembed an image

Select the embedded image in the Links Window. Open the drop-down menu and choose Unembed.

You may also be interested in our guide on how to disable the start screen in Illustrator.

NEXT UP

How to Resize an Image in InDesign

There are two options for resizing in InDesign: the easy way and the precise way.
howchoo   (467)
December 7, 2023

You might think that resizing an image would be as simple as dragging the corner of the frame. Well, it is, and it isn’t! Remember that when resizing an image in InDesign, you’re essentially resizing the image’s frame. For more information, on inserting an image in InDesign and frames, check our guide. How to Insert an Image

Continue Reading

howchoo

 467 guides

Introducing Howchoo, an enigmatic author whose unique pen name reflects their boundless curiosity and limitless creativity. Mysterious and multifaceted, Howchoo has emerged as a captivating storyteller, leaving readers mesmerized by the uncharted realms they craft with their words. With an insatiable appetite for knowledge and a love for exploration, Howchoo’s writing transcends conventional genres, blurring the lines between fantasy, science fiction, and the surreal. Their narratives are a kaleidoscope of ideas, weaving together intricate plots, unforgettable characters, and thought-provoking themes that challenge the boundaries of imagination.

Home Interests Raspberry Pi

How to Forget a Saved Wi-Fi Network on Your Raspberry Pi

Learn how to remove a saved wireless network in about a minute.
howchoo   (467)
August 14, 2023
6 minutes

Share

You’ll Need 1

What you’ll need
Interests
Howchoo is reader-supported. As an Amazon Associate, we may earn a small affiliate commission at no cost to you when you buy through our links.
Posted in these interests:
networking • 8 guides
pi • 92 guides

This short guide will show you how to delete, or “forget,” a saved wireless network from your Raspberry Pi. This is useful for changing networks or troubleshooting connectivity issues.

1 – Access the command line

Access the Raspberry Pi terminal using SSH or by connecting a keyboard, mouse, and monitor to your Pi.

How to Connect to a Raspberry Pi Remotely via SSH
The preferred (and most common) method of connecting to your Pi to run commands.

2 – Modify the existing wpa_supplicant config

Use the following command to access the full list of configured wireless networks:

/etc/wpa_supplicant/wpa_supplicant.conf

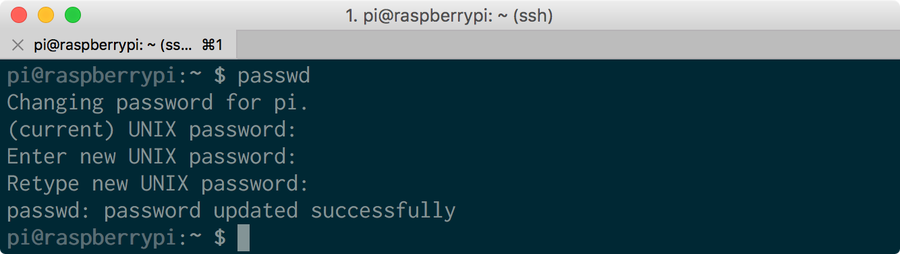
You’ll be prompted to enter your Raspberry Pi password—the default Raspberry Pi password is raspberrypi. If you haven’t already, I highly recommend you change your Raspberry Pi’s password after logging in by running the following command:

passwd

3 – Delete a wireless network

To forget a specific Pi wireless network, delete the corresponding network block, surrounded by opening and closing {} curly braces. For example, deleting the following will “forget” the serenity network:

network={
    ssid="serenity"
    psk="shepherdBookHasScaryHair$1"
    key_mgmt=WPA-PSK
}

If you want to forget a network but keep the configuration in place for later, you can uncomment the block instead by adding a # symbol to the beginning of each line. For example, uncommenting the following will “forget” the serenity network while keeping the details in the file for future use:

#network={
#    ssid="serenity"
#    psk="shepherdBookHasScaryHair$1"
#    key_mgmt=WPA-PSK
#}

When you’re done, save and exit by pressing CTRL-X, typing Y, and pressing enter.

A recommendation before deleting

Of course, if you’re connected to your Pi via the network you want to remove, you’ll be disconnected from the Pi as soon as your Pi forgets the network.

Therefore, I recommend adding a new network before deleting the other network—this makes it slightly easier to add your “new” network. If you need to, finding which network your Pi is connected to is easy.

How to Find the Current Raspberry Pi Wi-Fi Network Name (SSID)
Finding your Pi’s current network name is easy.

4 – Connect to a new network

Connecting to a new network is as simple as generating a new wpa_supplicant.conf file or by running the raspi-config utility.

NEXT UP

How to Run a Minecraft Server on the Raspberry Pi

A whole world trapped inside your Pi.
howchoo   (467)
December 7, 2023

There are several ways to go about running a Minecraft server on the Raspberry Pi. In this guide, I’ll cover how to install Nukkit—a cross-platform Minecraft server that’s super easy to set up on the Raspberry Pi. This server should work with PCs, consoles, and tablets running Minecraft 1.14. I’ll be using a Raspberry Pi

Continue Reading

howchoo

 467 guides

Introducing Howchoo, an enigmatic author whose unique pen name reflects their boundless curiosity and limitless creativity. Mysterious and multifaceted, Howchoo has emerged as a captivating storyteller, leaving readers mesmerized by the uncharted realms they craft with their words. With an insatiable appetite for knowledge and a love for exploration, Howchoo’s writing transcends conventional genres, blurring the lines between fantasy, science fiction, and the surreal. Their narratives are a kaleidoscope of ideas, weaving together intricate plots, unforgettable characters, and thought-provoking themes that challenge the boundaries of imagination.

Home Interests Anycubic

Anycubic Mega X: Cura Machine Settings and Cura Profile

Here’s how to add the new Anycubic Mega X to Cura.
howchoo   (467)
August 14, 2023
8 minutes

Share

You’ll Need 1

What you’ll need
Interests
Series
Howchoo is reader-supported. As an Amazon Associate, we may earn a small affiliate commission at no cost to you when you buy through our links.
Posted in these interests:
3dprinting • 36 guides
anycubic • 6 guides

The Anycubic Mega X is new enough that the machine doesn’t appear in Cura’s “Add a printer” interface. This short guide will show you how to add the Anycubic Mega X to Cura and set up the correct Anycubic Mega X Cura profile.

Anycubic Mega X Review (2023)
A budget 3D printer with a MASSIVE build volume.

1 – Add a placeholder printer

Open Cura and navigate to Preferences > Printers > Add and select Add a non-networked printer.

Then, select Anycubic > Anycubic i3 Mega. We’ll use this as the base for the Anycubic Mega X since it’s similar and then modify the profile from there.

Finally, change the printer name from “Anycubic i3 Mega” to “Anycubic Mega X” and click Add.

🛈 If you see “Anycubic Mega X” as a selectable option, it means Cura has been updated to include the Mega X natively. In this case, select it instead and proceed to the next step to double-check that the settings are correct.

2 – Edit the placeholder machine settings

In the preferences window, select Anycubic Mega X under Local printers and then click the Machine Settings button.

This will open the Machine Settings panel that we can customize for the Mega X.

3 – Set the Anycubic Mega X Cura Machine Settings

Make sure the following Anycubic Mega X Cura settings are selected:

Mega X Printer Settings

Printer Settings
Z (Width)300mm
Y (Depth)300mm
Z (Height)305mm
Build plate shapeRectangular
Origin at centerNo (unchecked)
Heated bedYes (checked)
G-code flavorMarlin

Mega X Printhead Settings

Printhead Settings
X min20mm
Y min10mm
X max10mm
Y max10mm
Gantry Height0
Number of Extruders1

Mega X Start G-code

G21 ;metric values
G90 ;absolute positioning
M82 ;set extruder to absolute mode
M107 ;start with the fan off
G28 X0 Y0 ;move X/Y to min endstops
G28 Z0 ;move Z to min endstops
G1 Z15.0 F{speed_travel} ;move the platform down 15mm
G92 E0 ;zero the extruded length
G1 F200 E3 ;extrude 3mm of feed stock
G92 E0 ;zero the extruded length again
G1 F{speed_travel}
M117 Printing...
G5

Mega X End G-code

M104 S0 ; turn off extruder
M140 S0 ; turn off bed
M84 ; disable motors
M107
G91 ;relative positioning
G1 E-1 F300 ;retract the filament a bit before lifting the nozzle, to release some of the pressure
G1 Z+0.5 E-5 ;X-20 Y-20 F{speed_travel} ;move Z up a bit and retract filament even more
G28 X0 ;Y0 ;move X/Y to min endstops, so the head is out of the way
G1 Y180 F2000
M84 ;steppers off
G90
M300 P300 S4000

When you’re finished, click Close to save.

4 – Optional: Change recommended print settings

Now that the machine itself is configured, you can optionally change a few print profile settings for the Mega X. The default print settings inherited from the i3 Mega should work great for the Mega X, except that I recommend updating a few values (below).

Download the Mega X Cura profile

You can find importable Cura profiles for PLA and TPU on the USB drive that came with your printer, or mirrored on our GitHub repo. Download those profiles and import them in Preferences > Profiles.

Or, manual setup

Navigate to Preferences > Profiles > Normal, click Duplicate, and give it a name such as “Mega X Profile” or “Mega X Normal Profile”. I generally use a single profile and update quality from there, but that’s up to you.

Close the settings panel. In the normal “Print settings” Cura panel, change the following settings:

Print Settings
Infill Density20%
Infill PatternGrid
Print Speed50mm/s
Outer Wall Speed30mm/s
Travel Speed120mm/s
Z Hop When RetractedYes (checked)

When you’re done, reopen the profile in Preferences > Profiles and click Update profile with current settings/overrides.

NEXT UP

How to Update Blender

Get the latest Blender has to offer.
howchoo   (467)
November 24, 2023

Blender is one of the most popular open-source 3D creation suites today. It doesn’t cost a dime to use and everything you create is yours to own for good. The community is robust and the dev team still releases new updates on the regular. If you want to get the latest version, you may have

Continue Reading

howchoo

 467 guides

Introducing Howchoo, an enigmatic author whose unique pen name reflects their boundless curiosity and limitless creativity. Mysterious and multifaceted, Howchoo has emerged as a captivating storyteller, leaving readers mesmerized by the uncharted realms they craft with their words. With an insatiable appetite for knowledge and a love for exploration, Howchoo’s writing transcends conventional genres, blurring the lines between fantasy, science fiction, and the surreal. Their narratives are a kaleidoscope of ideas, weaving together intricate plots, unforgettable characters, and thought-provoking themes that challenge the boundaries of imagination.

Home Interests Router

How to Reset a Charter Spectrum Router or Modem

howchoo
howchoo   (467)
August 14, 2023
5 minutes

Share

You’ll Need 1

What you’ll need
Interests
Series
Howchoo is reader-supported. As an Amazon Associate, we may earn a small affiliate commission at no cost to you when you buy through our links.
Posted in these interests:
internet • 36 guides
router • 32 guides

If you’re having trouble with your Spectrum internet connection, it may be necessary to reset the router/modem combination or gateway to factory defaults. We’ll also show you how to reset a standalone Spectrum modem used with a separate router.

This is one of the most useful troubleshooting steps and definitely one of the first things you should try before contacting tech support.

1 – Reset gateway (modem/router combination)

If you have a modem/router combination device, also known as a gateway, you can easily reset it.

  1. Disconnect the modem from power. Unplug the power cords and remove any batteries from the device.
  2. Leave the gateway alone for at least 30 seconds.
  3. Reinsert the batteries and reconnect the power cord.
  4. Leave the device alone for at least 2 minutes. The lights will be solid for this step instead of blinking.
  5. Verify your network connection. You should be able to reach the internet.

If this doesn’t work, attempt to locate a small recessed button on the back of your modem. If this reset button exists, depress it with a pen for 30 seconds until the router reboots itself.

2 – Reset modem with a separate router

If you use two devices—a modem and router—you will need to follow this process to reset them both.

  1. Disconnect the modem from power by unplugging the power cord and taking out any batteries.
  2. Disconnect the power cord from the router.
  3. Leave both devices alone for at least 30 seconds.
  4. Plug the power cord back into the modem and put any removed batteries back in place.
  5. Leave the modem alone for 2 minutes, at a minimum. The lights on the modem will be solid instead of blinking.
  6. Plug the power cord back into the router.
  7. Leave the router alone for about 2 minutes while it comes back online.
  8. Verify your network connection. You should be able to reach the internet.

3 – More help

It’s possible that resetting the devices won’t resolve your issue. It may be necessary to factory reset the devices. For further assistance, Charter Spectrum recommends contacting their support team or using their Internet Troubleshooting Tool.

NEXT UP

How to Change Your Frontier WiFi Password

howchoo
howchoo   (467)
November 25, 2023

There are a few reasons you might want to update or reset your WiFi password: making your network more secure, and making your password easier to remember and type. Improved network security You can add an extra layer of security to your network by changing the WiFi password. As long as your new password is

Continue Reading

howchoo

 467 guides

Introducing Howchoo, an enigmatic author whose unique pen name reflects their boundless curiosity and limitless creativity. Mysterious and multifaceted, Howchoo has emerged as a captivating storyteller, leaving readers mesmerized by the uncharted realms they craft with their words. With an insatiable appetite for knowledge and a love for exploration, Howchoo’s writing transcends conventional genres, blurring the lines between fantasy, science fiction, and the surreal. Their narratives are a kaleidoscope of ideas, weaving together intricate plots, unforgettable characters, and thought-provoking themes that challenge the boundaries of imagination.

Home Interests Raspberry Pi

Install or Recover Your Raspberry Pi 4 Bootloader

howchoo
howchoo   (467)
August 14, 2023
6 minutes

Share

You’ll Need 2

What you’ll need
Interests
Howchoo is reader-supported. As an Amazon Associate, we may earn a small affiliate commission at no cost to you when you buy through our links.
Posted in these interests:
pi • 92 guides

In this guide we’ll learn how to install a new bootloader on the Raspberry Pi 4. In most cases, the only reason you’d want to do this is if you’re having trouble booting your Pi. But there are some cases where, like I ran into recently, you want to load a custom bootloader.

In either case, this guide will show you how to load a new bootloader onto your Raspberry Pi 4.

What is a bootloader?

A bootloader is a program that loads the operating system. On the Raspberry Pi, the bootloader is stored on an EEPROM (basically just memory that persists even when the the device is powered off). Sometimes, for various reasons, that EEPROM can become corrupt, and needs to be reprogrammed.

1 – Check if your bootloader is working correctly

If you’re unable to boot the Pi, let’s check to see if your bootloader is working correctly before going through the steps to fix it. First, turn off the power, and unplug everything from the Pi, including the SD card. Then turn the power back on.

If the green LED is blinking in a repeating pattern then the bootloader is running properly, otherwise you’ve got an issue and the bootloader needs to be reinstalled.

2 – Download the bootloader

Go to the Raspberry Pi downloads page, and download the bootloader.

3 – Format a second Micro SD card

Format a second SD card using FAT (can be FAT16 or FAT32).

We’ll need to keep the operating system on the original SD card, that is, unless you want to scrap it and start over. If that’s the case, you can use a single SD card. Then follow our guide to install Raspberry Pi OS again when this process is complete.

How to Install Raspberry Pi OS on Your Raspberry Pi
Get the new official Raspberry Pi OS on your Pi.


4 – Extract the bootloader onto the Micro SD card

Since we downloaded a zip file containing the bootloader, we’ll need to extract it. You can typically do this by double-clicking on the file, and then dragging the contents onto the SD card, using a program like Finder or File Explorer.

If you’re comfortable with the CLI you can do something like this:

cd ~/Downloads
unzip rpi-boot-eeprom-recovery-2019-05-10.zip -d /Volumes/boot/

5 – Insert the Micro SD card into the Pi and power it back on

Now you can put the SD card back into the Pi, and turn the power back on. Wait at least 10 seconds. If the process is successful, you’ll see the green LED blink rapidly (forever). If you don’t see this blinking pattern, it failed, and you’ll need to repeat the process.

6 – Insert the original Micro SD card and boot the OS

Now you should be able to insert the original SD card and boot the operating system!

NEXT UP

How to Run a Minecraft Server on the Raspberry Pi

A whole world trapped inside your Pi.
howchoo   (467)
December 7, 2023

There are several ways to go about running a Minecraft server on the Raspberry Pi. In this guide, I’ll cover how to install Nukkit—a cross-platform Minecraft server that’s super easy to set up on the Raspberry Pi. This server should work with PCs, consoles, and tablets running Minecraft 1.14. I’ll be using a Raspberry Pi

Continue Reading

howchoo

 467 guides

Introducing Howchoo, an enigmatic author whose unique pen name reflects their boundless curiosity and limitless creativity. Mysterious and multifaceted, Howchoo has emerged as a captivating storyteller, leaving readers mesmerized by the uncharted realms they craft with their words. With an insatiable appetite for knowledge and a love for exploration, Howchoo’s writing transcends conventional genres, blurring the lines between fantasy, science fiction, and the surreal. Their narratives are a kaleidoscope of ideas, weaving together intricate plots, unforgettable characters, and thought-provoking themes that challenge the boundaries of imagination.

Home Interests MacOS

How to partition a hard drive on macOS

One hard drive—many partitions.
howchoo   (467)
August 14, 2023
5 minutes

Share

Interests
Posted in these interests:
 
apple • 18 guides
macos • 20 guides

Today we’re covering the easiest way to partition a hard drive on macOS. These steps will work on both internal hard drives and external devices like USB drives. Partitioning is useful for things like virtual machines or dual boot rigs. But it can also be a useful troubleshooting tool.

Partitioning involves splitting a hard drive into individually usable chunks. The capacity of the hard drive is split between the partitions, not shared. So a 100GB hard drive can make two 50GB partitions. But the split doesn’t have to be even. You can specify any amount you need. One partition can be 22Gb while the other is 78GB.

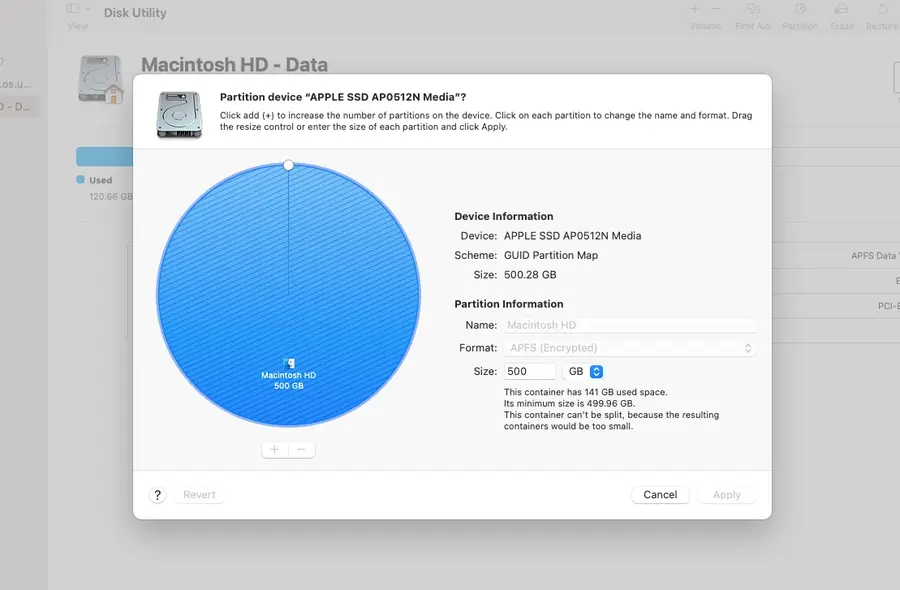
1 – Partition a hard drive using Disk Utility

Navigate to Applications > Utilities > Disk Utility. Or search for Disk Utility in Mac’s Spotlight Search.

When Disk Utility is open, select the hard drive you want to break into a partition on the left side of the window.

  • Click Partition from the top menu bar.
  • Select Add Volume to create a new partition.
  • Choose a size and name for your new partition.
  • Click Apply.

It may take a few minutes for the process to complete.

2 – Partition a hard drive using Terminal

Navigate to Applications > Utilities > Terminal.

Use the diskutil list command to see a list of drives connected to your computer. Take note of the disk name on the drive you want to partition.

This is the command to create a single partition:

diskutil partitionDisk /dev/disk2 GPT JHFS+ NewPartition 0b

Replace /dev/disk2 with the name of your hard drive. Replace JHFS+ with the formatting of your choice. Changing NewPartition will change the name of your new partition. Lastly, 0b represents the size of the new partition. Adjust this to create a specific partition size.

Here’s an example showing the creation of multiple 10GB partitions:

diskutil partitionDisk /dev/disk2 GPT JHFS+ Partition1 10g JHFS+ Partition2 10g

It may take a few minutes for the partition to be created. Congratulations! You’ve successfully split your hard drive.

NEXT UP

How to Enable the “Popping” Sound When Adjusting the Volume on Your Mac

howchoo
howchoo   (467)
December 13, 2023

Starting with MacOS Sierra and High Sierra, your Mac will no longer play a “pop” sound when you adjust your volume. If you prefer to have this sound when you adjust volume up and down (as I do), this guide will teach you how to reenable it. 1 – Open Sound System Preferences Navigate to System

Continue Reading

howchoo

 467 guides

Introducing Howchoo, an enigmatic author whose unique pen name reflects their boundless curiosity and limitless creativity. Mysterious and multifaceted, Howchoo has emerged as a captivating storyteller, leaving readers mesmerized by the uncharted realms they craft with their words. With an insatiable appetite for knowledge and a love for exploration, Howchoo’s writing transcends conventional genres, blurring the lines between fantasy, science fiction, and the surreal. Their narratives are a kaleidoscope of ideas, weaving together intricate plots, unforgettable characters, and thought-provoking themes that challenge the boundaries of imagination.