Home Interests Raspberry Pi

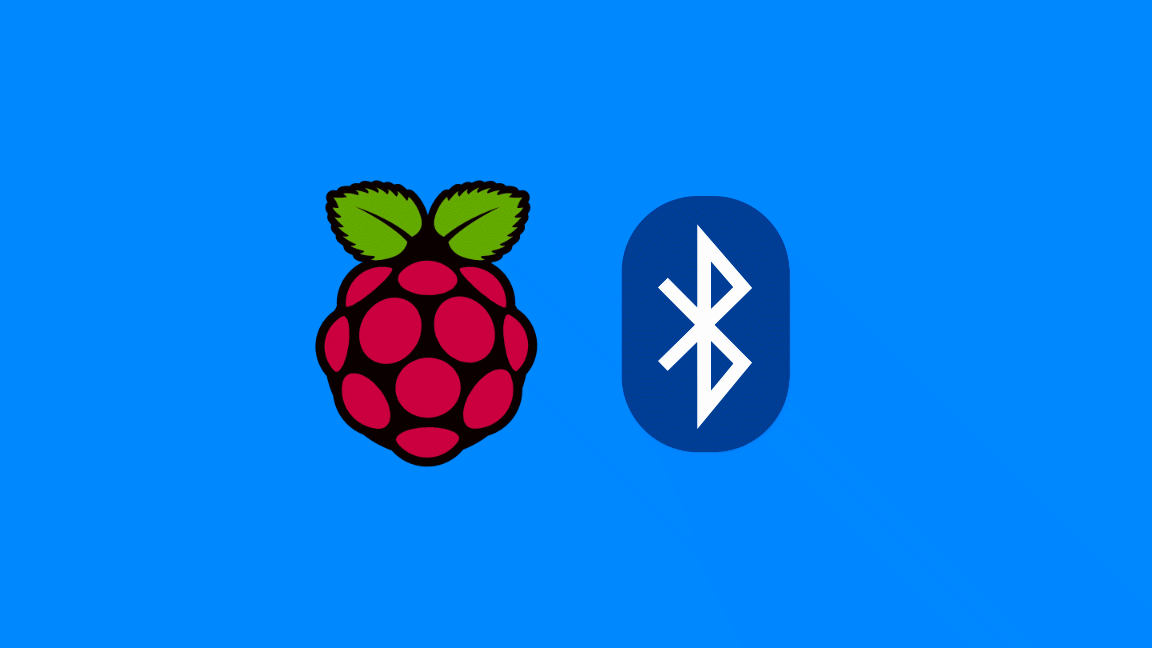
How to Set Up Bluetooth on a Raspberry Pi

The only Raspberry Pi Bluetooth guide you’ll ever need.
howchoo   (467)
September 19, 2023
19 minutes

Share

You’ll Need 1

What you’ll need
Interests
Series
Howchoo is reader-supported. As an Amazon Associate, we may earn a small affiliate commission at no cost to you when you buy through our links.
Posted in these interests:
pi • 92 guides

The Raspberry Pi single-board computer has had built-in Bluetooth connectivity since the release of the Raspberry Pi 3 in 2016, allowing you to connect wireless peripherals such as keyboards, game controllers, headsets, and more to your device.

If you don’t have a model of Raspberry Pi that has Bluetooth built-in, you can use a third-party USB adapter to add support. You may need to install additional software packages to do this, depending on the adapter you use.

If you’re using using Raspberry Pi OS (previously Raspbian), then Bluetooth should be enabled by default, but you’ll need to follow these additional steps to connect and set up your devices.

These instructions will work for Raspberry Pi OS users, including Raspberry Pi OS Lite, which lacks a graphical desktop environment by default.

1 – Installing the Bluetooth manager tool (desktop environment required)

The “full” version of Raspberry Pi OS has a basic Bluetooth settings menu that allows you to enable or disable the service and connect to nearby Bluetooth devices. This is available from the taskbar at the top of your screen.

It’s quite a basic tool, however, and doesn’t allow you to easily control certain types of Bluetooth devices like game controllers or wireless speakers. You can overcome these issues by installing an additional set of packages to manage your Bluetooth settings.

While the additional Bluetooth software packages you’ll install here can be useful for Raspberry Pi OS Lite users, you won’t be able to use the Blueman Bluetooth Manager tool itself, as Lite users don’t have a desktop environment installed. You’ll need to skip to the next section and follow the instructions for setting up Bluetooth using the terminal instead if this is the case.

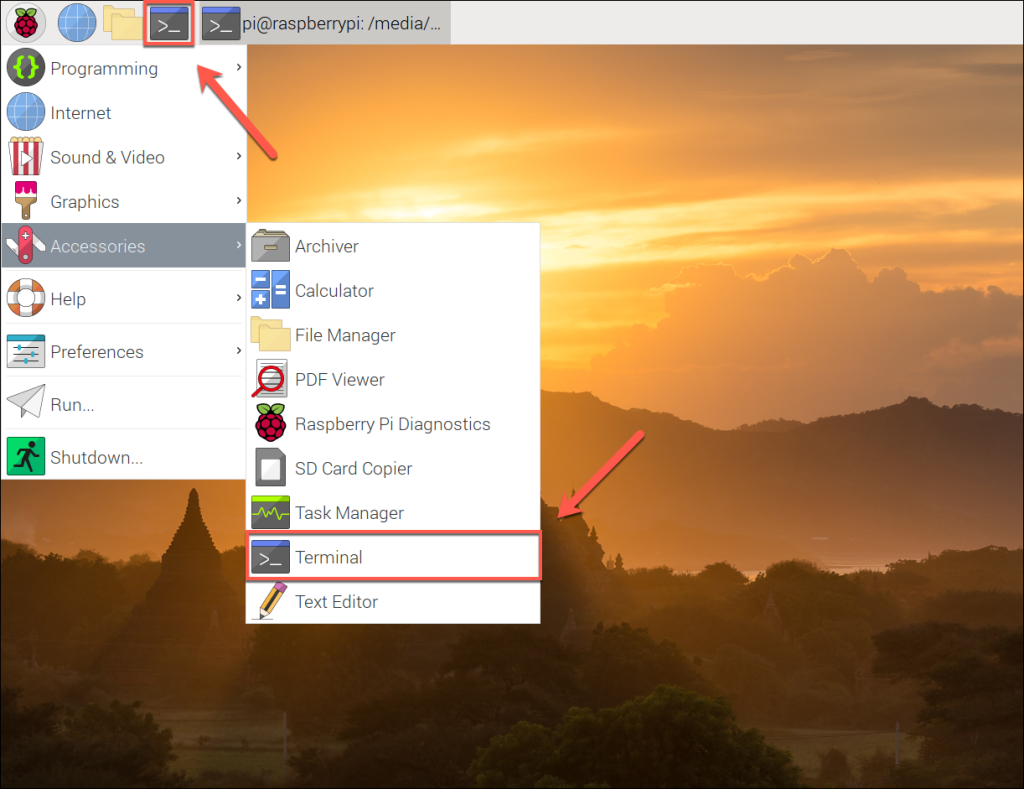
  1. To start, open a terminal window by clicking the Terminal icon on your menubar (or press the Raspberry Pi menu > Accessories > Terminal).
  2. In the open terminal window, type sudo apt update && sudo apt upgrade to check for new software packages and device firmware updates.
  3. Once this process has completed, type sudo apt install bluetooth pi-bluetooth bluez blueman to install the necessary additional packages.

2 – Using the Blueman Bluetooth Manager tool (desktop environment required)

Once the required Bluetooth software packages have finished installing, restart your Raspberry Pi. Upon rebooting, you should see a second Bluetooth icon with a blue circular background in the top-right corner of your menu bar.

From here, you can begin to control your Bluetooth connectivity and connect with other nearby devices.

  1. To begin controlling your Bluetooth settings, click this Bluetooth icon on the menu bar. If Bluetooth isn’t already active, click Turn Bluetooth On in the drop-down menu to switch it on.
  2. Once Bluetooth is active, click the Make Discoverable option. This will allow other Bluetooth-capable devices to find your Raspberry Pi, allowing them to connect.
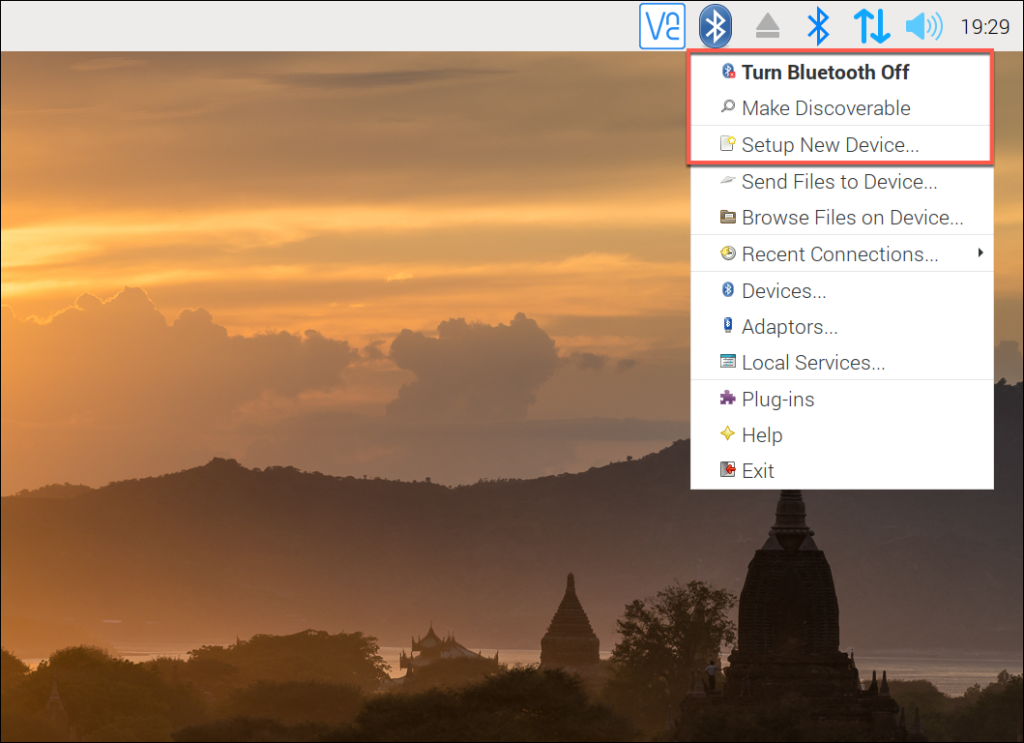
  1. With Bluetooth enabled, click the Setup New Device option.
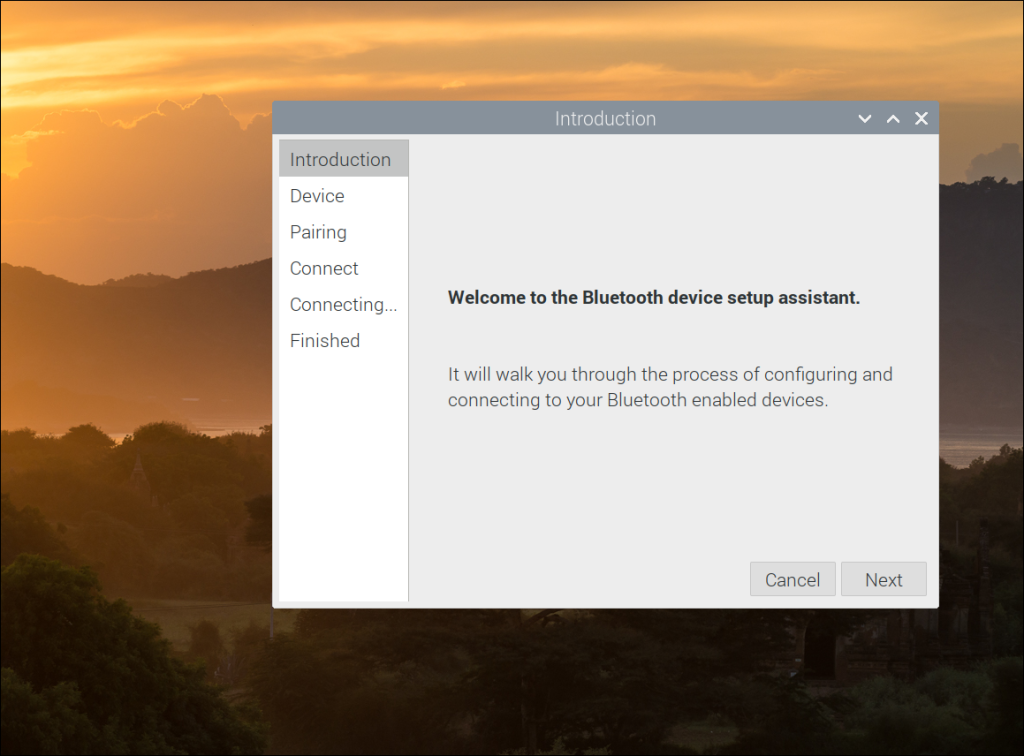
  2. This will launch the Bluetooth device setup assistant, which will help you to connect with and pair a Bluetooth device. Press Next to begin.
  1. A list of visible local Bluetooth devices will appear at the next stage. Click the search icon in the bottom-left to scan for any additional devices.
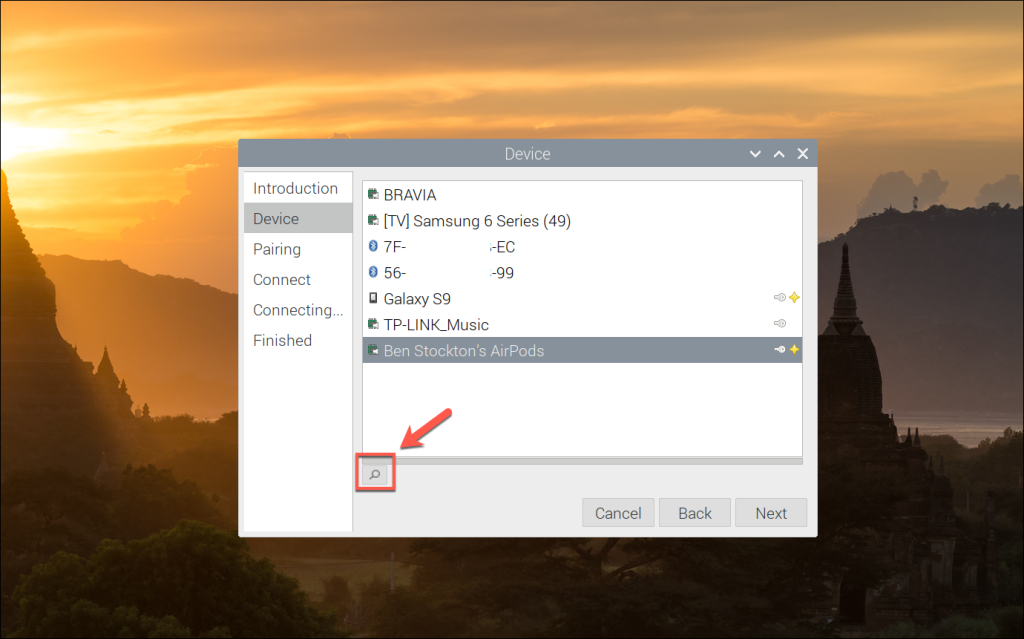
  1. Once your Bluetooth device appears, select it, then click Next.
  2. Select the Pair Device option to begin pairing your Bluetooth device, then click Next to proceed.
  3. If required, click Confirm to authorize the device pairing. You may need to follow similar steps on your Bluetooth device.
  4. A list of available connection methods will appear at the next stage. Select the appropriate option (for instance, Handsfree to use your Bluetooth device as a handsfree headset for your Pi), then click Next.
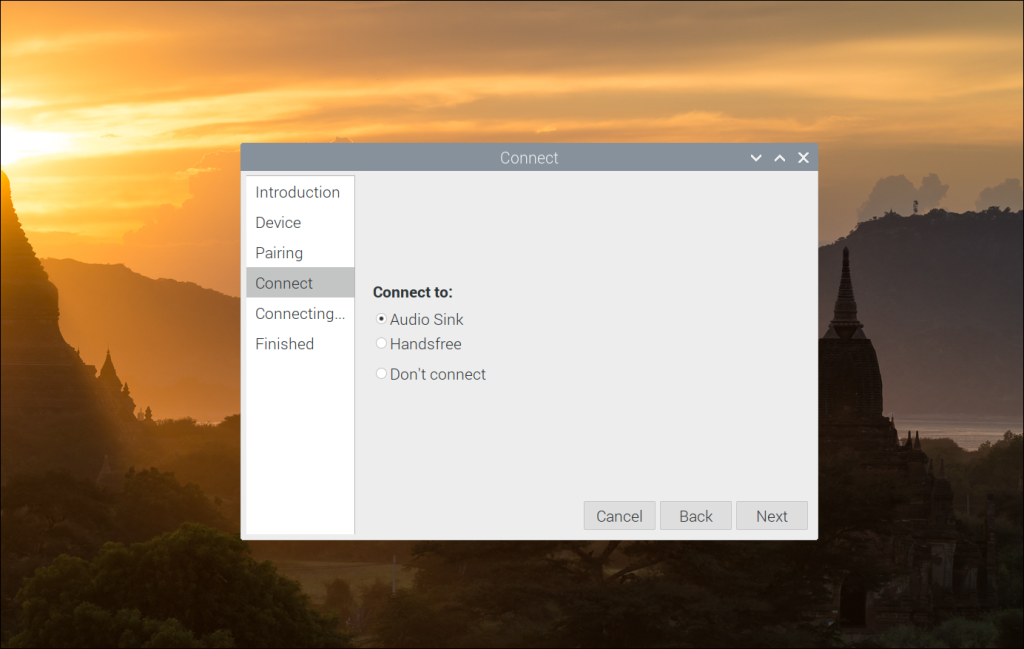
  1. This should complete the pairing and connection process. If it doesn’t, click Close and repeat the steps above.
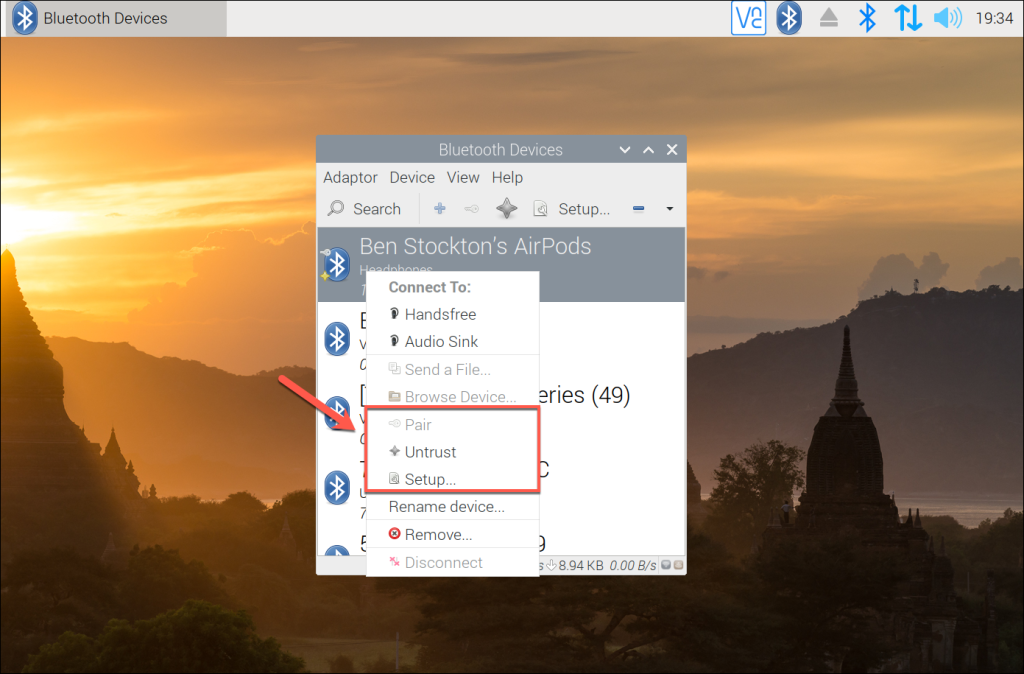
  2. Once the pairing process has completed successfully, you’ll be able to view the device (and available services) by clicking the Bluetooth menu icon and selecting the Devices option. From here, you’ll be able to view a list of local Bluetooth devices, as well as devices you’ve paired with — press the Search button to run a new scan for additional devices.
  3. You can connect to any of these devices manually by right-clicking a device and clicking Pair or Setup to begin the setup process. You can unpair any Bluetooth device by clicking Unpair instead, or Untrust to remove it from your trusted device list.

If your Bluetooth device successfully pairs with your Raspberry Pi, you should be able to control and use it as intended. Additional configuration may be required to use or configure your device, depending on the type of device you’re using.

3 – Setting up Bluetooth using a terminal or SSH connection

If you don’t have a graphical desktop environment installed (for instance, if you’re using Raspberry Pi OS Lite) or if you want to set up Bluetooth remotely over SSH, you can use commands from the terminal to set up your Bluetooth connections.

How to Connect to a Raspberry Pi Remotely via SSH
The preferred (and most common) method of connecting to your Pi to run commands.

You can also follow these instructions if you prefer to use the terminal from the Raspberry Pi desktop environment, or if you’re unable to connect using the Bluetooth Manager tool.

  1. To start, open a terminal window by clicking the Raspberry Pi menu icon. From there, click Accessories > Terminal to open a new terminal window. If you’re connecting remotely using SSH, connect to your Raspberry Pi using your Pi’s username and password.
  2. As the default Bluetooth packages are quite basic, you’ll need to install the additional Bluetooth management tools. Type sudo apt update && sudo apt upgrade to update your Raspberry Pi first. Once this process is complete, type sudo apt install bluetooth pi-bluetooth bluez to install the necessary additional packages.
  1. Once these packages have installed, reboot your Raspberry Pi by typing sudo reboot. You’ll need to re-establish your SSH connection if you’re connecting remotely.
  2. With a terminal window (or remote SSH connection) open, type sudo bluetoothctl. You may need to type your username and password again to confirm this. This will launch the Bluetooth terminal configuration tool.
  3. Type scan on to begin searching for local devices. A list of visible devices will appear, with Bluetooth MAC addresses (the device’s hardware ID) and device names.
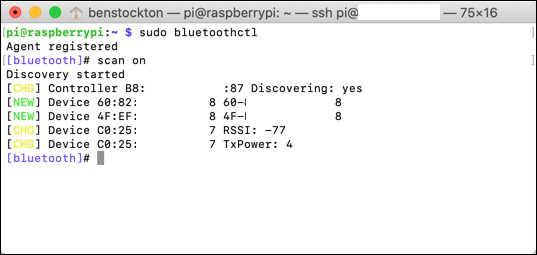
  1. To connect to one of these devices, you’ll need the Bluetooth MAC address for your device. If you see your device in the list, type pair XX:XX:XX:XX:XX:XX, replacing this string with your device’s Bluetooth MAC address.
  2. This will begin the pairing process — you may need to confirm this on your device. If instructed, type yes to confirm the Bluetooth passkey is correct.
  3. If the pairing process is complete, the terminal message will change to reflect the device name, and you may see a pairing successful message.
  1. Once the pairing process has completed, type connect XX:XX:XX:XX:XX:XX (using your Bluetooth device’s MAC address) to connect to it. If the connection is complete, a connection successful message (along with other log messages) will appear in the terminal.
  2. If you want to use this device regularly, type
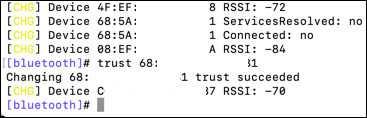
 trust XX:XX:XX:XX:XX:XX to place the device in your Bluetooth trusted devices list. This will save you time, meaning you won’t need to pair it again in the future. If this is successful, a trust succeeded message will appear in the terminal.
  1. Type exit to close the bluetoothctl tool once you’re done.

As with the GUI Bluetooth Manager tool, you may need to follow additional steps to configure and use your device further, depending on the device itself.

4 – Using Bluetooth on your Raspberry Pi

You should (at this point) be able to use your Bluetooth device with your Raspberry Pi. Your Bluetooth devices should be paired, connected, and available for you to use, however you like.

Thanks to the Bluetooth Manager and Bluetooth tools, it’s easy to connect and use multiple Bluetooth devices on your Raspberry Pi. If you’re using an older Pi without built-in Bluetooth, many third-party USB adapters should be supported out of the box, allowing you to connect Bluetooth peripherals with little additional setup required.

There are plenty of Raspberry Pi projects that you can tweak to make full use of Bluetooth connectivity – from wireless speakers to a Raspberry Pi-powered Amazon Echo Furby, where a Bluetooth microphone could be used over a wired alternative. To take it one step further, you can also set up a Raspberry Pi Chromecast!

NEXT UP

How to Run a Minecraft Server on the Raspberry Pi

A whole world trapped inside your Pi.
howchoo   (467)
December 7, 2023

There are several ways to go about running a Minecraft server on the Raspberry Pi. In this guide, I’ll cover how to install Nukkit—a cross-platform Minecraft server that’s super easy to set up on the Raspberry Pi. This server should work with PCs, consoles, and tablets running Minecraft 1.14. I’ll be using a Raspberry Pi

Continue Reading

howchoo

 467 guides

Introducing Howchoo, an enigmatic author whose unique pen name reflects their boundless curiosity and limitless creativity. Mysterious and multifaceted, Howchoo has emerged as a captivating storyteller, leaving readers mesmerized by the uncharted realms they craft with their words. With an insatiable appetite for knowledge and a love for exploration, Howchoo’s writing transcends conventional genres, blurring the lines between fantasy, science fiction, and the surreal. Their narratives are a kaleidoscope of ideas, weaving together intricate plots, unforgettable characters, and thought-provoking themes that challenge the boundaries of imagination.

Home Interests Raspberry Pi

How to run Windows on the Raspberry Pi

Your favorite MS OS on the Pi.
howchoo   (467)
September 19, 2023
5 minutes

Share

Interests
Posted in these interests:

PC

pc • 3 guides
pi • 92 guides
 
windows • 6 guides

Want to run Windows on the Raspberry Pi? Maybe you want to emulate the Raspberry Pi on Windows. Either way, there is a relationship between Windows and the Raspberry Pi.

Can you run Windows on the Raspberry Pi?

In short, yes. It’s possible to both install a native Windows image for the Pi and emulate older editions of Windows.

1 – Windows for the Raspberry Pi

If you want to run an official Windows image on the Raspberry Pi, you’ll need Windows 10 IoT Edition. This special edition is designed for basic IoT functions, it is not a complete Windows 10 interface.

You can find instructions on the Microsoft website for installing Windows 10 IoT Edition on a Raspberry Pi.

2 – Linux skins that resemble Windows

Boomerang Theming

At the end of the day, you’ll be hard-pressed to run a full Windows operating system on the Raspberry Pi. If you’re mainly after the look and feel of Windows, you can look for a Windows themed Linux skin.

For example, this project on Gnome Look mimics the look and feel of Windows 10.

3 – Emulators that run Windows software

If you want to run specific Windows software on the Pi but don’t care about the Windows GUI, you can try using software like Wine for compatibility. This application is designed to help run Windows applications in a Linux environment, like Raspberry Pi OS.

How to Install Raspberry Pi OS on Your Raspberry Pi
Get the new official Raspberry Pi OS on your Pi.

4 – Virtual machines

You can emulate older Windows editions on the Raspberry Pi with the help of a virtual machine, like QEMU. Versions like Windows 98 don’t require much power in the way of hardware, making the Raspberry Pi a feasible platform.

5 – Emulate the Raspberry Pi on Windows

When most people talk about emulating the Raspberry Pi, they’re referring to Raspberry Pi OS. If you’ve got a Windows machine, you can emulate Raspberry Pi OS with the help of software like VirtualBox. You can use the Raspberry Pi Desktop image when setting up the virtual machine.

If you found this guide useful, check out our guide on how to install Android on a Raspberry Pi and how to install OpenCV.

How to Install Android on Raspberry Pi
Run your favorite Android apps on the Pi!

NEXT UP

How to Run a Minecraft Server on the Raspberry Pi

A whole world trapped inside your Pi.
howchoo   (467)
December 7, 2023

There are several ways to go about running a Minecraft server on the Raspberry Pi. In this guide, I’ll cover how to install Nukkit—a cross-platform Minecraft server that’s super easy to set up on the Raspberry Pi. This server should work with PCs, consoles, and tablets running Minecraft 1.14. I’ll be using a Raspberry Pi

Continue Reading

howchoo

 467 guides

Introducing Howchoo, an enigmatic author whose unique pen name reflects their boundless curiosity and limitless creativity. Mysterious and multifaceted, Howchoo has emerged as a captivating storyteller, leaving readers mesmerized by the uncharted realms they craft with their words. With an insatiable appetite for knowledge and a love for exploration, Howchoo’s writing transcends conventional genres, blurring the lines between fantasy, science fiction, and the surreal. Their narratives are a kaleidoscope of ideas, weaving together intricate plots, unforgettable characters, and thought-provoking themes that challenge the boundaries of imagination.

Home Interests Kubernetes

Install Prometheus and Grafana in your Kubernetes cluster

howchoo   (467)
September 19, 2023
6 minutes

Share

Interests
Posted in these interests:
devops • 3 guides
kubernetes • 6 guides

What is Prometheus?

Prometheus is an open source systems monitoring toolkit originally developed by SoundCloud. Prometheus is now a part of the Cloud Native Computing Foundation and is managed independently of SoundCloud. Prometheus is the monitoring toolkit of choice for many Kubernetes users.

What is Grafana?

Grafana is an open source platform for visualizing time series data. It is often used as a front-end for Prometheus (and many other data sources).

What is Prometheus Operator?

Prometheus Operator is a set of resource definitions provided to create, configure, and manage Prometheus in a Kubernetes cluster.

As you can see, Prometheus and Grafana are a great, open source, set of tools for monitoring your Kubernetes cluster. In this guide, I’ll show you how to install prometheus-operator using helm, and start monitoring your cluster in just a few minutes.

1 – Install using helm

We’ll be installing prometheus-operator using this helm chart. According to the chart description, the default installation is sufficient for monitoring whichever cluster its deployed into.

However, if desired, there are plenty of values that can be configured. But for this guide, we’re going to install prometheus-operator with the default configuration.

Upgrade helm, if necessary

This may not be required, but I’m going to put it here just in case. You may need to upgrade helm before installing.

helm init --upgrade

Install the prometheus-operator chart

helm install stable/prometheus-operator --namespace monitoring --name prometheus

In the command above, I’ve run the basic helm install command but also specified the name and the namespace. Otherwise, you’ll get a random release name (something like old-camel or simple-cactus), and it will be installed in the default namespace.

You might be disappointed to hear, but that’s it! You’ve installed Prometheus and Grafana in your k8s cluster. In subsequent steps, I’ll provide a few more tips on getting logged in and set up.

2 – Logging in to Grafana

Get the password

To log in to the Grafana dashboard, you need to grab the admin password:

kubectl get secret --namespace monitoring prometheus-grafana -o jsonpath="{.data.admin-password}" | base64 --decode ; echo

Forward port 80

This chart creates a grafana service running on port 80. I’m going to use this service to forward port 3000 on our local machine to one of the grafana pods.

k port-forward -n monitoring service/prometheus-grafana 3000:80

Log in at localhost:3000

Open a browser, and navigate to http://localhost:3000. There you can log in using:

UsernamePassword
admin(the password you retrieved in the first part of this step)

Did you know Kubernetes is compatible with Superset? Check out this guide to install Apache Superset on a GKE Kubernetes Cluster.

NEXT UP

Secure Your Sensitive Data with Kubernetes Secrets

Learn how to create and use Kubernetes secrets.
howchoo   (467)
November 26, 2023

Kubernetes secrets are objects that store and manage sensitive data inside your Kubernetes cluster. One mistake developers often make is storing sensitive information like database passwords, API credentials, etc in a settings file in their codebase. This is very bad practice (hopefully for obvious reasons). Most developers know this, but still choose the option because it’s easy.

Continue Reading

howchoo

 467 guides

Introducing Howchoo, an enigmatic author whose unique pen name reflects their boundless curiosity and limitless creativity. Mysterious and multifaceted, Howchoo has emerged as a captivating storyteller, leaving readers mesmerized by the uncharted realms they craft with their words. With an insatiable appetite for knowledge and a love for exploration, Howchoo’s writing transcends conventional genres, blurring the lines between fantasy, science fiction, and the surreal. Their narratives are a kaleidoscope of ideas, weaving together intricate plots, unforgettable characters, and thought-provoking themes that challenge the boundaries of imagination.

Home Interests Home

How to Lay 5/4 Wood Decking

howchoo   (467)
September 19, 2023
4 minutes

Share

Interests
Posted in these interests:

DIY

diy • 17 guides
home • 7 guides
woodworking • 4 guides

5/4 decking looks great and is very cost effective. This guide will take you through laying and securing your 5/4 decking.

1 – Choose the side you would least like to have a ripped (partial width) piece

Lay your decking on the joists with plenty of space between each board.

2 – Lay the decking bark side up

Wood tends to cup towards the bark over time. Laying it this way with a nail on each edge minimizes this.

3 – Nail every 10th (or so) board

Use two nails at each intersection of the decking board and the joist. Roughly 1″ from the edge of the board works great.

Don’t forget this step. You will need the nails every so often to guide you when you nail the rest of the decking.

4 – Use blocking for fragile edges or notches

Nail the blocking however you can. It only needs to stay put until you nail the decking. Check out this guide to find out how to notch decking.

5 – Be mindful of rugged pieces

If you find a nasty edge on a piece, flip it over. That always takes precedence over the cupping issue.

6 – Make sure you’re laying your decking square

Every so often, measure from your starting point to make sure you’re laying the decking square.

To correct any issues, squeeze the decking a little tighter on the longer side.

7 – Rip the final piece

Usually your final piece will not be perfect width. Rip it to width on a table saw or with a circular saw.

8 – Nail the rest of the decking

Use the boards you already nailed as guides for your line of nails.

NEXT UP

How to Properly Dispose of a Worn or Damaged American Flag

howchoo   (467)
December 7, 2023

Since our country was conceived, the U.S. Flag has been a symbol of our country’s freedom. Our country’s Flag Code provides specific guidelines for how to “retire” a damaged or worn-out American flag. When should my American flag be retired? The US Flag Code (4 USC Sec 8 Para (k) Amended 7 July 1976) dictates that a flag

Continue Reading

howchoo

 467 guides

Introducing Howchoo, an enigmatic author whose unique pen name reflects their boundless curiosity and limitless creativity. Mysterious and multifaceted, Howchoo has emerged as a captivating storyteller, leaving readers mesmerized by the uncharted realms they craft with their words. With an insatiable appetite for knowledge and a love for exploration, Howchoo’s writing transcends conventional genres, blurring the lines between fantasy, science fiction, and the surreal. Their narratives are a kaleidoscope of ideas, weaving together intricate plots, unforgettable characters, and thought-provoking themes that challenge the boundaries of imagination.

Home Interests TP-Link

How to Log in to a TP-Link Router

howchoo
howchoo   (467)
September 19, 2023
3 minutes

Share

You’ll Need 2

What you’ll need
Interests
Series
Howchoo is reader-supported. As an Amazon Associate, we may earn a small affiliate commission at no cost to you when you buy through our links.
Posted in these interests:
internet • 36 guides
router • 32 guides
tplink • 1 guides

If you’re a TP-Link customer, you need to access your router. This guide covers everything you need from first time access to forgotten passwords. I’ll walk you through how to log in to your router and set up a custom password.

First you’ll need to connect to your TP-Link network. You can connect using Wifi or an Ethernet cable. It’s okay if you don’t have internet access.

2 – Connect to the router using a browser window

To access the router login screen, open a browser and connect using one of these three URLs. Try each of them to see which one brings up the login screen for you.

http://192.168.1.1
http://192.168.0.1
http://tplinkwifi.net

Enter your username and password on the login screen. If this is your first time, you will need to use the default credentials:

username: admin
password: admin

4 – Change the router password

Once you’re logged into the router, you can change the admin password under Management > Access Control > Password.

Congratulations! You’re logged in and ready to go.

NEXT UP

How to Change Your Frontier WiFi Password

howchoo
howchoo   (467)
November 25, 2023

There are a few reasons you might want to update or reset your WiFi password: making your network more secure, and making your password easier to remember and type. Improved network security You can add an extra layer of security to your network by changing the WiFi password. As long as your new password is

Continue Reading

howchoo

 467 guides

Introducing Howchoo, an enigmatic author whose unique pen name reflects their boundless curiosity and limitless creativity. Mysterious and multifaceted, Howchoo has emerged as a captivating storyteller, leaving readers mesmerized by the uncharted realms they craft with their words. With an insatiable appetite for knowledge and a love for exploration, Howchoo’s writing transcends conventional genres, blurring the lines between fantasy, science fiction, and the surreal. Their narratives are a kaleidoscope of ideas, weaving together intricate plots, unforgettable characters, and thought-provoking themes that challenge the boundaries of imagination.

Home Interests Nintendo

NES battery replacement for games that stopped saving

Extend the life of your favorite NES game.
howchoo   (467)
September 19, 2023
8 minutes

Share

You’ll Need 7

What you’ll need
Interests
Solder x 1
Flux x 1
Howchoo is reader-supported. As an Amazon Associate, we may earn a small affiliate commission at no cost to you when you buy through our links.
Posted in these interests:
READY PLAYER 1
gaming • 85 guides
nintendo • 13 guides
retrogaming • 29 guides

It’s been a while since NES games first hit the shelves. Yet it’s not uncommon to find a selection of NES titles at your local game store. But after so many years, some of these NES cartridges are struggling to save or won’t save data at all.

This issue is typically caused by an old battery. You can extend the life of your NES game by replacing it with a new one. Adding a new battery can extend your ability to save for years. You only need a few tools to get started.

Removing the current battery will cause all of the current save data to permanently erase. Proceed with caution!

Which NES games use a battery?

Not every NES cartridge uses a battery. The primary purpose of the battery was for storing save data. They were common with RPGs and various titles that used unlockable features. You can find a complete list of NES games that use a battery on DKoldies.

Note: This guide is only for NES games, visit this guide to change a SNES cartridge battery.

1 – Unscrew the NES cartridge shell

You will need a special screwdriver to access the inside of an NES cartridge. Using a 3.8mm NES security bit, unscrew the screws holding the cartridge together. There will be 3 total.

2 – Remove the board from the shell

The board is resting inside of the cartridge shell—there are no tabs to hold it in place. Remove the board by lifting it from the shell.

3 – Desolder the old battery

Flip the board over so the battery is facing down. Using a soldering iron, melt the existing solder that holds the battery in place. Suck up the additional solder with a solder sucker. When enough solder is removed, the battery can be wiggled loose.

4 – Fit the new battery into the old slot

You need this CR2032 battery with pre-soldered tabs to replace the old battery.

Put the new battery into place on the board. Be sure to have the positive and negative ends line up. You can use the pictures in this guide for reference.

I’m using a leftover CR2025 from replacing a Game Boy cartridge battery; it will work, except the tabs are slightly different and thus need to be clipped. Be sure to pick up a CR2032.

🛈 You cannot use just any CR2032. It must have pre-soldered tabs. Soldering to a battery can cause it to explode.

5 – Solder the new battery into place

Solder the new battery into place. I always use a little bit of flux when making new connections.

6 – Screw the NES cartridge shell together

Put the board back inside the shell and screw the cartridge together. You will need the 3.8mm NES security bit to close the cartridge. There are three screws used during this step.

7 – Test the finished product

It’s time to boot up the NES and play some Tecmo Super Bowl (or whatever game you have)!

Play enough to warrant a save on the cartridge. The goal here is to create new save data. Once you’ve created a new save file, reboot the NES and load the same save data. Congratulations! You’ve given new life to your old NES game.

NEXT UP

Top 10 Enchantments in Minecraft

howchoo   (467)
March 25, 2024

The longer you play Minecraft, the more you realize that early-game tools just won’t cut it. Exploring the enchantment feature of Minecraft can be exciting, but also intimidating. Rather than worry about researching enchantments, below are the best enchantments in Minecraft! To learn how to enchant items, check out this guide! In this guide, you’ll see

Continue Reading

howchoo

 467 guides

Introducing Howchoo, an enigmatic author whose unique pen name reflects their boundless curiosity and limitless creativity. Mysterious and multifaceted, Howchoo has emerged as a captivating storyteller, leaving readers mesmerized by the uncharted realms they craft with their words. With an insatiable appetite for knowledge and a love for exploration, Howchoo’s writing transcends conventional genres, blurring the lines between fantasy, science fiction, and the surreal. Their narratives are a kaleidoscope of ideas, weaving together intricate plots, unforgettable characters, and thought-provoking themes that challenge the boundaries of imagination.

Home Interests 3D Printing

Anycubic Kobra Go: How to Load Filament

Loading filament in the Kobra Go is easy, even for 3D printing noobs!
howchoo   (436)
September 18, 2023
7 minutes

Share

You’ll Need 1

What you’ll need
Interests
Howchoo is reader-supported. As an Amazon Associate, we may earn a small affiliate commission at no cost to you when you buy through our links.
Posted in these interests:
3dprinting • 36 guides
anycubic • 6 guides

DIY

diy • 17 guides
technology • 20 guides

I dig the Anycubic line of Kobra printers in large part because of how many ease-of-use features they incorporate, from automatic leveling, to filament sensors (in some of their models). And that ease of use extends all the way to the humblest of tasks: loading filament.

The Kobra Go is a kit 3D printer that offers high quality in a DIY package that saves you a considerable wad of cash and lands you with a high-quality entry-level printer. As one would expect, it can handle all the common filament types, and loading them into the printer is a breeze.

Anycubic’s Kobra Go 3D Printer Hands-On Review
A detailed review on the Anycubic Kobra Go DIY 3D printer

1 – Turn the knob to Menu

Turn the knob to Menu

On the main screen, turn the knob to “Menu” and depress the button to select.

2 – Select “Prepare” from the menu

Select “Prepare” from the menu

From the list of control options, select “Prepare”.

3 – Scroll down and select “Load Filament”

Scroll down and select “Load Filament”

Since we want to load new filament, we’ll select this option.

4 – Select the checkmark to continue

Select the checkmark to continue

The Kobra Go will notify you that the nozzle is too cold to load new filament, so select the checkmark and allow the printer to bring itself to temperature.

5 – The Nozzle will bring itself to temperature automatically

The Nozzle will bring itself to temperature automatically

Just let the printer do its thing, this should only take a couple of minutes.

6 – When ready, load filament

When ready, load filament

The screen will notify you when it’s time to load the filament.

7 – Press the filament into the short Teflon tube

Press the filament into the short Teflon tube

The tube acts as a handy guide. make sure that you use your wire cutters to snip the filament at a sharp angle, this makes it easier to slide it in. A little bit of pressure will be needed—you can depress the button on the side of the loader to allow the filament to more easily slide into place.

You’ll know you’re finished when the machine catches the filament, and it starts moving without you pressing it.

8 – Once the filament is loaded, insert your memory card.

Once the filament is loaded, insert your memory card.

Insert your memory card that came with the Kobra Go.

9 – Select Menu and then scroll to “Print from SD Card”

Select Menu and then scroll to “Print from SD Card”

The card comes preloaded with an owl model to test things out on.

10 – If necessary, correct the Z offset

If necessary, correct the Z offset

As the print begins, you can use the knob to select the Z offset control (depress the button to select and turn to either side to move the nozzle up or down). It’s easy to ensure that your nozzle is the perfect height from the printer bed.

11 – Enjoy your new print!

Enjoy your new print!

The Anycubic Kobra Go does a great job turning out models with all the most common filament types. Try it yourself now!

NEXT UP

How to Set Up Quick Connect on a Synology NAS

Get Synology’s powerful Quickconnect running in minutes on your NAS!
howchoo   (436)
November 24, 2023

Synology is one of the most popular creators of Network Attached Storage devices on the market today, and for great reason — they’re really good at what they do. They consistently make devices that stand the test of time and feature top-notch software that makes the process of running a home server as easy as

Continue Reading

howchoo

 436 guides

Introducing Howchoo, an enigmatic author whose unique pen name reflects their boundless curiosity and limitless creativity. Mysterious and multifaceted, Howchoo has emerged as a captivating storyteller, leaving readers mesmerized by the uncharted realms they craft with their words. With an insatiable appetite for knowledge and a love for exploration, Howchoo’s writing transcends conventional genres, blurring the lines between fantasy, science fiction, and the surreal. Their narratives are a kaleidoscope of ideas, weaving together intricate plots, unforgettable characters, and thought-provoking themes that challenge the boundaries of imagination.

Home Interests Movies

20 Highest Grossing Anime Franchises of All Time

アニメはお金です. (Anime is money!)
howchoo   (467)
September 18, 2023
34 minutes

Share

Interests
Posted in these interests:
movies • 2 guides
popculture • 14 guides

If you grew up watching cartoons, odds are you’ve come across an anime series or two. While anime is huge in Japan, it took a little while for the art to reach viewers across the world. Today, anime franchises are worth billions of dollars and many of them are household names.

In the spirit of all things ambitious, and the hundreds of journeys we’ve taken in watching these stories, we decided to gather a list of the most highest-grossing anime franchises of all time. These are the top dogs of anime—guaranteed to inspire at least 20 cosplayers at a local convention near you.

20 – Demon Slayer: Kimetsu no Yaiba – $2.6 Billion

Perhaps one of the most impressive entries on this list is Demon Slayer: Kimetsu no Yaiba. It’s only brought in $2.8 billion but that’s after having just debuted in 2016, making the rate of growth one of the fastest we’ve come across.

The story follows Tanjiro Kamodo, a wannabe demon slayer, motivated to fight after his sister is turned into a demon herself. It was created by Koyoharu Gotouge who has published over 20 volumes as of writing.

Demon Slayer: Kimetsu no Yaiba stats

Total Revenue: 2.6 Billion

Initial Release: 2016

Most recent release: 2021

Studio / Production Team: Ufotable

Created by: Koyoharu Gotouge

19 – Hamtaro – $3 Billion

I am genuinely surprised to share with you Hamtaro as one of the highest-grossing anime of all time. The series was created by Ritsuko Kawai in 1997 and by 1999 was developed into an anime series.

The story follows Hamtaro, a hamster who goes on wild adventures while his owner is at school. The series is well-received by viewers both inside and outside of its target demographic, lending to the total gross of $3 billion for the franchise.

Hamtaro stats

Total Revenue: 3 Billion

Initial Release: 1997

Most recent release: 2013

Studio / Production Team: TMS Entertainment

Created by: Ritsuko Kawa

18 – Astro Boy – $3.13 Billion

Astro Boy is the oldest and one of the most iconic entries on this list. He first appeared in 1952 and was seen as recently as 2009 in a modern movie adaptation. Astro Boy, known in Japan as Mighty Atom, was created by manga legend Osamu Tezuka.

Astro Boy is a robotic child created by Dr. Tenma. For those unfamiliar, it sounds like an innocent children’s tale. However, there are serious undertones to the story that aren’t apparent at first glance. Dr. Tenma created Astro Boy in response to the death of his son, even going as far as adopting Astro Boy as his own son. The superior writing and artwork have rightfully earned Astro Boy great reverence over the years.

Astro Boy stats

Total Revenue: 3.13 Billion

Initial Release: 1952

Most recent release: 2009

Studio / Production Team: Mushi Production

Created by: Osamu Tezuka

17 – Beyblade – $4.6 Billion

This anime franchise started as a competitive top game developed by Takara. Assuming Battle Tops wasn’t cool enough, it was released in 1999 under the name Beyblade. While Beyblade definitely sounds like a vicious right of passage from some mysterious land in the far East, it was essentially competitive tops.

The anime was released in 2001 and lasted for 51 episodes. Players got a first-hand look at a new world centered entirely around Beyblades and that fascination helped build a huge franchise—big enough to land a spot on this list at $4.6 billion.

Beyblade stats

Total Revenue: 4.6 Billion

Initial Release: 1999

Most recent release: 2021

Studio / Production Team: Madhouse / Nippon Animation

Created by: Takao Aoki

16 – Digimon – $6 Billion

If you remember Tamagotchi, you might remember Digimon. This anime actually began as a small, pocket-sized game in which players care for various digital monsters. To promote the Digimon game, a one-time movie was produced.

Reception was so high, this eventually spun into a full-blown anime series. Digimon was nothing like Pokemon despite the frequent comparisons. Well, they were sort of alike but this wasn’t a Pepsi vs Coca-Cola relationship, this was more like RC Cola vs Coca-Cola. Digimon were digital and Pokemon went in your pocket. Seriously, how did parents mix this one up? The Digimon franchise has ultimately grossed over $6 billion since the initial debut.

Digimon stats

Total Revenue: 6 Billion

Initial Release: 1997

Most recent release: 2020

Studio / Production Team: Toei

Created by: Akiyoshi Hongo

15 – Bleach – $7.24 Billion

Bleach is an action fantasy series written and illustrated by Tite Kubo in the early 2000s. By 2004, his original manga took the honorable step from Shounen Jump feature to fully serialized anime. This anime lasted for 366 episodes and inspired a few video games, as well.

The story follows Ichigo, a 15-year-old who just became a Soul Reaper—trust me when I say that’s no small deal. He learns to bridle his new strength while meeting new friends along the way. The anime was produced by Studio Pierrot and lasted until 2012. All of the manga, anime, and merch sales have grossed a total of over $7.4 billion for the franchise.

Bleach stats

Total Revenue: 7.24 Billion

Initial Release: 2001

Most recent release: 2012

Studio / Production Team: Pierrot

Created by: Noriyuki Abe

14 – Doraemon – $7.29 Billion

Doraemon first appeared in 1969. It was written and illustrated by Fujiko Fujio, the pen name of creative duo Motoo Abiko and Hiroshi Fujimoto. An attempt to serialize the manga into an anime was first made in 1973 but it was Shin-Ei Animation who oversaw the largest running Doraemon anime which featured over 1700 episodes and lasted until 2005.

Doraemon is a robotic cat with no ears sent from the future to help protagonist Nobita Nobi. Games, merchandise, toys, and more have kept the franchise afloat for decades. Since its inception, the Doraemon franchise has grossed over $7.2 billion.

Doraemon stats

Total Revenue: 7.29 Billion

Initial Release: 1969

Most recent release: 2020

Studio / Production Team: Shin-Ei Animation

Created by: Fujiko Fujio

13 – Pretty Cure – $7.59 Billion

The Pretty Cure franchise is a magical girl fest created by Izumi Todo. It’s filled with cute protagonists, lots of fights, and hundreds of episodes to indulge in. This series was inspired by magical girl shows like Sailor Moon, but it certainly wasn’t the first. Pretty Cure first appeared in 2004.

The latest series is known as Tropical-Rouge! Pretty Cure with episodes released as recently as April 2021, hampered only by production delays caused by coronavirus lockdowns. Fans can buy books, toys, apparel, and even video games to satiate their taste for Pretty Cure.

Pretty Cure stats

Total Revenue: 7.59 Billion

Initial Release: 2004

Most recent release: 2021

Studio / Production Team: Asahi Broadcasting Corporation / Asatsu-DK / Toei

Created by: Izumi Todo

12 – JoJo’s Bizarre Adventure – $9.8 Billion

JoJo’s Bizarre Adventure was first released in 1987 by creator Hirohiko Araki. It follows eight separate stories, each featuring a protagonist nicknamed JoJo. Multiple attempts have been made to serialize the manga into an anime, but each release is typically limited to a single story from the series.

JoJo is still going strong with new episodes having been produced within the last few years. The recent interest has sparked the release of new merch, helping reach the rank of one of the highest-grossing anime of all time at $9.8 billion.

JoJo’s Bizarre Adventure stats

Total Revenue: 9.8 Billion

Initial Release: 1987

Most recent release: 2014

Studio / Production Team: A.P.P.P.

Created by: Hirohiko Araki

11 – Naruto – $10.3 Billion

Masashi Kishimoto is the mastermind behind the Naruto franchise. The series follows the story of Naruto Uzumaki, a ninja-in-training from the leaf village. His ultimate goal is to become the next village leader, known as the Hokage.

This series inspired a few sequel shows and even a selection of video games. When it first debuted, fans could find merch from online stores, malls, and of course conventions. Figurines, costumes, posters, and more can still be found to this day featuring the plucky, orange-clad protagonist. The Naruto franchise has grossed more than $10 billion since its creation.

Naruto stats

Total Revenue: 10.3 Billion

Initial Release: 1999

Most recent release: 2017

Studio / Production Team: Pierrot

Created by: Masashi Kishimoto

10 – Sailor Moon – $14.3 Billion

I thoroughly believe magical girl anime exploded in popularity because of Sailor Moon. Please don’t beat me—hear me out! I more than recognize the value classics like Sally the Witch and Cutie Honey have had on anime culture as a whole and will always hold them in dear regard. But Sailor Moon’s Toonami slot in the 1990s put magical girl anime in the limelight on a global scale for the first time and its placement on this list is testament to that popularity.

The manga series was created by Naoko Takeuchi in 1991 and by 1992 it was a full-blown anime series. Sailor Moon is still going strong to this day and finding merch isn’t hard. From the sale of video games and toys to everything in between, Sailor Moon has grossed over $14 billion.

Sailor Moon stats

Total Revenue: 14.3 Billion

Initial Release: 1991

Most recent release: 2016

Studio / Production Team: Toei

Created by: Naoko Takeuchi

9 – KochiKame – $16.3 Billion

KochiKame is a comedy franchise created as a manga by Osamu Akimoto in 1976. It centers around Kanchiki Ryotsu, a local, neighborhood cop living in Tokyo. The setting takes place in modern times, which was the 1970s when the series first debuted.

A few short animations were produced here and there as well as a couple of commercial appearances, but it wasn’t until 1996 that a serious anime was commissioned and produced by Studio Gallop. The anime received over 380 episodes and ran until 2004. Overall, the franchise has earned $16.3 billion.

KochiKame stats

Total Revenue: 16.3 Billion

Initial Release: 1976

Most recent release: 2016

Studio / Production Team: Tatsunoko Productions

Created by: Osamu Akimoto

8 – Neon Genesis Evangelion – $16.6 Billion

This series is one of Gainax’s most well-known productions. Directed by Hideaki Anno, this story follows teenager Shinji in a coming-of-age mecha-filled anime extravaganza. He pilots a giant robotic suit known as the Evangelion and learns about himself, relationships, and the truth behind the dystopian future setting he was born into.

This series is very popular, having led to the release of video games, merchandise, figurines, and more over the years. Since it first debuted in 1995, Neon Genesis Evangelion has earned $16.6 billion.

Neon Genesis Evangelion stats

Total Revenue: 16.6 Billion

Initial Release: 1995

Most recent release: 2021

Studio / Production Team: Gainax

Created by: Hideaki Anno

7 – Yu-Gi-Oh! – $20.3 Billion

Contrary to popular belief, this show was not created to sell cards but rather was a passion project created by Kazuki Takahashi who loves card games and puzzles. After the show aired, viewers wanted to play the game at home—creating a demand for an actual game to be manufactured. This is why some of the rules and corresponding moves do not match between the actual card game and show.

Yu-Gi-Oh! first appeared in Shounen Jump back in 1996 but it wasn’t serialized into an anime until 1998 by Toei. Studio Gallop animated a 2000 series titled Yu-Gi-Oh! Duel Monsters. The combination of anime, merchandise, and duel monsters card game led to a franchise worth over $20 billion.

Yu-Gi-Oh! stats

Total Revenue: 20 Billion

Initial Release: 1996

Most recent release: 2020

Studio / Production Team: Toei

Created by: Kazuki Takahashi

6 – One Piece – $20.9 Billion

This series, illustrated and written by Eiichiro Oda, was inspired by monster-of-the-week classics like Dragon Ball. It made its debut in a 1997 edition of Shounen Jump and was serialized into an anime by 1997. One Piece quickly grew in popularity and has continued into the present day with the periodic release of new mangas.

The story follows Monkey D. Luffy, a quirky and lovable protagonist on a quest to become king of the pirates. He has super stretching powers after eating a devil fruit, known to grant various powers to those who consume them. Luffy and his team travel the world encountering tons of characters with notoriously creative designs while Eiichiro Oda encounters even more creative ways to earn money.

One Piece stats

Total Revenue: 20.9 Billion

Initial Release: 1997

Most recent release: 2021

Studio / Production Team: Toei

Created by: Eiichiro Oda

5 – Fist of the North Star – $22.5 Billion

Muscles were big in 1980’s anime. From Kinnikuman to Dragon Ball, these guys were known for being big and beefy but one of the most impressionable series of the time was Fist of the North Star, created by Buronson. The 1983 manga artwork was created by Tetsuo Hara which inspired the look of the 1986 anime that followed.

The story follows Kenshiro in a post-apocalyptic future. He tries his best to live his life and bring justice to a world wrought with bandits and criminal filth. The franchise is hands down one of the biggest ever, earning $22.5 billion over just the last couple of decades.

First of the North Star stats

Total Revenue: 22.5 Billion

Initial Release: 1983

Most recent release: 1988

Studio / Production Team: Toei

Created by: Buronson

4 – Gundam – $26 Billion

This mecha franchise was created in 1979 by Yoshiyuki Tomino. It’s one of the most well-known mecha franchises of all time and is known to have inspired many creators in the mecha genre. In this fictional world, humans pilot giant robotic suits known as Gundam.

The franchise expanded to include merchandise, toys, sequel series, and especially figurines designed for building piece-by-piece. If you’re into serious, gritty anime with cool giant robot fights, this anime is worth a watch. It’s easy to see how it’s earned a place on this list.

Gundam stats

Total Revenue: 26 Billion

Initial Release: 1979

Most recent release: 2021

Studio / Production Team: Nippon Sunrise

Created by: Yoshiyuki Tomino

3 – Dragon Ball – $27 Billion

If you watched Toonami, you probably came across Dragon Ball and the sequel series Dragon Ball Z once or twice. This franchise was huge and still is, with new content still coming out from creator Akira Toriyama. The manga first appeared in the weekly Shounen Jump Magazine back in 1984.

By 2021, the franchise has grown in value to reach a net worth of $27 billion. You can find Dragon Ball manga, anime, video games, figurines, toys, clothing, snacks, even cleaning products bearing the face of our favorite Saiyan Prince Vegeta.

Dragon Ball stats

Total Revenue: 27 Billion

Initial Release: 1984

Most recent release: 2019

Studio / Production Team: Toei

Created by: Akira Toriyama

2 – Anpanman – $60 Billion

Anpanman is one of the most popular children’s superhero characters in all of Japan. He’s easily recognized by his head which is made from a red bean paste pastry called an “anpan”, hence the name AnapanmanAnpanman is known to fight bad guys led by Baikinman, an evil villain from Baikin Planet.

Between all of the books, games, snacks, clothes, toys, and more, this franchise has steadily grown to a net worth of around $60 billion.

Anpanman stats

Total Revenue: 60 Billion

Initial Release: 1973

Most recent release: 2019

Studio / Production Team: Telecom Animation Film

Created by: Takashi Yanase

1 – Pokemon – $99 Billion

Of course, the biggest anime franchise of all time is Pokemon. You knew it was coming—Pokemon is a notorious marketing behemoth. Pikachu’s face alone has been sold on almost anything you can think of!

The franchise began in 1996 with the release of the Pokemon video game for Nintendo’s handheld Game Boy console. By 1997, it was serialized into an anime, spawning numerous sequel shows, often featuring the same protagonist—Ash Ketchum. This series is also responsible for the popularity of Pikachu who served as Ash’s main buddy in battle. Between the video games, anime, merch, and more, the Pokemon franchise has amassed a whopping net worth of around $99 billion.

Pokemon stats

Total Revenue: 99 Billion

Initial Release: 1996

Most recent release: 2021

Studio / Production Team: OLM, Inc. Team Ota

Created by: Takeshi Shudo (Original Head Writer)

NEXT UP

30 of the Rarest Board Games

30 rare board games that every collector wants!
howchoo   (467)
September 29, 2023

Board games may not be the first thing on your mind when you think of collectibles, and yet there is a deep and not-so-hidden world of board game hoarding, collecting, and trading as complex as that found within any other area of interest — perhaps deeper! There is a huge range of wonderful old games

Continue Reading

howchoo

 467 guides

Introducing Howchoo, an enigmatic author whose unique pen name reflects their boundless curiosity and limitless creativity. Mysterious and multifaceted, Howchoo has emerged as a captivating storyteller, leaving readers mesmerized by the uncharted realms they craft with their words. With an insatiable appetite for knowledge and a love for exploration, Howchoo’s writing transcends conventional genres, blurring the lines between fantasy, science fiction, and the surreal. Their narratives are a kaleidoscope of ideas, weaving together intricate plots, unforgettable characters, and thought-provoking themes that challenge the boundaries of imagination.

Home Interests Web Design

Time Travel the Internet: View Any Website from (Almost) Any Year

howchoo   (467)
September 18, 2023
5 minutes

Share

You’ll Need 1

What you’ll need
Interests
Howchoo is reader-supported. As an Amazon Associate, we may earn a small affiliate commission at no cost to you when you buy through our links.
Posted in these interests:
internet • 36 guides
webdesign • 5 guides

WWW

www • 2 guides

Most people don’t know that you can look up past “snapshots” of almost any website. Archive.org is a 501(c)(3) nonprofit organization that was formed to build an expansive Internet library. Since 1996, the organization has been archiving digital content to preserve the legacy and history of the Internet and the World Wide Web.

1 – Visit archive.org

Using your browser, navigate to Archive.org.

2 – Enter the website you’d like to view and click Browse History

I decided to check out Amazon’s humble roots since I’ve been reading the Jeff Bezos biography One Click.

3 – Select a year

The Archive.org meta crawler visits popular sites more often. Each blue circular bubble indicates that a snapshot exists. In my case I searched for Amazon, the 7th most popular site on the web; this explains the blue blur that you see below.

You might notice by the “annual” snapshot bar graphs that overall snapshots have increased over the years — this is due to hard drive space becoming less expensive, resulting in more crawls being possible. After all, each snapshot isn’t just a mere image — it’s an explorable version of the site.

From here, you can either select a blue bubble to view the relevant snapshot or choose a different year to view. Let’s go deeper. Select an older year.

🛈 Many of the older snapshots don’t have all page elements recorded; in other words, you might visit eBay’s 1997 site and find that most of the images are missing. This was largely due to storage space restrictions of the time.

4 – Select a snapshot

After you’ve selected the year, find the specific date you’d like to explore. Explorable dates are denoted by the blue bubble. A larger bubble means that multiple snapshots exist for that date. Click on a date bubble.

5 – Bask in the glory of old design

It’s interesting to see not only how web design has changed but also how far we’ve come in such a short period of time.

Amazon in 1996: See it in action

6 – Google in 1998

See it in action

7 – YouTube in 2005

See it in action

8 – eBay in 1999

See it in action

NEXT UP

How to Change Your Frontier WiFi Password

howchoo
howchoo   (467)
November 25, 2023

There are a few reasons you might want to update or reset your WiFi password: making your network more secure, and making your password easier to remember and type. Improved network security You can add an extra layer of security to your network by changing the WiFi password. As long as your new password is

Continue Reading

howchoo

 467 guides

Introducing Howchoo, an enigmatic author whose unique pen name reflects their boundless curiosity and limitless creativity. Mysterious and multifaceted, Howchoo has emerged as a captivating storyteller, leaving readers mesmerized by the uncharted realms they craft with their words. With an insatiable appetite for knowledge and a love for exploration, Howchoo’s writing transcends conventional genres, blurring the lines between fantasy, science fiction, and the surreal. Their narratives are a kaleidoscope of ideas, weaving together intricate plots, unforgettable characters, and thought-provoking themes that challenge the boundaries of imagination.

Home Interests Verizon

How to Set Up and Use Verizon Voicemail

Get set up and start missing calls today!
howchoo (467)
September 18, 2023
5 minutes

Share

You’ll Need 1
What you’ll need
Interests
Series
Howchoo is reader-supported. As an Amazon Associate, we may earn a small affiliate commission at no cost to you when you buy through our links.
Posted in these interests:
verizon • 6 guides
wireless • 6 guides
Your Verizon voicemail is easy to set up and even easier to use. It’s not only accessible from your Verizon phone but also from any phone. That freedom of access doesn’t come without property security measures—your voicemail is protected with a unique password/PIN.

1 – Set up voicemail

Voicemail can be set up using a Verizon cell phone. Make sure the phone has a signal before setting up your Verizon voicemail.
  1. Open the Phone app.
  2. Dial *86.
  3. Press the Call button.
  4. The recorded message will prompt you to choose a language and press #.
  5. When asked, enter a 4-7 digit password for your voicemail and press #. Your password/PIN can’t use repeating or consecutive numbers.
  6. Verizon will ask you to record your name. State your name when prompted and press #. You may have to press # again to confirm the name.
  7. The last prompt will be for a voicemail greeting. After recording your greeting, press #. Press # again to confirm the recording.

2 – Check voicemail

You can easily check your voicemail if you have your Verizon phone with you.
  1. Open the Phone app.
  2. Dial *86.
  3. Press the Call button.
  4. You will be asked to enter your password/PIN. Enter it using your keypad.
  5. Press #.
  6. Follow the instructions to navigate through your voicemail messages.

3 – Check voicemail from another phone

If you don’t have your Verizon phone with you, it’s still possible to check your voicemail.
  1. Using any phone, dial your 10-digit Verizon phone number.
  2. When you hear your voicemail greeting, interrupt it with the # key.
  3. Enter your password/PIN when prompted.
  4. Press #.
  5. Follow the prompts to navigate through your messages.

4 – Reset voicemail password

If you lose or forget your Verizon voicemail password, you can request a reset.
  1. Open the Phone app on your Verizon phone.
  2. Dial *611.
  3. The phone recording will ask you to state a reason for calling. You can say “Reset voicemail password.”
  4. The system will likely ask you to confirm information for security verification.
  5. You will then be prompted to create a new voicemail password.
You’re finished! Next, learn how to enable Verizon call forwarding.
How to Enable Verizon Call Forwarding Direct your calls elsewhere.
NEXT UP

How to Enable Verizon Call Forwarding

Direct your calls elsewhere.
howchoo (467)
December 1, 2023
Call forwarding is the process of directing phone calls from one number to another. Verizon allows its customers to enable call forwarding at no additional charge. Your typical call rates will still apply. This process works for all Verizon customers regardless of your carrier—including Samsung, Apple, LG, Lenovo, and more. Note: International numbers can not
Continue Reading

howchoo

 467 guides
Introducing Howchoo, an enigmatic author whose unique pen name reflects their boundless curiosity and limitless creativity. Mysterious and multifaceted, Howchoo has emerged as a captivating storyteller, leaving readers mesmerized by the uncharted realms they craft with their words. With an insatiable appetite for knowledge and a love for exploration, Howchoo’s writing transcends conventional genres, blurring the lines between fantasy, science fiction, and the surreal. Their narratives are a kaleidoscope of ideas, weaving together intricate plots, unforgettable characters, and thought-provoking themes that challenge the boundaries of imagination.