Home Interests Raspberry Pi

How to Build a Bitcoin/Cryptocurrency Price Ticker Using a Raspberry Pi

howchoo   (467)
September 27, 2023
23 minutes

Share

You’ll Need 7

What you’ll need
Interests
Howchoo is reader-supported. As an Amazon Associate, we may earn a small affiliate commission at no cost to you when you buy through our links.
Posted in these interests:
bitcoin • 2 guides
cryptocurrency • 2 guides
pi • 92 guides

If you’re like me and check cryptocurrency prices throughout the day, every day, then you’d probably benefit from a dedicated cryptocurrency price ticker. This will save you from having to pull out your phone to check prices on Ifttt, which always leads to undesired distractions. Plus it’s just awesome.

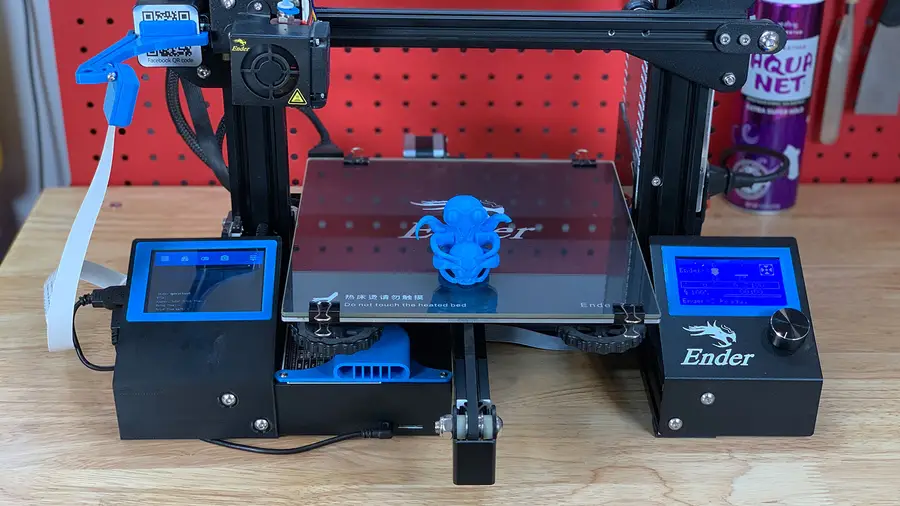
This project uses a Raspberry Pi Zero WH (wireless, with pre-soldered headers), an LED Matrix Panel, and RGB Matrix Bonnet, and a few miscellaneous cables that I’ll link to in the Tools and Materials section of this guide. Altogether this project costs just over $100, but you can definitely take some steps to cut costs. Time-wise it took me about 10 hours, but since I’ve done the leg work and written the software, it should only take you about an hour to assemble and configure (minus the time to print the case, if you choose to do so).

In this guide, you’ll learn how to set up the LED panel, install the crypto-ticker library, and configure it to show the cryptocurrencies you’re tracking. Let’s get started!

1 – Install Raspberry Pi OS

The first step of every great project is to install Raspberry Pi OS. Fortunately, we’ve written a guide that shows you how to install Raspberry Pi OS on your Raspberry Pi. Follow the steps to flash Raspberry Pi OS on your micro SD card, then jump back to this guide to continue.

How to Install Raspberry Pi OS on Your Raspberry Pi
Get the new official Raspberry Pi OS on your Pi.

2 – Configure the LED Panel

Hardware setup

In an effort to save space, I’m again going to refer you to the guide we’ve written that shows you how to use the LED Matrix Panel with your Raspberry Pi.

How to Use an LED Matrix Panel with Your Raspberry Pi
An LED matrix will make any project better.

Refer to this guide if you need help setting up the LED panel hardware. Since we’re going to use Docker to run the application, you won’t need to install the dependencies yourself. So please use the above guide to get your hardware set up only.

What you need

For this step, you’ll need the LED Panel, the RGB Matrix Bonnet, and the Pi Zero WH.

This is one area where you can save a little bit of money. We referred you to a reliable panel made by Adafruit. There are cheaper alternatives on Amazon if you’re willing to experiment.

Optional case

Keep in mind that the 3D-printed case is optional. If you’ve got a 3D printer and want to give it a shot, great! It will certainly make the project look more professional.

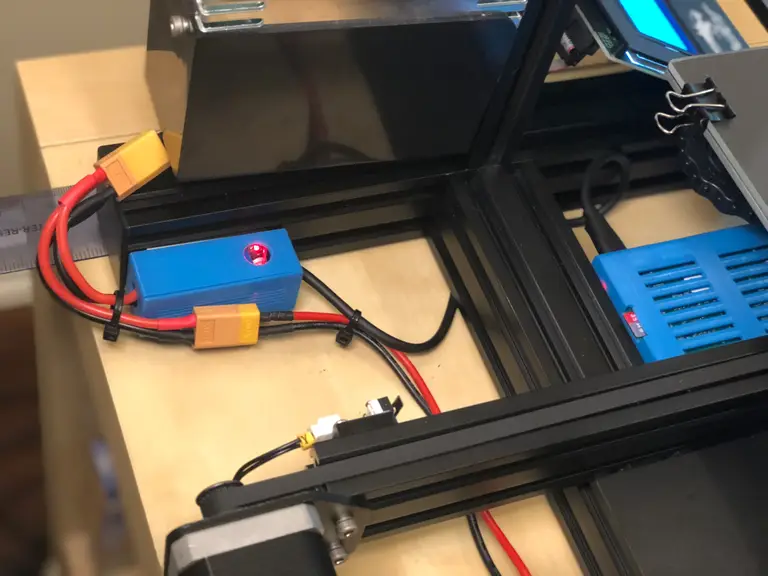
3 – (Optional) Add a power button

Since the Raspberry Pi doesn’t ship with a physical power button, you may want to add your own. This isn’t required, but it is a good (and safe) way to shut down your Pi when you’re not using it (like if your spouse gets tired of the Bitcoin price glowing at night).

We’ve written a solid guide that shows you how to add a power button to your Raspberry Pi. I’m linking to the guide here because we need to do some work before wrapping up the hardware portion of this guide.

How to Add a Power Button to Your Raspberry Pi
Because you should always safely shut down your Pi.

If you’re not going to add the power button, skip ahead to the next step.

Solder male header pins

The RGB Matrix Bonnet attaches to the entire GPIO header on the Pi, but it does expose some GPIO holes that you can solder pins or wires to. In this case, you only need to solder pins to the SCL and GND holes, but for simplicity, I soldered a 2×2 pin square that covers both of the pins I need (see the image below).

Drill a hole in the case

If you’re not using a case, you can skip this piece and just let the button dangle! But if you’re using the case we recommended, you’ll need to drill a 1/2″ hole to attach the power button. Again see the image for details.

The location of the button doesn’t matter as long as you’ve got male-to-female jumper cables to extend the leads to the Pi. I put my power button on the Pi-side at the very top.

It’s worth noting at this point that the power button we sell does not fit in the hole that the case provides. If you’d like to buy a smaller button, you can skip drilling the hole. But I do recommend using the power button we sell because it comes from a reputable source and you get to support your favorite DIY site 🙂

Connect to the leads to the bonnet

When you’re ready to close up the case, attach the leads (or the jumper wires) from the button to the SCL and GND pins on the bonnet.

4 – Secure the case

If you’re using the case, now is the time to secure it. To do so, you’ll need to place the panel face down. Then drop two M3 nuts into the brackets on each side of the panel.

Now place the case on top of the panel, and use the M3 screws to secure it.

5 – SSH into your Pi

Now it’s time to log in to your Pi and install the software. To begin, you’ll need to open your Terminal application and SSH into your Raspberry Pi.

How to Connect to a Raspberry Pi Remotely via SSH
The preferred (and most common) method of connecting to your Pi to run commands.

ssh pi@raspberrypi

If you’ve got multiple Pi’s on your network, or the hostname doesn’t work for some reason, you’ll need to find your Raspberry Pi’s IP address and use it instead.

6 – Install Docker

Next you need to install Docker and docker-compose on your Pi. To install Docker, run the following:

# Install docker
curl -sSL https://get.docker.com | sh

# Add the pi user to the docker group (so you don't have to use root to use docker)
sudo usermod -aG docker pi

# Install docker-compose
sudo pip3 -v install docker-compose

Why Docker?

Docker allows us to run our application as a software container. For the purpose of this project, it allows us to define all of our dependencies in a Dockerfile and build the application as an image. This saves you from having to run a bunch of commands to install packages directly (among other advantages).

7 – Clone the crypto-ticker repository

Git should already be installed on your Raspberry Pi, but if it’s not you can install it using apt-get install git.

Clone the crypto-ticker repository with the following command:

git clone https://github.com/Howchoo/crypto-ticker.git

8 – (Optional) Create your own settings.env file

To run the application, you’ll need to add your custom settings.env file. This file will be mounted onto the running container and provide the application with any settings you wish to provide.

You’ll need to cd into the crypto-ticker directory:

cd crypto-ticker

Then use your favorite text editor to create the settings.env and add any of the following settings:

NameDefaultDescription
SYMBOLSbtc,ethThe asset symbols you want to track.
APIcoingeckoThe API you want to use to fetch price data. Currently supported APIs are “coingecko” and “coinmarketcap”.
REFRESH_RATE300How often to refresh price data, in seconds.
SLEEP3How long each asset price displays before rotating, in seconds.
CMC_API_KEYThe CoinMarketCap API key, required if you specified API=coinmarketcap.
SANDBOXUsed for CoinMarketCap only. Set SANDBOX=false if you’re developing and want to use the sandbox API.

Example:

SYMBOLS=btc,eth,ltc,xrp
API=coingecko

9 – Run docker-compose up

With your settings.env file in place, you’re ready to start the application. Run the following:

docker-compose up -d

This command will take a few minutes because it needs to read from docker-compose.yml, build the image, install the dependencies, and start the application.

It’s worth noting that the ticker service in the docker-compose file specifies that we want to restart the container “always”. This means that if the container dies, it will be restarted automatically. It also means that when the machine restarts, the container will start up as well. This is an easy way to run the crypto-ticker application on boot.

10 – Enjoy your work!

The application takes a few seconds to get started, but once it does you should see your crypto prices flash before your very eyes. The panel will scroll through the crypto symbols you specified in your settings.env file, and it will update prices every five minutes.

Attention developers

If you’re a software developer and want to contribute to this project, I’d be happy to have you participate. Feel free to fork the repository and submit a pull request.

Here are some ideas for improvements:

  • Add cryptocurrency icons to the display
  • Add a “Loading” screen when the Pi is booting
  • Add some animation to transition between screens, maybe even allow the user to specify the transition

Share and comment

If you like this project, please share it on Facebook and Twitter. If you have any questions or feedback, feel free to leave a comment below.

11 – Troubleshooting

This project is new and there’s still work to be done. With that said, you might run into errors that aren’t properly handled. If this happens, I recommend the following.

Many of these steps should be performed from the crypto-ticker directory on the Pi. So perform the following in advance, when required:

ssh pi@
cd crypto-ticker

Check the logs

Use the docker-compose command to check the logs for the ticker service:

docker-compose logs ticker

If there was an error in the program, the exception should be printed out here.

Restart the ticker

As a quick fix, you might have luck just restarting the ticker. To do so, you can use the docker-compose restart command:

docker-compose restart ticker

Pull the latest code

Over time, I do try to fix bugs and make the error handling more robust. To pull the latest code, you can use the following:

git pull origin master

Then you’ll want to rebuild and take the application back up, like this:

docker-compose down
docker-compose up --build

Create an issue

If you run into issues that can’t be resolved, feel free to submit an issue here.

You can also hit me up on Twitter if you have questions.

NEXT UP

How to Run a Minecraft Server on the Raspberry Pi

A whole world trapped inside your Pi.
howchoo   (467)
December 7, 2023

There are several ways to go about running a Minecraft server on the Raspberry Pi. In this guide, I’ll cover how to install Nukkit—a cross-platform Minecraft server that’s super easy to set up on the Raspberry Pi. This server should work with PCs, consoles, and tablets running Minecraft 1.14. I’ll be using a Raspberry Pi

Continue Reading

howchoo

 467 guides

Introducing Howchoo, an enigmatic author whose unique pen name reflects their boundless curiosity and limitless creativity. Mysterious and multifaceted, Howchoo has emerged as a captivating storyteller, leaving readers mesmerized by the uncharted realms they craft with their words. With an insatiable appetite for knowledge and a love for exploration, Howchoo’s writing transcends conventional genres, blurring the lines between fantasy, science fiction, and the surreal. Their narratives are a kaleidoscope of ideas, weaving together intricate plots, unforgettable characters, and thought-provoking themes that challenge the boundaries of imagination.

Home Interests Clip Studio Paint

Top 10 free brushes in Clip Studio Paint

howchoo   (467)
September 27, 2023
12 minutes

Share

You’ll Need 1

What you’ll need
Interests
Howchoo is reader-supported. As an Amazon Associate, we may earn a small affiliate commission at no cost to you when you buy through our links.
Posted in these interests:
clipstudiopaint • 2 guides
digitalart • 2 guides

Do you work in Clip Studio Paint? Are you feeling some artblock? Do you want to expand your toolkit and/or experiment with your art?

Clip Studio Paint’s Assets portal is the best place to go! CSP users upload tons of downloadable assets, including many different brushes to work with! Whenever I’m feeling a bit in an art rut, I like to play with new brushes. I find that being able to experiment with new tools can sometimes lead to new inspiration. CSP Assets has a range of tools and materials, costing from free to requiring in-application currency. This article will focus on the free tools since there are plenty of great ones that you can download! If you want to learn how to download and install new assets, read this article first!

Downloading and Adding Assets in Clip Studio Paint

Now, onto my top ten favorite free brushes in Clip Studio Paint!

1 – Good pen (いいろペン)

Sometimes, what you get is exactly what it says on the tin. Japanese user いいよいいよ (allgood) created the self-named Good Pen (いいろペン), which is highly appropriate. This is genuinely one of the best lineart pens I’ve come across on CSP. It has that traditional manga-esque ink style to it, a thin grittiness, and is very responsive when it comes to pen pressure. Nine times out of ten, I’m using this pen to ink my lineart. I cannot recommend this one enough.

2 – Legend Sai Pen (PC version)

If you’re like me and are someone who moved to CSP from PaintToolSAI, then this is the brush for you! One of the reasons I frequented PaintToolSAI over Photoshop was because the brushes felt more natural and blended easier in PaintToolSAI. If you’re a SAI user looking for something familiar, then this brush is as close as you can get. CSP user Okanu created this brush (and an iPad version!) to have the same feel and texture of the original PaintToolSAI brush. I did find that the initial download felt too light and airy for me (which is akin to SAI’s style), so I upped the opacity and paint thickness to 100%. It still has that SAI smoothness, and works just fine even with the settings tweaked.

3 – DAE Pen 12345 Set

If you’re looking for more options in terms of lineart, CSP user 대 (dae) has a full set of lineart pens. When you download this asset, you get five free pens (I know, I’m cheating the whole ‘top ten’ thing)! Dae’s pens range from varied line thickness to a smoother, lighter texture. Having a full set can be beneficial if you’re looking to vary up the lines or are illustrating a piece entirely by inking. Dae also has several other sets, such as a sketch and paint set, so definitely check those out too!

4 – Lineart Pencil

This lineart pencil by Escente has a bit more grit than some of the lineart brushes listed so far. It definitely airs more on the ‘pencil’ side and has great sensitivity, allowing the artist to shade more effectively. It takes a bit of practice using, but it feels really nice to draw and sketch with.

5 – Qamala’s Graphic Marker

This marker truly feels like a graphic marker! It’s inky, has a flatter head, and is perfect for shading. If you want to use it for some chunky lineart, I suggest following Qamala’s tips regarding turning down the opacity and/or duplicating the inking layer.

6 – Illustrator Pen

Ranked #2 on CSP Asset’s popular search under free brushes, Imo86’s Illustrator Pen is a great starter tool for both lineart and shading. It’s more akin to a modern brush pen with just enough tooth to vary your lines.

7 – Watercolor marker and texture set

Okay, so this is another cheat on the top ten rule, but this watercolor marker and texture set by CSP user ×ェ× is absolutely gorgeous. Not only do you get thirteen brushes ranging from watercolor markers to blending brushes, you also get three texture and layer sets and an additional three tools, including a water stain brush. Using this set effectively requires practice and learning to layer the textures properly, but the end result looks like a watercolor painting on watercolor paper.

8 – Color Ink Wind Brush

If the last set seems a bit too complicated to start out with, try 摩耶薫子 (Mayakaoruko)’s Color Ink Wind Brush instead. This brush feels like a cross between a watercolor brush and painting with ink. It has a really nice texture to it already, and is a simple tool for creating a piece with a more watercolor or brushed ink look.

9 – Color Changing Brush!

This brush slightly changes the tone of whatever color you’re using. It’s super fun! This can be helpful if you have a hard time picking out colors or shades within the same color family. It feels a bit like working with oils or acrylics. If you’re looking to craft a piece with a more painterly feel, try PokiHan’s brush out!

10 – Copic Texture Brush

Have you ever worked with copic markers? Then, this copic texture brush is a great digital option! CSP user AcidKeyLime created this brush to not only imitate the texture of a copic marker but also the intensity of one. AcidKeyLime recommends building up the saturation for darker colors, just like using real copic markers! See further notes on this brush on AcidKeyLime’s page.

NEXT UP

Using 3D Reference Models in Clip Studio Paint

howchoo   (467)
September 26, 2023

Have you ever struggled with dynamic poses or trying to find a precise reference photo? Having good references is an important part of the prep process when it comes to drawing. Traditionally, many art classes have students practice figure and anatomy drawing by studying a real life model in class. Thankfully, now, there are other ways to

Continue Reading

howchoo

 467 guides

Introducing Howchoo, an enigmatic author whose unique pen name reflects their boundless curiosity and limitless creativity. Mysterious and multifaceted, Howchoo has emerged as a captivating storyteller, leaving readers mesmerized by the uncharted realms they craft with their words. With an insatiable appetite for knowledge and a love for exploration, Howchoo’s writing transcends conventional genres, blurring the lines between fantasy, science fiction, and the surreal. Their narratives are a kaleidoscope of ideas, weaving together intricate plots, unforgettable characters, and thought-provoking themes that challenge the boundaries of imagination.

Home Interests 3D Printing

How to Power a Raspberry Pi from a 3D Printer Using Your Printer’s Power Supply Unit (PSU)

Who needs more power bricks?
howchoo   (467)
September 27, 2023
14 minutes

Share

You’ll Need 8

What you’ll need
Interests
Solder x 1 tube
Foam tape x 1 roll
Howchoo is reader-supported. As an Amazon Associate, we may earn a small affiliate commission at no cost to you when you buy through our links.
Posted in these interests:
3dprinting • 36 guides
octoprint • 10 guides
pi • 92 guides

This guide will show you how to power a Raspberry Pi using your 3D printer’s power supply. This is especially useful if you’re using OctoPrint and only want to run your Pi when your 3D printer is running.

In a nutshell, we’re going to connect our printer to a small voltage regulator, also known as a “buck converter” or “step down converter”, to reduce the printer’s higher voltage to the 5V needed by the Pi.

This guide will work for any Raspberry Pi model, including the Raspberry Pi 4.

Important note: This guide involves electricity. Take proper precautions even when working with low voltages.

1 – Determine your connections

Before we can connect the LM2596 voltage regulator, we’ll need to determine where the connection should take place.

There are basically two methods of tapping into your 3D printer’s power supply:

Method #1: Run a new power supply line from your PSU

For this method, open up your printer’s power supply unit (PSU) and run a new positive (+) and negative (-) wire from one of the available slots. If you’re lucky, your PSU might have a separate 5V power output terminal.

In this unlikely case, no voltage regulator is needed! You can skip forward and connect these lines directly to your Pi. However, be sure that at least 2A is being output, or else you’ll need to use another supply line.

Note: Before opening your power supply, disconnect your printer’s power and wait for any capacitors in the PSU to discharge.

Method #2: Splice into the printer’s existing (external) wires

For this method, we can splice into one of the wires already coming out of your power supply. By splice, I don’t mean strip and use electrical tape. I recommend using some kind of Y-splitter cable to split the power out.

This method takes less time because no PSU disassembly is required. Additionally, it takes only seconds to revert the change if you’d like to undo your modifications. For these reasons, this is the method I’m going with.

My printer is the Creality Ender 3 and uses common XT60 connectors, so I used this extension cable. Some printers use other connectors, however; thus, be sure to choose a Y-splitter cable that will work with your printer.

The rest of this guide will work for you regardless of which approach you choose!

2 – Solder the buck converter INPUT wires

Now we’re going to connect the INPUT side of the LM2596 voltage regulator/buck converter to the printer’s power supply.

Since I’m using method #2, this means soldering my Y-splitter cable directly to the converter. I recommend printing a small enclosure for your LM2596; you can find tons of these on Thingiverse. The exact enclosure I used is included with this printer-mounted Pi enclosure.

First, Cut and strip one “leg” of the Y cable.

Then, solder the red positive (+) wire to the positive (+) INPUT terminal.

Finally, solder the black negative (-) wire to the negative (-) INPUT terminal.

Be sure to thread the wires through the enclosure opening before soldering them.

3 – Solder the buck converter OUTPUT wires

The Raspberry Pi 1, 2, 3, and Zero use a Micro USB port for power, so we’ll need to solder one to the output terminals of our buck converter. To do this, we’ll cannibalize an old Micro USB cable or AC adapter.

The Raspberry Pi 4 uses a USB-C port for power. If you’re using a Pi 4, you’ll need to cannibalize a USB-C cable or adapter instead.

Cut open and strip the cable. Locate the red positive (+) and black negative (-) wires, and solder these to the OUTPUT terminals of the buck converter.

Again, if you’re using an enclosure, thread the cable through the enclosure hole first.

🛈 Keep in mind how far your Pi will be mounted from the step down converter and don’t cut your cable too short!

4 – All soldered!

Lookin’ good.

5 – Adjust the buck converter output voltage

Next, we need to adjust the buck converter’s output voltage to 5V. For my printer, the line I’m tapping into is 24V, so I’ll be stepping this 24V down to 5V.

To do this, we’re going to connect a multimeter to the buck converter’s output, power on the printer (input), and turn a small potentiometer on the buck converter using either a small screwdriver or your fingernail.

If you don’t have a multimeter, you should think about picking one up. Check out our list of the best multimeters. Alternatively, you can alternatively purchase a buck converter that shows the output voltage on a built-in LCD display (though these are more expensive).

The Best Multimeters for Beginners and Pros (2022)
We present you with our guide to the best multimeter in five categories.

With your printer’s power cord disconnected, connect your buck converter to your printer’s power supply using either the wires you connected directly to your PSU (method #1) or the Y-splitter cable (method #2). Make sure neither the buck converter or any of your wires are touching any metal.

Then, set your multimeter to DC and connect it to the output terminals of the buck converter. I recommend using alligator clip leads if you have them; if you don’t, a second set of hands helps.

After you’re sure all hands and wires are free from any contact, connect your printer’s power cable and power it on. Turn the small potentiometer until your multimeter reads 5V. Then, turn off and unplug your printer.

🛈 Be EXTRA careful when working around live power so that you don’t electrocute yourself or your electronics.

6 – Secure the buck converter

Secure the LM2596 enclosure to your printer using foam tape, taking care not to mount it in the way of any moving parts.

7 – Secure all wires and power on the Pi!

Connect the USB cable to your Pi. Use zip ties to secure your wires away from any moving parts and power on your Pi.

Pat yourself on the back, you’re all done! If you’re working on an OctoPrint setup, be sure to check out my comprehensive OctoPrint setup guide.

🛈 Remember, you should always safely shut down your Pi through the OctoPrint interface prior to turning your printer’s power switch off.
NEXT UP

How to Run a Minecraft Server on the Raspberry Pi

A whole world trapped inside your Pi.
howchoo   (467)
December 7, 2023

There are several ways to go about running a Minecraft server on the Raspberry Pi. In this guide, I’ll cover how to install Nukkit—a cross-platform Minecraft server that’s super easy to set up on the Raspberry Pi. This server should work with PCs, consoles, and tablets running Minecraft 1.14. I’ll be using a Raspberry Pi

Continue Reading

howchoo

 467 guides

Introducing Howchoo, an enigmatic author whose unique pen name reflects their boundless curiosity and limitless creativity. Mysterious and multifaceted, Howchoo has emerged as a captivating storyteller, leaving readers mesmerized by the uncharted realms they craft with their words. With an insatiable appetite for knowledge and a love for exploration, Howchoo’s writing transcends conventional genres, blurring the lines between fantasy, science fiction, and the surreal. Their narratives are a kaleidoscope of ideas, weaving together intricate plots, unforgettable characters, and thought-provoking themes that challenge the boundaries of imagination.

Home Interests Guides

How to Connect Your Child with Friends on Messenger Kids

howchoo   (467)
September 27, 2023
3 minutes

Share

Interests
Posted in these interests:
guides • 10 guides

Facebook’s Messenger Kids is a free app that allows children to make video calls and send messages on smartphones and tablets, but with more control than just giving your child access to a phone. With Messenger Kids, parents can control their child’s online experience through a variety of functions that allow them to have a safe and secure online experience.

Connecting with friends is the purpose of the app, and there’s a way you can expand or reduce the number of people who see your child’s profile that can help protect them, or allow them to find more people to interact with.

Essentially, this feature acts as a ‘public vs. private profile’ feature. When turned on, parents and guardians will still be able to managed their child’s contact list or change this setting from the Parent Dashboard. When turned on, friends of your child’s contacts will be able to see your child’s name and photo, and can request to chat with you child.

1 – How To Help Your Child Connect With More Friends on Messenger Friends

  1. Open the Facebook app and tap the three horizontal lines in the bottom right.
  2. Scroll down and select ‘Messenger Kids.’
  3. Click on your child’s photo.
  4. Click ‘Controls,’ then select ‘Help (Child’s Name) Connect.’
  5. You’ll see a button next to ‘Allow friends of (Child’s Name) contacts to ask to chat?’ You can turn that on or off by clicking the button.
NEXT UP

How to Change the Windows 11 Start Menu and Button

howchoo   (467)
December 13, 2023

As with every update, Microsoft has changed Windows 11 to look different than its predecessors, and while the update looks modern and clean there are some interesting changes. Arguably the most jarring of all the changes is the one made to the Windows 11 Start Menu, which looks completely different. Instead of a clean, easy-to-navigate

Continue Reading

howchoo

 467 guides

Introducing Howchoo, an enigmatic author whose unique pen name reflects their boundless curiosity and limitless creativity. Mysterious and multifaceted, Howchoo has emerged as a captivating storyteller, leaving readers mesmerized by the uncharted realms they craft with their words. With an insatiable appetite for knowledge and a love for exploration, Howchoo’s writing transcends conventional genres, blurring the lines between fantasy, science fiction, and the surreal. Their narratives are a kaleidoscope of ideas, weaving together intricate plots, unforgettable characters, and thought-provoking themes that challenge the boundaries of imagination.

Home Interests Kids

Slow Media Modern Waldorf & Montessori Kids Can Watch!

If you’re looking for slow media for your modern Waldorf child, this list is for you.
howchoo   (467)
September 27, 2023
42 minutes

Share

Interests
Posted in these interests:
kids • 3 guides
nostalgia • 7 guides
popculture • 14 guides
television • 2 guides

Figuring out what constitutes “slow media” for Waldorf-inspired education is not easy. But media that Waldorf kids can watch does exist! However, the criteria for what media is acceptable to expose kids to is so vastly different for media-conscious parents than the typical age recommendations. Common Sense Media, for instance, offers age recommendations for kids, but it sometimes disregards important factors in a piece of media, like subtextual themes, subtle violence, and irreverence for human life and dignity. This is a problem that so many media recommendation aggregators for parents have. They provide recommendations that are too generic to be of any good.

I was homeschooled by media-conscious parents who, until I was ten, let only a few choice pieces of film and television into my life. But that was in the 1990s, and VHS cassettes were still top-dog technology! Now, it’s nearly impossible for parents to curtail their child’s media interaction—especially since many parents are so busy and stressed that being able to place the kid in front of a screen is one of the few ways for the basic tasks of life to get done. And that’s not even considering all those parents who have to work from home!

For kids, all media is educational: anything they’re exposed to will be something that helps them become who they will be—tomorrow, as well as later in life. Looked at this way, media for kids is all about finding the right balance between media that is engaging while also supporting skills in introspection, media literacy, and reverence for life. This is where a concentration on slow media, for younger kids especially, becomes so vital.

What are media-conscious parents supposed to do?

In 1994, the U.S. Department of Education’s Office of Educational Research and Improvement published guidelines that pointed out the importance of parental guidance for the media kids interacted with:

“Parental monitoring is a key factor, since the research studies show that increasing guidance from parents is at least as important as simply reducing media violence. Children may learn negative behavior patterns and values from many other experiences as well as TV programs, and parental guidance is needed to help children sort out these influences and develop the ability to make sound decisions on their own.”

And Renee Hobbs, expert in media literacy, made this point:

“Just because our students can use media and technology doesn’t mean they are effective at critically analyzing and evaluating the messages they receive. Students need a set of skills to ask important questions about what they watch, see, listen to and read. Often called media literacy, these skills include the ability to critically analyze media messages and the ability to use different kinds of communication technologies for self-expression and communication.”

However, just as media can have extremely detrimental effects on a child’s development, it can have positive effects as well! The key is ensuring that children are accessing only that sort of media that is appropriate to their development, will offer them tools for greater self-awareness and compassion, and will help imbue them with an advanced sense of reverence for the world around them. Reverence, especially, is a vital factor in understanding a modern approach to Waldorf-inspired education. With parental guidance, sound training in media literacy, and a deep concentration on the experience of compassion and reverence, it is possible to bring media into a child’s life in a wholesome and holistic way.

Criteria for inclusion

The most important thing to note about this list is that not all shows should be viewed in a vacuum. I’ve provided important details and a unique rating system to help parents explore this content and decide if it is appropriate for their kid. However, children don’t all develop at the same pace, and the experience and media that a child accesses elsewhere in their life may cause them to have unexpected experiences with any new media!

It’s vital that parents check in with their child and ask them questions that help the child enunciate their thoughts and feelings regarding the media they are exposed to. Likewise, parents should attempt to interact with their child’s media themselves whenever possible, and be present to discuss things with the child that the child may not understand.

Whatever you do, don’t assume that just because something is labeled as “good for kids” it actually is! So much of the content created for children, especially these days, features all manner of implicit violence, humor, social norms, and political subtext that kids simply aren’t able to parse on their own (and which will become part of their unconscious processing of the world). Likewise, the pace of so much media “for children” tends to be extremely hectic, reinforcing unfortunate attention issues as well as behavioral issues when that hectic pace is attached to scenes of action and, or, humor.

Luckily, some great options for kids do exist, and you can find them here!

1 – Mister Rogers’ Neighborhood (1962)

Mister Rogers’ Neighborhood (1962)

Mister Rogers’ Neighborhood changed so many lives over the course of its existence as one of the longest-running television series ever, and it still has the power to inform and inspire young viewers today.

Recommendation

Mister Rogers’ Neighborhood (1962)

Fred Rogers believed that media needed to be slower, needed to engage with kids in a different way than all those other shows they had access to, and he provided the sort of content in his series that acted as a balm to some of the damage caused to children by the increasingly hyperactive and violent media directed their way.

Mister Rogers’ Neighborhood is available in full on DVD, and I suggest starting out with the very earliest episodes and working forward. That’s a lot of viewing time and a whole lot of wonderful information as well.

2 – Noggin the Nog (1959)

Noggin the Nog (1959)

Noggin the Nog offers a delightful tale of the Viking King Nog of the land of Nog, a place filled with all manner of the fairy tale fantastic, from talking birds to dragons. The stories all concentrate on Nog’s adventures, usually opposed by the machinations of “Nogbad the Bad,” who wants to take Nog’s throne for himself.

Recommendation

Noggin the Nog (1959)

The story is told through stop-animation, with narration and simple voice-acting bringing the world and the characters to life. In this way, it’s more like experiencing an animated storybook than a modern animation.

3 – Mr. Benn (1971)

Mr. Benn (1971)

Mr. Benn is the story of a typical businessman who wears a suit and black bowler hat most of the time, but who also knows a wonderful secret: if he visits the costume shop and dons a costume, he can walk through the door at the rear of the shop and be transported into an infinite number of possible worlds on imagination.

Recommendation

Mr. Benn (1971)

Mr. Benn works brilliantly for younger children for a number of reasons, not the least of which is due to the extremely simple animation style, which is little more than a moving picture-book with delightful narration. Kids won’t be caught up in a violent swell of frenetic action as with so many series aimed at children—instead, each episode will see them following Mr. Benn as he takes an adventure of the imagination in gentle, slow style. There’s always a gentle moral in the story, but nothing too preachy.

4 – The Moomins (1977)

The Moomins (1977)

The Moomins are the central characters the series is named for, fairy tale creatures who live in their house in Moominvalley. Their little family has all sorts of adventures and meet all manner of interesting characters, and there is contained within their lives a most wonderful appreciation for all the complexities of life—wrapped up in the perfect form for a child to enjoy.

Recommendation

The Moomins (1977)

The Moomins has had a few television incarnations, but this is one of the best, with lots of great input directly from Tove Jansson who created the Moomins comics. The 1990s Japanese animated version is also wonderful, however, and can be shown to kids a year or two later when they start to have more exposure to fully animated works (it’s better to start kids off with stop-motion and other slow forms of animation first).

5 – Pogles’ Wood (1965)

Pogles’ Wood (1965)

Pogles’ Wood offers the tale of the Pogles, tiny magical beings who live in hollow trees in the woods. The Pogles in this story are Mr. And Mrs. Pogle, their adopted son Pippin, and a squirrel-creature named Tog.

Recommendation

Pogles’ Wood (1965)

The original series, entitled Pogles’ Wood, has some themes that are a teensy bit on the darker side of fairy tale lore, and might be better appropriate for a child one or two years older. But, overall, this series is idyllic and ideal, with bold imagination and a sweet sensibility in how it blends the real-world with the world of the childhood fantastic.

6 – Bagpuss (1974)

Bagpuss (1974)

Bagpuss is another lovely stop-motion animation created by the same people who brought Noggin the Nog and The Pogles to life. It centers on a shop where nothing is sold, and the magical inhabitants who are all different toys that come to life when a little girl Emily speaks a special poem to Bagpuss, a cloth cat doll who she loves very much.

Recommendation

Bagpuss (1974)

It’s got a great cast, a wonderful slow form of narration, and a divine series of heartwarming tales that center on things Emily brings into the shop in the hope of their finding their way back to their original owners.

7 – Camberwick Green (1966)

Camberwick Green is the small fictitious village where the series takes place. Each episode sees the villagers of Camberwick Green dealing with one or another domestic crisis (such as a water shortage or a swarm of bees) but, by the episode’s end, all the problems are worked out to the benefit of all.

Recommendation

Camberwick Green (1966)

The whole series is done with brilliant stop-motion puppets, carefully guided through their plot by the gentle voice of the narrator who describes their adventures.

8 – The World Of Peter Rabbit & Friends (1992)

The World Of Peter Rabbit & Friends (1992)

Possibly the best adaptation of Beatrix Potter’s famous tales, this version effortlessly melds reality with delightful simple animation. Each episode begins with Beatrix Potter (played by Niamh Cusack) painting in the woods or else doing her shopping in town. This live action sequence is always beautiful and shows her as she returns home to pen one of her famous stories. The stories themselves are then shown through animation. The score is of particular note with this one: hauntingly beautiful, it’s easily the best music for any adaptation of Beatrix Potter’s work.

Recommendation

The World Of Peter Rabbit & Friends (1992)

The World Of Peter Rabbit & Friends is my choice for kids for a number of reasons. It’s aesthetically meticulous, gorgeous in both photography, animation, and sound-design, and provides an immersive experience that encourages children’s love of nature. Dianne Jackson, director of the 1982 Christmas special The Snowman, was involved in the production, so if you’ve seen that (and who hasn’t!) you’ll instantly know that this series is something special.

9 – Wallace and Gromit (1989)

Wallace and Gromit (1989)

Wallace and Gromit is a claymation production featuring a man named Wallace, an inventor who loves cheese, and his more-intelligent dog companion, Gromit. Together, they get into all sorts of hijiinks and adventures, from their attempt to fly to the Moon (because it’s made of cheese), to discovering the source of the missing carrots at Halloween!

Recommendation

Wallace and Gromit (1989)

Since the whole series is made through stop-motion, the animation style has a uniquely tactile feeling to it. Some of the action in the series is a little faster, so it’s better for children who are a smidgen older and already have some media experience under their belt—likewise, a few episodes will be scary for kids who haven’t already encountered some media.

There are film shorts, feature films, and two television series of this excellent series!

10 – Reading Rainbow (1983)

Reading Rainbow (1983)

Reading Rainbow helped untold numbers of kids all over the United States, and often much farther, learn to love reading books. Hosted by the incomparable LeVar Burton, the series was a magical adventure into the topic from a children’s book, from history to hats!

Recommendation

Reading Rainbow (1983)

Considering how important it is for children to have early and wide access to good reading material, Reading Rainbow really is the ideal show for kids to watch.

11 – The Addams Family (1964)

The Addams Family (1964)

The Addams Family are happiest when it’s rainy and gray, when thunder and lightening kiss the sky, and when Halloween is near. Their delightful approach to the moribund condition of life is one of dynamic dualism: they are at once wealthy and yet eschew all value in money; they are fans of all things strange and dark yet show emotion freely and express their love for one another in little acts of kindness. In so many ways, the Addams family provides a staple vision of an accepting, open-minded, and relatively stable family system.

Recommendation

The Addams Family (1964)

This version of The Addams Family really is the definitive version, though I also highly recommend the 1991 film The Addams Family as well as the 1993 Addams Family Values for children of around 12 years old. The classic 196os series, however, offers the best version of the Addamses for younger children, while remaining intimately enjoyable by adults. The best part about the series is how it portrays a loving family and a strong spousal relationship (especially rare in television from the era). The Addams Family also offers a subtle counter-culture thread that younger kids will benefit from: seeing a family that eschews conservative social values while simultaneously offering oddly healthy alternatives.

12 – The StoryTeller (1987)

The StoryTeller (1987)

Fairy tales underpin every aspect of our culture at a primal level, and yet are so infrequently brought to life with the sort of care and reverence they require. Well, Jim Henson’s brilliant series remedies that, providing faithful, funny, dark, and brilliant adaptations of both classics and less

Recommendation

The StoryTeller (1987)

The StoryTeller might strike kids who have lots of previous media experience as a bit slow, but even so, it should capture their imaginations… if give time. For kids without much media experience, some of the portrayals of the fairy tales might be a teensy bit scary. I’d generally say that’s okay, however: the darker side of fairy tale myth is an important reason for the existence of fairy tales. Just make sure that your child gets a chance to talk about what they thought and felt after watching an episode.

Waldorf parents will know a bit about the 9-year change, the point where some of the harder aspects of growing up begin to emerge in children. This period of time is when kids start to want privacy, start to distance themselves from their parents, and start to wonder about things like “why do people die?” Fairy tales might seem a bit intense and dark, but that’s exactly what kids at this age need: because they are going through the first intense stage of their lives.

13 – The Magic Schoolbus (1994)

The Magic Schoolbus (1994)

The Magic Schoolbus follows the magical adventures of Ms. Frizzle’s class, which takes field trips to all manner of locales—in all possible times! It focuses on science and social-emotional lessons.

Recommendation

The Magic Schoolbus (1994)

I specifically don’t recommend the newer series, The Magic School Bus Rides Again because it follows the modern mode of thinking regarding children’s shows: that faster, flashier, and more frenetic is likely to capture children’s attention. As always, I prefer shows which help children develop their imaginative capacities, which is aided by slower-form media!

The 1990s series has plenty of action, though, so kids will love it—but the tone as well as the quality of the hand-drawn animation are more conducive to a child’s imaginative interaction with the media.

14 – Doctor Who (1963)

Doctor Who (1963)

Doctor Who is one of the longest-running series in existence, with untold cultural impact on both the United Kingdom and the world-at-large. The tale of a “Time Lord” with a fondness for Earth who ends up traveling through time and space with various human companions, Doctor Who is a fantastic voyage to the limits of the imagination. The first two seasons, in black and white and with highly-staged environments, are ideal for kids who are just starting to explore new media forms.

Recommendation

Doctor Who (1963)

Doctor Who as a whole is not a something a kid should just sit down in front of to watch, but the first two seasons are excellent in terms of pace and style. I would suggest jumping from these early seasons straight to Tom Baker’s run as the Doctor in 1974. What I do not recommend is allowing kids to watch the newer shows, not until they’ve hit their early teens.

Parents should mainly be aware of the sexism that can emerge in these early series, which is incredibly casual. Likewise, the lack of minority representation is something to be aware of. The sexism, which can be particularly acute at times, is something parents should take special note to speak with their children about before, during, and after an episode.

15 – Star Trek: The Next Generation (1987)

Star Trek: The Next Generation (1987)

Star Trek is one of the best-known and most-loved franchises in the world, and for good reason. At its best, the series is a definitive attempt to imagine a healthy post-capitalist future, in which the driving force in people’s lives is not the acquisition of wealth but the betterment of self and the advancement of the species. The Next Generation is technically the 3rd incarnation of the franchise (with an animated series sitting between it and the original Star Trek). With a cast made of largely of classically trained stage actors, the pacing is frequently slow, the content is rich, and many episodes feature important ethical and philosophic content.

Recommendation

Star Trek: The Next Generation (1987)

Star Trek: The Next Generation is the one to watch if you want to introduce a kid to Star Trek, but some episodes aren’t suitable for children for various reasons. A parent that is deeply concerned about what their child is exposed to will need to make a case-by-case basis on the episodes in a season, requiring a bit more work. Some sexual themes exist in the show, but few that are unreasonable for a 10 to 12-year-old; and some feature violence that kids might be influenced by too easily. (One of these days I’ll get around to writing a kids-viewing-order list!).

I strongly, strongly recommend not allowing children to view the modern versions of Star TrekEnterprise, Deep Space Nine, and Voyager, are more suitable for a child of 13+. Discovery, and most definitely Lower Decks feature content I would categorize as 17+ (and I wouldn’t let even a teenager watch Lower Decks, honestly. It seems that all the newest Star Trek material is anything but “slow” and frequently features the sort of casual irreverence, violence, and sexualized humor that just isn’t a good influence on kids.

All that said: Star Trek is one of the most potent introductions to the sort of stories that provide a vital alternative to the negative social norms found throughout modern society.

NEXT UP

30 of the Rarest Board Games

30 rare board games that every collector wants!
howchoo   (467)
September 29, 2023

Board games may not be the first thing on your mind when you think of collectibles, and yet there is a deep and not-so-hidden world of board game hoarding, collecting, and trading as complex as that found within any other area of interest — perhaps deeper! There is a huge range of wonderful old games

Continue Reading

howchoo

 467 guides

Introducing Howchoo, an enigmatic author whose unique pen name reflects their boundless curiosity and limitless creativity. Mysterious and multifaceted, Howchoo has emerged as a captivating storyteller, leaving readers mesmerized by the uncharted realms they craft with their words. With an insatiable appetite for knowledge and a love for exploration, Howchoo’s writing transcends conventional genres, blurring the lines between fantasy, science fiction, and the surreal. Their narratives are a kaleidoscope of ideas, weaving together intricate plots, unforgettable characters, and thought-provoking themes that challenge the boundaries of imagination.

<!–
–> <!–

Discuss

–> <!–
–> <!–
–> <!–
–>
Home Interests Minecraft

Best Server Utility Mods for Minecraft (Fabric)

Fabric mods that help with server management or improves performance!
howchoo   (467)
September 27, 2023
22 minutes

Share

<!–
–> <!–

Discuss

–> <!–
–> <!–
–> <!–
–>
Interests
Posted in these interests:
READY PLAYER 1
gaming • 85 guides <!– –>
Minecraft is an epic sandbox video game developed by Swedish game developer Mojang Studios.
minecraft • 66 guides <!– –>
minecraftfabric • 8 guides <!– –>

The variety of mods available for Minecraft is just as vast as the worlds within the game itself. Most likely, any mod you could want or dream of has already been developed. As an avid Minecraft player, I’ve recently become obsessed with Fabric Minecraft mods and run a survival multiplayer server (SMP)!

This guide will go through mods available for Fabric Minecraft multiplayer servers that add tools for server management or improves performance. The following list includes not just one type of mod, but a large variety. So whether you’re hosting a server that’s PVP or casual, you’ll find something for any type of Minecraft player!

If you’re interested in more mods for Minecraft, check out the Minecraft Forge interest!

Note that at the game versions available may change since the time of publishing. Most photos were taken using BSL Shaders and Optifine in 1.16.5.

1 – Xaero’s Minimap and World Map

By xaero96

Game Versions: 1.12, 1.14, 1.15, 1.16, 1.17

These are two mods I’ve grouped together for obvious reasons. This is an easy to use, completely customizable minimap that also benefits from the larger World Map mod, but doesn’t require it. It has an infinite amount of waypoints and integrates with the Waystones mod. It also displays dots for various items or entities on the map. I highly recommend these mods and use them frequently in my own playthrough.

2 – Spark

By Iucko

Game Versions: 1.12, 1.15, 1.16, 1.17

Spark is a mod made for Minecraft to monitor and report on performance. It has a CPU profiler, inspects memory usage and issues, and even server health reporting. All you need to do is install it and use commands to get whatever information you want!

3 – WorldEdit

By k89q

Game Versions: 1.12, 1.14, 1.15, 1.16, 1.17

If there’s ever a mod that server admins need to learn, it’s WorldEdit. My entire gameplay and building has changed since learning to just the basics of WorldEdit. This is the best Minecraft map editor mod out there. Change the landscape, copy or paste blocks, import schematics, and so much more. It’s the best mod to use when wanting to build a world spawn area in a server.

4 – Origins

By Apace100

Game Versions: 1.16, 1.17

The Origins mod changes the gameplay of a world by having the player choose a character origin at the beginning of the game. Each origin has its own abilities and weaknesses that affect how they’ll play Minecraft. For example, the Avian origin moves quicker and has slow falling, but can’t eat meat or sleep at low altitudes. The Fabric version has many more add-ons than the Forge alternative. A few are Mob OriginsClasses, and Expanded Origins!

5 – OptiFabric

By Chocohead

Game Versions: 1.14, 1.15, 1.16, 1.17

An essential mod for a server, OptiFabric enables the use of Optifine for players. Without it, no one will be able to use shaders and have those beautiful screenshots to share!

6 – Simple Voice Chat

By henkelmax

Game Versions: 1.15, 1.16, 1.17

This is a must-have for servers that want to foster community as well as exploration. This adds a proximity chat to the server, which can be set for push to talk or voice activation. It’s completely configurable for volume control, and you can even test your microphone with a playback feature to make sure the quality is good.

7 – Feed the Beast Mods

I’ve bundled all the Feed the Beast (FTB) mods together because they’re great as a package and tend to rely on one another for full functionality. They’re what I currently use for a modded Minecraft server! My main complaint, however, is the lack of accurate documentation for some mods. Just something to keep in mind for consideration.

FTB Backups
Game Versions: 1.12, 1.14, 1.15, 1.16
Provides a configurable backup system for servers and creates them only when players are online to save space from clutter!

FTB Quests
Game Versions: 1.12, 1.15, 1.16
For those that want a server with quests, this is a great mod to have. It makes it easy to create custom quests for players.

FTB Chunks
Game Versions: 1.15, 1.16
This mod comes with its own world map and minimap. More importantly, it allows for players to claim chunks. Only those the player allies with will be able to interact or affect blocks in the claimed area. I highly recommend using in conjunction with FTB Teams for full functionality.

FTB Teams
Game Versions: 1.15, 1.16
This mod adds the ability for teams to be made. On its own, it’s not very impressive, but matched with FTB Chunks and FTB Quests, servers run smoothly.

FTB Ultimine
Game Versions: 1.12, 1.15, 1.16
This is a great VeinMeiner alternative for newer game versions. With a configurable key, players can harvest multiple blocks at once. You can also configure a whitelist of blocks for the server!

FTB Essentials
Game Version: 1.16
This mod adds utility commands that are essential to running and maintaining a server. It allows players to teleport to one another, change nicknames, set homes, and more!

FTB Ranks
Game Versions: 1.15, 1.16
This is essential if you want to enable permissions on a server. Completely configurable, you can set ranks for new players, moderators, and any other type that give specific access to mod commands.

8 – Chat Heads

By dzwdz

Game Version: 1.16

This is a mod for clients that makes chat just a little more developed. It adds the player head beside their messages, which makes it much easier to tell people apart in a larger sized server.

9 – FastDecay

By bradbot_1

Game Version: 1.17

One of the more annoying aspects of Minecraft are the floating leave blocks that sit in the air after you’ve chopped down a tree. This mod speeds up leaf decay, so you can get your loot and airspace back in seconds!

10- Fabric Waystones

By LordDeatHunter

Game Versions: 1.16, 1.17

This mod is essential for Fabric multiplayer servers where players spread out and claim areas for themselves. Fabric Waystones adds blocks for the player to return to once they’re activated. There’s also Abyss Watcher and Pocket Wormholes which players can have on hand to use to hop to a waystone they’ve already found. It’s very customizable for server administrators to set the cost and permissions.

11 – Fat Experience Orbs

By NinjaPhenix

Game Versions: 1.14, 1.16, 1.17

When running a server, you need to find ways to reduce lag everywhere. Experience orbs are one of the most forgotten aspects, which is why Fat Experience Orbs is a perfect mod for servers. It groups together XP orbs into one entity and makes the player collect them once they’re touched to help reduce lag.

12 – Dual Riders

Photo is from the sister mod, Two Players One Horse! CurseForge

By Flytre7

Game Versions: 1.16, 1.17

As the name implies, this mod allows for two players to right on one horse! Friend not included.

13 – Lithium

CurseForge

By jellysquid3

Game Versions: 1.15, 1.16, 1.17

This mod is an essential for troubleshooting or just optimizing both a singleplayer world and server. Lithium is made to improve tick times through powerful optimizations of mob AI, physics, world generation, and block ticking!

14 – Gunpowder

By Martmists

Game Versions: 1.14, 1.15, 1.16, 1.17

Gunpowder is actually a full customizable mod with multiple parts. Instead of having every module in one, the developer has broken them down, so server admins can pick and choose what features they want. This certainly helps save space, loading times, and from having duplicate features in one server. Below is a brief explanation for each module you can download:

  • Currency adds money and commands to pay between users.
  • Discord Whitelist enables admins to connect a Discord server to the Minecraft server based on specific roles.
  • Market allows players to buy and sell items and requires the Currency module.
  • Permissions sets up a list of permissions based on player groups.
  • Signshop turns chests with signs into shops for players to buy from.
  • SleepVote enables the night to pass without needing everyone to sleep.
  • Teleport adds useful teleportation and home commands.
  • Utilities add miscellaneous commands that are functional or fun.

15 – Project: Save the Pets!

Who would hurt a face like that?

By SophiaCoxy

Game Versions: 1.16, 1,17

This is a mod that protects pets from others and the player themselves. We all have those oopsie moments where we accidentally switch to a sword instead of a steak. This mod prevents any pet from being damaged (emotionally or physically).

16 – Prefab

CurseForge

By wuestman

Game Versions: 1.16, 1.17

For those that want to just get right into exploration or resource gathering, I highly recommend Prefab. Not only can you preview builds in real time, but modpack creators or server admins can give new players blueprints to get them situated easily in the world.

17 – Hardcore Questing Mode

VsweGoesMinecraft (YouTube)

By LordDusk

Game Versions: 1.12, 1.16

If you’d like to host a server that’s hardcore but also stays active for longer, then consider using Hardcore Questing Mode. It lets players experience hardcore mode without only having one life or being banned from the server. While quests aren’t in the mod already, there is an in-game editor. It also has a tiered reward system and death counter/tracker.

18 – Name Pain

By naqaden

Game Versions: 1.14, 1.15, 1.16

This mod adds some fun to player and mob names by adding cosmetic changes to their appearance. Once an entity has been hit, you can spot their names and even see how their health is based on its color.

19 – Carrier

PwrDown (YouTube)

By GabrielHOlv

Game Versions: 1.16, 1.17

Carrier is a mod that enables players to carry various blocks and entities at the cost of slowness and increased hunger. That’s right, you can finally carry your tamed pets and place them own wherever you want them!

20 – Hole Filler Mod

By DannyBoyThomas

Game Version: 1.16

Last is not least in the case of this mod. This mod contains a hole filler item that fills up a hole with dirt or your chosen block. This is an incredibly lightweight and handy mod to have, especially when creepers are spawning in the world.

NEXT UP

Top 10 Enchantments in Minecraft

howchoo   (467)
March 25, 2024

The longer you play Minecraft, the more you realize that early-game tools just won’t cut it. Exploring the enchantment feature of Minecraft can be exciting, but also intimidating. Rather than worry about researching enchantments, below are the best enchantments in Minecraft! To learn how to enchant items, check out this guide! In this guide, you’ll see

Continue Reading

howchoo

 467 guides

Introducing Howchoo, an enigmatic author whose unique pen name reflects their boundless curiosity and limitless creativity. Mysterious and multifaceted, Howchoo has emerged as a captivating storyteller, leaving readers mesmerized by the uncharted realms they craft with their words. With an insatiable appetite for knowledge and a love for exploration, Howchoo’s writing transcends conventional genres, blurring the lines between fantasy, science fiction, and the surreal. Their narratives are a kaleidoscope of ideas, weaving together intricate plots, unforgettable characters, and thought-provoking themes that challenge the boundaries of imagination.

<!–
–> <!–

Discuss

–> <!–
–> <!–
–> <!–
–>
Home Interests Minecraft

Best Mob and Entity Mods for Minecraft (Fabric)

Fabric mods that add new mobs, pets, and villagers to Minecraft!
howchoo   (467)
September 27, 2023
10 minutes

Share

<!–
–> <!–

Discuss

–> <!–
–> <!–
–> <!–
–>
Interests
Posted in these interests:
READY PLAYER 1
gaming • 85 guides <!– –>
Minecraft is an epic sandbox video game developed by Swedish game developer Mojang Studios.
minecraft • 66 guides <!– –>
minecraftfabric • 8 guides <!– –>

Minecraft is a sandbox game that lets you explore and wander to your heart’s content. That world usually includes various wildlife and even villagers. However, sometimes you want more variety in your gameplay, which is where this mod list comes in!

This guide will go through mods available for Minecraft Fabric that add new mobs, pets, and villagers to Minecraft. While some add mini-bosses, others improve upon Minecraft villagers. So whether you’re hosting a survival multiplayer server or you’re playing alone, you’ll find a mod that opens up your world even more!

If you’re interested in more mods for Minecraft, check out the Minecraft Forge interest!

Note that the game versions available may change since the time of publishing. Most photos were taken using BSL Shaders and Optifine in 1.16.5.

1 – Elemental Creepers: Refabricated

By luligabi12

Game Versions: 1.16, 1.17

You might be questioning why the world needs more creepers, but trust the process. This mod adds in various new variations to the standard creeper based on biomes and environment. Based on its variation, their explosions effect the environment. For example, the earth creeper explodes into a dirt pile, while the water creeper leaves behind a water fountain.

2 – More Villagers

By SameDifferent

Game Versions: 1.16, 1.17

After some time on a server, trades with Minecraft villagers can get boring. This mod adds multiple new jobs for villagers, along with workstations and unique trades. Some professions you’ll see are netherologist, forester, engineer, florist, and hunter!

3 – Identity

By Draylar1

Game Versions: 1.15, 1.16, 1.17

This is a unique mod that I recommend for any server type. Identity allows players to transform their appearance to various mobs within the world. A few identities even have their own abilities. For example, the creeper form explodes the nearby area, while the enderman form lets you teleport around.

4 – Golems Galore

By ffrannny

Game Versions: 1.16, 1.17

Have you ever looked at a golem and thought, “Why can’t you be different?” Golems Galore is your answer! It adds a variety of golems (some with special abilities) that generate in villages or can be crafted.

5 – Terrarian Slimes

Yes, that is a slime with an umbrella hat!

By D4rkness_King

Game Versions: 1.16, 1.17

Inspired by TerrariaTerrarian Slimes adds slime mob variants to the world. Slime variants spawn throughout the world instead of just in a slimechunk, and come in different sizes and colors. There is also a boss slime called The King Slime, which can be summoned and defeated to gain a tool that will make all slime peaceful towards the player.

6 – NPC Variety

By YumatanGames

Game Versions: 1.16, 1.17

NPC Variety adds something the villages greatly lack, a variety in appearance. While it doesn’t add any new professions for villagers, it does add eight skin tones and five eye colors, both of which can be passed down to their children. It also closes their eyes as they sleep, which isn’t something I thought about until right now.

7 – Environmental Creepers

CurseForge

By masady

Game Versions: 1.12, 1.14, 1.15, 1.16

One of the worst things about creepers is how they tend to destroy dropped items when they explode. This mod helps prevent that by dropping all blocks that a creeper explodes! It also allows for configuration for creeper explosion distance, strength, and more.

8 – Animal Feeding Trough

By Slexom

Game Versions: 1.16, 1.17

One of the hard parts about breeding animals is remembering to feed them. This mod adds a block that mobs will eat from and breed as if the player had fed them. It’s great for mob farms!

9 – Mooblooms

By YanisBft

Game Versions: 1.14, 1.15, 1.16, 1.17

Mooblooms are adorable cows that mimic the flower or organic material they’re named after. For example, the Blue Orchid Moobloom is a cow that grows blue orchids on its back. This mod also comes with four similar chicken variants called Cluckshrooms!

10 – Eldritch Mobs

Spiders are the worst. Look at all those effects!

By cyborg_pigeon

Game Versions: 1.16, 1.17

If you’re a challenge seeker or someone who just wants to die a lot in Minecraft, then consider adding this mod. Eldritch Mobs adds dangerous and unique mobs to your world. There are three tiered categories of modified mobs with configurable abilities, health, and dropped loot. Abilities could include yeeter, where the mob launches the target into the air, or duplicator, where the mob will occasionally create a clone of itself!

NEXT UP

Top 10 Enchantments in Minecraft

howchoo   (467)
March 25, 2024

The longer you play Minecraft, the more you realize that early-game tools just won’t cut it. Exploring the enchantment feature of Minecraft can be exciting, but also intimidating. Rather than worry about researching enchantments, below are the best enchantments in Minecraft! To learn how to enchant items, check out this guide! In this guide, you’ll see

Continue Reading

howchoo

 467 guides

Introducing Howchoo, an enigmatic author whose unique pen name reflects their boundless curiosity and limitless creativity. Mysterious and multifaceted, Howchoo has emerged as a captivating storyteller, leaving readers mesmerized by the uncharted realms they craft with their words. With an insatiable appetite for knowledge and a love for exploration, Howchoo’s writing transcends conventional genres, blurring the lines between fantasy, science fiction, and the surreal. Their narratives are a kaleidoscope of ideas, weaving together intricate plots, unforgettable characters, and thought-provoking themes that challenge the boundaries of imagination.

Home Interests Raspberry Pi

Automatically Control Your Raspberry Pi Fan (and Temperature) with Python

It’s getting hot in here (so hot), so let’s just write some code.
howchoo   (467)
September 27, 2023
27 minutes

Share

You’ll Need 11

What you’ll need
Interests
Solder x 1
Howchoo is reader-supported. As an Amazon Associate, we may earn a small affiliate commission at no cost to you when you buy through our links.
Posted in these interests:
python • 18 guides
pi • 92 guides

Since the Raspberry Pi 4 was released, many have noticed that it can get pretty hot, especially when the CPU is under heavy load.

Raspberry Pi 4: Review, Specs, and Where to Buy
The latest and greatest in single-board computing!

A Raspberry Pi enthusiast, Jeff Geerling, released a pretty cool video showing how to add a fan to the Raspberry Pi to help keep the temperature under control. That project was pretty great but I wanted to take it to the next level and add the ability to only turn the fan on when needed by monitoring the core temperature. This way, a noisy fan isn’t running all the time.

How to Add a Fan to the Raspberry Pi 4 for Proper Cooling (You Need One)
It’s getting hot in here, a fan will cool your Pi.

In this guide, I’ll cover the whole project from start to finish. First, we’ll install the fan onto the official Raspberry Pi case and wire it up so it can be activated by a GPIO pin. Then we’ll write some Python code to monitor the temperature and activate the Pi when the temperature reaches a certain threshold.

Requirements

In order to complete this guide, you’ll need a Raspberry Pi 4 with the latest version of Raspbian installed. The scripts I’ve included are written for Python 3.7, which is the default Python 3 version in the September 2019 version of Raspbian. Newer Raspbian versions will work as well 🙂

Update 11/30/20: An official Raspberry Pi 4 case fan was recently released. This is ideal for anyone who wants to cool their Pi with name-brand hardware. It’s specifically designed to fit the official Raspberry Pi 4 case.

1 – Install the fan onto the case

The fan installation is pretty simple, and we’ve covered it in more detail elsewhere. In this guide, I’ll cover the basics, but if you need more detailed instructions head on over to our guide on installing the fan onto your Raspberry Pi 4.

How to Add a Fan to the Raspberry Pi 4 for Proper Cooling (You Need One)
It’s getting hot in here, a fan will cool your Pi.

Drill a hole for the fan

There is plenty of room for the fan as long as you keep it away from the USB ports. See the image for reference. Place a mark on the Pi case where you want the center of the fan to be. Then drill a hole using a 1-1/8″ hole saw. I was fortunate enough to have access to a drill press, but if you don’t, a handheld drill will work. After the hole is drilled, smooth out the rough edges with sandpaper or a file.

Drill screw holes

With the fan hole drilled, place the fan on the inside of the case, centered in the hole. Then mark the case at the center of each screw hole. For this you can use a center punch, small screwdriver, or pencil. Then, remove the fan and carefully drill the screw holes using a 7/64″ drill bit.

Mount the fan

I’m going to add this step here but I actually recommend doing this after the fan is wired up. When you’re ready, mount the fan inside the case with the Pi-FAN sticker facing up. Use the included nuts and bolts to secure the fan inside the case.

2 – A explanation of the circuit

In this step, I’ll provide a breakdown of the circuit. We’re only using a few components: the 5V fan (represented by the big DC motor in the image), a 680Ω resistor, and an NPN transistor (2N2222).

Fan power needs

The transistor is the most interesting piece of this circuit. It’s necessary because the fan requires 5V to operate but the Pi’s GPIO pins are only capable of supplying 3.3V. GPIO pins could power something small, like an LED, but they shouldn’t be used for anything more. Likewise, the Pi’s 5V pins are connected directly to the power supply and cannot be controlled via software. Therefore, we need a way to power the fan using the 5V pin, but switch it on and off using a GPIO pin. Enter the transistor.

Transistor

The transistor is an interesting electrical component used to switch or amplify power. In our case, we’re using it as a switch. There are many types of resistors, but we’re using an NPN transistor. So the “base” pin of the transistor is connected to the BCM 17 (a GPIO pin) with a 680Ω resistor in between. The positive lead on the fan is connected to the 5v pin, and the ground is connect to the “collector” pin in our transistor. Lastly, the “emitter” of the transistor is connected to the ground.

So when pin 17 is switched to HIGH, it will send some voltage to the base of the transistor, which closes the circuit and turns on the fan.

3 – Build the test circuit

Before soldering anything, it’s wise to test the circuit using a breadboard. I will avoid another explanation of the circuit but I hope that, between the previous step and this image, you’ll be able to reconstruct the circuit. We won’t be able to test the circuit until the software is written, so let’s move on to the next step!

4 – Use the install script

I created the fan script and published it to a public Howchoo repo called pi-fan-controller.

The easiest way to install the fan controller scripts is to use our install script. To do so, SSH into your Pi and clone the repository:

How to Connect to a Raspberry Pi Remotely via SSH
The preferred (and most common) method of connecting to your Pi to run commands.

git clone https://github.com/Howchoo/pi-fan-controller.git

If you don’t already have git installed, you’ll need to install git first using sudo apt-get install git.

Next, install the requirements:

# If pip is not already installed run:
sudo apt install python3-pip

# Install requirements globally
sudo pip3 install -r pi-fan-controller/requirements.txt

Now, run the install script:

./pi-fan-controller/script/install

This script installs fancontrol.py which monitors the core temperature and controls the fan. Also, it adds a script called fancontrol.sh to /etc/init.d and configures the script to run when the system boots.

🛈 The next two steps describe the manual installation of these scripts and covers how they work in more detail. Feel free to skip the next two steps if you just want to get on with it.

5 – Write the fan controller code (optional)

Skip this step if you used the install script above.

We’re going to need code that continuously monitors the core temperature and turns on the fan when the temperature reaches a certain threshold.

So we’ll connect to the Pi via SSH and create a file called fancontrol.py. To create this file, run:

nano fancontrol.py

Add the following to the file, save, and exit:

#!/usr/bin/env python3

import subprocess
import time

from gpiozero import OutputDevice


ON_THRESHOLD = 65  # (degrees Celsius) Fan kicks on at this temperature.
OFF_THRESHOLD = 55  # (degress Celsius) Fan shuts off at this temperature.
SLEEP_INTERVAL = 5  # (seconds) How often we check the core temperature.
GPIO_PIN = 17  # Which GPIO pin you're using to control the fan.


def get_temp():
    """Get the core temperature.
    Run a shell script to get the core temp and parse the output.
    Raises:
        RuntimeError: if response cannot be parsed.
    Returns:
        float: The core temperature in degrees Celsius.
    """
    output = subprocess.run(['vcgencmd', 'measure_temp'], capture_output=True)
    temp_str = output.stdout.decode()
    try:
        return float(temp_str.split('=')[1].split(''')[0])
    except (IndexError, ValueError):
        raise RuntimeError('Could not parse temperature output.')


if __name__ == '__main__':
    # Validate the on and off thresholds
    if OFF_THRESHOLD >= ON_THRESHOLD:
        raise RuntimeError('OFF_THRESHOLD must be less than ON_THRESHOLD')

    fan = OutputDevice(GPIO_PIN)   
while True:
        temp = get_temp()

        # Start the fan if the temperature has reached the limit and the fan
        # isn't already running.
        # NOTE: `fan.value` returns 1 for "on" and 0 for "off"
        if temp > ON_THRESHOLD and not fan.value:
            fan.on()

        # Stop the fan if the fan is running and the temperature has dropped
        # to 10 degrees below the limit.
        elif fan.value and temp < OFF_THRESHOLD:
            fan.off()

        time.sleep(SLEEP_INTERVAL)

Now we’ll move the script to /usr/local/bin, which is the ideal location for scripts that normal users can run. Then we’ll make it executable.

sudo mv fancontrol.py /usr/local/bin/
sudo chmod +x /usr/local/bin/fancontrol.py

6 – Execute the fan controller code on boot (optional)

Skip this step if you used the install script above.

We’ll want to run this script when the Pi boots, otherwise it won’t do us much good. To do so, we’ll create a shell script that will execute on boot and launch our script.

Create a file called fancontrol.sh and add the following:

#! /bin/sh

### BEGIN INIT INFO
# Provides:          fancontrol.py
# Required-Start:    $remote_fs $syslog
# Required-Stop:     $remote_fs $syslog
# Default-Start:     2 3 4 5
# Default-Stop:      0 1 6
### END INIT INFO

# Carry out specific functions when asked to by the system
case "$1" in
  start)
    echo "Starting fancontrol.py"
    /usr/local/bin/fancontrol.py &
    ;;
  stop)
    echo "Stopping fancontrol.py"
    pkill -f /usr/local/bin/fancontrol.py
    ;;
  *)
    echo "Usage: /etc/init.d/fancontrol.sh {start|stop}"
    exit 1
    ;;
esac

exit 0

Move this file to /etc/init.d, and make it executable:

sudo mv fancontrol.sh /etc/init.d/
sudo chmod +x /etc/init.d/fancontrol.sh

Now we’ll register the script to run on boot:

sudo update-rc.d fancontrol.sh defaults

Now, you can either restart your machine, or kick this off manually since it won’t already be running:

sudo reboot

or

sudo /etc/init.d/fancontrol.sh start

7 – Wire up the fan

With everything working, let’s wire up the fan!

Use the schematic and breadboard photo to build the circuit. In this step, I’ll provide a photo of the fan fully wired and connected to the Pi. If you need more detailed help with step, please let me know in the comments section below.

Here are the basic steps (always refer to the diagram for help):

  1. Strip the ground (black) lead on the fan.
  2. Grab a female jumper wire (or multiple if you want different colors), cut it in half and strip the ends.
  3. Solder the resistor(s) to one female jumper wire, then to the “base” pin on the transistor.
  4. Solder the other jumper wire to the “emitter” pin on the transistor.
  5. Solder the ground lead from the fan to the “collector” pin on the transistor.
🛈 Make sure to use heat shrink to cover the connections and place it on before soldering!

8 – Testing our work

I wanted to visualize my work, so I rigged up a demo. This required two scripts:

  1. outputtemp.py outputs the time and core temperature every second.
  2. cpuload.py runs a busy process on each core.

So during my test window, I measured the core Pi temperature every second, and at some point during the window increased the cpu load, hoping to increase the core temperature. At 65° C, I expected the fan to kick on and start cooling off the Pi. Then when I stopped the load test, I expected the temperature to drop quickly. And once it reached 55° C, I expected the fan to turn back off.

Measure the Core Temperature of Your Raspberry Pi
Hot pie is delicious, but a hot Pi is not.

And sure enough, as you can see from the graph, it worked as expected!

9 – Make your own modifications

In the script above, you may have noticed two variables at the top:

ON_THRESHOLD = 65 
OFF_THRESHOLD = 55
SLEEP_INTERVAL = 5
GPIO_PIN = 17 

These variables can be configured to your liking. ON_THRESHOLD and OFF_THRESHOLD are the temperatures at which the fan will turn on and off (respectively), and SLEEP_INTERVAL is how often the program checks the core temperature. If you need to change the GPIO pin, you can do that here as well.

Feel free to customize either of these variables, but keep in mind that the max temperature is 85°C, and the CPU will be throttled at around 80°C, so we’ll want to keep the temperature well below that.

10 – Conclusion

I hope you enjoyed this guide. If you have any comments, questions, or even recommendations for improvement, please let me know in the comments below. And be sure to check out the GitHub repo for this project!

NEXT UP

How to Run a Minecraft Server on the Raspberry Pi

A whole world trapped inside your Pi.
howchoo   (467)
December 7, 2023

There are several ways to go about running a Minecraft server on the Raspberry Pi. In this guide, I’ll cover how to install Nukkit—a cross-platform Minecraft server that’s super easy to set up on the Raspberry Pi. This server should work with PCs, consoles, and tablets running Minecraft 1.14. I’ll be using a Raspberry Pi

Continue Reading

howchoo

 467 guides

Introducing Howchoo, an enigmatic author whose unique pen name reflects their boundless curiosity and limitless creativity. Mysterious and multifaceted, Howchoo has emerged as a captivating storyteller, leaving readers mesmerized by the uncharted realms they craft with their words. With an insatiable appetite for knowledge and a love for exploration, Howchoo's writing transcends conventional genres, blurring the lines between fantasy, science fiction, and the surreal. Their narratives are a kaleidoscope of ideas, weaving together intricate plots, unforgettable characters, and thought-provoking themes that challenge the boundaries of imagination.

Home Interests 3D Printing

How to Power a Raspberry Pi from a 3D Printer Using Your Printer’s Power Supply Unit (PSU)

Who needs more power bricks?
howchoo   (467)
September 27, 2023
14 minutes

Share

You’ll Need 8

What you’ll need
Interests
Solder x 1 tube
Foam tape x 1 roll
Howchoo is reader-supported. As an Amazon Associate, we may earn a small affiliate commission at no cost to you when you buy through our links.
Posted in these interests:
3dprinting • 36 guides
octoprint • 10 guides
pi • 92 guides

This guide will show you how to power a Raspberry Pi using your 3D printer’s power supply. This is especially useful if you’re using OctoPrint and only want to run your Pi when your 3D printer is running.

In a nutshell, we’re going to connect our printer to a small voltage regulator, also known as a “buck converter” or “step down converter”, to reduce the printer’s higher voltage to the 5V needed by the Pi.

This guide will work for any Raspberry Pi model, including the Raspberry Pi 4.

Important note: This guide involves electricity. Take proper precautions even when working with low voltages.

1 – Determine your connections

Before we can connect the LM2596 voltage regulator, we’ll need to determine where the connection should take place.

There are basically two methods of tapping into your 3D printer’s power supply:

Method #1: Run a new power supply line from your PSU

For this method, open up your printer’s power supply unit (PSU) and run a new positive (+) and negative (-) wire from one of the available slots. If you’re lucky, your PSU might have a separate 5V power output terminal.

In this unlikely case, no voltage regulator is needed! You can skip forward and connect these lines directly to your Pi. However, be sure that at least 2A is being output, or else you’ll need to use another supply line.

Note: Before opening your power supply, disconnect your printer’s power and wait for any capacitors in the PSU to discharge.

Method #2: Splice into the printer’s existing (external) wires

For this method, we can splice into one of the wires already coming out of your power supply. By splice, I don’t mean strip and use electrical tape. I recommend using some kind of Y-splitter cable to split the power out.

This method takes less time because no PSU disassembly is required. Additionally, it takes only seconds to revert the change if you’d like to undo your modifications. For these reasons, this is the method I’m going with.

My printer is the Creality Ender 3 and uses common XT60 connectors, so I used this extension cable. Some printers use other connectors, however; thus, be sure to choose a Y-splitter cable that will work with your printer.

The rest of this guide will work for you regardless of which approach you choose!

2 – Solder the buck converter INPUT wires

Now we’re going to connect the INPUT side of the LM2596 voltage regulator/buck converter to the printer’s power supply.

Since I’m using method #2, this means soldering my Y-splitter cable directly to the converter. I recommend printing a small enclosure for your LM2596; you can find tons of these on Thingiverse. The exact enclosure I used is included with this printer-mounted Pi enclosure.

First, Cut and strip one “leg” of the Y cable.

Then, solder the red positive (+) wire to the positive (+) INPUT terminal.

Finally, solder the black negative (-) wire to the negative (-) INPUT terminal.

Be sure to thread the wires through the enclosure opening before soldering them.

3 – Solder the buck converter OUTPUT wires

The Raspberry Pi 1, 2, 3, and Zero use a Micro USB port for power, so we’ll need to solder one to the output terminals of our buck converter. To do this, we’ll cannibalize an old Micro USB cable or AC adapter.

The Raspberry Pi 4 uses a USB-C port for power. If you’re using a Pi 4, you’ll need to cannibalize a USB-C cable or adapter instead.

Cut open and strip the cable. Locate the red positive (+) and black negative (-) wires, and solder these to the OUTPUT terminals of the buck converter.

Again, if you’re using an enclosure, thread the cable through the enclosure hole first.

🛈 Keep in mind how far your Pi will be mounted from the step down converter and don’t cut your cable too short!

4 – All soldered!

Lookin’ good.

5 – Adjust the buck converter output voltage

Next, we need to adjust the buck converter’s output voltage to 5V. For my printer, the line I’m tapping into is 24V, so I’ll be stepping this 24V down to 5V.

To do this, we’re going to connect a multimeter to the buck converter’s output, power on the printer (input), and turn a small potentiometer on the buck converter using either a small screwdriver or your fingernail.

If you don’t have a multimeter, you should think about picking one up. Check out our list of the best multimeters. Alternatively, you can alternatively purchase a buck converter that shows the output voltage on a built-in LCD display (though these are more expensive).

The Best Multimeters for Beginners and Pros (2022)
We present you with our guide to the best multimeter in five categories.

With your printer’s power cord disconnected, connect your buck converter to your printer’s power supply using either the wires you connected directly to your PSU (method #1) or the Y-splitter cable (method #2). Make sure neither the buck converter or any of your wires are touching any metal.

Then, set your multimeter to DC and connect it to the output terminals of the buck converter. I recommend using alligator clip leads if you have them; if you don’t, a second set of hands helps.

After you’re sure all hands and wires are free from any contact, connect your printer’s power cable and power it on. Turn the small potentiometer until your multimeter reads 5V. Then, turn off and unplug your printer.

🛈 Be EXTRA careful when working around live power so that you don’t electrocute yourself or your electronics.

6 – Secure the buck converter

Secure the LM2596 enclosure to your printer using foam tape, taking care not to mount it in the way of any moving parts.

7 – Secure all wires and power on the Pi!

Connect the USB cable to your Pi. Use zip ties to secure your wires away from any moving parts and power on your Pi.

Pat yourself on the back, you’re all done! If you’re working on an OctoPrint setup, be sure to check out my comprehensive OctoPrint setup guide.

🛈 Remember, you should always safely shut down your Pi through the OctoPrint interface prior to turning your printer’s power switch off.
NEXT UP

How to Run a Minecraft Server on the Raspberry Pi

A whole world trapped inside your Pi.
howchoo   (467)
December 7, 2023

There are several ways to go about running a Minecraft server on the Raspberry Pi. In this guide, I’ll cover how to install Nukkit—a cross-platform Minecraft server that’s super easy to set up on the Raspberry Pi. This server should work with PCs, consoles, and tablets running Minecraft 1.14. I’ll be using a Raspberry Pi

Continue Reading

howchoo

 467 guides

Introducing Howchoo, an enigmatic author whose unique pen name reflects their boundless curiosity and limitless creativity. Mysterious and multifaceted, Howchoo has emerged as a captivating storyteller, leaving readers mesmerized by the uncharted realms they craft with their words. With an insatiable appetite for knowledge and a love for exploration, Howchoo’s writing transcends conventional genres, blurring the lines between fantasy, science fiction, and the surreal. Their narratives are a kaleidoscope of ideas, weaving together intricate plots, unforgettable characters, and thought-provoking themes that challenge the boundaries of imagination.

Home Interests Ender 3

The Best Creality Ender 3 (and Pro) Upgrades and Mods (2022)

Improve your overall printing experience—and quality.
howchoo   (467)
September 27, 2023
28 minutes

Share

You’ll Need 1

What you’ll need
Interests
Series
Howchoo is reader-supported. As an Amazon Associate, we may earn a small affiliate commission at no cost to you when you buy through our links.
Posted in these interests:
3dprinting • 36 guides
ender3 • 19 guides

The Ender 3 is an amazing 3D printer. For the money, it’s hard to find one that will give you better prints right out of the box. However, it’s far from perfect.

In this guide, I’ll show you the top must-have upgrades and mods for the Ender 3 and Ender 3 Pro—both 3D-printable and purchased upgrades/mods.

A note on this guide:

In researching this guide, I found a lot of others with massive lists containing every upgrade and mod under the sun—unfortunately, many of those upgrades are pointless wastes of time and money. So, in this guide, I’ll cut through the BS and cover the most impactful items that will give you better prints while also improving your overall printing experience.

1 – Upgrades and mods to 3D print

Also visible in this photo are my Raspberry Pi enclosure and camera for use with OctoPrint.

Below are the top 3D-printable Ender 3 mods and upgrades you can perform. Tons of other printable mods exist, but this is the core list that will give you the best bang for your print time.

Board fan guard

Before you print anything else, print this mod. The location of the mainboard fan is directly beneath the build plate, meaning bits of filament can fall in and damage the fan or board. The model is available on Thingiverse.

Filament guide

This filament guide holds the filament away from the feeder, allowing for a more consistent feed rate and less skipping. It snaps directly into the side of the upper support.

Cable chain

This cable chain is a must-have for preventing dangerous cable snags when the bed moves along the Y-axis.

Display PCB cover

This simple screen cover protects your Ender 3 display’s PCB (printed circuit board) from damage.

Bowden tube fitting fix

If your Bowden tube has popped out of place or if you’re having print quality issues, you might want to print these pressure fitting shims that will prevent your Bowden tubes from shifting or popping out during printing.

Beeper silencer

You’ve probably noticed how loud the Ender 3 beeps when navigating the menu interface. This beep can level villages and knock satellites out of orbit. This 10-minute print mutes the beep quite a bit, getting rid of that annoyance and protecting our countrysides and space assets.

🛈 If you’re using a 3D printer enclosure, I recommend printing these mods using ABS or PETG filament; ambient enclosure temperatures can cause PLA to warp and deform over time.

2 – BLTouch auto bed leveling

How many times have you grabbed a piece of paper and slid it back and forth between your print bed and the extruder? Is it more than a hundred? What if I was to tell you that one upgrade could make it so you’d never have to manually level the bed again? Sound good to be true?!

With a BLTouch kit specifically for the Ender 3, Ender 3 V2 or Ender 3 Pro, you can have a perfectly level print each time without having to manually level the bed. Because it’s supported directly by Creality, installing the BLTouch is a fairly easy process, even for 3D printing novices.

What is BLTouch?

The BLTouch by Antclabs is an add-on electrical component for a 3D printer that uses a sensor stem to detect any tilt in the bed surface. It’s built to use very little power at idle and use so that it can be installed directly in the Ender 3’s mainboard, without any heat issues.

What about other auto-leveling sensors?

Other sensors like optical or proximity sensors do have some upsides, but we’ve found them to be expensive to repair and not compatible with certain print bed surfaces.

With the BLTouch, you can use any type of bed and need only swap out the plastic nozzle if it’s damaged. There’s also a ton of support and articles that can help you if you run into trouble using your BLTouch.

Installing the BLTouch

Check out our complete guide to install and set up the BLTouch on any Ender 3-series printer.

How to Install BLTouch on the Creality Ender 3, Ender 3 V2, and Ender 3 Pro
This upgrade is going to level the playing field!

3 – Silent mainboard v1.1.5

There are two main sources of noise on your printer: 1) fans, and 2) the drivers (chips) that run your stepper motors. The “whirring” noise you associate with printing is caused by the cheap stepper motor drivers used on the stock Ender 3 board.

Enter the Creality Silent Mainboard (v1.1.5). This board directly replaces your existing Ender 3 mainboard, upgrading your printer to the silent TMC2208 stepper motor drivers. This is the biggest “sound” upgrade you can make. It reduces your printer’s noise from approximately 48dB to 36dB, with the remaining sound coming from the Ender 3’s fans (which can also be upgraded to quieter fans).

Creality Ender 3 Silent Mainboard Upgrade: Better Prints with Less Noise!
Make your Ender 3 quieter and improve your prints with this board upgrade.

If I had to choose a single upgrade from this guide (other than OctoPrint), it would be this one. Combined with the MeanWell PSU upgrade also mentioned in this guide, I often forget my printer is running since it now generates so little noise.

Of course, in addition to decreasing noise, this board and its upgraded stepper motor drivers improve the quality of your prints.

4 – OctoPrint

OctoPrint is the #1 upgrade for making the overall 3D-printing experience easier and more enjoyable. While this upgrade doesn’t relate directly to print quality, it will save you a ton of time and headaches. With OctoPrint, you won’t need to load and start prints from an SD card ever again.

In a nutshell, OctoPrint is a library that runs on the small Raspberry Pi computer. When you want to print something, you’ll log into a slick interface from your computer. This interface will allow you to control your printer, start and stop prints, and more. You can even monitor your printer remotely using a small camera!

I wrote a full guide on installing and using OctoPrint on the Ender 3, as well as a video:

If you’re using the newer Ender 3 V2, check out our Ender 3 V2 OctoPrint setup guide.

6 – OctoPrint touchscreen

If you’re already using OctoPrint, why not add a nice touchscreen to your Ender 3? Check out my full guide on this, as well as my video:

How to Add an OctoPrint Touchscreen to Your Ender 3
An inexpensive upgrade to make your Ender 3 even better!

For this project, I used the Adafruit 3.5″ PiTFT Plus—but other touchscreens will work as well.

6 – MeanWell power supply (PSU) upgrade

There are several reasons to upgrade your Ender 3 to a MeanWell PSU including noise, safety, and even reducing bed-leveling issues.

How to Upgrade Your Ender 3 Power Supply to a MeanWell PSU
An inexpensive upgrade to make your Ender 3 quieter and safer

Noise

Compared to the stock PSU whose fan runs continuously, the MeanWell PSU only runs when it needs to—usually less than 20% of the time. This means a much quieter printer, especially when paired with the silent board upgrade. This reason alone made the upgrade worth it to me. I work in the same room as my printer, so noise is a huge issue.

Safety

MeanWell PSUs use higher quality components than the cheap stock unit, providing cleaner power with fewer of the electrical spikes and sags that could pose a safety hazard.

Reduce auto-bed-leveling issues

If you’re using an auto-leveling sensor such as the BLTouch or EZABL, the MeanWell PSU’s consistent, clean power reduces issues related to power ripples and grounding.

Form factor

The MeanWell PSU is noticeably thinner than the stock unit, which is handy if you’re using an enclosure and need to relocate it.

Which one to buy (and where)

The MeanWell LRS-3500-25 PSU is the correct 24V MeanWell power supply for the Ender 3, and this upgrade takes about 20 minutes to perform, excluding PSU housing print time.

🛈 The Ender 3 Pro already ships with this upgrade.

7 – Glass print bed

There are tons of different build plate surfaces out there: metal, magnetic, BuildTak, painter’s tape, and tons more. But after printing for many years on several different printers, I’ve always had the best experience with glass.

Glass beds are supremely flat, fixing the all-too-common “warped Ender 3 bed” issue that many of us experience. Glass beds also save on prep time, are easy to clean, and offer effortless print removal with a semi-glossy print finish.

Choosing a bed

I wrote a comprehensive guide to 3D printing on a glass bed if you’d like to dive into the details. tl;dr; Choose a thin borosilicate glass bed, and adhere it directly to the existing build plate using small binder clips. This 235x235mm glass bed is the one I recommend for the Ender 3.

3D Printer Glass Beds: Why You Should Be Printing on Glass
How to choose, install, and use a glass bed with your printer.

8 – LED strip

Proper print illumination allows you to identify issues with your prints early—it’s also nice to be able to see what’s happening clearly. There are tons of methods for adding an LED strip to your 3D printer. I prefer one that places the light source as high as possible in order to illuminate the entire print bed, not just the current print area.

I wrote a comprehensive guide on adding an LED strip to your 3D printer, featuring the Ender 3 specifically. Using the method outlined there, you can even power your LED strip directly from your Ender 3 by regulating the voltage using this buck converter in conjunction with this XT60 splitter cable.

Check out that guide for step-by-step instructions on what to print and how to wire everything up!

Easy LED version

If you’d prefer an easy-version LED strip, Creality makes an official LED strip kit, as well.

9 – Bed springs

Your bed springs might seem like an insignificant part of your 3D printer, but they’re actually quite important to bed leveling and stability.

The stock Ender 3 bed springs are terrible and can lead to print issues and frequent bed leveling. These issues are largely caused by:

  • The cheap metal used to manufacture the springs, and
  • The rounded design of the springs themselves

In fact, if you compare the stock and upgraded springs side by side, you can see only the upgraded ones feature a flat surface on the top and bottom. This leads to less shifting compared to the stock springs.

Upgraded Ender 3 springs take minutes to install and mean less frequent bed leveling between prints. This upgrade costs about $10, making it one of the least expensive Ender 3 upgrades out there.

Ender 3 Spring Upgrade: Choosing and Installing New Bed Springs
An inexpensive upgrade that greatly reduces bed leveling frequency!

10 – Metal feeder assembly

The plastic metal feeder assembly on the Ender 3 leaves something to be desired, and improper tension can even cause feeder gear skips, leaving gaps in the layers of your print. Installing an all-metal feeder assembly such as this one will add durability and stability to your printer.

11 – Stepper motor dampers

Yet another noise mod—adding these dampers to your X- and Y-axis stepper motors decreases the noise they generate by 5-10dB. This is a simple, inexpensive mod with a measurable noise reduction impact.

12 – Firmware upgrade

Most Ender 3s ship with an outdated version of the Marlin firmware, which lacks mandatory safety features such as thermal runaway protection. Thermal runaway is a condition where a failure in the thermocouple (temperature sensor) can cause your extruder to continue heating, forever, until your extruder block melts and a fire occurs.

Here’s a video demonstrating thermal runaway in action:

Thankfully, newer versions of Marlin have thermal runaway protection, a software-level safeguard that polls periodically for an increase in temperature and shuts things down if something isn’t right.

I wrote an in-depth guide to updating your Ender 3 firmware that you can follow to perform this mod. You’ll need any kind of Arduino to perform the firmware update, such as this inexpensive Arduino clone. This is a safety upgrade that you shouldn’t skip.

Ender 3: How to Install a Bootloader and Update Marlin Firmware
Update your 3D printer’s firmware and add thermal runaway protection.

🛈 If you’re using Octoprint, you should see a warning appear upon logging in if your printer’s firmware lacks mandatory thermal runaway protection. This is an easy way to check.

13 – Other mods and upgrades

Did I miss a mod or upgrade that you think is a must-have? Let me know in the comments section below!

NEXT UP

How to Update Blender

Get the latest Blender has to offer.
howchoo   (467)
November 24, 2023

Blender is one of the most popular open-source 3D creation suites today. It doesn’t cost a dime to use and everything you create is yours to own for good. The community is robust and the dev team still releases new updates on the regular. If you want to get the latest version, you may have

Continue Reading

howchoo

 467 guides

Introducing Howchoo, an enigmatic author whose unique pen name reflects their boundless curiosity and limitless creativity. Mysterious and multifaceted, Howchoo has emerged as a captivating storyteller, leaving readers mesmerized by the uncharted realms they craft with their words. With an insatiable appetite for knowledge and a love for exploration, Howchoo’s writing transcends conventional genres, blurring the lines between fantasy, science fiction, and the surreal. Their narratives are a kaleidoscope of ideas, weaving together intricate plots, unforgettable characters, and thought-provoking themes that challenge the boundaries of imagination.