Android


How to Set Up Your Work Email on Your Android Phone

Setting up your work email on an Android phone is easy—everything synchronizes through Gmail, the

In these interests: AndroidProductivityRemote Work
Home Interests Home

How to Properly Dispose of a Worn or Damaged American Flag

howchoo (467)
December 7, 2023
8 minutes

Share

You’ll Need 1
What you’ll need
Interests
Howchoo is reader-supported. As an Amazon Associate, we may earn a small affiliate commission at no cost to you when you buy through our links.
Posted in these interests:
america • 1 guides
flags • 1 guides
home • 7 guides
Since our country was conceived, the U.S. Flag has been a symbol of our country’s freedom. Our country’s Flag Code provides specific guidelines for how to “retire” a damaged or worn-out American flag. When should my American flag be retired? The US Flag Code (4 USC Sec 8 Para (k) Amended 7 July 1976) dictates that a flag should be destroyed “when it is in such condition that it is no longer a fitting emblem of display”. This includes the flag becoming tattered or overly worn or sun-bleached.
How do I dispose of my American flag? The same section of our Flag Code states that the flag “should be destroyed in a dignified way, preferably by burning”. When I was first researching how to properly dispose of my U.S. flag, I was surprised to find that the proper method is to burn the flag. Burning the flag just seemed wrong — but apparently this is how it is done. This short guide will show you how to perform a flag retirement ceremony properly. What if I can’t burn my American Flag? Burning the flag is the only preferred method of flag disposal per the U.S. flag code. However, if you live in an area where you cannot perform the burning ceremony, there are still many other accepted options for respectfully retiring your flag: – Contact your local VFW Post and they can perform the flag ceremony for you. – Bury and/or shred the flag: use a pair of scissors to carefully and methodically separate the thirteen stripes and leave the blue star-spangled section intact. Then, place in a wooden box and bury the flag, giving it a short “funeral” ceremony (e.g. recite the Pledge of Allegiance or other respectful words).

1 – Determine whether your American flag should be destroyed

My American flag had a hole in it (presumably from a falling branch) and appeared very worn. Nylon flags, when flown continuously outdoors, generally last less than a year. This is why most government buildings remove their flags at sundown and raise them at sunup.

2 – Remove and fold your flag

Remove the flag from its flagpole and fold it into a triangle. Do not let the flag touch the ground.

3 – Build a fire

Build a campfire in a safe area and wait for the coals to get hot (think “cooking” hot).

4 – Carefully place and burn the flag

Carefully place the flag in the center of the fire. I say carefully because you want to be able to collect all of the flag ashes later. While the flag is burning, it is customary to recite the Pledge of Allegiance. Wait until the flag material has been completely converted into ash. Then, you can either wait for the fire to go out on its own or use a fire extinguisher to put the fire out.

5 – Bury the flag

Bury the flag in an area where people won’t often walk over it. It is also customary to leave a marker of some kind to mark its location.
🛈 Do not bury hot coals — this can be dangerous to the feet around you, especially if performing the ceremony in a public area.

6 – Raise a new flag

And of course, after disposing of your old flag, be sure to replace it with a new one!
NEXT UP

How to See If I’m Eligible for Amazon Prime Free Same-Day Delivery

howchoo
howchoo (467)
November 24, 2023
So Amazon just announced free same-day delivery in 14 different metro areas. How do you know if you apply? 1 – Check your zip code Go to this page. Wait for the page to finish loading completely, scroll down, and enter your zip code. This will tell you if you live in an area that is
Continue Reading
Home Interests Amazon

How to See If I’m Eligible for Amazon Prime Free Same-Day Delivery

howchoo
howchoo (467)
November 24, 2023
2 minutes

Share

Interests
Posted in these interests:
 
amazon • 5 guides
home • 7 guides
So Amazon just announced free same-day delivery in 14 different metro areas. How do you know if you apply?

1 – Check your zip code

Go to this page. Wait for the page to finish loading completely, scroll down, and enter your zip code. This will tell you if you live in an area that is eligible for free same-day delivery.

2 – Or simply try to check out on Amazon

If you add at least $35 of eligible products to your cart, you should see same-day delivery as a shipping option. Also, eligible items will display “Prime FREE Same-Day” or “Prime FREE One-Day” on their detail page. If you don’t see this, it doesn’t apply!
NEXT UP

How to Properly Dispose of a Worn or Damaged American Flag

howchoo (467)
December 7, 2023
Since our country was conceived, the U.S. Flag has been a symbol of our country’s freedom. Our country’s Flag Code provides specific guidelines for how to “retire” a damaged or worn-out American flag. When should my American flag be retired? The US Flag Code (4 USC Sec 8 Para (k) Amended 7 July 1976) dictates that a flag
Continue Reading
Home Interests Illustrator

How to Remove a Background in Illustrator

And transparency to your work in Illustrator.
howchoo (467)
November 21, 2023
5 minutes

Share

You’ll Need 1
What you’ll need
Interests
Howchoo is reader-supported. As an Amazon Associate, we may earn a small affiliate commission at no cost to you when you buy through our links.
Posted in these interests:
 
adobe • 7 guides
digitalillustration • 2 guides
illustrator • 3 guides
Adobe Illustrator has a few tools available that allow users to remove the background from their work. This process makes it possible to create artwork with transparent areas anywhere they want. In guide this, I’ll go over the easiest ways to do this, as there are more complex processes don’t always apply to general use cases. I’ll provide a simple example as we go along, but be aware that’s possible to create more complex images with a little bit of patience and familiarity with Illustrator.

1 – Enable transparency

You’ll first need to ensure the image you’re working with is a vector. If it’s a picture, you can turn it into a vector by going to the top menu and choosing Window > File Trace.
Next, we need to enable transparency in order to delete the background, otherwise it defaults to a plain white background. To do this, go to the top menu and navigate to View > Show Transparency Grid. The Shift + Ctrl/Command + D keyboard shortcut will also enable transparency.

2 – Select the background

Select the image and go to Object > Expand from the top menu to show all of the points in your vector image. Select only the points that pertain to the background you want to remove.

3 – Delete the background

Once you’ve selected the background, press Delete on your keyboard. This will remove anything that was selected and replace it with transparency. Now that your background is removed, you can save and export the image or continue your work in Illustrator.

4 – Alternative method: us a clipping mask

Alternatively, you can use a clipping mask to remove the background. You will need to enable transparency from step one and then follow our guide on how to use a Clipping Mask in Illustrator to make the background transparent.
How to Make a Clipping Mask in Illustrator Cut out images with custom shapes in Illustrator.
NEXT UP

How to Resize an Image in InDesign

There are two options for resizing in InDesign: the easy way and the precise way.
howchoo (467)
December 7, 2023
You might think that resizing an image would be as simple as dragging the corner of the frame. Well, it is, and it isn’t! Remember that when resizing an image in InDesign, you’re essentially resizing the image’s frame. For more information, on inserting an image in InDesign and frames, check our guide. How to Insert an Image
Continue Reading
Home Interests 3D Printing

How to 3D print custom rubber stamps

APPROVED! REJECTED! APPROVED!
howchoo   (467)
November 20, 2023
10 minutes

Share

You’ll Need 2

What you’ll need
Interests
Howchoo is reader-supported. As an Amazon Associate, we may earn a small affiliate commission at no cost to you when you buy through our links.
Posted in these interests:
3dprinting • 36 guides

Art

art • 2 guides

Let’s make some stamps! Why bother buying a pre-made design when you can create one yourself? In this guide, we’ll be creating our own howchoo logo stamp using a 3D printer.

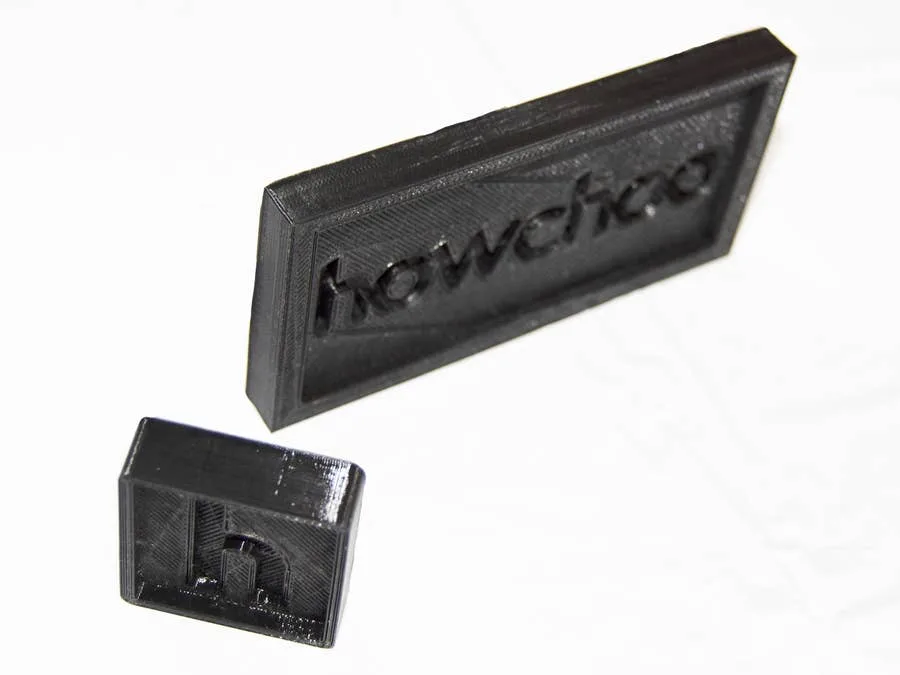
I’ve designed a couple of handles to 3D print for my stamps. You can download them from Thingiverse to use yourself. I’ve created a wide rectangle and square shaped designs.

For the actual stamp part, we’ll be designing our own mold to 3D print and filling it with silicone rubber.

1 – Create the stamp design using an image or logo

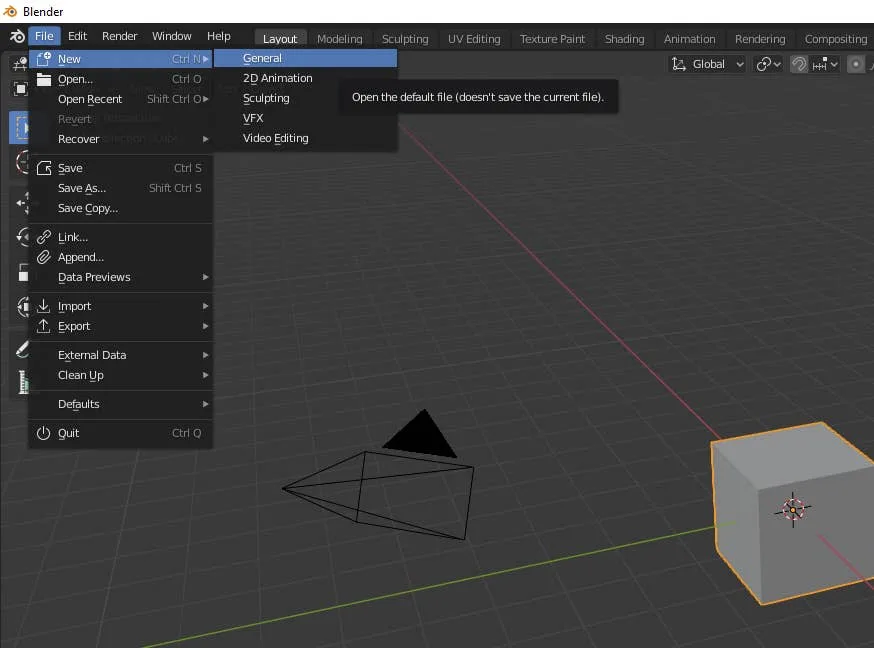
You can use any 3D design software you like, I’ll be using Blender. The idea is to trace the logo and create a 3D shape from the outline. If you’d like to follow along with me, download a copy of Blender and keep reading.

Upload the design as a background image

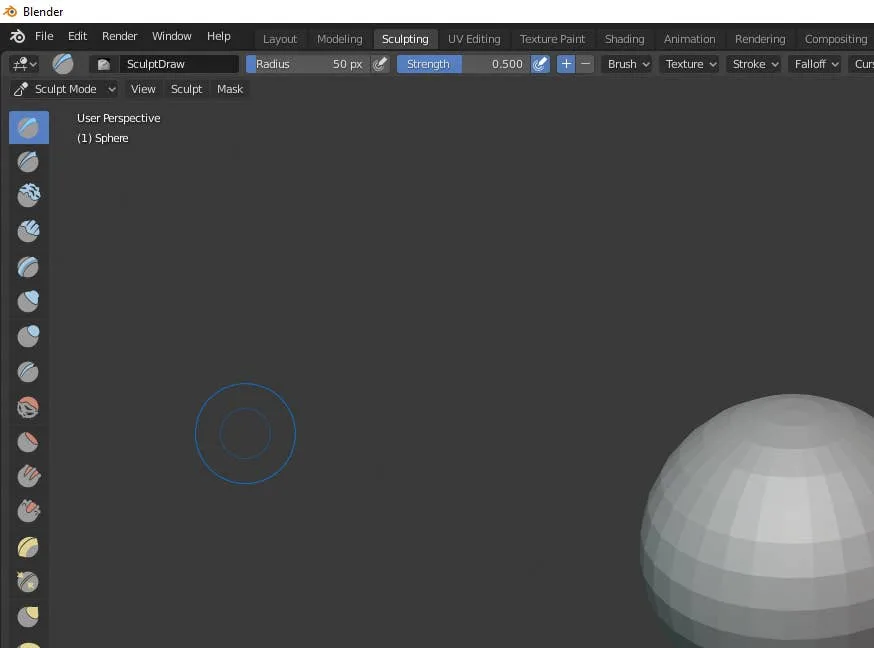
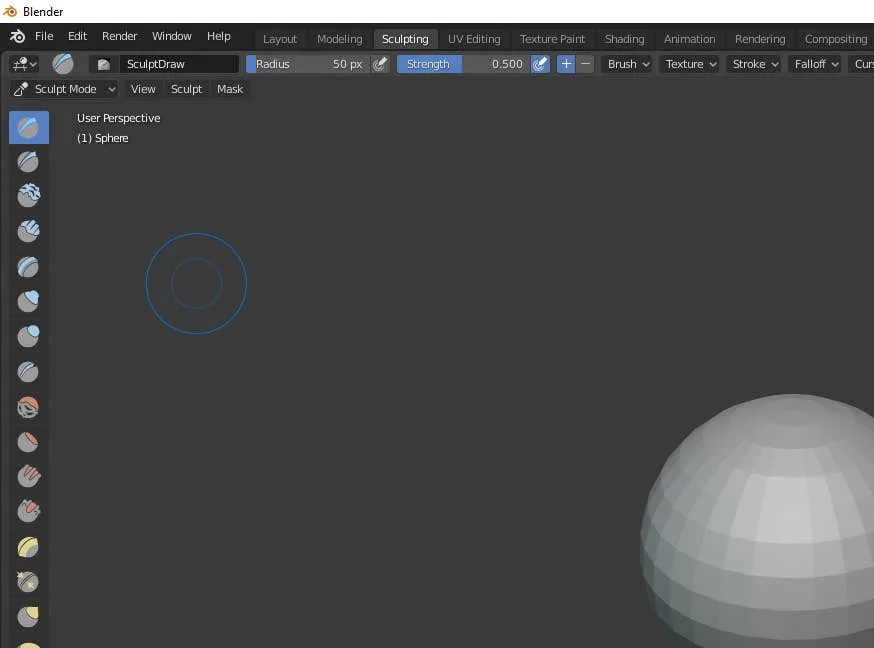
To open the sidebar we need, press N. Under the Background Images section, upload the stamp design. Press 5 on the numpad to orient the camera and expose the background image. If it’s missing, try pressing 5 again.

Outline the design

Create a plane and delete three of the vertices, this will leave you with a single point. Position this point over the edge of your stamp design. Press e to generate a new point and draw a line from this one. Using this technique, outline the design of your stamp, merging the final points together.

Make a 3D shape from the outline

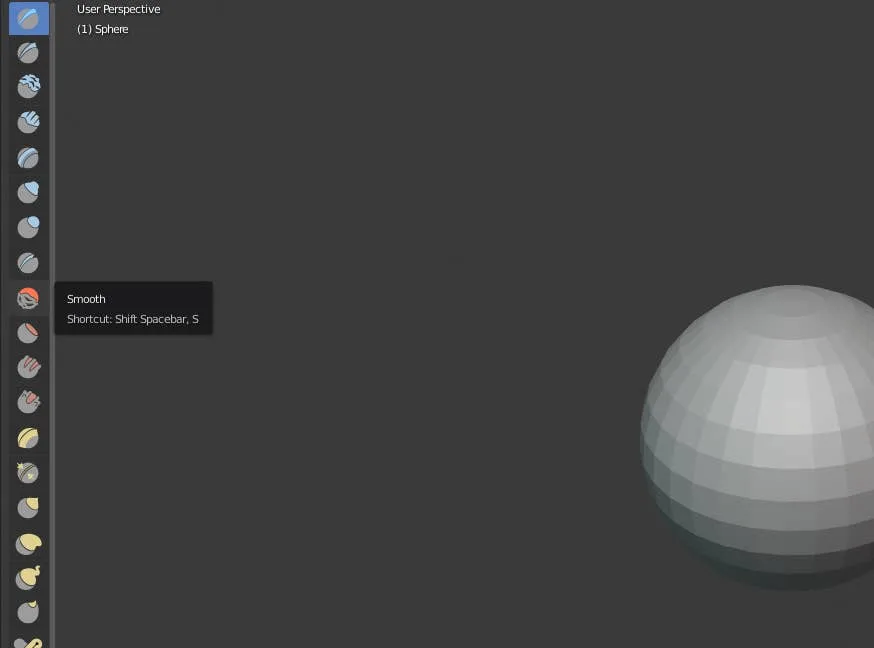
To create a face from the new outline, press A. This will highlight all of the points around the design. Press F to turn the selected points into a face. Select the new face and press E + Z to extrude the face up. This will turn the design into a 3D shape.

2 – Make a base for the stamp design

We’ll need a base for our stamp design. This base will fit inside our 3D printed handle. After creating the base, we’ll punch a hole out in the shape of our design. This will make an empty cavity that can be filled with silicone. Follow the steps below to create your own, or download the one I created from Thingiverse.

Design the stamp base

The design I made will need to fit on a 4cm x 9cm base. To create the base, I’ll create a 4cm x 9cm plane and extrude the top face up.

Punch the base out of the mold block

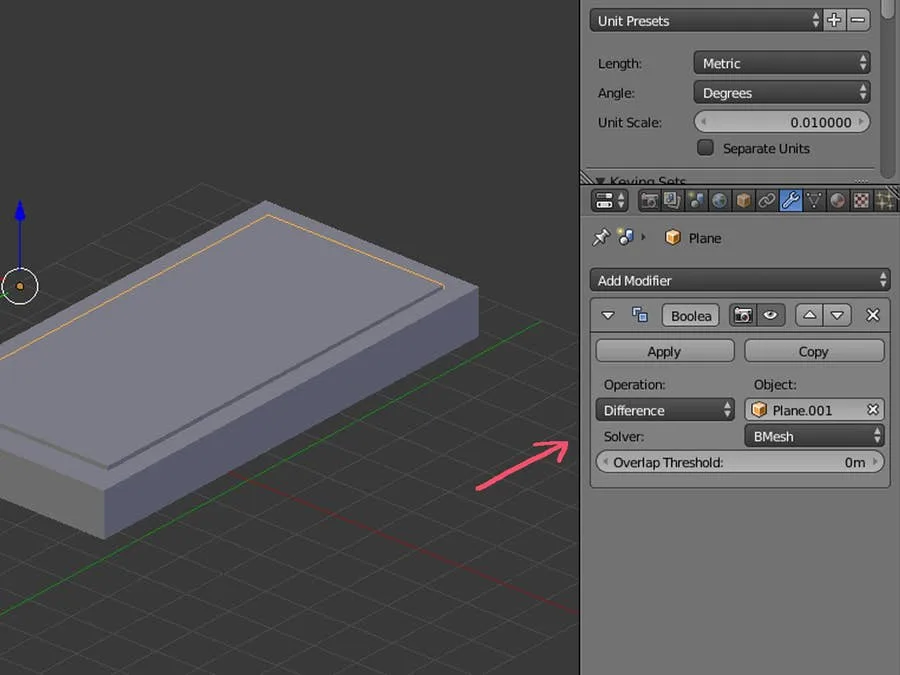
This prism will need to be punched out of our mold block. We’ll do this using a boolean modifier. Overlap the 3D base with the silicone mold block until it’s lined up as desired. I’m leaving enough room for the edges to retain some stability so I don’t break the mold when removing the silicone.

Once the base object is overlapping the mold block, apply a Difference boolean modifier to the block. The modifier should be set to use the base object.

3 – Punch out the stamp design

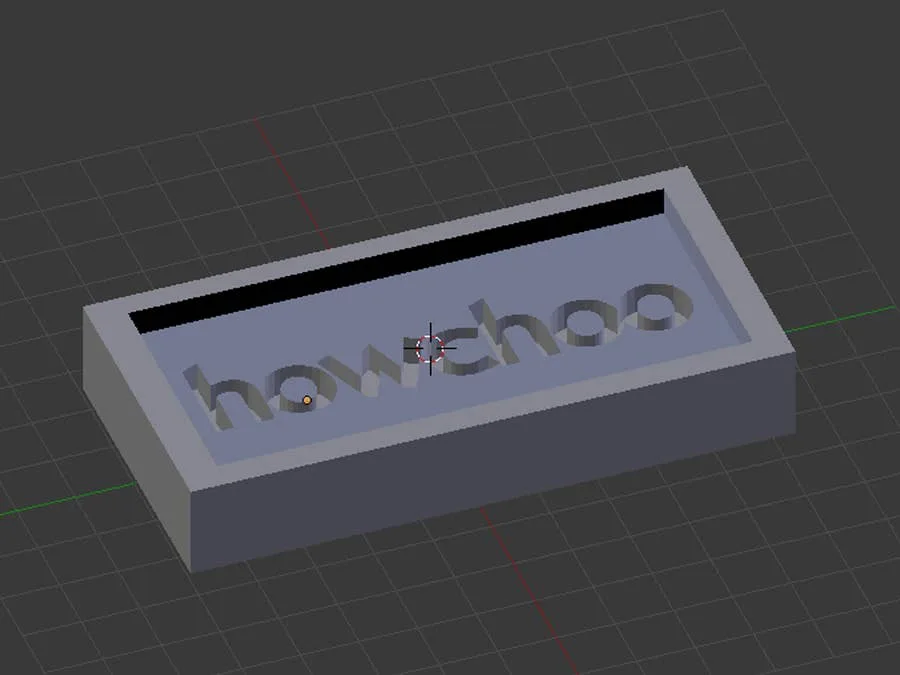
Just like the base for our stamp, we’ll be using a boolean modifier to punch out a shape with our 3D design. Overlap the stamp design object with the mold block and apply the difference modifier.

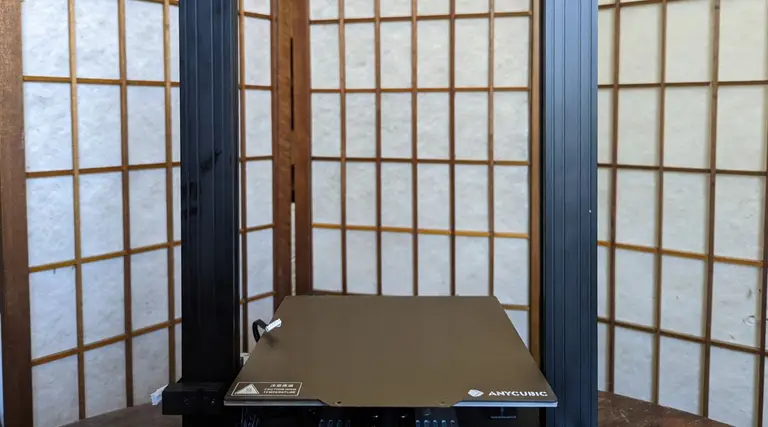
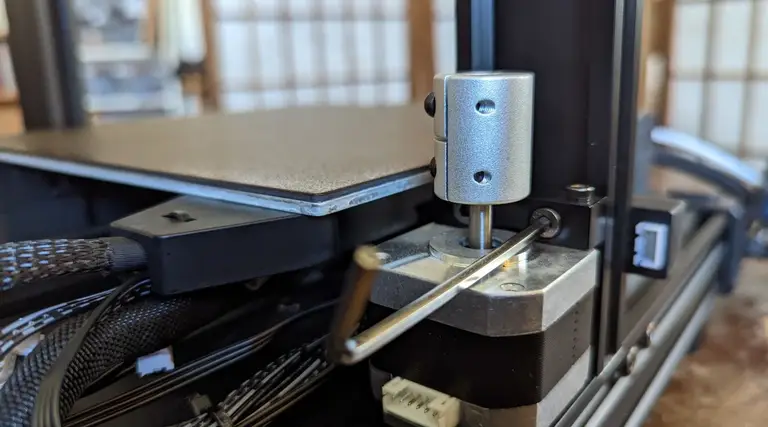
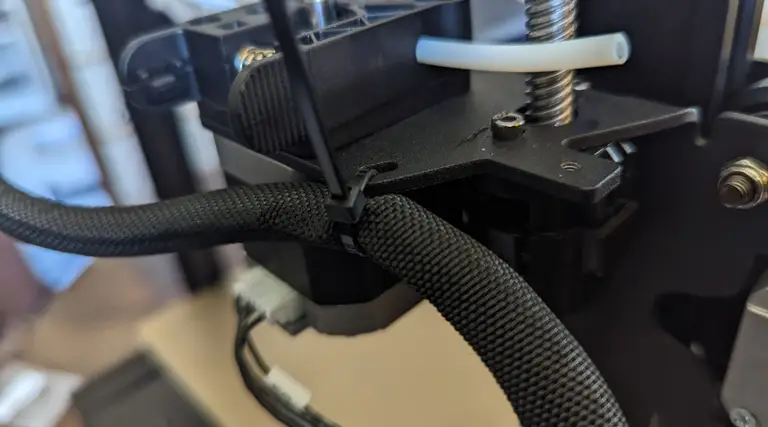
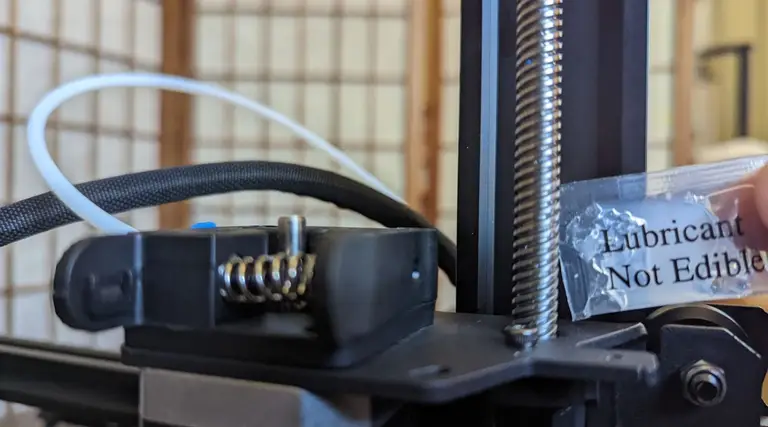
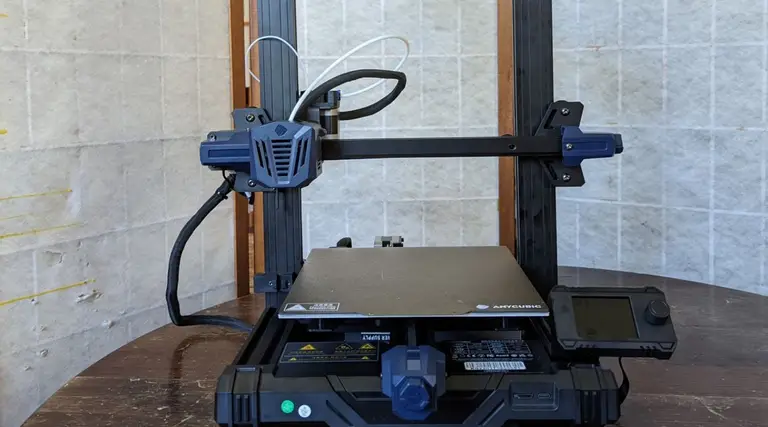
Export the final mode to an stl and prepare it for printing with your favorite slicer. I’ll be using Cura to prepare my printer file. You will need to experiment with your 3D printer to find the most ideal settings to print your mold with. I’m using PLA filament at 240° with a .2mm layer height. Smoothing out your molds or printing them with fine lines can help preserve design quality. As with any project, you’ll need to experiment to find the most desirable results.

5 – Fill the mold with silicone rubber

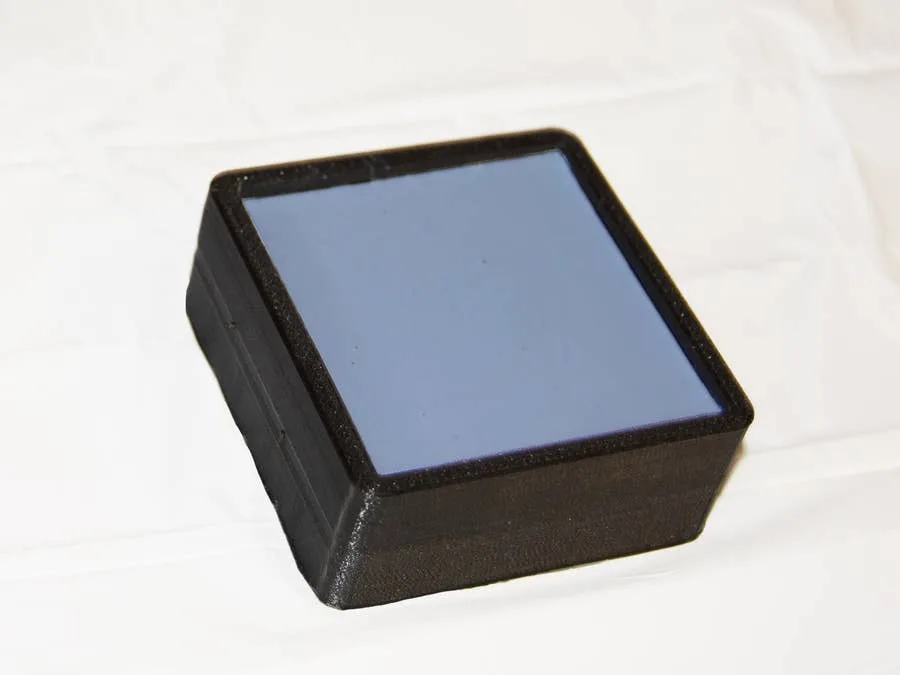
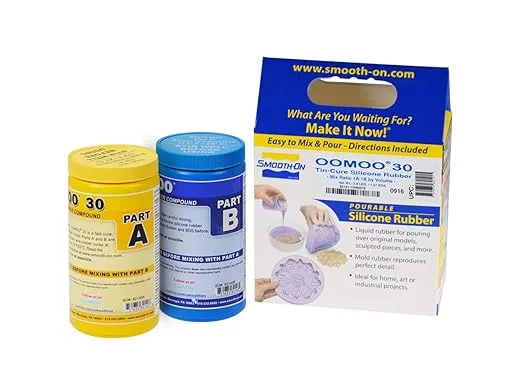
Now that everything is printed, it’s time to fill them with silicone. I’ll be using Oomoo for my project, but you can experiment with other materials. You’ll find that certain materials work better than others depending on the design and filament used.

6 – Time to stamp!

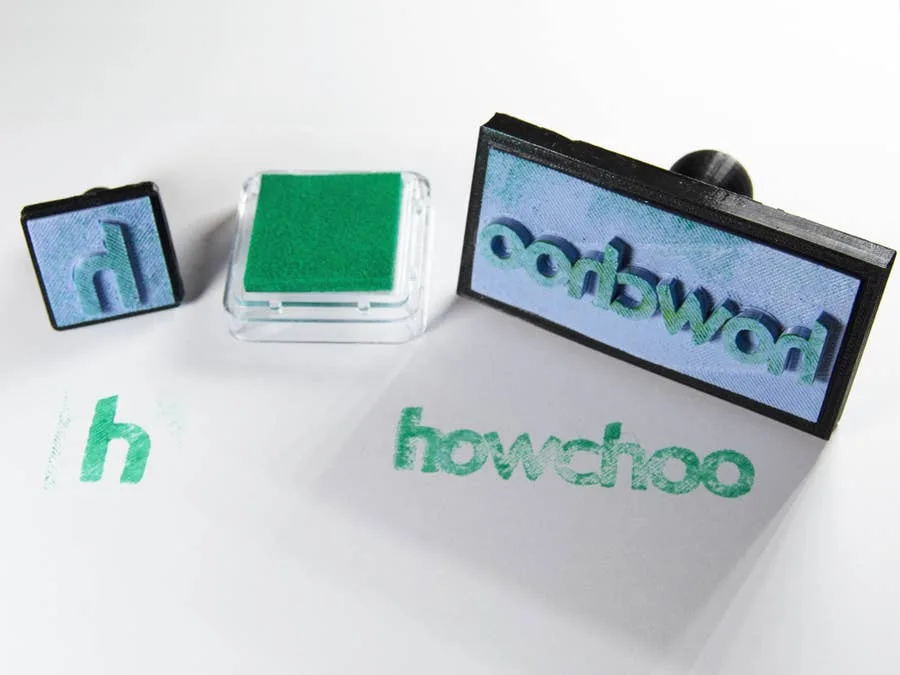
Once enough time has passed to cure your molds, it’s time for a test stamp. Just glue the stamp, base, and handle pieces together. Congratulations—your stamps are ready to go. Find an ink pad and get stamping!

NEXT UP

How to Update Blender

Get the latest Blender has to offer.
howchoo   (467)
November 24, 2023

Blender is one of the most popular open-source 3D creation suites today. It doesn’t cost a dime to use and everything you create is yours to own for good. The community is robust and the dev team still releases new updates on the regular. If you want to get the latest version, you may have

Continue Reading
Home Interests Windows

How to Sculpt in Blender

Let’s work with open source digital clay!
howchoo (467)
November 21, 2023
11 minutes

Share

Interests
Posted in these interests:
3dprinting • 36 guides

Mac

mac • 24 guides
 
windows • 6 guides
Blender has made a name for itself over the years as the go-to open source 3D modeling application. It’s free price tag and no limitation regarding commercial use makes it an ideal candidate for many developers, artists, and more. The latest edition has a selection of sculpting tools that make Blender a viable option that stands up to many commercial-grade competitors. Sculpting makes it possible to work with 3D shapes in real time by manipulating them as you might an actual piece of clay. These digital creations have a range of use cases from video games to 3D printing and much more.

1 – Make sure Blender is up to date

Before you begin any new project in Blender, make sure you’re running the most recent version. Unless you’re using a specific version for a particular reason, it’s good practice to keep your software up to date. Check out our guide on how to update Blender if you’ve never done this before.

2 – Start a new file

Open Blender and create a new project file. You can start with anything but choose ‘General’ if you aren’t sure. It’s important to understand how to access Sculpting mode. You can also choose to create a new Sculpting file which will take you directly into Sculpting mode.

3 – Choose the sculpting tab

Along the top of the Blender window is a series of tabs that will take you into different types of editing modes. Select the Sculpting tab if it’s not already enabled.

4 – Familiarize with the sculpting tools

On the left hand panel is a list of Sculpting tools that let you draw freehand, inflate faces, add crease, make blobs, and more. The more faces your object has, the more detail you can add with Sculpting. Explore each tool individually to get a feel for what they do. We also have a complete list of Blender Sculpting tools below if you’re looking for something specific.

5 – Blender Sculpting Tools List

  • Draw – This tool allows you to paint with a 3D brush, moving vertices either in or out.
  • Clay – The clay tool paints inward or outward but only on a specific plane.
  • Clay Strips – The Clay Strips tool works just like the Clay tool but uses a cube-shaped brush instead of a spherical one.
  • Layer – With the layer tool, the height of each brush stroke is capped. Letting go of the button and starting a new stroke will reset the height cap.
  • Inflate – This tool expands (or contracts when using Deflate mode) vertices based on the direction of their normals.
  • Blob – Using this tool will round meshes outward or inward into a spherical shape.
  • Crease – This tool makes sharp crevices.
  • Smooth – The Smooth tool evens out vertices touched by the brush.
  • Flatten – With Flatten, you can make solid, flat, planes on an otherwise bumpy surface.
  • Fill – This tool pulls vertices up level with others to fill in gaps. The Deepen mode will push them down.
  • Scrape – The Scrape tool is similar to both Flatten and Fill by moving vertices in relation to a plane. Its inverse is the Peak tool which pushes vertices upwards and away from a given plane.
  • Pinch – Wherever the brush is placed when pressing the mouse button will attract vertices to the center of that point. The inverse of the tool is Magnify which moves them away from the brush center.
  • Grab – The Grab tool allows you to pick and move vertices by clicking and dragging.
  • Snake Hook – Vertices are pulled along each brush stroke to form a snake-like pattern.
  • Thumb – When using the Thumb tool, vertices within the brush area are flattened towards the direction of the stroke.
  • Nudge – The Nudge tool lets you push vertices with the stroke of a brush.
  • Rotate – Clicking and dragging will rotate the vertices within the brush. Moving the brush will determine how far and which direction the rotation goes.
  • Simplify – This tool will address any short edges by collapsing them but only if dynamic topology is enabled under the Brush > Sculpt Tool menu.
  • Mask – Use this tool to select vertices that you don’t want to be affected by other brushes.
  • Annotate – Annotate offers a selection of annotation tools including lines, free-hand, and polygonal options.

6 – Sculpt your object

There’s no way to tell you exactly how to sculpt something without knowing what you want to sculpt. You can always learn through trial and error but I always recommend researching tutorials on how to create the objects you want to make. Without directly copying other makers, tutorials can provide insights on how to use these tools to create your own variations. Take your time and be sure to pace yourself. Digital sculpting has a steep learning curve. A little patience and diligence will pay off faster than you might think. Congratulations and welcome to the world of sculpting!
NEXT UP

How to Enable the “Popping” Sound When Adjusting the Volume on Your Mac

howchoo
howchoo (467)
December 13, 2023
Starting with MacOS Sierra and High Sierra, your Mac will no longer play a “pop” sound when you adjust your volume. If you prefer to have this sound when you adjust volume up and down (as I do), this guide will teach you how to reenable it. 1 – Open Sound System Preferences Navigate to System
Home Interests 3D Printing

Setting up the Anycubic Kobra Go

Set up the Anycubic Kobra Go 3D printer with this step-by-step guide!
howchoo (467)
September 22, 2023
26 minutes

Share

Interests
Posted in these interests:
3dprinterreviews • 1 guides
3dprinting • 36 guides
anycubic • 6 guides
technology • 20 guides
Anycubic’s Kobra Go is the latest in their Kobra series of FDM 3D printers. This is Anycubic’s answer to Creality’s Ender 3 line of FDM kit printers. Aimed at the DIY crowd, these printers come unassembled and need a fair bit of time to piece together, though everything required to get them running is included in the box. The Ender 3 has reigned supreme in the world of DIY kit printers, but Anycubic is giving the old workhorse a run for its money, specifically due to its focus on automatic levelling. In the case of the Kobra go, you get 25-point automatic levelling, which is an extremely handy feature, as anyone who’s struggled with the Ender 3’s manual 4-point levelling can tell you. Read our full review of the Anycubic Kobra Go here.
Anycubic’s Kobra Go 3D Printer Hands-On Review A detailed review on the Anycubic Kobra Go DIY 3D printer

1 – Unboxing your Anycubic Kobra Go

Unboxing your Anycubic Go
The Kobra Go comes well packaged in a secure box, and it’s undeniably a pretty printer. Anycubic has a gift for classy design choices, and the Kobra Go is no exception.

2 – Familiarize yourself with the components of your new Anycubic Kobra Go

Familiarize yourself with the components of your new Anycubic Kobra Go
Before starting, save yourself some trouble and carefully organize all the various pieces. Make sure you have everything! In the kit I received, some of the screws were mislabeled, but I was still able to easily complete the build process. By making sure that everything was in place beforehand, it kept me from worrying when I reached the point where the instructions and my on-hand components differed!

3 – Install the Z-axis profiles

Install the Z-axis profiles
  • Spring washer x 4 (#26)
  • M5x25 screws x2 (#23)
  • M5x45 x2 (#25)
Don’t forget to put the washers on the screw before tightening them!

4 – Screwing in the Z-axis profiles

Screwing in the Z-axis profiles
The profiles are simple enough to install, but watch out for the wires beneath the left profile when you’re putting in the screw. One screw is very close to the wires, and though they’re well insulated, you still don’t want to risk damaging them.

5 – Admire your Z-axis profiles

Admire your Z-axis profiles
Mmm, that’s a nice profile. Both flat edges will be facing the front of the printer.

6 – Installing the Z-axis motor kit

Installing the Z-axis motor kit
Collect the Z-axis motor kit items.
  • The motor
  • M4x15 screws x2 (#20)

7 – Attach the Z-axis motor kit

Attach the Z-axis motor kit
It fits in easily behind the profile, just line it up and screw it in.

8 – Prepare the Z-axis screw

Prepare the Z-axis screw
Get out the screw and the anti-backlash nut.

9 – Attach the anti-backlash nut

Attach the anti-backlash nut
You want to make sure that the anti-backlash nut is fully compressed before putting it on the screw. This requires a fair bit of finger strength! Depress the top of the nut into the main part of the nut’s body, then slot onto the screw. When it’s on, the top of the nut will remain slightly more depressed than it could be when off the screw, even after you stop squeezing it.

10 – Tighten the screw coupling and attach the screw

The Z-axis screw is ready to go!
You’ll slot the opposite end of the screw from the anti-backlash nut into the coupling of the motor. Loosen the locking screw, press the driver screw down into position, then tighten the top locking screw again to make sure that the driver screw is held in place.
Tighten the screw coupling

11 – Prepare the XE axis kit

Prepare the XE axis kit
  • Spring washer 2 x3 (#27)
  • M4x16 x5 screw (#21)
The kit doesn’t separate out the parts quite as well as I would have liked, and the instructions were a bit complicated (solely due to organization and readability). For this section, you’ll be using just three of the #21 screws.

12 – Attach the XE axis to the X-axis profile bar

Attach the XE axis to the X-axis profile bar
Attaching is easy, just thread the washer onto the screws and attach. Two screws for the XE-axis kit and one screw for the Z-axis passive block.

13 – Install the Z-axis passive block

Install the Z-axis passive block
One screw gets the passive block into position. The two large rollers should be on the outside of the strut.

14 – Install the synchronous belt

Install the synchronous belt
The belt slots into the strut, teeth down, so that it can interface with the gear.

15 – Install the Kobra Go print head

Install the print head
You’ll take the printer head and slide it onto the strut from the end nearest the passive block. The runners will sit atop the belt that you just placed into the strut’s groove, holding it in place.
Slide the print head onto the profile bar, so that the runners sit atop the belt.

16 – Install the X-axis tensioner

Install the X-axis tensioner
The tensioner came assembled, so disassemble and lay at the ready.

17 – Thread the belt into the X-axis tensioner

Thread the belt into the X-axis tensioner
Take the gear and slot the belt into it so that the belt’s teeth interface with the gear.

18 – Clip the belt onto the print head

Clip the belt onto the print head
Stretch the belt out and slide the ends with the brass crimps into the metal slots.

19 – Bolt down the X-axis tensioner cover

Once the belt is clipped in, attach the casing for the tensioner using the screws.
  • M4x16 screw x2
Bolt down the X-axis tensioner cover

20 – Install the X-axis component

Install the X-axis component
Now that the whole x-axis arm is complete, you can slide it onto the struts. It won’t go down very far at first.

21 – Align the anti-backlash nut

Align the anti-backlash nut
You must make sure that the anti-backlash nut is in place. It has two “wings” on either side, and one of these will fit into a slotted groove on the X-axis strut.

22 – Install the photoelectric switch baffle

Install the photoelectric switch baffle
  • M3x8 x2 screws (#18)
Using the provided screws, connect the metal baffle so that the long end faces down.

23 – Install the top beam

Install the top beam
This part is pretty easy, though you may have to press apart (or together) the struts with a small amount of manual force to get the top beam to slot into place. The beam is plastic, not metal like with the Ender 3, but it’s heavy-duty plastic and I don’t find that it’s a compromise that bothers me overall.
  • M5x16 x4 (#24)

24 – Install the screen kit

Install the screen kit
The screen kit installs easily into the front of the printer, and you can connect the cable immediately. Having the screen already screwed down might make adjusting the levelling knobs a little difficult later on, but not terribly so, especially if you have smaller hands.

25 – Install the X-axis photoelectric switch

Install the X-axis photoelectric switch
This is the switch that tells the printer when the x-axis arm hits its lowest point. Before screwing it into place, you’ll absolutely need to connect the cable. This makes it a little finicky, as aligning the cable through the slot in the cover, connecting the plastic bits, and screwing it down all felt a little difficult. An unwary person might accidentally snap the plastic lock on the bottom, too. Just take your time, be careful, and it will go smoothly.
The wiring needs to be installed first

26 – Connect the wires

Double check the voltage setting!
None of the wires have corresponding markers, which is extremely weird, but it’s also not that hard to figure out which ones go where just based on the size of the cable connector heads and the lengths of the cables themselves. Don’t try pulling any cables longer than they already are, and you’ll be fine.

27 – Install the filament holder

Install the filament holder
The filament holder screws right into the top beam, easy as pie.

28 – Check the X-axis horizontal calibration

Check the X-axis horizontal calibration
Now, this part was not well described in the instruction manual, though I could see that the manual designer meant well by including this. Basically, you use the included toolkit box to make sure that the x-axis arm is level, and you ensure the level by loosening and tightening certain screws and bolts. Note that the bolts don’t have a maximum “tight” position! They move between loose and tight, depending on the position of a little dot bored into the bolt’s metal. If the dot is facing toward the nearest strut, it’s in its tightest state. If the little dot is facing away, it’s in its loosest state. Play with it, and it will quickly make sense just by feel.
I really wish, for the sake of less-experienced enthusiasts, that this whole section was clearer, as it provides a bit of a stumbling block for anyone not used to DIY kit printers.

29 – Connect the Teflon tubing

Connect the Teflon tubing
There are two Teflon tubes. The long one attached to the printer head, and a short one that comes with the kit. Unclip the blue fastener already attached to the filament injector, then slide in the long Teflon tube’s end. Re-clip the blue fastener in place to hold it together. On the other side of the printer, press in the short length of Teflon tubing—this acts as a feeder for the filament as it is brought into the injector component.

30 – Tie cabling

Tie cabling so it’s out of the way
Tie down the excess cables, but make sure to leave some room on either end—this cable should not be too tight anywhere, and this tie is just to keep it out of the way.

31 – Grease the screw

Grease the screw
Lubricating the driver screw will ensure that the printer runs more smoothly.

32 – Adjust the print head for wobble

Adjust the screw until the print head no longer wobbles.
The print head will likely have a little wobble at first, so just use the included wrench to adjust the eccentric nut until the wobble goes away.

33 – Level the print bed

The bolts turn between a “tight” and “loose” state.
Press on the print bed with your hand. If you feel a wobble, you need to adjust the two eccentric nuts beneath the build plate. Remember, these don’t have a “maximum” tight state, but oscillate between loose and tight. Go slowly, and you’ll quickly figure out what feels right.

34 – Enjoy your new Kobra Go 3D printer!

Enjoy your new Kobra Go 3D printer!
Before you can use your new Kobra Go 3D printer, you will want to level it, make sure to read our easy levelling guide before trying to use your printer for prints. Then check out our guide for loading filament and preparing for your first print which will take all the guesswork out of the process for you. Leveling the Kobra Go is relatively easy, as its auto-leveling function does much of the work for you, but if you fail to run this step you’ll find your prints coming out pretty wonky.
But, otherwise, your new printer is ready to go! The Kobra Go is easy enough to put together, though perhaps slightly more complex than the Ender 3 v2 kit printer. Especially for those following the stock directions, and for those without prior experience putting together a DIY kit printer, this would be a big project. What makes this a powerful contender to Creality’s Ender 3 v2 is the automatic levelling procedure that the Kobra series offers. Aligning the Kobra beforehand is a bit of a pain, but once it’s ready, the auto-levelling feature makes it absurdly easy to get your print bed ready for projects.

Who is the Kobra Go for?

You want the Kobra Go if you’re experienced at putting together kit printers and want something that’s easy to assemble for your skill level, that also provides automatic levelling and produces high-quality prints. The Kobra Go would be a reasonable choice for beginners new to the world of 3D printing, as long as they have a lot of patience, the end result (a kit 3D printer with automatic levelling) is definitely worth it.
NEXT UP

How to Set Up Quick Connect on a Synology NAS

Get Synology’s powerful Quickconnect running in minutes on your NAS!
howchoo (467)
November 24, 2023
Synology is one of the most popular creators of Network Attached Storage devices on the market today, and for great reason — they’re really good at what they do. They consistently make devices that stand the test of time and feature top-notch software that makes the process of running a home server as easy as
Continue Reading

iOS

How to Block a Website with Screen Time on Your iPhone

Screen time gives iPhone users the opportunity to track and manage their iPhone usage, making s

In these interests: AppleiOSiPhone

What the Symbols on Your Apple iPhone Mean

Over the years, as iOS versions improve and advance, the symbols and status indicators on

In these interests: AppleiOSiPhone

Simplest Way to Find the Battery Charge Cycle Count on Your iPhone

This is the simplest way to see the health of your iPhone’s battery. For a reminder, after 500

In these interests: iOSiPhone

The Difference Between iCloud and Internal Storage

During many years of working in the tech industry, one of the biggest problems I dealt with was the

In these interests: AppleiOSiPhone

How to Turn off iMessage and Disable Messages on Mac

iMessage is an instant messaging service exclusively made for Apple devices that can process both re

In these interests: iOSMacMacOS

KodiKodi
Kodi

Kodi3 guides

This user wrote the first guide in this interest.

jeremy's profile picturejeremy's profile picture
jeremy
Joined in 2015

Formerly known as XBMC, Kodi is a free and open-source media center that runs on a variety of platforms including Windows, MacOS, Linux, Raspberry Pi, and more. Just connect your device running Kodi to a TV or monitor and enjoy your full library of movies, TV shows, music, and more!

About h/kodi
3
1
31
About h/kodi
3
1
31
Started By
jeremy's profile picturejeremy's profile picture
jeremy
Joined in 2015
jeremy's profile picturejeremy's profile picture
jeremy
Joined in 2015
jeremy's profile picture
Kodi on firestickKodi on firestick
Kodi on firestickHow to install Kodi on Fire TV Stick (Firestick)amazonfirestickkodi
Kodi RetroPieKodi RetroPie
Kodi RetroPieHow to Install Kodi on RetroPiekodiretropiepi
Kodi on Raspberry PiKodi on Raspberry Pi
Kodi on Raspberry PiKodi on Raspberry Pi: Build Your Own Raspberry Pi Media Center!streamingkodipi
Finding guides
Finding guides

This user wrote the first guide in this interest.

jeremy's profile picturejeremy's profile picture
jeremy
Joined in 2015

This user wrote the first guide in this interest.

jeremy's profile picturejeremy's profile picture
jeremy
Joined in 2015
jeremy's profile picturejeremy's profile picture
jeremy
Joined in 2015
jeremy's profile picture
Discover interesting things!
Explore Howchoo’s most popular interests.
Explore

Follow @howchoo and learn cool things:

Are you a passionate writer? We’re hiring!

Write for Howchoo

Like what we do?

Donate

Want to support Howchoo? When you buy a tool or material through one of our Amazon links, we earn a small commission as an Amazon Associate.

Write for HowchooDonate

iPhone

How to Block a Website with Screen Time on Your iPhone

Screen time gives iPhone users the opportunity to track and manage their iPhone usage, making s

In these interests: AppleiOSiPhone

What the Symbols on Your Apple iPhone Mean

Over the years, as iOS versions improve and advance, the symbols and status indicators on

In these interests: AppleiOSiPhone

30 Amazing Things You Didn’t Know Your iPhone Could Do

Most iPhone users use their iPhones everyday without accessing all of its capabilities. We often hea

In these interests: AppleiPhone

Check AT&T Bill Balance and Due Date Via Text

You can check your AT&T bill balance and due date at any time by text from your iPhone, Android,

In these interests: AT&TiPhoneWireless

Check your T-Mobile Bill Balance Without Making a Call

You can check your bill balance any time you’d like — without sitting through annoying v

In these interests: iPhoneT-MobileWireless

Simplest Way to Find the Battery Charge Cycle Count on Your iPhone

This is the simplest way to see the health of your iPhone’s battery. For a reminder, after 500

In these interests: iOSiPhone

Check AT&T Upgrade Eligibility Via Text

I’ve been eying a coworker’s Galaxy Note 3 as a replacement for my aging iPhone 4s. Howe

In these interests: AT&TCellphonesiPhoneWireless

What the Symbols on Your Apple iPhone Mean

iPhone symbols demystified! Over the years, as iOS versions improve and advance, the symbo

In these interests: iPhone

The Difference Between iCloud and Internal Storage

During many years of working in the tech industry, one of the biggest problems I dealt with was the

In these interests: AppleiOSiPhone