Home Interests MacOS

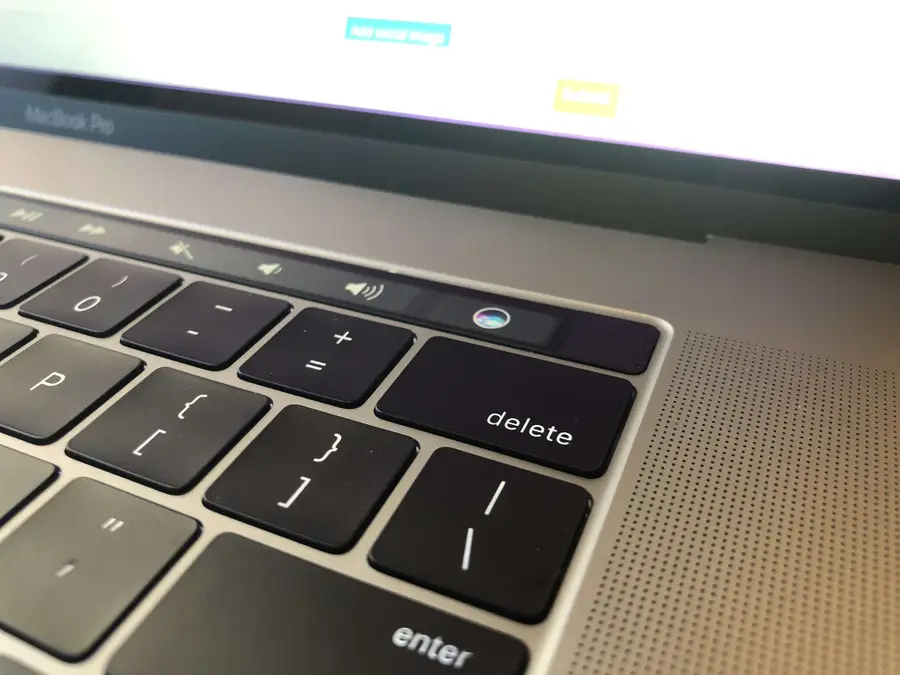
How to disable Chrome tab sharing (Handoff) in MacOS

How to disable Chrome tab sharing handoff in MacOS
howchoo   (467)
September 7, 2023
2 minutes

Share

Interests
Posted in these interests:

Mac

mac • 24 guides
osx • 6 guides
macos • 20 guides

By default, macOS and OSX will offer to share your Chrome tabs between your Mac and iOS devices via iCloud sharing. This short guide will show you how to disable the Google Chrome dock sharing icon and Handoff functionality in macOS and OSX.

Once you are done disabling this Handoff feature, check out our guide on how to create tab groups in google chrome with the new tab groups feature.

1 – Open System Preferences

open system references

Click the Apple icon in the top left of your screen and select System Preferences.

🛈 You can also press CMD-SPACEBAR and type System Preferences.

2 – Go to General

go to general

Click General to access the General Preferences pane.

3 – Uncheck the tab sharing option

Uncheck the tab sharing option

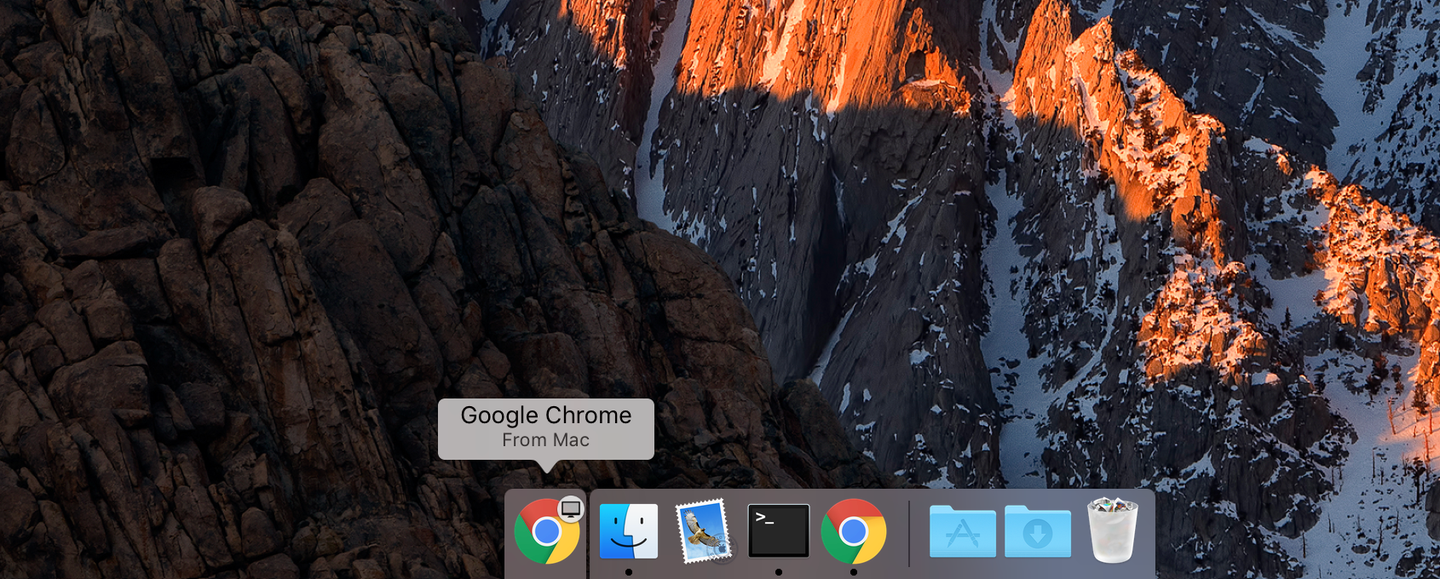
Uncheck the Allow Handoff between this Mac and your iCloud devices option. You’re all done!

NEXT UP

How to Enable the “Popping” Sound When Adjusting the Volume on Your Mac

howchoo
howchoo   (467)
December 13, 2023

Starting with MacOS Sierra and High Sierra, your Mac will no longer play a “pop” sound when you adjust your volume. If you prefer to have this sound when you adjust volume up and down (as I do), this guide will teach you how to reenable it. 1 – Open Sound System Preferences Navigate to System

Continue Reading

howchoo

 467 guides

Introducing Howchoo, an enigmatic author whose unique pen name reflects their boundless curiosity and limitless creativity. Mysterious and multifaceted, Howchoo has emerged as a captivating storyteller, leaving readers mesmerized by the uncharted realms they craft with their words. With an insatiable appetite for knowledge and a love for exploration, Howchoo’s writing transcends conventional genres, blurring the lines between fantasy, science fiction, and the surreal. Their narratives are a kaleidoscope of ideas, weaving together intricate plots, unforgettable characters, and thought-provoking themes that challenge the boundaries of imagination.

Home Interests Furby

How to disassemble Furby

close-up of disassembled furby
howchoo (467)
September 6, 2023
6 minutes

Share

You’ll Need 3
What you’ll need
Interests
Furby x 1
Howchoo is reader-supported. As an Amazon Associate, we may earn a small affiliate commission at no cost to you when you buy through our links.
Posted in these interests:
furby • 1 guides
teardown • 1 guides
This short teardown guide will teach you how to disassemble Furby. Perhaps you need to do this to fix your Furby, or to turn Furby into an Amazon Echo — whatever the reason, this guide will get you going.
I turned a Furby into an Amazon Echo. Introducing: Furlexa I’m sorry.
The Furby I’m disassembling is an original Furby (circa 1998), but the instructions for newer Furbies will be similar.

1 – Skin Furby alive

This sad but crucial step is an easy one. We need to carefully remove Furby’s fur so that we can access his insides and start transplanting Alexa. Before you start, be sure to remove Furby’s batteries. Furby’s fur is primarily held on by a small plastic zip tie at his base. Locate the head of the zip tie and snip it off with some wire cutters. We’ll replace this later with a new one. You may need to cut some of the fabric away to expose the head of the zip tie. Carefully roll Furby’s skin upwards until you reach the faceplate.
🛈 I just realized that the “Fur” in “Furby” comes from the word fur. That only took 20 years.

2 – Remove Furby’s faceplate

Before you can finish removing Furby’s fur, you need to remove his faceplate. Remove the two small screws on either side of his head. There is a small amount of very weak glue securing his fur on the outside of his eyes. Simply pull his fur gently to remove it from this glue. Finally, there is a small open hook at the top of the faceplate. Unclasp this hook.

3 – Free Furby’s ears

The last things holding Furby’s fur in place are his ears. His ears are plastic and have loops at the end; his fur is bound to these loops with thread. Snip this thread and remove his fur fully.

4 – Remove Furby’s carapace

Like a large insect, Furby has a hard exoskeleton. Remove the four screws that hold it in place — one on his head, one on his lower back and two on his sides. Separate the two halves and slide out the small microphone that’s embedded in his side.

5 – Remove Furby’s speaker

If you wish to remove Furby’s speaker to replace it, simply remove the red front speaker grille assembly by removing its two screws and disconnect the speaker’s white connector.
🛈 Furby’s speaker is 32 ohm and 0.25 watts and has a diameter of 40mm, in case you find that interesting.

6 – Now Furby is terrifying

Don’t look him in the eyes.

howchoo

 467 guides
Introducing Howchoo, an enigmatic author whose unique pen name reflects their boundless curiosity and limitless creativity. Mysterious and multifaceted, Howchoo has emerged as a captivating storyteller, leaving readers mesmerized by the uncharted realms they craft with their words. With an insatiable appetite for knowledge and a love for exploration, Howchoo’s writing transcends conventional genres, blurring the lines between fantasy, science fiction, and the surreal. Their narratives are a kaleidoscope of ideas, weaving together intricate plots, unforgettable characters, and thought-provoking themes that challenge the boundaries of imagination.
Home Interests MacOS

What to do when you can’t drag a window to an external display in MacOS or OS X

howchoo   (467)
August 25, 2023
2 minutes

Share

Interests
Posted in these interests:
osx • 6 guides
macos • 20 guides

When I turned my computer on this morning, it seems that the menu bar was blocking me from dragging a Google Chrome window from my laptop display to my external display. After much trial and error, I found that I simply needed to drag the window further.

1 – Drag the window further onto the second display

Drag a window from your primary display onto the secondary display until your cursor is at least 75% of the way across the external display. You’ll see the window suddenly jump onto this second display.

NEXT UP

How to Enable the “Popping” Sound When Adjusting the Volume on Your Mac

howchoo
howchoo   (467)
December 13, 2023

Starting with MacOS Sierra and High Sierra, your Mac will no longer play a “pop” sound when you adjust your volume. If you prefer to have this sound when you adjust volume up and down (as I do), this guide will teach you how to reenable it. 1 – Open Sound System Preferences Navigate to System

Continue Reading

howchoo

 467 guides

Introducing Howchoo, an enigmatic author whose unique pen name reflects their boundless curiosity and limitless creativity. Mysterious and multifaceted, Howchoo has emerged as a captivating storyteller, leaving readers mesmerized by the uncharted realms they craft with their words. With an insatiable appetite for knowledge and a love for exploration, Howchoo’s writing transcends conventional genres, blurring the lines between fantasy, science fiction, and the surreal. Their narratives are a kaleidoscope of ideas, weaving together intricate plots, unforgettable characters, and thought-provoking themes that challenge the boundaries of imagination.

Home Interests Networking

How to Set up the Edimax EW-7811Un USB WiFi Adapter on Your Raspberry Pi

howchoo   (467)
August 25, 2023
6 minutes

Share

You’ll Need 2

What you’ll need
Interests
Howchoo is reader-supported. As an Amazon Associate, we may earn a small affiliate commission at no cost to you when you buy through our links.
Posted in these interests:
linux • 12 guides
networking • 8 guides
pi • 92 guides

The Edimax WiFi adapter is popular because it’s small, cheap, and most common pi distros come with the drivers already installed. Setting this up via the command line is simple.

1 – Connect your Edimax WiFi adapter and ethernet cable

Before booting up the Pi, plug in the USB WiFi adapter as well as the ethernet cable.

2 – Boot up the Pi

To boot the Pi, simply plug in the power cable.

3 – SSH into the Pi

By default, the raspberry pi uses the hostname “raspberrypi”. So you can SSH using:

ssh pi@raspberrypi

The default username is pi, and the default password is raspberryRefer to this guide for more information on the default username and password..

If you’re having trouble with the hostname, follow this guide to find the IP address of your Raspberry Pi.


4 – Make sure the Pi recognizes the device and the drivers are loaded

Once you’re logged in to the Pi, check to see if the Pi recognizes the USB device using the following command:

lsusb

You should see the following:

Bus 001 Device 004: ID 7392:7811 Edimax Technology Co., Ltd EW-7811Un 802.11n Wireless Adapter [Realtek RTL8188CUS]
Bus 001 Device 003: ID 0424:ec00 Standard Microsystems Corp. SMSC9512/9514 Fast Ethernet Adapter
Bus 001 Device 002: ID 0424:9514 Standard Microsystems Corp.
Bus 001 Device 001: ID 1d6b:0002 Linux Foundation 2.0 root hub

Notice the first line.

Now we’ll check to see if the device drivers are loaded. To list the kernal modules use:

lsmod

You should see something like:

Module                                   Size              Used by
cfg80211
rfkill
8192cu       
bcm2835_gpiomem
...

8192cu is what we’re looking for, and it looks like it’s installed.

As a final check, run:

iwconfig

And you should see the wireless adapter here:

wlan0     unassociated  Nickname:""
          Mode:Managed  Frequency:2.462 GHz  Access Point: 20:3D:66:44:C6:70
          Bit Rate:72.2 Mb/s   Sensitivity:0/0
          Retry:off   RTS thr:off   Fragment thr:off
          Power Management:off
          Link Quality=100/100  Signal level=100/100  Noise level=0/100
          Rx invalid nwid:0  Rx invalid crypt:0  Rx invalid frag:0
          Tx excessive retries:0  Invalid misc:0   Missed beacon:0

5 – Configure the wpa_supplicant with your wifi credentials

Now, open the following file to add our network credentials.

sudo vim /etc/wpa_supplicant/wpa_supplicant.conf

Add the following to the end of this file:

For Raspbian Jessie:

network={
ssid="SSID"
proto=RSN
key_mgmt=WPA-PSK
pairwise=CCMP TKIP
group=CCMP TKIP
psk="PASSWORD"
}

For Raspbian Stretch:

ctrl_interface=DIR=/var/run/wpa_supplicant GROUP=netdev
network={
    ssid="SSID"
    proto=RSN
    key_mgmt=WPA-PSK
    pairwise=CCMP TKIP
    group=CCMP TKIP
    psk="PASSWORD"
}

Of course, you’ll need to substitute your SSID and password.

6 – Reboot

Remove the ethernet cable, and reboot with the following command:

reboot

Now you should be able to connect over WiFi.

NEXT UP

How to Run a Minecraft Server on the Raspberry Pi

A whole world trapped inside your Pi.
howchoo   (467)
December 7, 2023

There are several ways to go about running a Minecraft server on the Raspberry Pi. In this guide, I’ll cover how to install Nukkit—a cross-platform Minecraft server that’s super easy to set up on the Raspberry Pi. This server should work with PCs, consoles, and tablets running Minecraft 1.14. I’ll be using a Raspberry Pi

Continue Reading

howchoo

 467 guides

Introducing Howchoo, an enigmatic author whose unique pen name reflects their boundless curiosity and limitless creativity. Mysterious and multifaceted, Howchoo has emerged as a captivating storyteller, leaving readers mesmerized by the uncharted realms they craft with their words. With an insatiable appetite for knowledge and a love for exploration, Howchoo’s writing transcends conventional genres, blurring the lines between fantasy, science fiction, and the surreal. Their narratives are a kaleidoscope of ideas, weaving together intricate plots, unforgettable characters, and thought-provoking themes that challenge the boundaries of imagination.

Home Interests Vim

Vim: Convert Tabs to Spaces

howchoo
howchoo (467)
August 25, 2023
2 minutes

Share

Interests
Posted in these interests:

Vim

vim • 5 guides
Tabs are evil. This guide will show you how to convert tabs to spaces in Vim.

1 – Use expand tab to convert new tabs to spaces

The expandtab property will ensure that when you hit tab it will actually use spaces. So first set the number of spaces a tab should be, then set expandtab.
set tabstop=2 shiftwidth=2 expandtab
Tabstop determines how many columns a tab counts for. Shiftwidth determines how many columns text is indented when using reindent operations. Expandtab is what actually uses spaces instead of tabs.

2 – Convert existing tabs to spaces

If you’ve got a file already full of tabs, converting to spaces is super easy. Make sure to follow step one first, then use retab. Open the file and type:
:retab
This will fix all existing tabs.
NEXT UP

How to Change or Switch the Case of Characters in Vim

howchoo
howchoo (467)
September 18, 2023
Need to change the case of characters to all caps or all lowercase? This is easily done using Vim. This guide will show you how to change the case of characters in Vim. tl;dr Toggle “Hello” to “hELLO” with g~. Uppercase “Hello” to “HELLO” with gU. Lowercase “Hello” to “hello” with gu. 1 – Select the text you’re
Continue Reading

howchoo

 467 guides
Introducing Howchoo, an enigmatic author whose unique pen name reflects their boundless curiosity and limitless creativity. Mysterious and multifaceted, Howchoo has emerged as a captivating storyteller, leaving readers mesmerized by the uncharted realms they craft with their words. With an insatiable appetite for knowledge and a love for exploration, Howchoo’s writing transcends conventional genres, blurring the lines between fantasy, science fiction, and the surreal. Their narratives are a kaleidoscope of ideas, weaving together intricate plots, unforgettable characters, and thought-provoking themes that challenge the boundaries of imagination.
Home Interests Peloton

How to Sync your Peloton Workout with Your Apple Watch

howchoo
howchoo   (467)
August 25, 2023
5 minutes

Share

Interests
Posted in these interests:
fitness • 5 guides
peloton • 2 guides

So you just crushed it on the Peloton Bike, but when you check your Apple Watch no activity has tracked. If you’re into data-driven fitness and tracking, is there anything worse than checking your progress and finding nothing has been recorded?

While your Peloton and Apple Watch are programmed to sync together, follow these quick steps to update your activity right away instead of waiting for your rides and classes to update.

Let’s get started!

1 – Check your Activity rings

Glance at the Activity app on your iPhone or Apple Watch. If your circles are lagging behind the Peloton workout you’ve just completed, you’ll want to do a quick sync to bring everything up to date.

For example, you can see in the screenshot above that after finishing a 60-minute cycling class, my activity rings display no data from my workout.

2 – View your workout in the Peloton app

Next you will need to view each workout you are trying to sync in your Peloton app.

To view your workout, open the Peloton app on your iPhone. Go to your profile to access the workout you’d like to sync. Select “View all” to open your history of completed workouts.

In the list of completed Peloton classes, tap the workout you’d like to sync to open it and view your workout statistics.

3 – Close the Peloton app and Activity app

After you’ve viewed each workout you’d like to sync, close both your Peloton app and your Activity app on your iPhone. This will allow your Activity app to refresh when you reopen it and log your new activity.

4 – Reopen the Activity app

Reopen the Activity app on your iPhone or Apple Watch to see your updated rings. Sometimes it may take a few minutes to see the circles sync with your Peloton, but it will be much faster than waiting for it to track.

Need some more accessories to sync up?! Check out our guide to the best accessories for your Peloton!

Eight Must-Have Peloton Accessories (2022)
Get prepped for your next Peloton cycling ride with these accessories.

NEXT UP

How to Clean Vibram Five Finger Toe Shoes Without Ruining Them

howchoo   (467)
November 22, 2023

Vibram Five Finger shoes are awesome pieces of running gear. But you can also use them for hiking and looking weird around town. Unfortunately, toe shoes start to smell if you don’t wear socks with them every time you wear them. While Vibram claims that the shoes are machine washable, you will ruin them if you wash

Continue Reading

howchoo

 467 guides

Introducing Howchoo, an enigmatic author whose unique pen name reflects their boundless curiosity and limitless creativity. Mysterious and multifaceted, Howchoo has emerged as a captivating storyteller, leaving readers mesmerized by the uncharted realms they craft with their words. With an insatiable appetite for knowledge and a love for exploration, Howchoo’s writing transcends conventional genres, blurring the lines between fantasy, science fiction, and the surreal. Their narratives are a kaleidoscope of ideas, weaving together intricate plots, unforgettable characters, and thought-provoking themes that challenge the boundaries of imagination.

Home Interests Django

How to Rerun a Django Migration

howchoo
howchoo   (467)
August 25, 2023
4 minutes

Share

Interests
Posted in these interests:
django • 3 guides
python • 18 guides

By default, Django migrations are run only once. But sometimes we need to rerun a Django migration, especially when testing custom migrations during development. This guide will show you how to do just that.

1 – Fake back to the migration immediately before the one you want to rerun

First, imagine the migration history for myapp looks like this:

$ ./manage.py showmigrations myapp
myapp
...
[x] 0004_the_migration_right_before
[x] 0005_the_migration_i_want_to_rerun
[x] 0006_a_migration_i_dont_care_about
...
[x] 0010_the_latest_migration

It’s wise to visualize the migration history before messing with migrations. When we’re finished with this process we can ensure the final migration state matches the original state.

So the latest migration is 0010_the_latest_migration and we want to rerun 0005_the_migration_i_want_to_rerun.

We’ll use the --fake flag to “fake” back to the migration before the one we want to rerun. We’ll also need to specify the target app for the migration, which in this case is myapp.

./mange.py migrate --fake myapp 0004_the_migration_right_before

Keep in mind, this is an advanced feature that modifies the migration state. It can cause issues that require manual recovery.

2 – Rerun the target migration

Now we can run only our target migration:

./mange.py migrate myapp 0005_the_migration_i_want_to_rerun

3 – Fake back to the latest migration

Now, in order to restore the original migration state, we need to fake back to the latest migration:

./mange.py migrate --fake myapp 0010_the_latest_migration

We can confirm our migration history looks correct by running the following, and comparing to the original state:

./manage.py showmigrations myapp
myapp
...
[x] 0004_the_migration_right_before
[x] 0005_the_migration_i_want_to_rerun
[x] 0006_a_migration_i_dont_care_about
...
[x] 0010_the_latest_migration
NEXT UP

Class Vs. Instance Variables in Python 3

howchoo
howchoo   (467)
November 22, 2023

When learning object oriented programming in Python, there can be a few gotchas when it comes to distinguishing between class and instance variables. In this guide I’ll explain the difference between class and instance variables and provide examples demonstrating various use cases. 1 – Class vs. instance variables First, a quick review if you’re new

Continue Reading

howchoo

 467 guides

Introducing Howchoo, an enigmatic author whose unique pen name reflects their boundless curiosity and limitless creativity. Mysterious and multifaceted, Howchoo has emerged as a captivating storyteller, leaving readers mesmerized by the uncharted realms they craft with their words. With an insatiable appetite for knowledge and a love for exploration, Howchoo’s writing transcends conventional genres, blurring the lines between fantasy, science fiction, and the surreal. Their narratives are a kaleidoscope of ideas, weaving together intricate plots, unforgettable characters, and thought-provoking themes that challenge the boundaries of imagination.

Home Interests Computers

How to Diagnose a PSU (Without Any Tools)

howchoo   (467)
August 25, 2023
4 minutes

Share

Interests
Posted in these interests:
computers • 2 guides

PC

pc • 3 guides

Being able to test your PSU without tools like a multimeter or other voltage reader really saved my butt and I wanted to pass on the knowledge.

And while you don’t need a multimeter for this guide, but they’re nice to have handy. Check out our best multimeter guide to learn more.

The Best Multimeters for Beginners and Pros (2022)
We present you with our guide to the best multimeter in five categories.


1 – Unplug the computer from the wall

2 – Take your computer’s case cover off

If you’re not used to this, don’t worry. Its not a big deal at all.

3 – Remove the main connector from the motherboard

This is slightly scarier but only very slightly. There is usually a small clasp on one side that you have to hold open while removing this from your motherboard.

4 – Plug in a case fan or a hard drive

Some PSU’s require at least a small load for this test to work.

5 – Bend the paperclip into a U shape

6 – Bridge the paperclip between the green wire and a ground (usually black) wire

If your PSU is a corsair like mine, then any black wire is a ground wire. This is not dangerous at all, its just basically telling the PSU to power up as soon as its turned on.

🛈 Sorry about the thumb in the way!!!

7 – ATX power cable pinout diagram

Note the small connector tab on the right of the diagram for proper orientation.

The attached ATX pinout diagram identifies the ground pins you can use. This is for the common 24-pin ATX power connector.

8 – Plug in and power on the PSU

If the PSU fan powers on and starts spinning, then your PSU is most likely good! In my case, my PSU didn’t budge so I know its busted and I’ll be ordering a replacement.

NEXT UP

How to Use a GameCube Controller on PC

Nothing beats the original GameCube controller.
howchoo   (467)
September 20, 2023

If you’re a fan of the original Nintendo GameCube, you’re not alone. But sometimes emulating GameCube games just isn’t the same if the controller doesn’t hit right. And by that we mean—you need the original hardware to make the experience. If you want to use the original GameCube controller on a PC, all you need

Continue Reading

howchoo

 467 guides

Introducing Howchoo, an enigmatic author whose unique pen name reflects their boundless curiosity and limitless creativity. Mysterious and multifaceted, Howchoo has emerged as a captivating storyteller, leaving readers mesmerized by the uncharted realms they craft with their words. With an insatiable appetite for knowledge and a love for exploration, Howchoo’s writing transcends conventional genres, blurring the lines between fantasy, science fiction, and the surreal. Their narratives are a kaleidoscope of ideas, weaving together intricate plots, unforgettable characters, and thought-provoking themes that challenge the boundaries of imagination.

Home Interests DIY

How to Soften Paintbrushes (and keep them good as new!)

The softer the bristle, the better the painting
howchoo (467)
August 25, 2023
12 minutes

Share

You’ll Need 5
What you’ll need
Interests
Pot x 1
Howchoo is reader-supported. As an Amazon Associate, we may earn a small affiliate commission at no cost to you when you buy through our links.
Posted in these interests:

Art

art • 2 guides

DIY

diy • 17 guides
If you’re a painter, you’ve likely dealt with dried paint left on the bristles on your brush. Which means you’ve also probably wondered: how do I soften my paintbrush? When left unchecked, dried paint can wreak havoc on the integrity of the brush itself, affecting how well the brush paints, your artistic ability and your art, too. In addition, hardened bristles aren’t malleable, making them impossible to use, which is especially painful if you’ve sunk a good amount of money into your brushes. Removing dried paint might be an art in itself, but what about restoring those dried bristles to their soft fresh-from-the-package state of being? That’s where the true art happens. Here’s everything you need to know about removing dried paint, and how to soften your paintbrushes.

1 – Remove as much paint as you can

Before you work to soften the hardened bristles of your paint-encrusted brush, you’re going to have to remove as much extra paint as you can.

How to remove water-based paint

  • Soak your brush in warm water.
  • Put dish soap directly on the wet bristles.
  • Massage the soap gently into the bristles.
  • Run bristles beneath warm water, massaging the soap and paint until the water runs clear.

How to remove oil-based paint

  • Soak the end of your brush in paint thinner or turpentine.
  • Work the paint thinner/turpentine through the bristles by massaging the liquid into the brush.
  • Continue working with your fingers until the bristles are cleaner.
  • Rinse with warm water and dish soap to remove the painter thinner/turpentine.
Now that your bristles are relatively clean, you’re ready to soften them up! There are several ways you can do this, but we’ll focus on the top 3 easiest methods: The moisturizer, the vinegar, and the fabric softener methods.

2 – The moisturizer method

Using moisturizer to soften your dried paintbrushes is a great way to accomplish your goal easily because you don’t have to create your own mixture. Here’s how to use moisturizer to soften your paint bristles. You can use any lightweight moisturizer or lotion that doesn’t leave behind a greasy residue. Residue can cause buildup in your bristles, negatively impacting your ability to paint in the longrun. Tip: Look for any moisturizer or lotion that has oil-free written on the packaging.

How to soften your brushes

  • Squirt a peasize amount of moisturizer into the palm of your hand.
  • Run the bristles of your brush in a back and forth motion over the moisturizer.
  • Take care to work as much moisturizer into the bristles as you can, using your fingertips if necessary.
  • Continue to work in the moisturizer for a minute or until you feel confident as much of the bristles as possible are coated.
  • Use a clean paper towel to wipe off any excess moisturizer by applying medium to firm pressure on the ferrule and working your way to the tip of your brush.
  • Repeat until the moisturizer is gone.
  • Rinse and dry as normal.

Why the moisturizer method works

Moisturizer loosens the dried paint from the bristle, making it easier to slide it off when you run your paper towel over it.

3 – The vinegar method

Certainly the smelliest method for how to soften your paintbrushes, vinegar is a good option if you want to avoid using harsh chemicals.

How to prepare your vinegar

  • Pour a cup into a pot and place the pot on your stovetop.
  • Heat your vinegar on high heat until small bubbles start to form on the bottom of the pan (just shy of boiling).

How to soften your brushes

  • Pour your heated vinegar into a glass.
  • Submerge your bristles up to the ferrule.
  • Let your brushes sit for 20 minutes.
  • Check to see if your bristles are soft. If they’re not yet, submerge them once more for 10 more minutes.
  • Rinse with warm water and let them dry as normal.

Why the vinegar method works

Vinegar is a unique substance that is known for many things. Not only is it edible, it’s also a disinfectant, too and can be used to strip build-up from surfaces (and bristles!).

4 – The fabric softener method

How to make your fabric softener mixture

  • You can use the fabric softener of your choice, but I like to use unscented softeners.
  • If you’re softening a few brushes: mix 1 tablespoon of fabric softener with 1 cup of water.
  • If you’re softening a dozen brushes: mix 1/4 cup of fabric softener with 4 cups of water.
  • Make sure you’re using a hard bowl to combine your softener with your water. This will make it easier to work the mixture into your bristles.

How to soften your brushes

  • Submerge one brush at a time up to the ferrule.
  • Swirl the bristles through your mixture.
  • Gently press your bristles against the bottom of your bowl, moving the brush in circular or back and forth motions.
  • Repeat until the excess paint dislodges from the bristles and falls to the bottom of your bowl.
  • Once the bristles are clean and soft to the touch, you can set them aside to dry as you normally would.

Why the fabric softener method works

Fabric softener works to coat the individual fibers of whatever it comes in contact with, either clothes, towels, or the bristles of your paintbrush. It also decreases the amount of surface tension between the liquid and your brush, making it easier for the water to penetrate all those nooks and crannies between the bristles once you work your brush against the base of your bowl. There you have it! 3 ways to soften your paintbrushes, keeping them as good as new for as long as possible.
NEXT UP

How to Make Whiskey Simple Syrup

No whisk, no reward.
howchoo (467)
November 20, 2023
When I was first offered a beverage flavored with whiskey simple syrup, I was in a coffee shop in San Jose, California. I wasn’t even really interested in drinking coffee. It was later in the day; I was already feeling a little tired; I figured coffee was the last thing I needed. But when the
Continue Reading

howchoo

 467 guides
Introducing Howchoo, an enigmatic author whose unique pen name reflects their boundless curiosity and limitless creativity. Mysterious and multifaceted, Howchoo has emerged as a captivating storyteller, leaving readers mesmerized by the uncharted realms they craft with their words. With an insatiable appetite for knowledge and a love for exploration, Howchoo’s writing transcends conventional genres, blurring the lines between fantasy, science fiction, and the surreal. Their narratives are a kaleidoscope of ideas, weaving together intricate plots, unforgettable characters, and thought-provoking themes that challenge the boundaries of imagination.
Home Interests Obsidian

How to Sync your Obsidian Vault for Free!

Obsidian is one of the best note tools, and syncing for free makes it better!
howchoo (467)
August 25, 2023
11 minutes

Share

Interests
Posted in these interests:
apps • 1 guides
obsidian • 1 guides
technology • 20 guides
zettelkasten • 1 guides
I am a huge fan of Obisdian, the free and open-source tool for all your note-taking needs. Obsidian is one of the best tools for knowledge workers, writers, and educators, and I personally use it daily to manage my volunteering across half a dozen different organizations, as well as my personal learning. Like other similar note-taking tools, it features a simple and powerful design that makes storing your ideas inside your digital “second brain” a breeze. But syncing through Obsidian’s official live sync is expensive. I highly recommend it if you can afford the $10/month charge, as the company deserves your support, but if you, like me, find that the $100/year isn’t doable, try this free method for securely syncing all your Obsidian notes, across all your vaults, for free!

1 – SyncThing

SyncThing is a free and open-source peer-to-peer syncing app, designed to quickly and securely transfer data between your devices. It can sync across multiple devices almost instantly, and can handle syncing between multiple types of devices, including those with different operating systems (Windows to iOS, etc.). Your data is safe and secure with this type of file syncing, and it’s impossible to beat the free price tag! You need to navigate to the official SyncThing GitHub to download SyncThing. Just follow the instructions on their GitHub page and download the correct installer for your device! Since I use Windows, I’ll show you how to install the official windows app “SyncTrayzor”, but SyncThing-MacOS will feature much the same steps.

2 – Download SyncTrayzor

Download SyncTrayzor from the list on the GitHub page.

3 – Run the SyncTrayzor .exe file

Find your downloads section and double-click your new SyncTrayzor extension (or just click “run” from the download button on your browser).

4 – SyncTrayzor control panel

Once you have SyncTrayzor installed and opened, you’ll start in the main control panel screen. This is where you’ll be able to see which folders are shared, which are actively syncing, and which devices you have connected.

5 – Check the SyncThing settings

Let’s make sure that your settings are correct.
  • First go to “File”, then click “Settings”.
  • On the SyncTrayzor tab, at the bottom, you’ll find two setting checkboxes:
  • “Automatically start on login”, and “Start minimized”.
  • Make sure both are checked.

6 – Download SyncThing onto your phone

This app can also be found on F-Droid and through the AuroraStore privacy-focused version of the Google app store.

7 – Prepare to add a new device to SyncTrayzor

On your SyncTrayzor application on your PC, click the “Action” tab, and then click “Show ID” to bring up a unique QR code that you can use to link your phone to SyncTrayzor.

8 – Add your device

On the mobile app, find the devices tab, then press the “+” sign to add a new device. Now, simply scan the QR code from the SyncTrayzor app on your PC. Back on the SyncTrayzor app on your PC, you should see a new notification pop up at the top of the SyncTrayzor control panel. Click “Add Device”. Now, under “Remote Devices” in the SyncTrayzor window, you will see your phone!

9 – Sync your Obsidian vault

  • On your computer, open the folder location of your obsidian vault.
  • Right-click on the folder. Select “copy as path”. If you’re on Windows 10, you may need to first click “Show more options” to see the full context menu.
  • Return to the SyncTrazor app and click on “Add folder”.
  • Paste the folder path and remove the quotation marks (“…”) from the ends of the folder path link.
  • Add a unique identifier to the “Label” section, such as “Obsidian”.

10 – Enable file versioning and set up on mobile

  • Click on the “Sharing” tab in the SyncTrayzor window for your folder.
  • Under “File Versioning” click the “Trash Can File Versioning” checkbox.
  • Click “Save”.
  • On your mobile device, a new notification should appear letting you know that a folder wants to be shared.
  • Tap on this notification and choose the folder on your phone that you want to use as your Obsidian Vault. Make sure “Watch for Changes” is selected.
  • Tap “Create”.
Your new synced Obsidian folder will be created, syncing everything between your phone and PC! The file versioning will ensure that if there are glitches between the devices, previous iterations of your important files will be saved. It is important to note that I encountered some errors when I had both the Obsidian program on my laptop and the app on my phone running at the same time. The file that would sync would be whichever was the last to close. If I closed my PC app first and then my mobile app, the data on the mobile app would sync to both devices. Versioning captured changes, however, and made sure I didn’t lose anything.
NEXT UP

How to Set Up Quick Connect on a Synology NAS

Get Synology’s powerful Quickconnect running in minutes on your NAS!
howchoo (467)
November 24, 2023
Synology is one of the most popular creators of Network Attached Storage devices on the market today, and for great reason — they’re really good at what they do. They consistently make devices that stand the test of time and feature top-notch software that makes the process of running a home server as easy as
Continue Reading

howchoo

 467 guides
Introducing Howchoo, an enigmatic author whose unique pen name reflects their boundless curiosity and limitless creativity. Mysterious and multifaceted, Howchoo has emerged as a captivating storyteller, leaving readers mesmerized by the uncharted realms they craft with their words. With an insatiable appetite for knowledge and a love for exploration, Howchoo’s writing transcends conventional genres, blurring the lines between fantasy, science fiction, and the surreal. Their narratives are a kaleidoscope of ideas, weaving together intricate plots, unforgettable characters, and thought-provoking themes that challenge the boundaries of imagination.