Home Interests Chrome

How to Stop Chrome from Automatically Redirecting to https

stop google chrome redirect
Prevent this major dev annoyance.
howchoo   (467)
August 3, 2023
5 minutes

Share

You’ll Need 1

What you’ll need
Interests
Howchoo is reader-supported. As an Amazon Associate, we may earn a small affiliate commission at no cost to you when you buy through our links.
Posted in these interests:
chrome • 7 guides
webdev • 10 guides

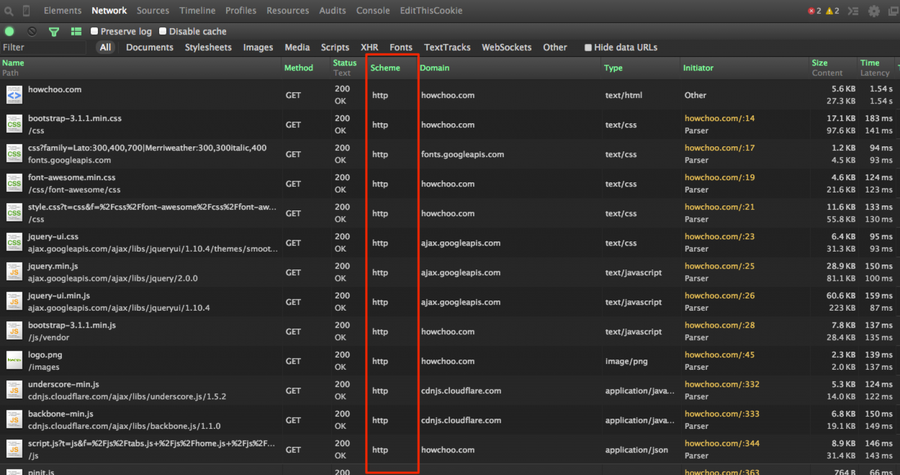
If you ever visited the https version of a website (whether it resolved or not), Google Chrome might repeatedly send you to that version. In other words, http://local.howchoo.com:4000 continually redirects you to https://local.howchoo.com:4000.

Why this happens

This is a secure caching issue where Chrome erroneously caches the redirect the first time you visit the secure version of a site—even if the site doesn’t have a valid SSL/TLS certificate.
A pain in local development

This is a major problem in local development where you’re often coding in a non-secure environment.

This short guide will show you how to remove the automatic redirect to https in Chrome, fixing the issue.

1 – Open HSTS settings in net-internals in Chrome
hsts settings

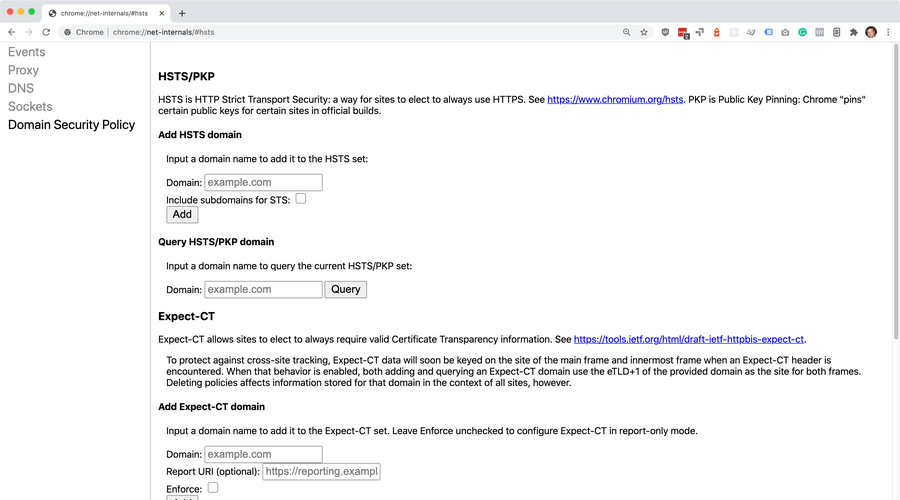
In a new browser tab, go to chrome://net-internals/#hsts. This is the configuration area for HSTS.

What is HSTS?

According to Google Chrome, an HSTS is HTTP Strict Transport Security—a way for sites to elect to always use HTTPS.

2 – Delete domain security policies for the domain
domain security policies

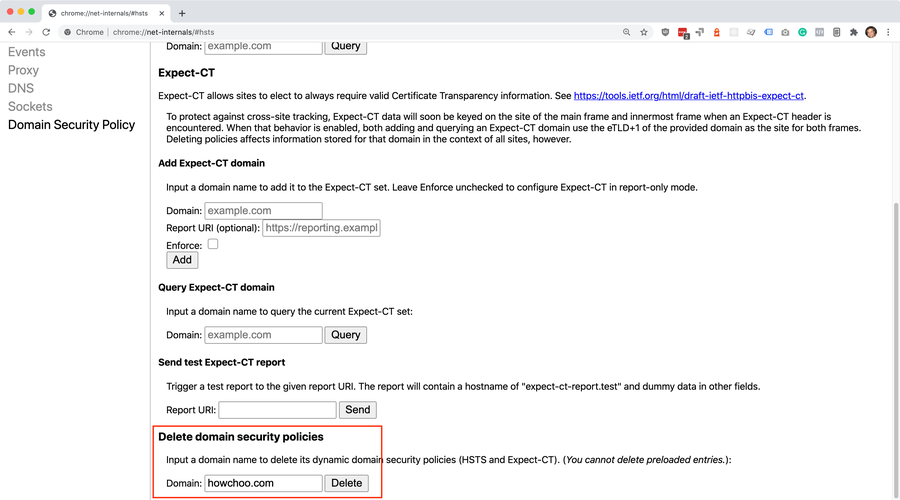
Scroll down to “Delete domain security policies” and enter the root domain that’s causing you issues. For example, I entered howchoo.com to prevent the domain from automatically redirecting to https.

Then, click the Delete button.

3 – Visit the website to test
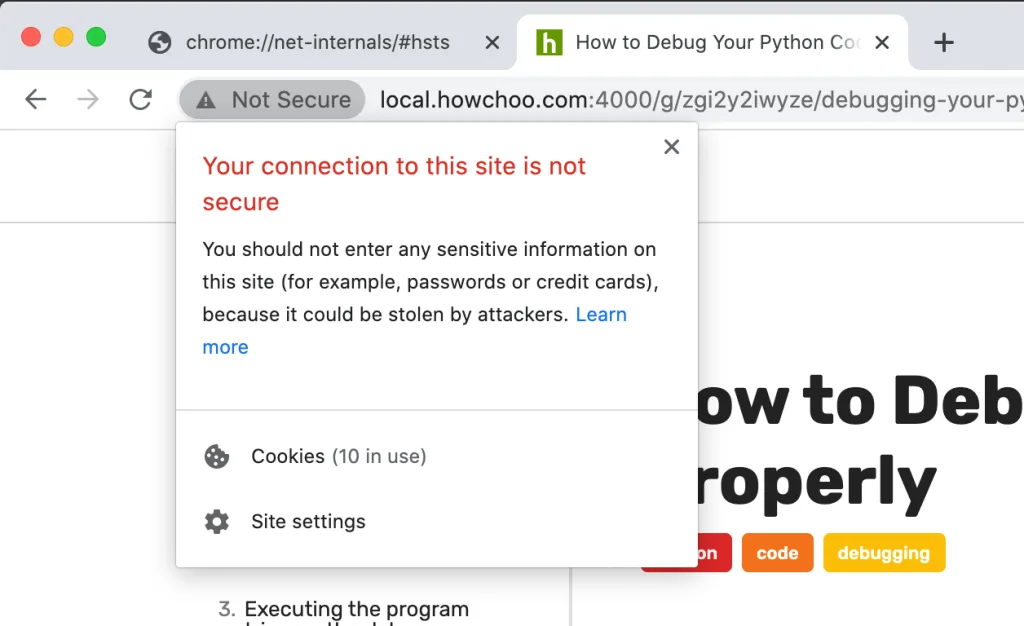
nonsecure domain

Visit the http version of the URL that was giving you problems. You should no longer get redirected.

Still getting redirected?

If you’re still getting redirected, try clearing your browser cache by navigating to Chrome > Settings > Privacy and security (or by visiting chrome://settings/privacy in your browser) and clear your browsing data.

How to Clear Your Browser Cache for Any Browser

Trouble loading web pages? Try clearing your cache!

You can also clear data just for the specific domain by visiting the domain in your browser by navigating to View > Developer > Developer Tools > Application > Clear storage and then clicking the Clear site data button.

NEXT UP

How to Clear Your Browser Cache for Any Browser

Trouble loading web pages? Try clearing your cache!
howchoo   (467)
November 22, 2023

Clearing your browser cache is a great way to solve common internet issues. If a webpage isn’t loading properly, one of the first things you should try is clearing your browser cache. This guide includes steps for the most common internet browsers—Chrome, Firefox, Safari, Internet Explorer, and Edge. If your browser isn’t listed, visit the

Continue Reading

howchoo

 467 guides

Introducing Howchoo, an enigmatic author whose unique pen name reflects their boundless curiosity and limitless creativity. Mysterious and multifaceted, Howchoo has emerged as a captivating storyteller, leaving readers mesmerized by the uncharted realms they craft with their words. With an insatiable appetite for knowledge and a love for exploration, Howchoo’s writing transcends conventional genres, blurring the lines between fantasy, science fiction, and the surreal. Their narratives are a kaleidoscope of ideas, weaving together intricate plots, unforgettable characters, and thought-provoking themes that challenge the boundaries of imagination.

Home Interests Minecraft

How to Install Shaders on CurseForge

how to install shaders on curseforge
Make those clouds look good enough to eat!
howchoo   (467)
August 2, 2023
6 minutes

Share

Interests
Posted in these interests:
curseforge • 4 guides
READY PLAYER 1
gaming • 85 guides
Minecraft is an epic sandbox video game developed by Swedish game developer Mojang Studios.
minecraft • 66 guides

Shaders, also known as shader packs, are a way to bring your Minecraft gameplay to a new level of beautiful. Minecraft Shaders improve the game’s visual elements, such as color enhancement, improved lighting, and generally make the game look more realistic. Depending on the shader, players can customize their world to their preference. So if you want pink water and purple sky, shader packs are the way to make it happen.

Before you dive into our guide on how to install shaders in CurseForge, make sure you already have OptiFine installed. We have a helpful guide on how to do that here! Without OptiFine, the shaders won’t work, so make sure to do that and return here after!

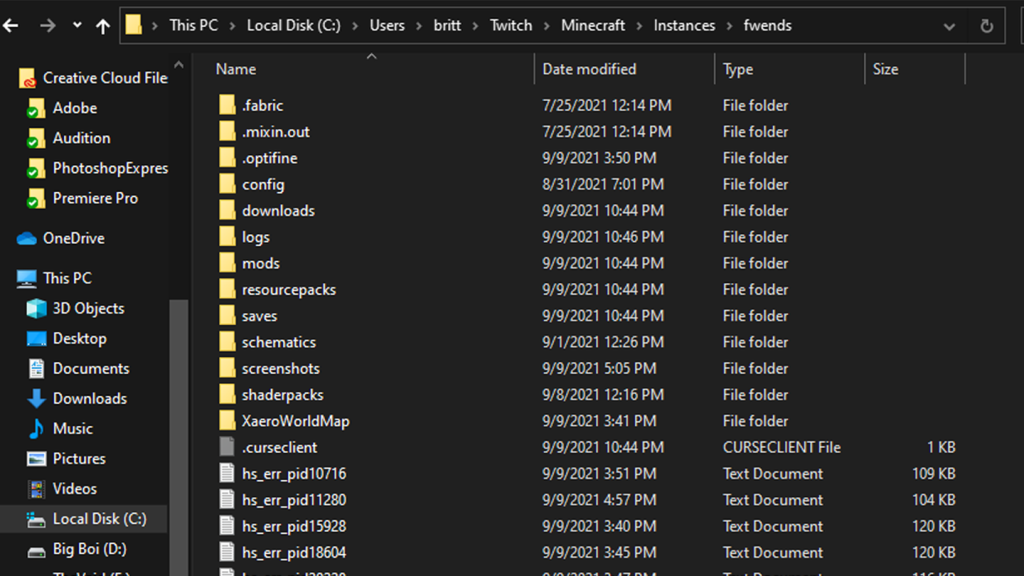
1 – Find the correct File Path

find the correct file path

Before you can download and install a shader pack, you’ll need to find where in CurseForge your game is!

  1. Open CurseForge and navigate to the modpack you’re using.
  2. Click the ... button to the left of the Play button.
  3. In the drop-down menu, click Open Folder.
  4. This is where you’ll install your shaders!
usual file path look

Usually, the file path looks like this: C:UsersUSER_NAMETwitchMinecraftInstancesMODPACK_NAME.

2 – Create a shaders folder

create a shaders folder

Unfortunately, Minecraft doesn’t automatically create a folder to place shaders into. Inside the Minecraft folder you found in the last step, create a new folder called shaderpacks. Make sure to spell it exactly or else the game won’t recognize where you’ve placed your shaders.

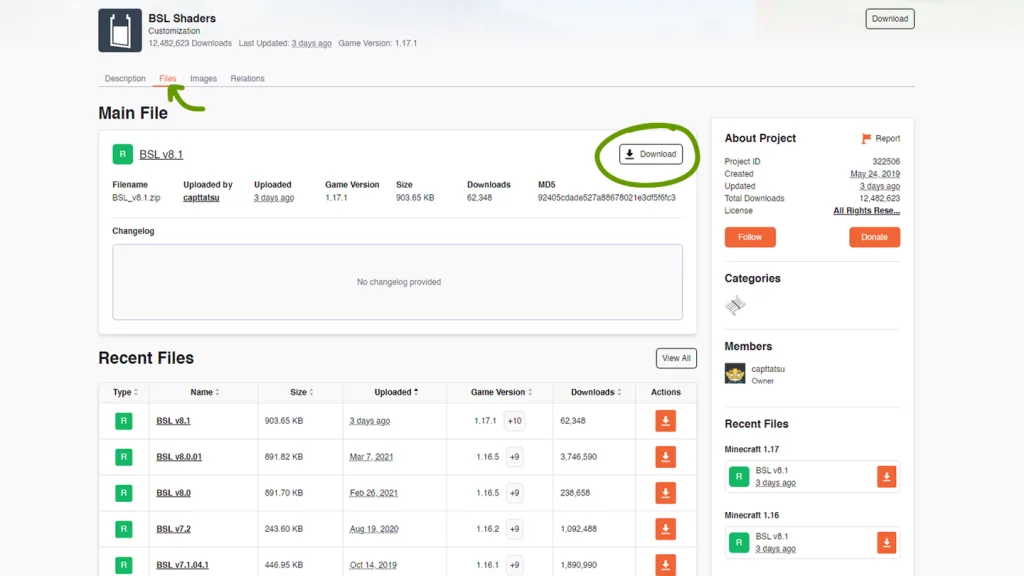
3 – Choose a shader pack

choose a shader pack

There are plenty of websites out there for finding shaders, but some are safer than most. We recommend CurseForge or Shaders Mods. Alternatively, you can download directly from a developer’s website as well!

Just make sure it’s compatible with your Minecraft game version and then move on to the next step!

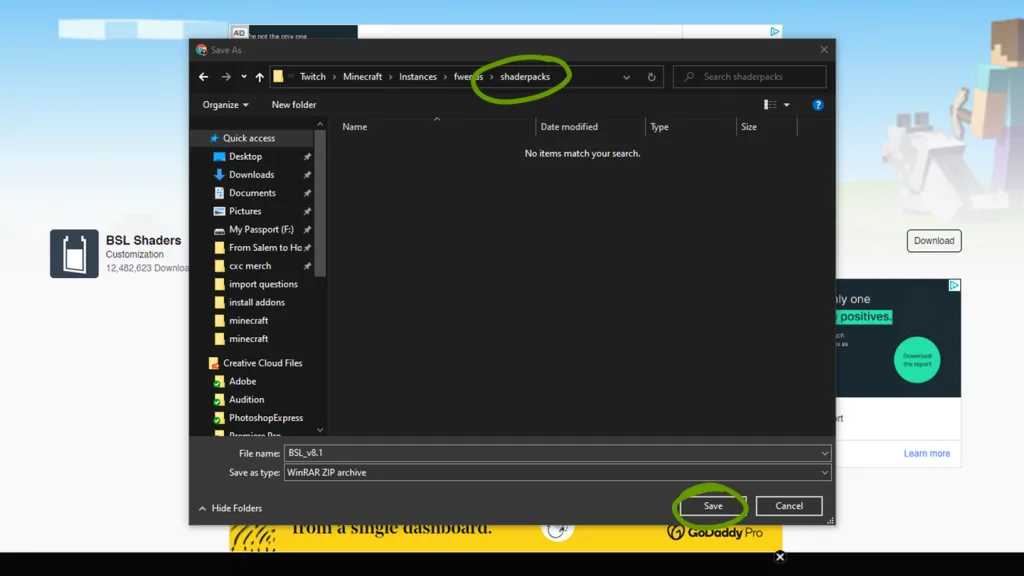
4 – Install shaders

install shaders

Download the correct game version of the shader you’ve chosen and place it within the shaders folder you made in step 2. Make sure you don’t unzip the downloaded file!

5 – Activate shaders

activate shaders

Now it’s time to run Minecraft and activate your shaders!

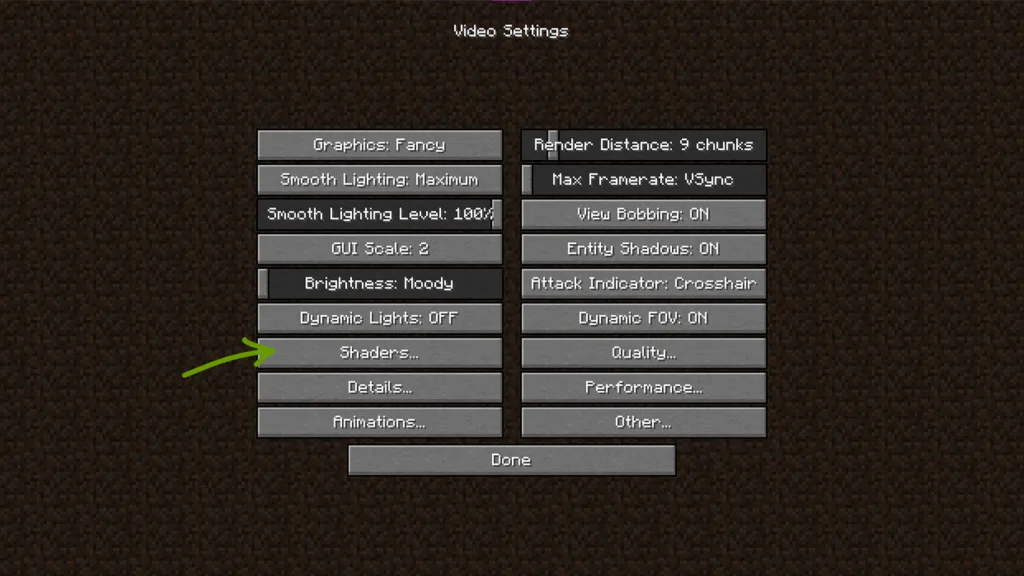
1. Once the game has launched, follow these steps:
2. Click Options then Video Settings.
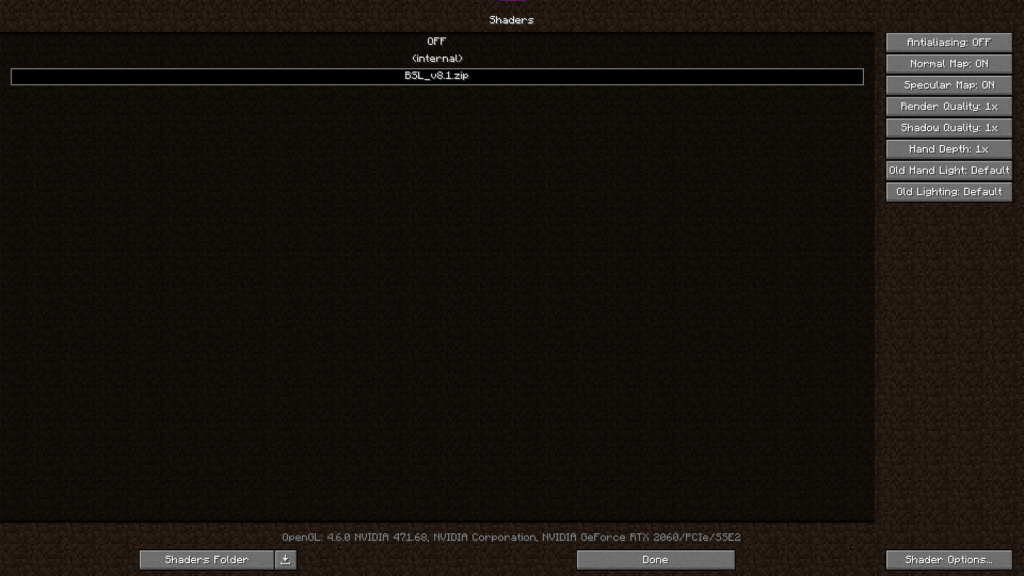
3. Click Shaders… as shown in the image above.

shaders menu

4. In the Shaders menu, choose the shader you want to activate. A loading screen will appear and return you back to the Shaders menu when its finished rendering.

From this menu you can either click the Shader Options button on the bottom right to customize the shader pack or click Done and return to the main menu!

NEXT UP

Top 10 Enchantments in Minecraft

howchoo   (467)
March 25, 2024

The longer you play Minecraft, the more you realize that early-game tools just won’t cut it. Exploring the enchantment feature of Minecraft can be exciting, but also intimidating. Rather than worry about researching enchantments, below are the best enchantments in Minecraft! To learn how to enchant items, check out this guide! In this guide, you’ll see

Continue Reading

howchoo

 467 guides

Introducing Howchoo, an enigmatic author whose unique pen name reflects their boundless curiosity and limitless creativity. Mysterious and multifaceted, Howchoo has emerged as a captivating storyteller, leaving readers mesmerized by the uncharted realms they craft with their words. With an insatiable appetite for knowledge and a love for exploration, Howchoo’s writing transcends conventional genres, blurring the lines between fantasy, science fiction, and the surreal. Their narratives are a kaleidoscope of ideas, weaving together intricate plots, unforgettable characters, and thought-provoking themes that challenge the boundaries of imagination.

This user wrote the first guide in this interest.

zach's profile picturezach's profile picture
zach
Joined in 2015

Follow @howchoo and learn cool things:

Are you a passionate writer? We’re hiring!

Write for Howchoo

Like what we do?

Donate

Want to support Howchoo? When you buy a tool or material through one of our Amazon links, we earn a small commission as an Amazon Associate.

Brielleelise

This user wrote the first guide in this interest.

tyler's profile picturetyler's profile picture
tyler
Joined in 2015

Follow @howchoo and learn cool things:

Are you a passionate writer? We’re hiring!

Write for Howchoo

Like what we do?

Donate

Want to support Howchoo? When you buy a tool or material through one of our Amazon links, we earn a small commission as an Amazon Associate.

Dianarchin

tinfoilhats
vicarious
Joined in 2015
Finding guides
vicarious
Joined in 2015
This awesome three-pack of XT60 parallel extension cables allows you to split power between multiple devices.
Want to add a power button to your Raspberry Pi project but you don’t have a soldering iron? No problem! This two-pack of pre-soldered Raspberry Pi push power buttons has you covered.

Here’s How to Configure Your Router to Use WPA2: A Quick Guide

Add extra layer of security to your Wi-Fi network by configuring your router to WPA2!
Feb 26, 2023
0

WPA2 is commonly used as an extra security measure for routers. It keeps your internet access safe from attacks that can come through your router and infect the devices that are connected. It’s not the latest technology when it comes to router security, but it is one of the most reliable.

If you want to add some extra security to your Wi-Fi network, configuring WPA2 to your router is a great way to do so. However, it can seem complicated to set it up, that’s why we are here to help you out.

As we have introduced, WPA2 is a security protocol that can be used on routers to better protect them from malicious attacks. WPA stands for Wi-Fi Protected Access, and it is the second version of WPA.

As of now, there are 3 versions of WPA. There is the original WPA, WPA2, and WPA3. Even though WPA3 is the newest security technology, many people still prefer WPA2 as it is more widely available and still really tough to crack.

Some image descriptionSome image description

WPA3 is still really new and the creators of WPA3 are still working on it. There aren’t nearly as many devices that are compatible with WPA3 as there are with WPA2.

WPA replaced WEP in 2003. WEP was the older version of the security measure, but it was much easier to crack and get through. People were experiencing security problems even when they had the WEP measure, so WPA was created.

Configuring your router for WPA2 is a straightforward and simple process. You just need to make sure that your router is compatible with WPA2, but with how old WPA2 is, it shouldn’t be a problem at all.

To check if your router is compatible with WPA2, head over to your computer or mobile device. Any of these devices that can connect to your Wi-Fi can find out what kind of security it is compatible with. If you have a SmartTV, you might even be able to find the information there as well.

On your computer, you will want to head over to the Wi-Fi settings. This can be done by searching “Wi-Fi settings” or “network and internet settings,” if you have Windows 10 or 11. If you have a Mac, press the option key and the Wi-Fi icon to be presented with the information.

The next step for a Windows computer is to select the Wi-Fi properties. From there, you will see a line of text that says security type. The text afterward will show what kind of security protocol your router is compatible with.

Some image descriptionSome image description

On an Android phone, go to your settings and select Wi-Fi. You will want to open the details section and you should see a spot that says the security configuration.

It is important to note that every Android phone can have a slightly different layout and that the security information might be in a different place amongst the Wi-Fi settings.

It is recommended that when finding what kind of security your router is compatible with through your phone, look up the specific information for your phone model.

When you are at the point where you see what kind of security your router is compatible with, take note of what the information says. To configure your router to WPA2, it needs to say WPA/WPA2 or something similar. On a computer, you might see WPA2-personal.

If this information says WPA3 because you have brand new technology that has this feature, you still might be able to configure WPA2.

This is because these pieces of technology sometimes can switch what kind of WPA can be used, allowing you to use either WPA3 or WPA2 depending on what works best for your technology.

Accessing the Router Settings

Now that you know that your router can be configured to WPA2, it is time to access the router settings to set it all up. There are several different ways that you can access the settings of your router.

First, if you haven’t changed the credentials of your router, you can use the default login. This default login can be located at the back of your router. It will include a username, password, and a general default gateway.

If you did change the credentials of your router, use those. However, if you can’t remember what you changed them to, you can reset the router and log in with the default login.

However, you will have to configure the router from scratch.

Some routers will have a QR code located on the box. This makes it super easy to log in as you just have to scan the QR code to access the settings.

Finally, more and more routers recently have been coming with their own app. If you have this app, all you have to do is log in and access the settings from there.

On the back of the router, there will also be an IP address listed. This is usually located right around the default login information of the router.

Enter this IP address into your internet browser to be sent to the place where you will change the network settings of your router.

However, if your router has a specific app that it comes with, you probably won’t need to do this step. Simply follow what your app tells you to do.

Each router might have a login screen that looks a little bit different. Follow the steps given to you by your specific router.

Changing the Network Settings

Now that you have accessed your router’s settings, you can now go in and change them. Look for “wireless settings” or “network settings”

Then click on wireless security. This is where you want to be to set up and configure WPA2. Now that you have clicked on the security page, you will be brought to a page that has a lot of information. Don’t get overwhelmed when you first view this page. It is still a simple process.

Find a line that says security. Next to it might be a drop-down box or some other method of inputting information, depending on the specific router page.

Let’s say that you see a drop-down box for the sake of an easy explanation. Click on the drop-down box and you will see an option that includes WPA2-personal.

Your router might also include some other options that you can choose from, but make sure to choose the WPA2 option. Click on this option and you will see the box be selected with the WPA2 option.

There might be a location further down on the page that also gives you the drop-down box to choose a security option.

Also, choose the WPA2-personal option for this box as well. Sometimes, you might be prompted to choose an encryption algorithm. Select AES from the drop-down menu.

To save your changes, you will be prompted to re-enter the password for your router. You’ll then want to reboot the router to make sure it is now working with the new security system.

Once your router is properly configured with WPA2, you might have to reconnect your devices to the router with the new WPA2 password. This is to make sure that all the connected devices are protected as well.

That’s It!

Once you have completed all of those steps, you have successfully configured your router to WPA2. Now you have extra security for both your router and all of your devices.

There are no downsides to having a security protocol set up with your router. Instead, you get all the great benefits that come from having extra security.

Still worried that you and your internet-connected devices aren’t as protected as you want them to, even after configuring them to WPA2? Well, you are in luck. You can still add extra security to your devices and even your router.

The best way to add extra security is to add a VPN. Not only are VPNs great for accessing shows that are being streamed in other countries and getting around locked websites, but they also add extra security to your device.

A VPN will essentially hide your device’s location from other devices and other servers. It adds a layer of invisibility to your device that can prevent viruses and other attacks from accessing your device.

On some router access pages, there will be a section to add a VPN along with the security protocol. This adds extra security to your router as a whole.

Configuring your router to WPA2 is so much easier than some people may think. It doesn’t take too much time and it isn’t too difficult to complete. Many times, you just have to follow what your specific router’s page tells you to do.

From there, you are promised so much extra security so you can access the internet on your devices with peace in your mind.

A simple change for added security
AshAsh Ash (362)
Nov 19, 2020
5 minutes

If you’ve got a Belkin router, you might need to change the Wi-Fi password. Changing your Wi-Fi password adds an extra level of security to your network.

Here’s How to Configure Your Router to Use WPA2: A Quick Guide

Add extra layer of security to your Wi-Fi network by configuring your router to WPA2!
Feb 26, 2023
0

WPA2 is commonly used as an extra security measure for routers. It keeps your internet access safe from attacks that can come through your router and infect the devices that are connected. It’s not the latest technology when it comes to router security, but it is one of the most reliable.

If you want to add some extra security to your Wi-Fi network, configuring WPA2 to your router is a great way to do so. However, it can seem complicated to set it up, that’s why we are here to help you out.

As we have introduced, WPA2 is a security protocol that can be used on routers to better protect them from malicious attacks. WPA stands for Wi-Fi Protected Access, and it is the second version of WPA.

As of now, there are 3 versions of WPA. There is the original WPA, WPA2, and WPA3. Even though WPA3 is the newest security technology, many people still prefer WPA2 as it is more widely available and still really tough to crack.

Some image descriptionSome image description

WPA3 is still really new and the creators of WPA3 are still working on it. There aren’t nearly as many devices that are compatible with WPA3 as there are with WPA2.

WPA replaced WEP in 2003. WEP was the older version of the security measure, but it was much easier to crack and get through. People were experiencing security problems even when they had the WEP measure, so WPA was created.

Configuring your router for WPA2 is a straightforward and simple process. You just need to make sure that your router is compatible with WPA2, but with how old WPA2 is, it shouldn’t be a problem at all.

To check if your router is compatible with WPA2, head over to your computer or mobile device. Any of these devices that can connect to your Wi-Fi can find out what kind of security it is compatible with. If you have a SmartTV, you might even be able to find the information there as well.

On your computer, you will want to head over to the Wi-Fi settings. This can be done by searching “Wi-Fi settings” or “network and internet settings,” if you have Windows 10 or 11. If you have a Mac, press the option key and the Wi-Fi icon to be presented with the information.

The next step for a Windows computer is to select the Wi-Fi properties. From there, you will see a line of text that says security type. The text afterward will show what kind of security protocol your router is compatible with.

Some image descriptionSome image description

On an Android phone, go to your settings and select Wi-Fi. You will want to open the details section and you should see a spot that says the security configuration.

It is important to note that every Android phone can have a slightly different layout and that the security information might be in a different place amongst the Wi-Fi settings.

It is recommended that when finding what kind of security your router is compatible with through your phone, look up the specific information for your phone model.

When you are at the point where you see what kind of security your router is compatible with, take note of what the information says. To configure your router to WPA2, it needs to say WPA/WPA2 or something similar. On a computer, you might see WPA2-personal.

If this information says WPA3 because you have brand new technology that has this feature, you still might be able to configure WPA2.

This is because these pieces of technology sometimes can switch what kind of WPA can be used, allowing you to use either WPA3 or WPA2 depending on what works best for your technology.

Accessing the Router Settings

Now that you know that your router can be configured to WPA2, it is time to access the router settings to set it all up. There are several different ways that you can access the settings of your router.

First, if you haven’t changed the credentials of your router, you can use the default login. This default login can be located at the back of your router. It will include a username, password, and a general default gateway.

If you did change the credentials of your router, use those. However, if you can’t remember what you changed them to, you can reset the router and log in with the default login.

However, you will have to configure the router from scratch.

Some routers will have a QR code located on the box. This makes it super easy to log in as you just have to scan the QR code to access the settings.

Finally, more and more routers recently have been coming with their own app. If you have this app, all you have to do is log in and access the settings from there.

On the back of the router, there will also be an IP address listed. This is usually located right around the default login information of the router.

Enter this IP address into your internet browser to be sent to the place where you will change the network settings of your router.

However, if your router has a specific app that it comes with, you probably won’t need to do this step. Simply follow what your app tells you to do.

Each router might have a login screen that looks a little bit different. Follow the steps given to you by your specific router.

Changing the Network Settings

Now that you have accessed your router’s settings, you can now go in and change them. Look for “wireless settings” or “network settings”

Then click on wireless security. This is where you want to be to set up and configure WPA2. Now that you have clicked on the security page, you will be brought to a page that has a lot of information. Don’t get overwhelmed when you first view this page. It is still a simple process.

Find a line that says security. Next to it might be a drop-down box or some other method of inputting information, depending on the specific router page.

Let’s say that you see a drop-down box for the sake of an easy explanation. Click on the drop-down box and you will see an option that includes WPA2-personal.

Your router might also include some other options that you can choose from, but make sure to choose the WPA2 option. Click on this option and you will see the box be selected with the WPA2 option.

There might be a location further down on the page that also gives you the drop-down box to choose a security option.

Also, choose the WPA2-personal option for this box as well. Sometimes, you might be prompted to choose an encryption algorithm. Select AES from the drop-down menu.

To save your changes, you will be prompted to re-enter the password for your router. You’ll then want to reboot the router to make sure it is now working with the new security system.

Once your router is properly configured with WPA2, you might have to reconnect your devices to the router with the new WPA2 password. This is to make sure that all the connected devices are protected as well.

That’s It!

Once you have completed all of those steps, you have successfully configured your router to WPA2. Now you have extra security for both your router and all of your devices.

There are no downsides to having a security protocol set up with your router. Instead, you get all the great benefits that come from having extra security.

Still worried that you and your internet-connected devices aren’t as protected as you want them to, even after configuring them to WPA2? Well, you are in luck. You can still add extra security to your devices and even your router.

The best way to add extra security is to add a VPN. Not only are VPNs great for accessing shows that are being streamed in other countries and getting around locked websites, but they also add extra security to your device.

A VPN will essentially hide your device’s location from other devices and other servers. It adds a layer of invisibility to your device that can prevent viruses and other attacks from accessing your device.

On some router access pages, there will be a section to add a VPN along with the security protocol. This adds extra security to your router as a whole.

Configuring your router to WPA2 is so much easier than some people may think. It doesn’t take too much time and it isn’t too difficult to complete. Many times, you just have to follow what your specific router’s page tells you to do.

From there, you are promised so much extra security so you can access the internet on your devices with peace in your mind.

A simple change for added security
AshAsh Ash (362)
Nov 19, 2020
5 minutes

If you’ve got a Belkin router, you might need to change the Wi-Fi password. Changing your Wi-Fi password adds an extra level of security to your network.


Here’s How to Configure Your Router to Use WPA2: A Quick Guide

Add extra layer of security to your Wi-Fi network by configuring your router to WPA2!
Feb 26, 2023
0

WPA2 is commonly used as an extra security measure for routers. It keeps your internet access safe from attacks that can come through your router and infect the devices that are connected. It’s not the latest technology when it comes to router security, but it is one of the most reliable.

If you want to add some extra security to your Wi-Fi network, configuring WPA2 to your router is a great way to do so. However, it can seem complicated to set it up, that’s why we are here to help you out.

As we have introduced, WPA2 is a security protocol that can be used on routers to better protect them from malicious attacks. WPA stands for Wi-Fi Protected Access, and it is the second version of WPA.

As of now, there are 3 versions of WPA. There is the original WPA, WPA2, and WPA3. Even though WPA3 is the newest security technology, many people still prefer WPA2 as it is more widely available and still really tough to crack.

Some image descriptionSome image description

WPA3 is still really new and the creators of WPA3 are still working on it. There aren’t nearly as many devices that are compatible with WPA3 as there are with WPA2.

WPA replaced WEP in 2003. WEP was the older version of the security measure, but it was much easier to crack and get through. People were experiencing security problems even when they had the WEP measure, so WPA was created.

Configuring your router for WPA2 is a straightforward and simple process. You just need to make sure that your router is compatible with WPA2, but with how old WPA2 is, it shouldn’t be a problem at all.

To check if your router is compatible with WPA2, head over to your computer or mobile device. Any of these devices that can connect to your Wi-Fi can find out what kind of security it is compatible with. If you have a SmartTV, you might even be able to find the information there as well.

On your computer, you will want to head over to the Wi-Fi settings. This can be done by searching “Wi-Fi settings” or “network and internet settings,” if you have Windows 10 or 11. If you have a Mac, press the option key and the Wi-Fi icon to be presented with the information.

The next step for a Windows computer is to select the Wi-Fi properties. From there, you will see a line of text that says security type. The text afterward will show what kind of security protocol your router is compatible with.

Some image descriptionSome image description

On an Android phone, go to your settings and select Wi-Fi. You will want to open the details section and you should see a spot that says the security configuration.

It is important to note that every Android phone can have a slightly different layout and that the security information might be in a different place amongst the Wi-Fi settings.

It is recommended that when finding what kind of security your router is compatible with through your phone, look up the specific information for your phone model.

When you are at the point where you see what kind of security your router is compatible with, take note of what the information says. To configure your router to WPA2, it needs to say WPA/WPA2 or something similar. On a computer, you might see WPA2-personal.

If this information says WPA3 because you have brand new technology that has this feature, you still might be able to configure WPA2.

This is because these pieces of technology sometimes can switch what kind of WPA can be used, allowing you to use either WPA3 or WPA2 depending on what works best for your technology.

Accessing the Router Settings

Now that you know that your router can be configured to WPA2, it is time to access the router settings to set it all up. There are several different ways that you can access the settings of your router.

First, if you haven’t changed the credentials of your router, you can use the default login. This default login can be located at the back of your router. It will include a username, password, and a general default gateway.

If you did change the credentials of your router, use those. However, if you can’t remember what you changed them to, you can reset the router and log in with the default login.

However, you will have to configure the router from scratch.

Some routers will have a QR code located on the box. This makes it super easy to log in as you just have to scan the QR code to access the settings.

Finally, more and more routers recently have been coming with their own app. If you have this app, all you have to do is log in and access the settings from there.

On the back of the router, there will also be an IP address listed. This is usually located right around the default login information of the router.

Enter this IP address into your internet browser to be sent to the place where you will change the network settings of your router.

However, if your router has a specific app that it comes with, you probably won’t need to do this step. Simply follow what your app tells you to do.

Each router might have a login screen that looks a little bit different. Follow the steps given to you by your specific router.

Changing the Network Settings

Now that you have accessed your router’s settings, you can now go in and change them. Look for “wireless settings” or “network settings”

Then click on wireless security. This is where you want to be to set up and configure WPA2. Now that you have clicked on the security page, you will be brought to a page that has a lot of information. Don’t get overwhelmed when you first view this page. It is still a simple process.

Find a line that says security. Next to it might be a drop-down box or some other method of inputting information, depending on the specific router page.

Let’s say that you see a drop-down box for the sake of an easy explanation. Click on the drop-down box and you will see an option that includes WPA2-personal.

Your router might also include some other options that you can choose from, but make sure to choose the WPA2 option. Click on this option and you will see the box be selected with the WPA2 option.

There might be a location further down on the page that also gives you the drop-down box to choose a security option.

Also, choose the WPA2-personal option for this box as well. Sometimes, you might be prompted to choose an encryption algorithm. Select AES from the drop-down menu.

To save your changes, you will be prompted to re-enter the password for your router. You’ll then want to reboot the router to make sure it is now working with the new security system.

Once your router is properly configured with WPA2, you might have to reconnect your devices to the router with the new WPA2 password. This is to make sure that all the connected devices are protected as well.

That’s It!

Once you have completed all of those steps, you have successfully configured your router to WPA2. Now you have extra security for both your router and all of your devices.

There are no downsides to having a security protocol set up with your router. Instead, you get all the great benefits that come from having extra security.

Still worried that you and your internet-connected devices aren’t as protected as you want them to, even after configuring them to WPA2? Well, you are in luck. You can still add extra security to your devices and even your router.

The best way to add extra security is to add a VPN. Not only are VPNs great for accessing shows that are being streamed in other countries and getting around locked websites, but they also add extra security to your device.

A VPN will essentially hide your device’s location from other devices and other servers. It adds a layer of invisibility to your device that can prevent viruses and other attacks from accessing your device.

On some router access pages, there will be a section to add a VPN along with the security protocol. This adds extra security to your router as a whole.

Configuring your router to WPA2 is so much easier than some people may think. It doesn’t take too much time and it isn’t too difficult to complete. Many times, you just have to follow what your specific router’s page tells you to do.

From there, you are promised so much extra security so you can access the internet on your devices with peace in your mind.

A simple change for added security
AshAsh Ash (362)
Nov 19, 2020
5 minutes

If you’ve got a Belkin router, you might need to change the Wi-Fi password. Changing your Wi-Fi password adds an extra level of security to your network.

Here’s How to Configure Your Router to Use WPA2: A Quick Guide

Add extra layer of security to your Wi-Fi network by configuring your router to WPA2!
Feb 26, 2023
0

WPA2 is commonly used as an extra security measure for routers. It keeps your internet access safe from attacks that can come through your router and infect the devices that are connected. It’s not the latest technology when it comes to router security, but it is one of the most reliable.

If you want to add some extra security to your Wi-Fi network, configuring WPA2 to your router is a great way to do so. However, it can seem complicated to set it up, that’s why we are here to help you out.

Here’s How to Configure Your Router to Use WPA2: A Quick Guide

How to Configure a Router to Use WPA2
Add extra layer of security to your Wi-Fi network by configuring your router to WPA2!
Feb 26, 2023
0
Riddhish
 
Table of Contents

Table of Contents:


As we have introduced, WPA2 is a security protocol that can be used on routers to better protect them from malicious attacks. WPA stands for Wi-Fi Protected Access, and it is the second version of WPA.

As of now, there are 3 versions of WPA. There is the original WPA, WPA2, and WPA3. Even though WPA3 is the newest security technology, many people still prefer WPA2 as it is more widely available and still really tough to crack.

Some image descriptionSome image description

WPA3 is still really new and the creators of WPA3 are still working on it. There aren’t nearly as many devices that are compatible with WPA3 as there are with WPA2.

WPA replaced WEP in 2003. WEP was the older version of the security measure, but it was much easier to crack and get through. People were experiencing security problems even when they had the WEP measure, so WPA was created.

As we have introduced, WPA2 is a security protocol that can be used on routers to better protect them from malicious attacks. WPA stands for Wi-Fi Protected Access, and it is the second version of WPA.

As of now, there are 3 versions of WPA. There is the original WPA, WPA2, and WPA3. Even though WPA3 is the newest security technology, many people still prefer WPA2 as it is more widely available and still really tough to crack.

Some image descriptionSome image description

WPA3 is still really new and the creators of WPA3 are still working on it. There aren’t nearly as many devices that are compatible with WPA3 as there are with WPA2.

WPA replaced WEP in 2003. WEP was the older version of the security measure, but it was much easier to crack and get through. People were experiencing security problems even when they had the WEP measure, so WPA was created.

What is WPA2?

Some image description

Configuring your router for WPA2 is a straightforward and simple process. You just need to make sure that your router is compatible with WPA2, but with how old WPA2 is, it shouldn’t be a problem at all.

To check if your router is compatible with WPA2, head over to your computer or mobile device. Any of these devices that can connect to your Wi-Fi can find out what kind of security it is compatible with. If you have a SmartTV, you might even be able to find the information there as well.

On your computer, you will want to head over to the Wi-Fi settings. This can be done by searching “Wi-Fi settings” or “network and internet settings,” if you have Windows 10 or 11. If you have a Mac, press the option key and the Wi-Fi icon to be presented with the information.

The next step for a Windows computer is to select the Wi-Fi properties. From there, you will see a line of text that says security type. The text afterward will show what kind of security protocol your router is compatible with.

Some image descriptionSome image description

On an Android phone, go to your settings and select Wi-Fi. You will want to open the details section and you should see a spot that says the security configuration.

It is important to note that every Android phone can have a slightly different layout and that the security information might be in a different place amongst the Wi-Fi settings.

It is recommended that when finding what kind of security your router is compatible with through your phone, look up the specific information for your phone model.

When you are at the point where you see what kind of security your router is compatible with, take note of what the information says. To configure your router to WPA2, it needs to say WPA/WPA2 or something similar. On a computer, you might see WPA2-personal.

If this information says WPA3 because you have brand new technology that has this feature, you still might be able to configure WPA2.

This is because these pieces of technology sometimes can switch what kind of WPA can be used, allowing you to use either WPA3 or WPA2 depending on what works best for your technology.

Accessing the Router Settings

Now that you know that your router can be configured to WPA2, it is time to access the router settings to set it all up. There are several different ways that you can access the settings of your router.

First, if you haven’t changed the credentials of your router, you can use the default login. This default login can be located at the back of your router. It will include a username, password, and a general default gateway.

If you did change the credentials of your router, use those. However, if you can’t remember what you changed them to, you can reset the router and log in with the default login.

However, you will have to configure the router from scratch.

Some routers will have a QR code located on the box. This makes it super easy to log in as you just have to scan the QR code to access the settings.

Finally, more and more routers recently have been coming with their own app. If you have this app, all you have to do is log in and access the settings from there.

On the back of the router, there will also be an IP address listed. This is usually located right around the default login information of the router.

Enter this IP address into your internet browser to be sent to the place where you will change the network settings of your router.

However, if your router has a specific app that it comes with, you probably won’t need to do this step. Simply follow what your app tells you to do.

Each router might have a login screen that looks a little bit different. Follow the steps given to you by your specific router.

Changing the Network Settings

Now that you have accessed your router’s settings, you can now go in and change them. Look for “wireless settings” or “network settings”

Then click on wireless security. This is where you want to be to set up and configure WPA2. Now that you have clicked on the security page, you will be brought to a page that has a lot of information. Don’t get overwhelmed when you first view this page. It is still a simple process.

Find a line that says security. Next to it might be a drop-down box or some other method of inputting information, depending on the specific router page.

Let’s say that you see a drop-down box for the sake of an easy explanation. Click on the drop-down box and you will see an option that includes WPA2-personal.

Your router might also include some other options that you can choose from, but make sure to choose the WPA2 option. Click on this option and you will see the box be selected with the WPA2 option.

There might be a location further down on the page that also gives you the drop-down box to choose a security option.

Also, choose the WPA2-personal option for this box as well. Sometimes, you might be prompted to choose an encryption algorithm. Select AES from the drop-down menu.

To save your changes, you will be prompted to re-enter the password for your router. You’ll then want to reboot the router to make sure it is now working with the new security system.

Once your router is properly configured with WPA2, you might have to reconnect your devices to the router with the new WPA2 password. This is to make sure that all the connected devices are protected as well.

That’s It!

Once you have completed all of those steps, you have successfully configured your router to WPA2. Now you have extra security for both your router and all of your devices.

There are no downsides to having a security protocol set up with your router. Instead, you get all the great benefits that come from having extra security.

Configuring your router for WPA2 is a straightforward and simple process. You just need to make sure that your router is compatible with WPA2, but with how old WPA2 is, it shouldn’t be a problem at all.

To check if your router is compatible with WPA2, head over to your computer or mobile device. Any of these devices that can connect to your Wi-Fi can find out what kind of security it is compatible with. If you have a SmartTV, you might even be able to find the information there as well.

On your computer, you will want to head over to the Wi-Fi settings. This can be done by searching “Wi-Fi settings” or “network and internet settings,” if you have Windows 10 or 11. If you have a Mac, press the option key and the Wi-Fi icon to be presented with the information.

The next step for a Windows computer is to select the Wi-Fi properties. From there, you will see a line of text that says security type. The text afterward will show what kind of security protocol your router is compatible with.

Some image descriptionSome image description

On an Android phone, go to your settings and select Wi-Fi. You will want to open the details section and you should see a spot that says the security configuration.

It is important to note that every Android phone can have a slightly different layout and that the security information might be in a different place amongst the Wi-Fi settings.

It is recommended that when finding what kind of security your router is compatible with through your phone, look up the specific information for your phone model.

When you are at the point where you see what kind of security your router is compatible with, take note of what the information says. To configure your router to WPA2, it needs to say WPA/WPA2 or something similar. On a computer, you might see WPA2-personal.

If this information says WPA3 because you have brand new technology that has this feature, you still might be able to configure WPA2.

This is because these pieces of technology sometimes can switch what kind of WPA can be used, allowing you to use either WPA3 or WPA2 depending on what works best for your technology.

Accessing the Router Settings

Now that you know that your router can be configured to WPA2, it is time to access the router settings to set it all up. There are several different ways that you can access the settings of your router.

First, if you haven’t changed the credentials of your router, you can use the default login. This default login can be located at the back of your router. It will include a username, password, and a general default gateway.

If you did change the credentials of your router, use those. However, if you can’t remember what you changed them to, you can reset the router and log in with the default login.

However, you will have to configure the router from scratch.

Some routers will have a QR code located on the box. This makes it super easy to log in as you just have to scan the QR code to access the settings.

Finally, more and more routers recently have been coming with their own app. If you have this app, all you have to do is log in and access the settings from there.

On the back of the router, there will also be an IP address listed. This is usually located right around the default login information of the router.

Enter this IP address into your internet browser to be sent to the place where you will change the network settings of your router.

However, if your router has a specific app that it comes with, you probably won’t need to do this step. Simply follow what your app tells you to do.

Each router might have a login screen that looks a little bit different. Follow the steps given to you by your specific router.

Changing the Network Settings

Now that you have accessed your router’s settings, you can now go in and change them. Look for “wireless settings” or “network settings”

Then click on wireless security. This is where you want to be to set up and configure WPA2. Now that you have clicked on the security page, you will be brought to a page that has a lot of information. Don’t get overwhelmed when you first view this page. It is still a simple process.

Find a line that says security. Next to it might be a drop-down box or some other method of inputting information, depending on the specific router page.

Let’s say that you see a drop-down box for the sake of an easy explanation. Click on the drop-down box and you will see an option that includes WPA2-personal.

Your router might also include some other options that you can choose from, but make sure to choose the WPA2 option. Click on this option and you will see the box be selected with the WPA2 option.

There might be a location further down on the page that also gives you the drop-down box to choose a security option.

Also, choose the WPA2-personal option for this box as well. Sometimes, you might be prompted to choose an encryption algorithm. Select AES from the drop-down menu.

To save your changes, you will be prompted to re-enter the password for your router. You’ll then want to reboot the router to make sure it is now working with the new security system.

Once your router is properly configured with WPA2, you might have to reconnect your devices to the router with the new WPA2 password. This is to make sure that all the connected devices are protected as well.

That’s It!

Once you have completed all of those steps, you have successfully configured your router to WPA2. Now you have extra security for both your router and all of your devices.

There are no downsides to having a security protocol set up with your router. Instead, you get all the great benefits that come from having extra security.

How to Configure Your Router for WPA2

Some image description

Still worried that you and your internet-connected devices aren’t as protected as you want them to, even after configuring them to WPA2? Well, you are in luck. You can still add extra security to your devices and even your router.

The best way to add extra security is to add a VPN. Not only are VPNs great for accessing shows that are being streamed in other countries and getting around locked websites, but they also add extra security to your device.

A VPN will essentially hide your device’s location from other devices and other servers. It adds a layer of invisibility to your device that can prevent viruses and other attacks from accessing your device.

On some router access pages, there will be a section to add a VPN along with the security protocol. This adds extra security to your router as a whole.

Still worried that you and your internet-connected devices aren’t as protected as you want them to, even after configuring them to WPA2? Well, you are in luck. You can still add extra security to your devices and even your router.

The best way to add extra security is to add a VPN. Not only are VPNs great for accessing shows that are being streamed in other countries and getting around locked websites, but they also add extra security to your device.

A VPN will essentially hide your device’s location from other devices and other servers. It adds a layer of invisibility to your device that can prevent viruses and other attacks from accessing your device.

On some router access pages, there will be a section to add a VPN along with the security protocol. This adds extra security to your router as a whole.

How Can I Have More Security?

Configuring your router to WPA2 is so much easier than some people may think. It doesn’t take too much time and it isn’t too difficult to complete. Many times, you just have to follow what your specific router’s page tells you to do.

From there, you are promised so much extra security so you can access the internet on your devices with peace in your mind.

Configuring your router to WPA2 is so much easier than some people may think. It doesn’t take too much time and it isn’t too difficult to complete. Many times, you just have to follow what your specific router’s page tells you to do.

From there, you are promised so much extra security so you can access the internet on your devices with peace in your mind.

Final Thoughts

A simple change for added security
AshAsh Ash (362)
Nov 19, 2020
5 minutes

If you’ve got a Belkin router, you might need to change the Wi-Fi password. Changing your Wi-Fi password adds an extra level of security to your network.

A simple change for added security
AshAsh Ash (362)
Nov 19, 2020
5 minutes

If you’ve got a Belkin router, you might need to change the Wi-Fi password. Changing your Wi-Fi password adds an extra level of security to your network.

NEXT UP
How to Change Your Belkin Wi-Fi Password
A simple change for added security
AshAsh Ash (362)
Nov 19, 2020
5 minutes
Ash Continue reading
Share this guide!
TwitterRedditEmailTextPinterest
Riddhish's profile pictureRiddhish's profile pictureRiddhish
Joined in 2022 9 guides
Riddhish's profile picture
Related to this guide:
How to Change Your Belkin Wi-Fi PasswordHow to Change Your Belkin Wi-Fi Password
A simple change for added security
In these interests: belkininternetrouter
How to Change Your Frontier WiFi PasswordHow to Change Your Frontier WiFi Password
Add a layer of security to your wireless network
In these interests: frontierinternetrouter
How to Change Your Belkin Wi-Fi PasswordHow to Change Your Belkin Wi-Fi Password
A simple change for added security
In these interests: belkininternetrouter
Ash's profile pictureView guide
In these interests: belkininternetrouter
belkininternetrouterAsh's profile pictureView guide
In these interests: internetcenturylinkrouter
internetcenturylinkrouter
How to Change Your Frontier WiFi PasswordHow to Change Your Frontier WiFi Password
Add a layer of security to your wireless network
In these interests: frontierinternetrouter
Ash's profile pictureView guide
In these interests: frontierinternetrouter
frontierinternetrouter
People also read:
Learn to Choose an OpenWrt Router
Man finding Network Security Key on phoneMan finding Network Security Key on phone
First, check your router. If it’s not there, then we can help you find it!
Eero Router ReviewEero Router Review
Keep Reading Before You Order the Eero Router
How to Reset a Nighthawk RouterHow to Reset a Nighthawk Router
Learn how to reset your router with these quick and easy steps!
How to Use a RouterHow to Use a Router
Understand what your wireless router is capable of and what you can do with it.
Fios G3100 Router ReviewFios G3100 Router Review
Read On For Fios G3100 Router Review
Create GitHub personal access tokens for the command line
How to Get To Router SettingsHow to Get To Router Settings
Read On To Know About Router Settings
How to Update Router FirmwareHow to Update Router Firmware
Keep Reading To Update Router Firmware
Learn to Choose an OpenWrt Router
Man finding Network Security Key on phoneMan finding Network Security Key on phone
First, check your router. If it’s not there, then we can help you find it!
Eero Router ReviewEero Router Review
Keep Reading Before You Order the Eero Router
How to Reset a Nighthawk RouterHow to Reset a Nighthawk Router
Learn how to reset your router with these quick and easy steps!
How to Use a RouterHow to Use a Router
Understand what your wireless router is capable of and what you can do with it.
Best Router OpenWrt
Man finding Network Security Key on phoneMan finding Network Security Key on phone
Man finding Network Security Key on phoneHow to Find Your Network Security Key (And Protect It!)
Eero Router ReviewEero Router Review
Eero Router ReviewEero Router Review: You Should Buy Or Not?
How to Reset a Nighthawk RouterHow to Reset a Nighthawk Router
How to Reset a Nighthawk RouterHere’s How to Factory Reset Your Netgear Nighthawk Router
How to Use a RouterHow to Use a Router
How to Use a RouterHow to Set Up and Use a Wireless Network Router
Fios G3100 Router ReviewFios G3100 Router Review
Read On For Fios G3100 Router Review
Create GitHub personal access tokens for the command line
How to Get To Router SettingsHow to Get To Router Settings
Read On To Know About Router Settings
How to Update Router FirmwareHow to Update Router Firmware
Keep Reading To Update Router Firmware
Fios G3100 Router ReviewFios G3100 Router Review
Fios G3100 Router ReviewFios G3100 Router Review: Is It Smooth To Use?
How to Generate Personal Access Tokens in GitHub
How to Get To Router SettingsHow to Get To Router Settings
How to Get To Router SettingsHow to Get To Router Settings? [3 Quick Steps]
How to Change Your Time Warner WiFi Password
How to Update Router FirmwareHow to Update Router Firmware
How to Update Router FirmwareUpdate Router Firmware: 10 Easy Steps
Discuss this guide!
Discover interesting things!
Explore Howchoo’s most popular interests.
Explore

Follow @howchoo and learn cool things:

Are you a passionate writer? We’re hiring!

Write for Howchoo

Like what we do?

Donate

Want to support Howchoo? When you buy a tool or material through one of our Amazon links, we earn a small commission as an Amazon Associate.

Write for HowchooDonate

The Full Scoop on the Creality Ender 3 S1 Pro

A powerful modular printer with a few kinks.
OdinOdin Odin (182)
Feb 15, 2023
0
Our rating: 4/5

Creality’s Ender series of 3D printers has long been a central name in the world of 3D printing, with their highly-modifiable system offering a cheap base option that can, with a little tinkering, become a total powerhouse.

However, many new companies have been vying for Creality’s position as industry leader, and the competition is getting stiff. If the Ender series was going to continue to remain on top, Creality needed to give it a big makeover: so that’s exactly what they did.

TLDR: If you’re a fan of the Ender and are looking for an upgrade, this is a head-and-shoulders improvement. It doesn’t outright beat other printers in a similar price range, but it does stand on equal footing, and comes backed by the Creality name. Just make sure to heavily test your model within its return window, and don’t expect the auto-leveling to be anything special.

Posted in these interests:
h/3dprinterreviews14 guides
h/3dprinting91 guides
h/technology90 guides
Ender 3 S1 Pro Key FeaturesEnder 3 S1 Pro Key Features
Ender 3 S1 Pro Key Features

There are a lot of things about the S1 Pro that I loved, but there was one glaring gray area that needed resolving, and remains an important point of consideration with stacking this printer up against others in the same price range.

It’s a large FDM printer (490 x 455 x 625 mm) compared to its relatively small 220 x 220 x 270mm print bed. But, it’s also a very stable printer. Its size and weight give it a nice, sturdy printing base, and that wobble elimination is a win.

The Ender 3 S1 Pro also has both a Type-C USB slot, and an SD card port. This gives you more options for connecting your printer to external devices, like a Raspberry Pi.

The winsThe wins
The wins

Firstly, let’s take a look at what this printer does well. It absolutely hits some peaks for me, and on these, alone, it’s a worthwhile contender to many printers on the market.

Extruder and nozzle

The S1 Pro also has a “Sprite” full-metal dual-gear direct extruder rather than the more common Bowden design (where the filament is fed through a plastic tube at an angle). With an extrusion force of 80N. This is a manual loading and unloading process, but it allows for a bit more wiggle room when it comes to which filaments you use, and is generally very straight forward.

The S1’s new brass nozzle design can stand up to 300°C printing temperature, and is compatible with multiple filaments, such as PLA, ABS, PVA, Wood, TPU, PETG, and PA.

Build plate

The build plate is magnetic PEI Spring Steel, which is pretty common these days because of how easy it is to remove prints from the surface—no more worrying about scratching your build plate with a chisel as you try to pry the plastic off.

Lighting

A feature I enjoyed having added from the get-go was the LED light, built into the top of the frame. Yes, you can mod your own onto the Ender, but it’s a lovely touch to have it there from the beginning.

Problem detection

The Ender 3 S1 Pro has a filament sensor to ensure that you don’t suddenly run out of filament and ruin a print, and includes a power loss detection feature, which likewise keeps a sudden outage from making a mess of things. These are totally standard at this price range these days, but weren’t not that long ago, so it’s worth a highlight.

You can use it to shoot lasers

One of the immediate highlights about the Ender 3 S1 Pro is that it’s compatible with Creality’s line of laser modules, opening an exciting doorway to a truly multipurpose device capable of both 3D printing and laser engraving. You can read my review of the Ender 3 S1 Pro combined with a 10 watt laser module, here.

The QuestionsThe Questions
The Questions

Now, one of the reasons I was most excited about the S1 Pro was because it touted “CR-Touch” a 16-point automatic leveling system. Anyone who’s been following me for a while knows that I love a 3D printer with a good automatic leveling system, and that the current king of this area is Anycubic. I’d been looking forward to seeing how the Ender 3 S1 Pro stacked up.

I manually level all my printers before running any automated system—no problem there. But, as soon as I ran the automated leveling program, I knew there was an issue. The system was setting the Z-vector (the vertical height of the extruder) about two centimeters higher than the bed!

I reached out to Creality for support and received what they could offer, but all to no avail. One way or another, the problem persisted, despite the best efforts of their engineering team, and my own attempts to solve the issue. Only when I took the machine apart entierly, cleaned and refit every main component, was I eventually able to get it to level even manually as well as needed to accomplish some basic print testing. Auto-leveling remained completely inaccessible, as the issue repeated itself without cease.

Given my experience with other printers that offer complete auto-leveling along the full XYZ axis, this was disappointing. However, the printer performed well when only manually leveled, allowing me to ascertain that it is indeed a speedy and stable printer by all accounts.

While I would like to assume that this was an issue with only the printer sent to me, and not one endemic to the well-liked series as a whole, I would still caution prompt and comprehensive testing before your return period expires. This especially because I found complaints online regarding issues extremely similar to mine: all involving problems with the printer’s ability to level itself correctly.

Unboxing and assemblingUnboxing and assembling
Unboxing and assembling

The Ender 3 S1 Pro has the best packaging of any printer I’ve reviewed. It’s well-packed in a tight case, and the parts are minimal. It’s nice to have a printer that comes partially assembled like this because it allows you to get started faster. The Anycubic products that I reviewed in 2022 were amazing, but often required a fair bit of work to set up. One of the downsides of pre-assembled printers is that the shipping container often has to be larger, but Creality’s done a great job of keeping the size compact.

As always, the printer comes with tools, screws for assembly, and misc. accessories.

Assembling

Setting this one up is far easier than most kit printers, and that’s a huge boon to people who are new to the world of 3D printing and just want to get straight into the fun. You can read my full assembly guide, here.

I love how few parts there are for this printer: it’s easy to assemble in the extreme, and I was able to have it up and running in about a half hour (not including the time it took me to take notes and pictures). Some printers that I’ve assembled would really have benefited from a two-person team, but this printer is clearly designed with the solo enthusiast in mind. Even someone with no prior experience assembling a 3D printer would be able to handle this.

Unboxing and assemblingUnboxing and assembling
Unboxing and assembling

Priced at the $450-$500 range ($500-$600 with the laser module combo), the Ender 3 S1 Pro is aiming to compete in a very stiff market of upper-mid-range printers.

There were remarked difficulties with the auto-leveling feature in my model, but even if there had not been, it is a less functional form of automatic leveling than other models on the market for a similar price. What sets it apart is its inherent modularity and companion pieces like the laser module.

Well worthwhile for an experienced 3D printer professional, I would not recommend this for anyone just starting out with this as a hobby.

Because maybe you can’t read the default Chinese Ender 3 menu.
MichaelMichael Michael (175)
Feb 2, 2021
1 minute

Some of Creality’s Ender 3 V2 3D printers will arrive with the default language set to Chinese. Creality is based in China, after all.

Follow @howchoo and learn cool things:

Are you a passionate writer? We’re hiring!

Write for Howchoo

Like what we do?

Donate

Want to support Howchoo? When you buy a tool or material through one of our Amazon links, we earn a small commission as an Amazon Associate.