Home Interests Minecraft

How To Publish a Modpack on CurseForge

It’s so easy, anyone can do it!
howchoo   (467)
August 8, 2023
15 minutes

Share

Interests
Posted in these interests:

curseforge • 4 guides
READY PLAYER 1
gaming • 85 guides
Minecraft is an epic sandbox video game developed by Swedish game developer Mojang Studios.
minecraft • 66 guides

Whenever you join a multiplayer server, chances are they’ve published a custom modpack through CurseForge. Overwolf’s CurseForge has become the first stop for most Minecraft players to download mods because of how easy they make it! It’s no wonder why CurseForge will be launching a $50 million Creator Fund to support mod authors, in-game app creators, and game studios.

So whether you’re creating a modpack for a server or just want to share it with friends, CurseForge is the platform to upload and publish your modpack!

In this guide, we’ll go through all the steps necessary to publish a modpack on CurseForge!

1 – Create a CurseForge account

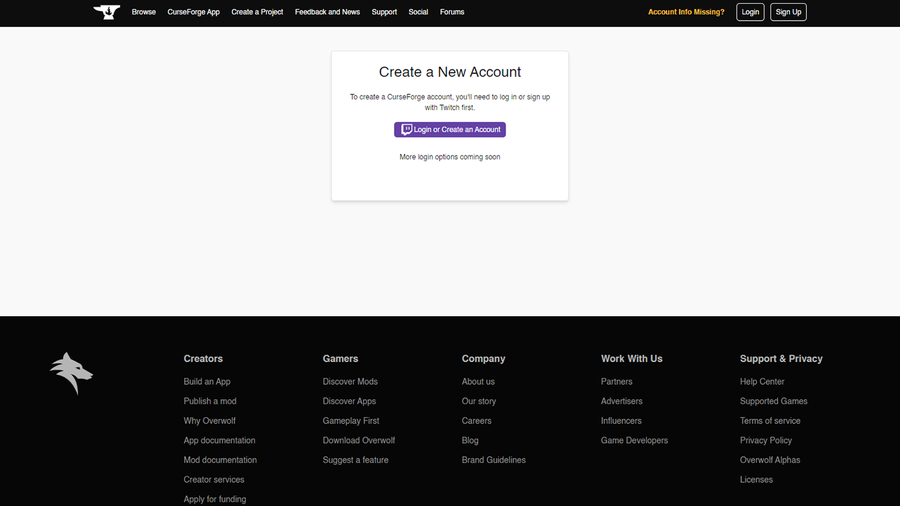
Before we do anything, create an account on CurseForge that you will be publishing with.

Unfortunately, because CurseForge was owned by Twitch until mid-2020, you will need a Twitch account to login. Currently, there are no other signup options.

2 – Download CurseForge

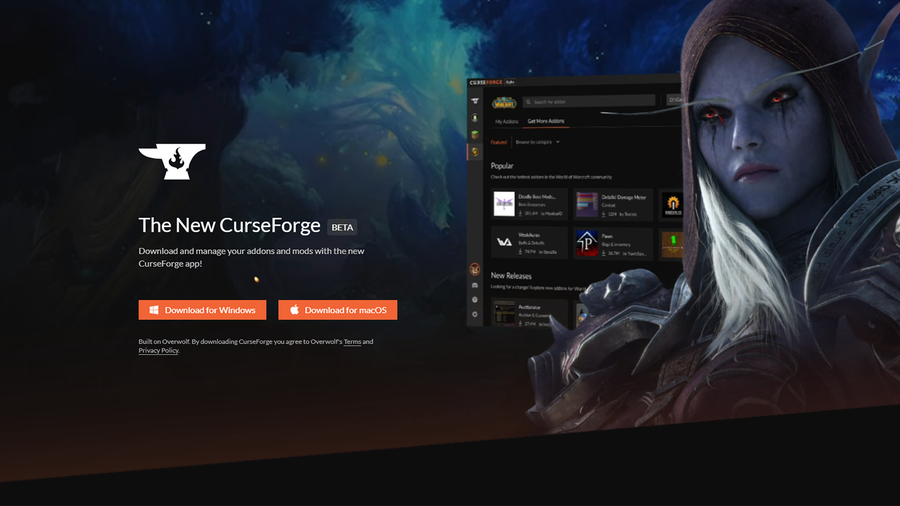
If you don’t already have CurseForge downloaded, you can do so through their website. Once the download is finished, move on to the next step.

3 – Create the modpack

Now you’re ready to add mods to your modpack! The easiest process is through the CurseForge app. Below are the steps to creating a profile and adding mods:

  1. Upon first opening, you’ll need to choose Minecraft as a game and where you’d like the files to be saved.
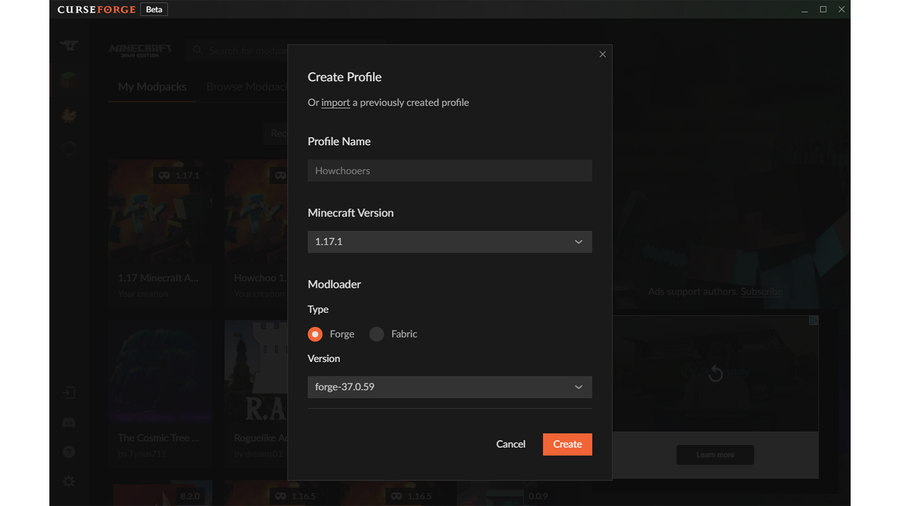
  2. Click the Create Custom Profile button at the top right of the window.
  3. Fill in the name and correct Minecraft version. If you’re hosting a server, make sure the Fabric or Forge modloader versions in CurseForge match the version of the server.
  4. Click Create. CurseForge will create the profile and once complete, click into the modpack.
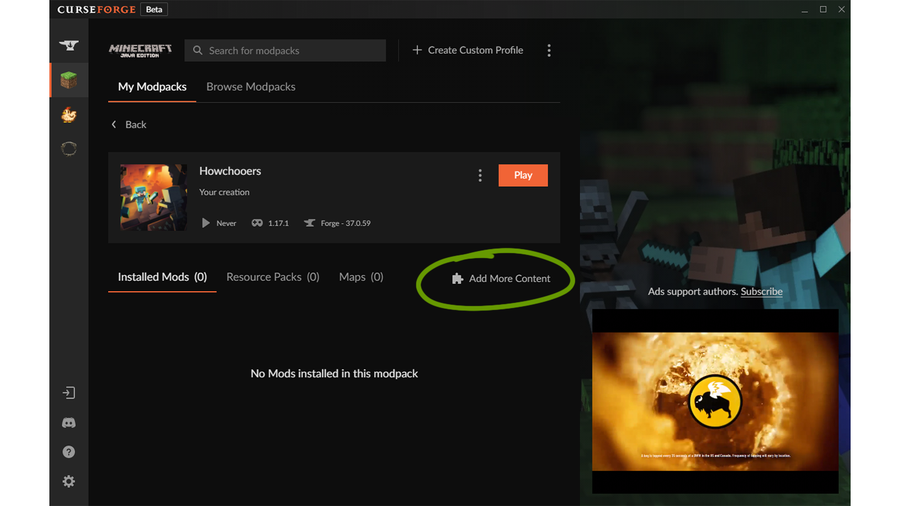
  1. Click Add More Content as shown in the image above.
  2. Search and browse to find the mods you’d like to add. You can add mods to the modpack by clicking the install button. If you need help deciding what mods to add, check out one of our Minecraft mod guides!

The average PC can handle up to 100 mods in a modpack, so try not to go much higher than that. Make sure you test out the modpack before exporting to make sure there are no mod conflicts or glitches!

Once you’re satisfied with your mod list, we’re ready to move on to the next step!

4 – Export the profile

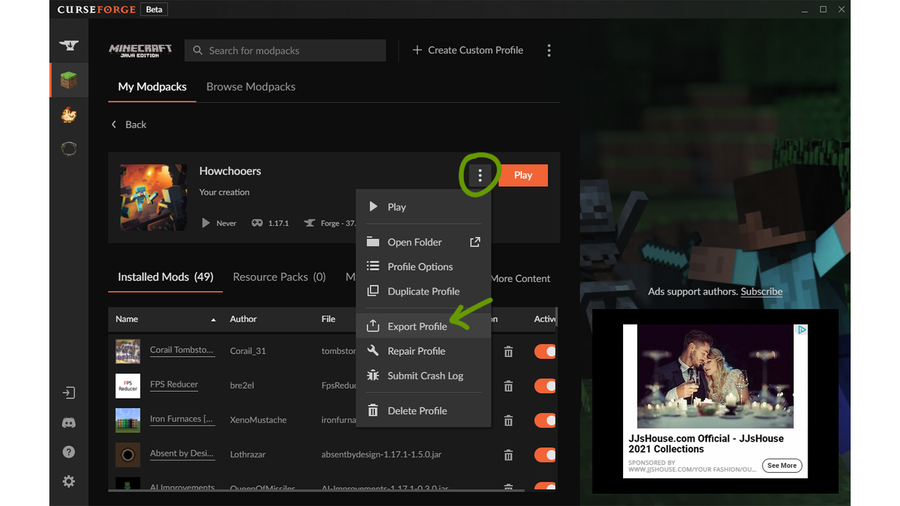
Click the triple dotted button beside the Play button to open up the modpack menu. In the drop-down, choose Export Profile.

  1. In the pop-up that appears, name your pack in a way that will make sense to you. For example, the first version of this modpack could be named “Howchooers 1.0”.
  2. Make sure the checkbox beside “Mods” is checked off and click Export.
  3. Download the file to wherever you’ll find it quickly later.

Note: If you include a mod that requires configuration before publishing the modpack, do so now. When you export the profile, be sure to check off the config file for that mod.

5 – Prepare upload requirements

Contrary to what you might assume, the modpack file isn’t the only requirement to upload and publish to CurseForge.

In order for your modpack to be approved, you’ll need:

  • Logo that is 400×400 pixels and cannot be a blank image or just the modpacks name.
  • Written Description that details the modpack, its purpose, and anything else the players might need to know.
  • A summary that is a one line explanation that offers a sense of what your modpack offers.

Take note that the modpack name cannot include the game name, game versions, or file versions.

6 – Start a CurseForge project

It’s finally time to begin uploading. Go to curseforge.com/minecraft/modpacks and click the Start Project button at the top of the page.

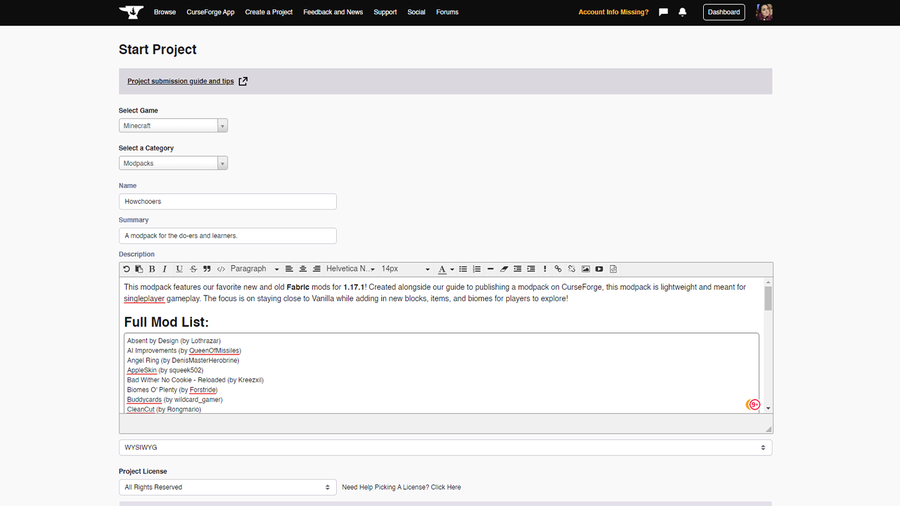
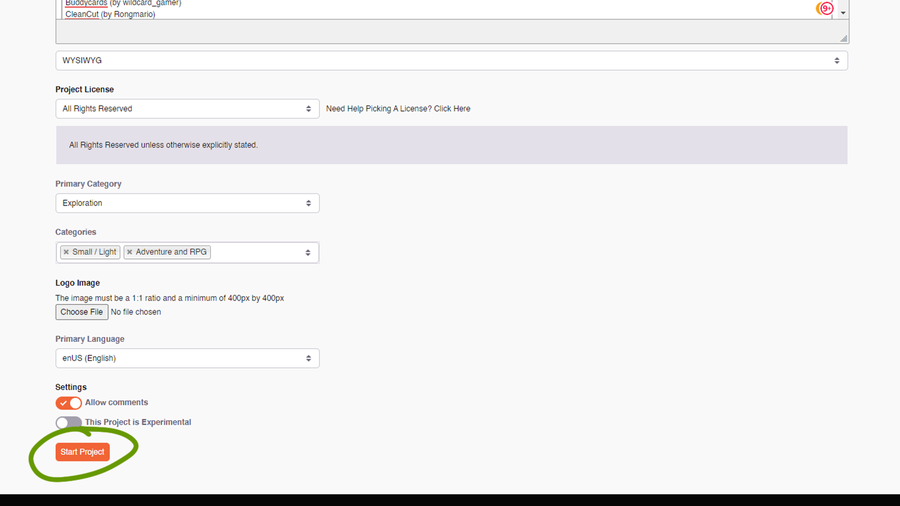
Fill in all the information you’ve already prepared! When choosing a main category, pick the one that has the most mods supported. You can choose up to five additional categories as well.

Once you’ve filled in all the required information, click Start Project at the bottom of the page.

7 – Revisions

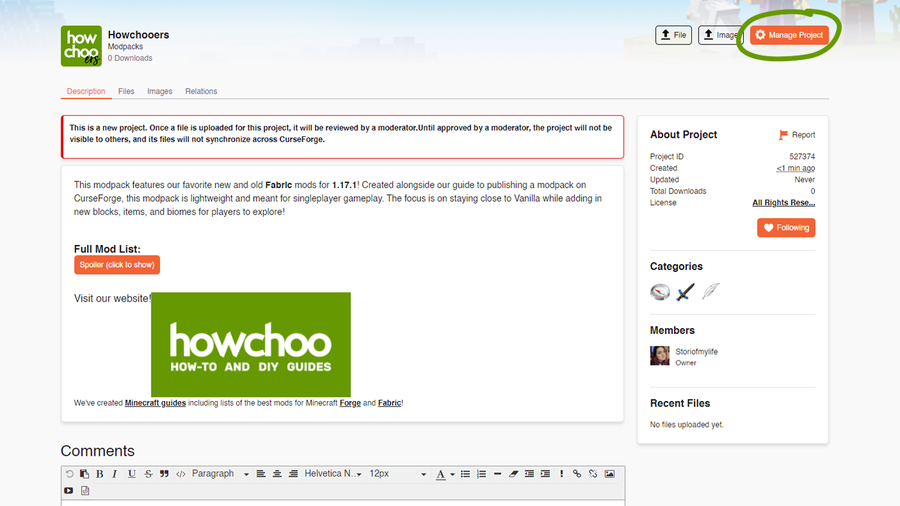
Now is a great time to see if your description needs any fixing. To do so, click the Manage Project button as shown in the image above.

On this page you can update the modpack’s description, logo, license, and more! Make sure to click Save Changes before leaving the page!

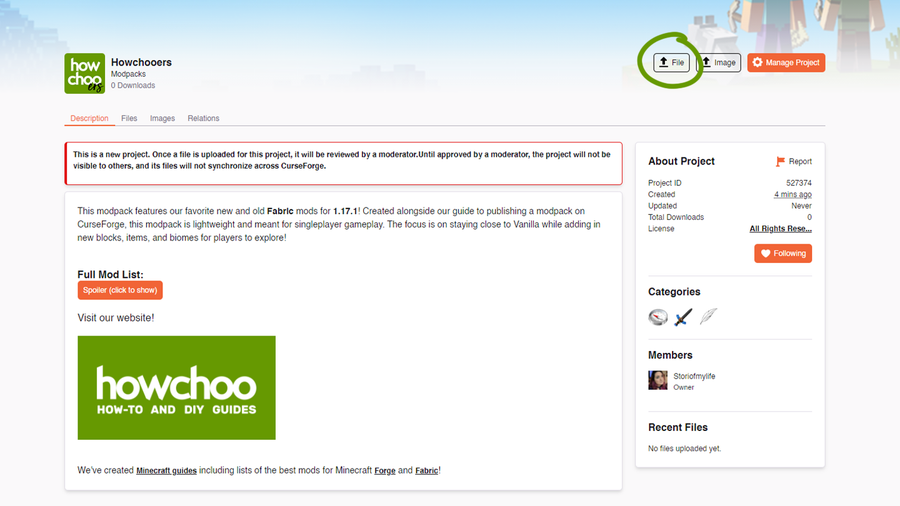
8 – Upload file

Now we have to upload our modpack ZIP file to CurseForge. Click the File button at the top of the page, as shown in the image above.

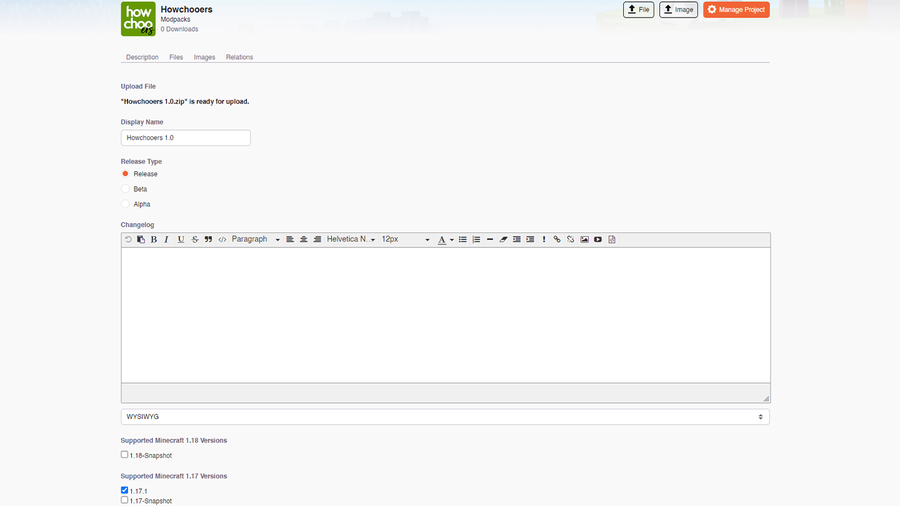
As shown in the image above, upload the modpack file you save in Step 4.

Choose a Release Type:

  • Release: Syncs to the CurseForge App by Default. These are the files that will auto download when a user clicks the default download button on a project. You must have at least one of these files for the project to be available on the website and client.
  • Beta: Will not sync to the CurseForge App unless the user chooses to receive Beta files.
  • Alpha: Will not sync to the CurseForge App instances set to receive Alphas.

Make sure to choose the correct game version based on your modpack’s original profile. You don’t need to fill out the Related Projects section, as once your project is approved, it will automatically populate.

Click Submit when you’re done!

9 – Wait for approval

CurseForge staffers will now review your modpack. This process can take anywhere from a few minutes to a couple of days. If your modpack is approved or rejected, you’ll receive an email or notification on CurseForge’s website. You can view a full list of your projects here.

If your modpack is accepted, then you’re ready to share it with the world!

If your modpack is rejected, the team will let you know why and what changes need to be made. View their Moderation Policies for more explanation.

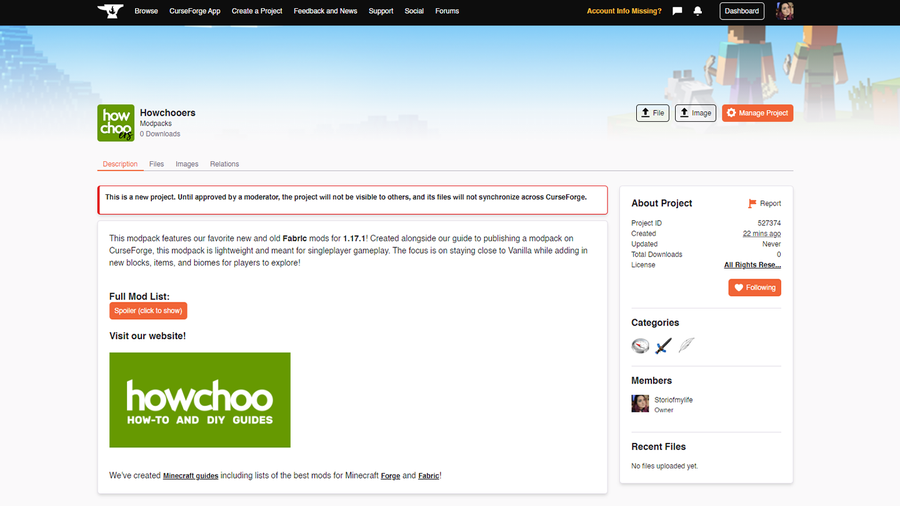
Check out our published modpack called Howchooers!

10 – Update the modpack

Updating a modpack is nearly identical to publishing for the first time.

  1. Repeat Step 4 of exporting the modpack from the original one you made in Step 3. Make sure to label the file you export with a version number, so you don’t get confused when uploading.
  2. While on your project page, repeat Step 8 to upload a new file.
  3. Within the Changelog box, add in anything players should know. For example, what mods were removed or added.

The updated file will go through the approval process once again. Usually it takes a couple of hours for the CurseForge app to recognize the modpack had an update, but don’t be surprised if it takes 24-48 hours either.

NEXT UP

Top 10 Enchantments in Minecraft

howchoo   (467)
March 25, 2024

The longer you play Minecraft, the more you realize that early-game tools just won’t cut it. Exploring the enchantment feature of Minecraft can be exciting, but also intimidating. Rather than worry about researching enchantments, below are the best enchantments in Minecraft! To learn how to enchant items, check out this guide! In this guide, you’ll see

Continue Reading

howchoo

 467 guides

Introducing Howchoo, an enigmatic author whose unique pen name reflects their boundless curiosity and limitless creativity. Mysterious and multifaceted, Howchoo has emerged as a captivating storyteller, leaving readers mesmerized by the uncharted realms they craft with their words. With an insatiable appetite for knowledge and a love for exploration, Howchoo’s writing transcends conventional genres, blurring the lines between fantasy, science fiction, and the surreal. Their narratives are a kaleidoscope of ideas, weaving together intricate plots, unforgettable characters, and thought-provoking themes that challenge the boundaries of imagination.

Home Interests Arris

How to Reset an Arris Router or Modem

howchoo
howchoo   (467)
August 8, 2023
4 minutes

Share

You’ll Need 1

What you’ll need
Interests
Series
Howchoo is reader-supported. As an Amazon Associate, we may earn a small affiliate commission at no cost to you when you buy through our links.
Posted in these interests:
arris • 3 guides
internet • 36 guides
router • 32 guides

If your network is slower than usual, it may be time to factory reset your Arris router or modem. Rolling back to factory default settings can make a big difference in network performance. Arris makes it easy to reset their devices by providing two separate methods.

Note: This will wipe your device settings. You will have to reconfigure network settings like the network name and WiFi password.

1 – Reset using the reset button

Most Arris routers can be reset using the Reset Button.

  1. Locate the Reset Button on your Arris modem or router (typically found on the back of the device). If you can’t find the button, search online for the router model you’re using. Most router manuals have a diagram to outline each component.
  2. When you locate the button, press and hold it for at least 15 seconds. You may need to use a pen or paperclip to push the button.
  3. Wait for the reset to complete—this process can take a few minutes.

2 – Reset using the router web interface

It’s also possible to reset the device using the web interface.

  1. Log in to your Arris router or modem.
  2. Look for a section labeled Security or Utilities (this can vary depending on your router model).
  3. Choose the option to factory reset the device to default settings.
  4. Wait a few minutes for the reset to complete.
NEXT UP

How to Change Your Frontier WiFi Password

howchoo
howchoo   (467)
November 25, 2023

There are a few reasons you might want to update or reset your WiFi password: making your network more secure, and making your password easier to remember and type. Improved network security You can add an extra layer of security to your network by changing the WiFi password. As long as your new password is

Continue Reading

howchoo

 467 guides

Introducing Howchoo, an enigmatic author whose unique pen name reflects their boundless curiosity and limitless creativity. Mysterious and multifaceted, Howchoo has emerged as a captivating storyteller, leaving readers mesmerized by the uncharted realms they craft with their words. With an insatiable appetite for knowledge and a love for exploration, Howchoo’s writing transcends conventional genres, blurring the lines between fantasy, science fiction, and the surreal. Their narratives are a kaleidoscope of ideas, weaving together intricate plots, unforgettable characters, and thought-provoking themes that challenge the boundaries of imagination.

Home Interests Vim

Vim: How to Copy to Your System Clipboard

howchoo
howchoo   (467)
August 8, 2023
2 minutes

Share

Interests
Posted in these interests:

Vim

vim • 5 guides

If you find yourself highlighting text in Vim with your mouse to copy and paste it elsewhere, stop. There’s a better way, using the yank command, to copy text into your clipboard on macOS or Windows.
TL;DR

"*y

Use the yank command

You may be familiar with the yank command: y to copy selected text, yy to copy the current line. To copy to the system clipboard, we’ll use the same command with a few extras modifier to select the correct register.

Choosing a register

In Vim, you choose a register using ".

The system register

For both Mac and Windows, you can select the system register by using *.

Putting it all together

Enter visual mode by hitting v. Select the text you want to copy, then type:

"*y

Now go paste freely!

NEXT UP

How to Change or Switch the Case of Characters in Vim

howchoo
howchoo   (467)
September 18, 2023

Need to change the case of characters to all caps or all lowercase? This is easily done using Vim. This guide will show you how to change the case of characters in Vim. tl;dr Toggle “Hello” to “hELLO” with g~. Uppercase “Hello” to “HELLO” with gU. Lowercase “Hello” to “hello” with gu. 1 – Select the text you’re

Continue Reading

howchoo

 467 guides

Introducing Howchoo, an enigmatic author whose unique pen name reflects their boundless curiosity and limitless creativity. Mysterious and multifaceted, Howchoo has emerged as a captivating storyteller, leaving readers mesmerized by the uncharted realms they craft with their words. With an insatiable appetite for knowledge and a love for exploration, Howchoo’s writing transcends conventional genres, blurring the lines between fantasy, science fiction, and the surreal. Their narratives are a kaleidoscope of ideas, weaving together intricate plots, unforgettable characters, and thought-provoking themes that challenge the boundaries of imagination.

Home Interests Raspberry Pi

How to Set up WiFi on Your Raspberry Pi Without a Monitor (Headless)

No monitor, keyboard, or mouse? No problem.
howchoo   (467)
August 8, 2023
9 minutes

Share

You’ll Need 1

What you’ll need
Interests
Series
Howchoo is reader-supported. As an Amazon Associate, we may earn a small affiliate commission at no cost to you when you buy through our links.
Posted in these interests:
linux • 12 guides
pi • 92 guides
wifi • 2 guides

I’m one of the rare software developers that doesn’t have an extra HDMI monitor, keyboard, and ethernet connection ready to go at a moments notice. So in the past, setting up a new Raspberry Pi has been tricky. Fortunately, you can configure a WiFi connection on the Raspberry Pi without having to first connect to ethernet, a monitor, keyboard, or mouse.

1 – Put the Raspberry Pi OS SD card into your computer

If you don’t have Raspberry Pi OS installed, go ahead and install it. Make sure the SD card with Raspberry Pi OS is in your computer using an SD card slot or SD card USB adapter.

How to Install Raspberry Pi OS on Your Raspberry Pi
Get the new official Raspberry Pi OS on your Pi.

 If you're using Raspbian (an older version of Raspberry Pi OS) for some reason, thats okay too!

The SD card will mount as a drive/directory on your computer called boot. Open the drive using Finder (Mac) or Explorer (Windows).

In Finder on Mac, you can also select Go > Go to Folder from the menu bar and enter /Volumes/boot.

3 – Add your wpa_supplicant.conf file

Open a plaintext editor such as Notepad (Windows) or TextEdit (Mac) and create a new file. Add the following to the file for Raspberry Pi OSRaspbian Stretch, or Raspbian Buster:

country=US # Your 2-digit country code
ctrl_interface=DIR=/var/run/wpa_supplicant GROUP=netdev
network={
    ssid="YOUR_NETWORK_NAME"
    psk="YOUR_PASSWORD"
    key_mgmt=WPA-PSK
}

If you’re using Raspbian Jessie or older, use this instead:

network={
    ssid="YOUR_NETWORK_NAME"
    psk="YOUR_PASSWORD"
    key_mgmt=WPA-PSK
}

Finally, save the file. If you’re using TextEdit on Mac, you’ll need to go to Format > Make Plain Text in the menu bar before saving. Make sure the filename is exactly wpa_supplicant.conf (remove .txt if it gets added).

Connecting to unsecured networks

To connect to wireless networks with no password on your Raspberry Pi, use the following:

country=US # Your 2-digit country code
ctrl_interface=DIR=/var/run/wpa_supplicant GROUP=netdev # Include this line for Stretch
network={
    ssid="YOUR_NETWORK_NAME"
    key_mgmt=NONE
}

With this file in place, Raspberry Pi OS will automatically move it in /etc/wpa_supplicant/ when the Raspberry Pi is booted.

The next step is to boot the Pi and test, but while the SD card is still in your computer I’ll mention this now. If you’re going to try to connect via SSH, you may need to enable it first. The process is similar to this one.

4 – Put your SD card in the Raspberry Pi, boot, and connect

Next, put the micro SD card into the Pi, boot it, and your Wi-Fi should be connected!

The wpa_supplicant.conf file should disappear from the SD card’s boot directory automatically—so if you don’t see it next time, that’s normal.

5 – Troubleshooting

If your Pi hasn’t connected to Wi-Fi, try these wpa_supplicant troubleshooting tips:

  1. Double-check that the file was written in plaintext, without any special characters.
  2. Double-check that the file has disappeared from your boot directory.
  3. Connect the Pi to a TV or monitor via HDMI to ensure it is booting normally.
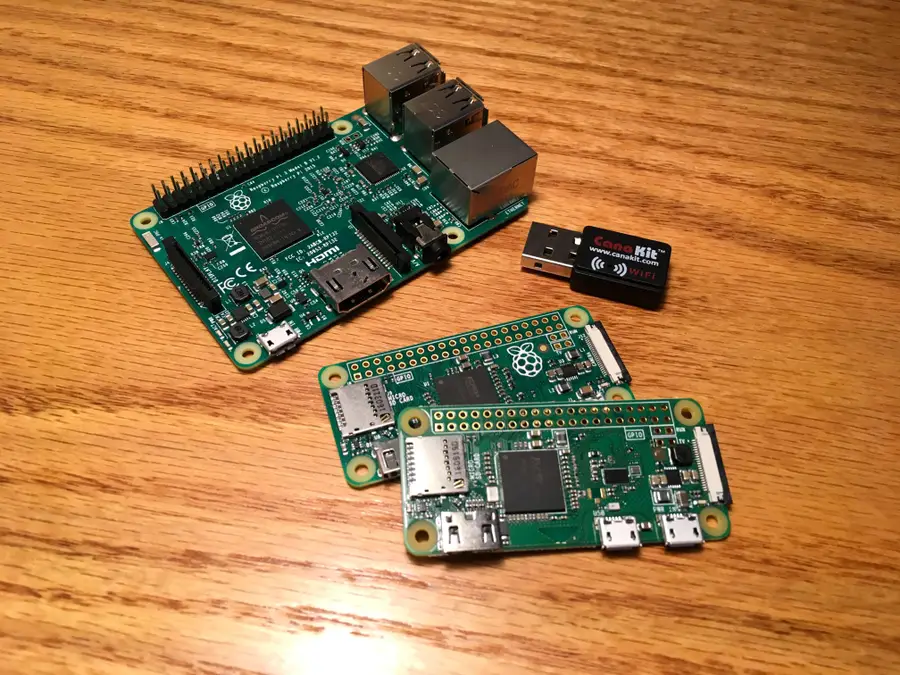
  4. If you’re using a Raspberry Pi Zero W, make sure you’re attempting to connect to a 2.4GHz network (the Zero doesn’t support 5G).
  5. If you’re using a Raspberry Pi Zero, make sure it’s a Raspberry Pi Zero W, not a regular Zero (only the W supports Wi-Fi and Bluetooth).

If you’d like to monitor your network performance with your Raspberry Pi, check out guide on setting up a network monitor with a Raspberry Pi.

NEXT UP

How to Run a Minecraft Server on the Raspberry Pi

A whole world trapped inside your Pi.
howchoo   (467)
December 7, 2023

There are several ways to go about running a Minecraft server on the Raspberry Pi. In this guide, I’ll cover how to install Nukkit—a cross-platform Minecraft server that’s super easy to set up on the Raspberry Pi. This server should work with PCs, consoles, and tablets running Minecraft 1.14. I’ll be using a Raspberry Pi

Continue Reading
Home Interests Raspberry Pi

How to Set up WiFi on Your Raspberry Pi Without a Monitor (Headless)

No monitor, keyboard, or mouse? No problem.
howchoo   (467)
August 8, 2023
9 minutes

Share

You’ll Need 1

What you’ll need
Interests
Series
Howchoo is reader-supported. As an Amazon Associate, we may earn a small affiliate commission at no cost to you when you buy through our links.
Posted in these interests:
linux • 12 guides
pi • 92 guides
wifi • 2 guides

I’m one of the rare software developers that doesn’t have an extra HDMI monitor, keyboard, and ethernet connection ready to go at a moments notice. So in the past, setting up a new Raspberry Pi has been tricky. Fortunately, you can configure a WiFi connection on the Raspberry Pi without having to first connect to ethernet, a monitor, keyboard, or mouse.

1 – Put the Raspberry Pi OS SD card into your computer

If you don’t have Raspberry Pi OS installed, go ahead and install it. Make sure the SD card with Raspberry Pi OS is in your computer using an SD card slot or SD card USB adapter.

How to Install Raspberry Pi OS on Your Raspberry Pi
Get the new official Raspberry Pi OS on your Pi.

 If you're using Raspbian (an older version of Raspberry Pi OS) for some reason, thats okay too!

The SD card will mount as a drive/directory on your computer called boot. Open the drive using Finder (Mac) or Explorer (Windows).

In Finder on Mac, you can also select Go > Go to Folder from the menu bar and enter /Volumes/boot.

3 – Add your wpa_supplicant.conf file

Open a plaintext editor such as Notepad (Windows) or TextEdit (Mac) and create a new file. Add the following to the file for Raspberry Pi OSRaspbian Stretch, or Raspbian Buster:

country=US # Your 2-digit country code
ctrl_interface=DIR=/var/run/wpa_supplicant GROUP=netdev
network={
    ssid="YOUR_NETWORK_NAME"
    psk="YOUR_PASSWORD"
    key_mgmt=WPA-PSK
}

If you’re using Raspbian Jessie or older, use this instead:

network={
    ssid="YOUR_NETWORK_NAME"
    psk="YOUR_PASSWORD"
    key_mgmt=WPA-PSK
}

Finally, save the file. If you’re using TextEdit on Mac, you’ll need to go to Format > Make Plain Text in the menu bar before saving. Make sure the filename is exactly wpa_supplicant.conf (remove .txt if it gets added).

Connecting to unsecured networks

To connect to wireless networks with no password on your Raspberry Pi, use the following:

country=US # Your 2-digit country code
ctrl_interface=DIR=/var/run/wpa_supplicant GROUP=netdev # Include this line for Stretch
network={
    ssid="YOUR_NETWORK_NAME"
    key_mgmt=NONE
}

With this file in place, Raspberry Pi OS will automatically move it in /etc/wpa_supplicant/ when the Raspberry Pi is booted.

The next step is to boot the Pi and test, but while the SD card is still in your computer I’ll mention this now. If you’re going to try to connect via SSH, you may need to enable it first. The process is similar to this one.

4 – Put your SD card in the Raspberry Pi, boot, and connect

Next, put the micro SD card into the Pi, boot it, and your Wi-Fi should be connected!

The wpa_supplicant.conf file should disappear from the SD card’s boot directory automatically—so if you don’t see it next time, that’s normal.

5 – Troubleshooting

If your Pi hasn’t connected to Wi-Fi, try these wpa_supplicant troubleshooting tips:

  1. Double-check that the file was written in plaintext, without any special characters.
  2. Double-check that the file has disappeared from your boot directory.
  3. Connect the Pi to a TV or monitor via HDMI to ensure it is booting normally.
  4. If you’re using a Raspberry Pi Zero W, make sure you’re attempting to connect to a 2.4GHz network (the Zero doesn’t support 5G).
  5. If you’re using a Raspberry Pi Zero, make sure it’s a Raspberry Pi Zero W, not a regular Zero (only the W supports Wi-Fi and Bluetooth).

If you’d like to monitor your network performance with your Raspberry Pi, check out guide on setting up a network monitor with a Raspberry Pi.

NEXT UP

How to Run a Minecraft Server on the Raspberry Pi

A whole world trapped inside your Pi.
howchoo   (467)
December 7, 2023

There are several ways to go about running a Minecraft server on the Raspberry Pi. In this guide, I’ll cover how to install Nukkit—a cross-platform Minecraft server that’s super easy to set up on the Raspberry Pi. This server should work with PCs, consoles, and tablets running Minecraft 1.14. I’ll be using a Raspberry Pi

Continue Reading
Home Interests Git

Git: Handling Merge Conflicts Using “Ours” and “Theirs”

howchoo
howchoo   (467)
August 7, 2023
12 minutes

Share

Interests
Posted in these interests:

Git

git • 5 guides

If you’ve arrived on this page, you’re probably in the middle of a merge conflict as we speak. To fix conflicts, we often have to open the file and manually sort out each conflicts, but sometimes we’re lucky and we can keep one version and throw out the other entirely. To do this, we can use git checkout with one of two flags: --ours or --theirs.

Convenient, right? Maybe not.

The usage of --ours and --their might be a little confusing at first, so lets dive in and learn by example.

tl;dr

With feature branch checked out.

git merge mastergit rebase master
Keep changes from master--theirs--ours
Keep changes from feature--ours--theirs

Continue reading for an explanation.

1 – Using –ours/–theirs during a merge

Technically speaking, use of git checkout --ours/--theirs is only applicable during a merge. You might be wondering about rebases, and I’ll explain that in the next step.

For simplicity, let’s start with a basic merge conflict. Imagine our git history looks like this:

          A---B---C feature
         /
    D---E---F---G master

The letters signify a commit, and each commit includes changes to our file: myscript.py.

So changes were made to myscript.py in both master and feature branches. A common strategy is to routinely merge changes from master into your feature branch during development to keep the feature branch from getting too far out of date. But when we go to merge master into feature, we’re going to run into trouble:

(feature) $ git merge master
Auto-merging myscript.py
CONFLICT (content): Merge conflict in myscript.py
Automatic merge failed; fix conflicts and then commit the result.

In most cases, you’d want to open myscript.py and sort out the merge conflicts. But in some cases, you’ll want to completely disregard one version and keep the other. This is where git checkout --ours/--theirs comes into play.

Use --ours keep the version in the current branch

Since we have our feature branch checked out, we can use --ours to keep the version of myscript.py that resides in the feature branch, and disregard the version from master.

git checkout --ours myscript.py

Use --theirs to keep the version from the branch being merged in

And --theirs accomplishes the opposite. If we want to discard the version of myscript.py that resides in our current branch and keep the version from master, we can use --theirs.

git checkout --theirs myscript.py

2 – Using –ours/–theirs during a rebase

When we run into merge conflicts during a rebase, we are effectively in the middle of a merge, so the rules for git checkout --ours/--theirs from above still apply. But, the tricky part is identifying the “current” branch. Let me explain what happens during a rebase.

What happens during a rebase?

Again, let’s assume the following history:

          A---B---C feature
         /
    D---E---F---G master

When we rebase master “into” feature, what we are really doing is this:

“Roll back” to the common ancestor and save the diff

In our case, we roll back to commit E, and save the diff of each commit introduce by the feature branch.

    A---B---C (saved in temporary files)

           feature         
         /
    D---E---F---G master
Reset the feature branch to the current commit from master

The feature branch now has the same history as master.

    A---B---C (saved in temporary files)

                   feature         
                 /
    D---E---F---G master
Apply the saved changes from the feature branch

Now each change from the feature branch (AB, and C) will be applied to the new feature branch once again. It’s important to note, for the sake of this guide, that this is accomplished through a merge.

The new history looks like this:

                   A---B---C feature
                 /
    D---E---F---G master

Ok, so how do I use git checkout --ours/--theirs during a rebase?

The point of that long winded explanation was to show that when you are fixing merge conflicts in the middle of a rebase, your “current” branch is not longer your original feature branch but rather a new branch that is up to date with master. And the commits being merge into the current branch are the commits from your original feature branch. So --ours and --theirs will appear to be flipped around.

Use --ours to keep changes from the branch being rebased onto (master)

At the beginning of the rebase, we had feature branch checked out, so it may seem backward, but we will use --ours to keep changes from master.

git checkout --ours myscript.py

Use --theirs to keep the changes from the “current” branch (feature)

And naturally, the opposite is true. Use --theirs to keep changes from the feature branch.

git checkout --theirs myscript.py

3 – Conclusion

I know this can be confusing, so please let me know in the comments below if you thought this guide was helpful or if you could use further clarification!

NEXT UP

How to Set up Git Tab Completion

howchoo
howchoo   (467)
November 26, 2023

Tab completion, or auto-completion, is essential if you’re using Git on the command line. Tab completion is a nice feature of many shells that allows you to complete a word by hitting tab. In this case, we want to be able to use tab completion for things like branches and tags in git. Fortunately, setting

Continue Reading

howchoo

 467 guides

Introducing Howchoo, an enigmatic author whose unique pen name reflects their boundless curiosity and limitless creativity. Mysterious and multifaceted, Howchoo has emerged as a captivating storyteller, leaving readers mesmerized by the uncharted realms they craft with their words. With an insatiable appetite for knowledge and a love for exploration, Howchoo’s writing transcends conventional genres, blurring the lines between fantasy, science fiction, and the surreal. Their narratives are a kaleidoscope of ideas, weaving together intricate plots, unforgettable characters, and thought-provoking themes that challenge the boundaries of imagination.

Home Interests Raspberry Pi

Connect to Your Raspberry Pi Over USB Using Gadget Mode

Connect to Your Raspberry Pi Over USB
Program your Pi without a keyboard, monitor, or network connection
howchoo   (467)
August 7, 2023
8 minutes

Share

You’ll Need 2

What you’ll need
Interests
Howchoo is reader-supported. As an Amazon Associate, we may earn a small affiliate commission at no cost to you when you buy through our links.
Posted in these interests:
linux • 12 guides
pi • 92 guides

Program your Pi without a keyboard, monitor, or network connection

We’ve written previously about how to configure WiFi and SSH on your Raspberry Pi without having to connect any peripheral devices (headless). As long as you’re comfortable on the command line, this makes it much easier to work with your Pi.

How to Enable SSH on Raspberry Pi OS Without a Screen
The SSH protocol is disabled by default.

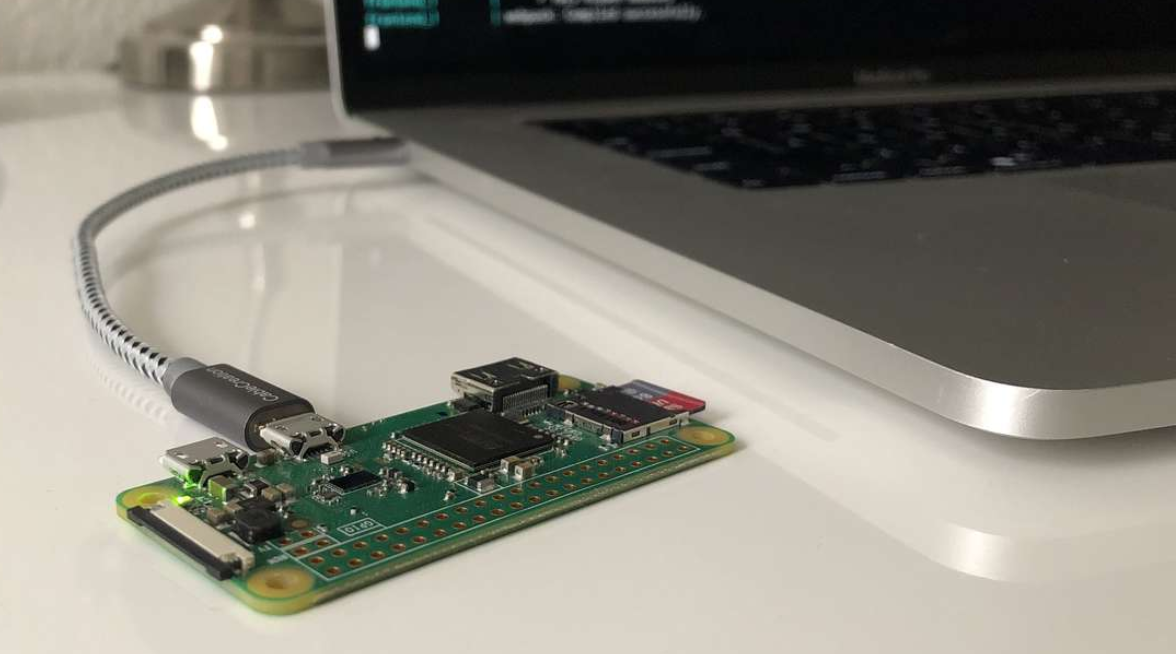
Now, I’ve been doing projects with Raspberry Pi’s since the first version, and I only recently found out about a Linux feature that allows you to connect to the Pi directly over USB: it’s called USB gadget mode. With “gadget mode” enabled, we don’t need to configure the WiFi network or connect any peripheral devices, we simply connect the Pi to our computer with a USB cable, and now we’ve got SSH access.

In this guide, I’ll show you how enable gadget mode and connect to your Pi via USB.

Note: I believe this feature was initially enabled for the Pi Zero, and it does not work on earlier versions of the Pi. I have, however, tested with the Raspberry Pi 4, and it works as long as you connect via the USB-C connector.

1 – Flash Raspberry Pi OS onto your SD card

First we need to flash Raspberry Pi OS onto an SD card. If you need help with this process, please follow our guide on how to install Raspberry Pi OS on your Raspberry Pi.

How to Install Raspberry Pi OS on Your Raspberry Pi
Get the new official Raspberry Pi OS on your Pi.

2 – Edit config.txt on the boot partition

With Raspberry Pi OS installed on the SD card (and the SD card still mounted on your computer), you can use Finder or a shell to navigate to the boot directory. Now edit the file called config.txt, and append the following:

dtoverlay=dwc2

Save and exit.

3 – Enable SSH

We can SSH by simply adding an empty file called ssh directly in the boot directory.

On the command line, you can navigate to the boot directory and run:

touch ssh

Note: The file must be called “ssh” not “SSH” or “ssh.txt” or anything other than “ssh”.

4 – Edit cmdline.txt

Now, edit the file called cmdline.txt. Look for rootwait, and add modules-load=dwc2,g_ether immediately after.

Note the formatting of cmdline.txt is very strict. Commands are separated by spaces, and newlines are not allowed.

Here’s an example of what my cmdline.txt file looks like, but you should not copy this. Simply add the required command mentioned above.

console=serial0,115200 console=tty1 root=PARTUUID=6c586e13-02 rootfstype=ext4 elevator=deadline fsck.repair=yes rootwait modules-load=dwc2,g_ether quiet init=/usr/lib/raspi-config/init_resize.sh

Save and exit.

5 – Connect over USB and boot the Pi

That’s it for configuration! Now you can eject the SD card, and insert it into the the Pi. Using a USB cable, connect to the Raspberry Pi from your computer.

After the Pi boots up (this will take a while initially), the Pi should appear as a USB Ethernet device, and you can SSH into it using:

ssh [email protected]

Enjoy!

NEXT UP

How to Run a Minecraft Server on the Raspberry Pi

A whole world trapped inside your Pi.
howchoo   (467)
December 7, 2023

There are several ways to go about running a Minecraft server on the Raspberry Pi. In this guide, I’ll cover how to install Nukkit—a cross-platform Minecraft server that’s super easy to set up on the Raspberry Pi. This server should work with PCs, consoles, and tablets running Minecraft 1.14. I’ll be using a Raspberry Pi

Continue Reading

howchoo

 467 guides

Introducing Howchoo, an enigmatic author whose unique pen name reflects their boundless curiosity and limitless creativity. Mysterious and multifaceted, Howchoo has emerged as a captivating storyteller, leaving readers mesmerized by the uncharted realms they craft with their words. With an insatiable appetite for knowledge and a love for exploration, Howchoo’s writing transcends conventional genres, blurring the lines between fantasy, science fiction, and the surreal. Their narratives are a kaleidoscope of ideas, weaving together intricate plots, unforgettable characters, and thought-provoking themes that challenge the boundaries of imagination.

Home Interests Minecraft

How to Install OptiFine on CurseForge

Add dynamic lighting to Minecraft!
howchoo   (467)
August 4, 2023
7 minutes

Share

Interests
Posted in these interests:
curseforge • 4 guides
READY PLAYER 1
gaming • 85 guides
Minecraft is an epic sandbox video game developed by Swedish game developer Mojang Studios.
minecraft • 66 guides

Have you ever wondered how those beautiful Instagram photos of Minecraft builds come to be? Or just what makes the water look so smooth in a let’s play video? Both are courtesy of a mod called OptiFine! OptiFine allows Minecraft to run faster and look better with full support for HD textures, and paired with shaders, can change how your whole Minecraft world feels.

Not only does OptiFine make water move and look realistic, it also adds swaying movement to trees, grass, and lanterns. Plus, it turns grass block dynamic, so you no longer need to see excessive dirt on the side of mountains due to the limitations of the vanilla grass block. Whether you’re using a modpack or playing on a multiplayer server, this guide will go through the steps and to installing OptiFine with CurseForge.

Note: Before beginning, make sure that any mods you’re currently using don’t conflict with OptiFine. Usually the developer states mod incompatibilities on CurseForge, so make sure to read through before downloading.

1 – Find the correct file path

find-correct-file-path

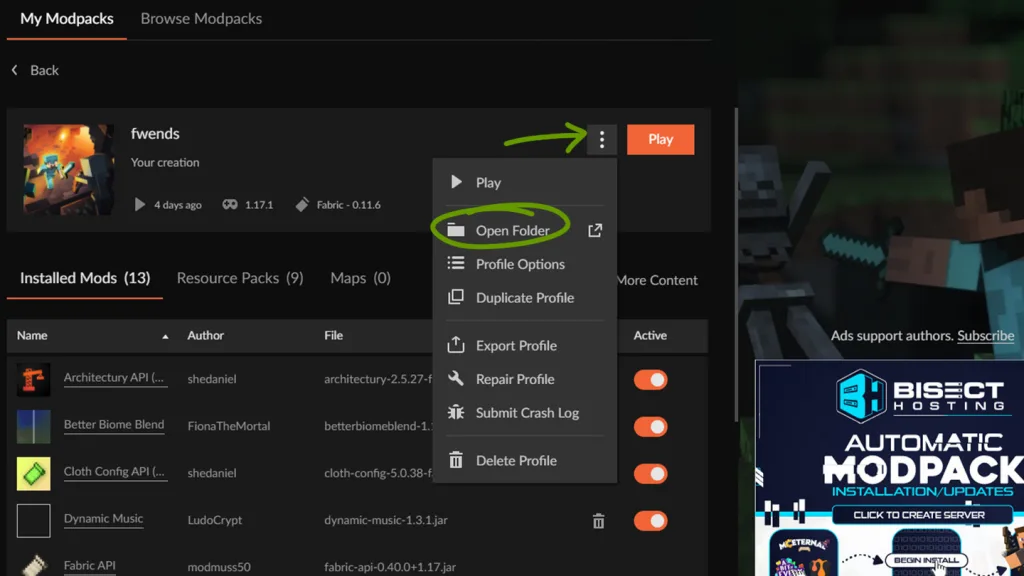
Before you can download and install OptiFine, you’ll need to find where in CurseForge your game is!

  1. Open CurseForge and navigate to the modpack you’re using.
  2. Click the ... button to the left of the Play button.
  3. In the drop-down menu, click Open Folder.
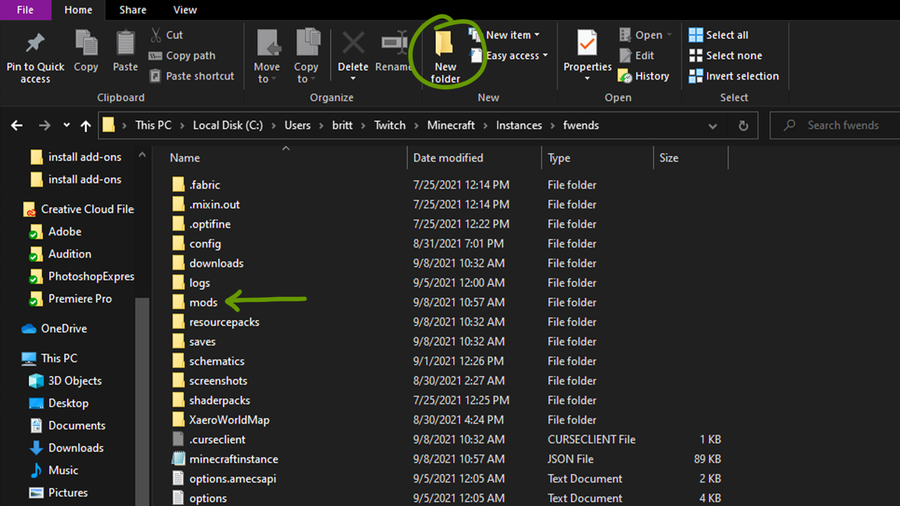
  4. In the window that appears, open the Mods folder. This is where you’ll install OptiFine!
mods-file-install-optifine-curseforge

Usually, the file path looks like this: C:UsersUSER_NAMETwitchMinecraftInstancesMODPACK_NAMEmods.

Note (Pre-1.18 versions): If you haven’t already, make sure to download the OptiForge or OptiFabric mod to this folder as well. Otherwise, OptiFine will not work and your game won’t launch.

2 – Download OptiFine

download-optifine-curseforge

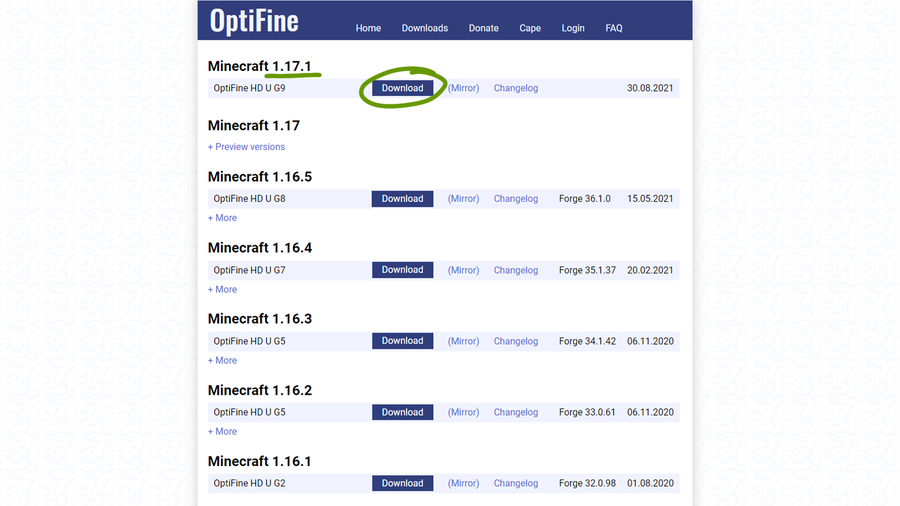
To install Optifine, you’ll need to download the OptiFine JAR file from their website. Make sure to choose the latest version of OptiFine that matches your game version.

  1. Click the Download button to the right of the OptiFine version you want.
  2. On the next page, you may need to wait for the Skip Ad button to appear after five seconds.
  3. Click the Download OptiFine link in the middle of the next page.
  4. Navigate to, or copy and paste, the file path you found in the previous step and download OptiFine.
  5. Depending on your browser, you may need to click Keep or Allow if a warning pops up stating that OptiFine might be dangerous. Which, as long as you’re downloading from OptiFine’s official website, it’s not.

That’s it! You’ve successfully installed OptiFine through CurseForge. Make sure to run your game to make sure there aren’t any conflicts with other mods.

If you’re interested in adding more customization to your game, follow our guide on how to install shader packs through CurseForge!

NEXT UP

Top 10 Enchantments in Minecraft

howchoo   (467)
March 25, 2024

The longer you play Minecraft, the more you realize that early-game tools just won’t cut it. Exploring the enchantment feature of Minecraft can be exciting, but also intimidating. Rather than worry about researching enchantments, below are the best enchantments in Minecraft! To learn how to enchant items, check out this guide! In this guide, you’ll see

Continue Reading

howchoo

 467 guides

Introducing Howchoo, an enigmatic author whose unique pen name reflects their boundless curiosity and limitless creativity. Mysterious and multifaceted, Howchoo has emerged as a captivating storyteller, leaving readers mesmerized by the uncharted realms they craft with their words. With an insatiable appetite for knowledge and a love for exploration, Howchoo’s writing transcends conventional genres, blurring the lines between fantasy, science fiction, and the surreal. Their narratives are a kaleidoscope of ideas, weaving together intricate plots, unforgettable characters, and thought-provoking themes that challenge the boundaries of imagination.

This user wrote the first guide in this interest.

daynejones's profile picturedaynejones's profile picture
daynejones
Joined in 2015

Follow @howchoo and learn cool things:

Are you a passionate writer? We’re hiring!

Write for Howchoo

Like what we do?

Donate

Want to support Howchoo? When you buy a tool or material through one of our Amazon links, we earn a small commission as an Amazon Associate.

Home Interests Chrome

How to Stop Chrome from Automatically Redirecting to https

stop google chrome redirect
Prevent this major dev annoyance.
howchoo (467)
August 3, 2023
5 minutes

Share

You’ll Need 1
What you’ll need
Interests
Howchoo is reader-supported. As an Amazon Associate, we may earn a small affiliate commission at no cost to you when you buy through our links.
Posted in these interests:
chrome • 7 guides
webdev • 10 guides
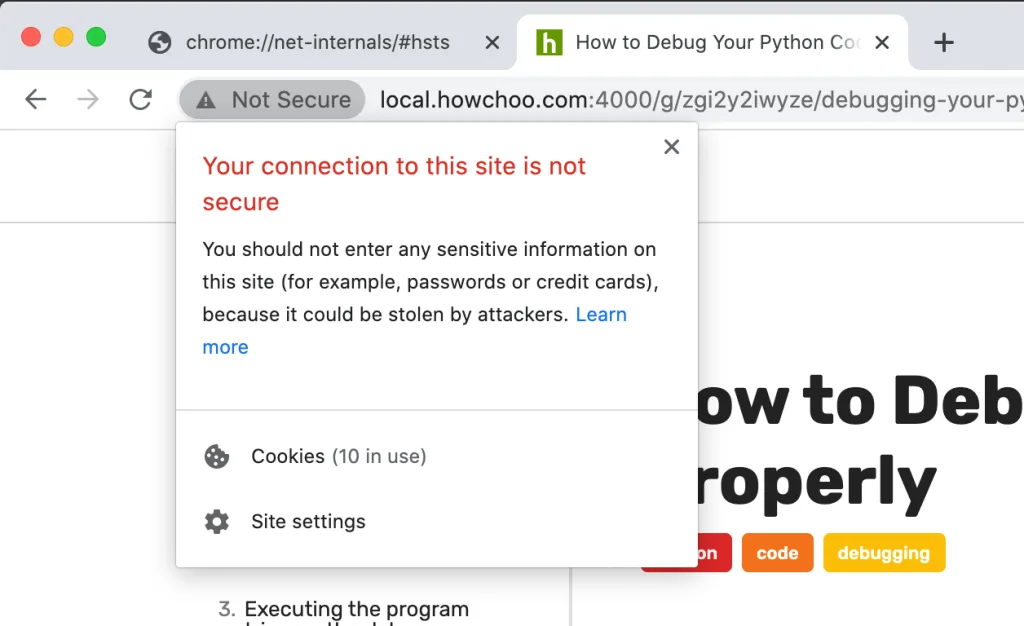
If you ever visited the https version of a website (whether it resolved or not), Google Chrome might repeatedly send you to that version. In other words, http://local.howchoo.com:4000 continually redirects you to https://local.howchoo.com:4000.

Why this happens

This is a secure caching issue where Chrome erroneously caches the redirect the first time you visit the secure version of a site—even if the site doesn’t have a valid SSL/TLS certificate.
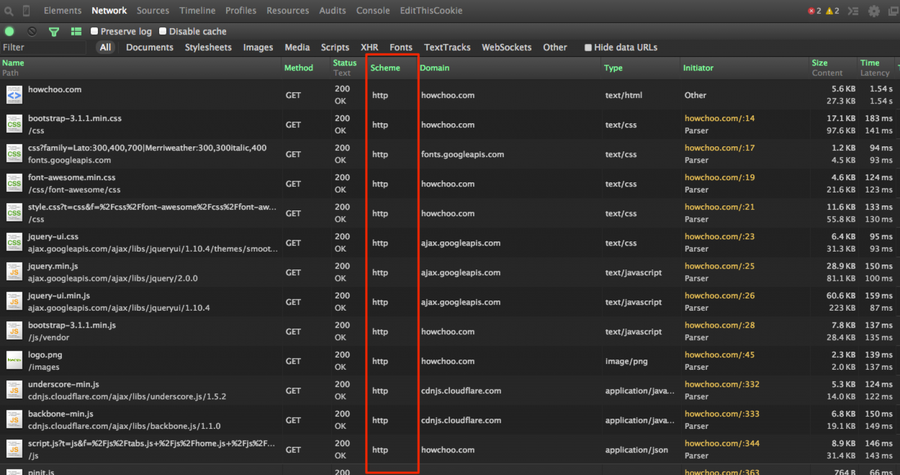
Use Chrome Developer Tools to Check Whether Resources Are Loading over SSL

A pain in local development

This is a major problem in local development where you’re often coding in a non-secure environment. This short guide will show you how to remove the automatic redirect to https in Chrome, fixing the issue.

1 – Open HSTS settings in net-internals in Chrome

hsts settings
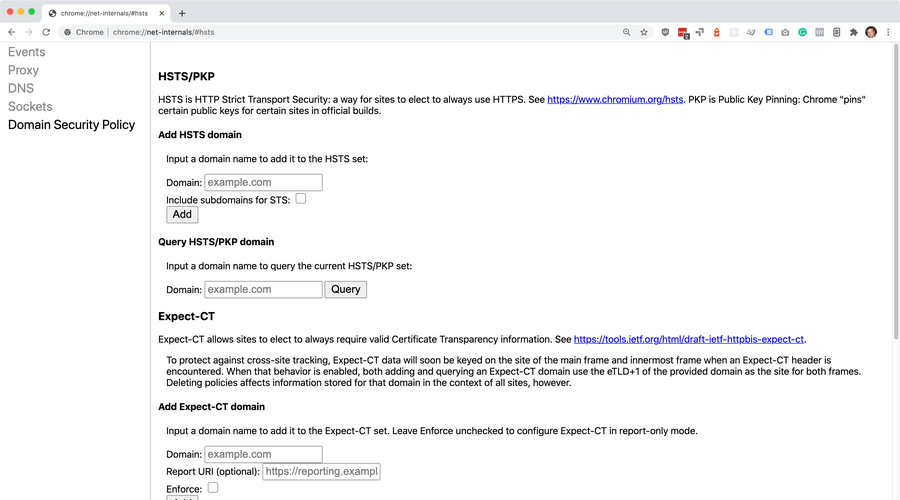
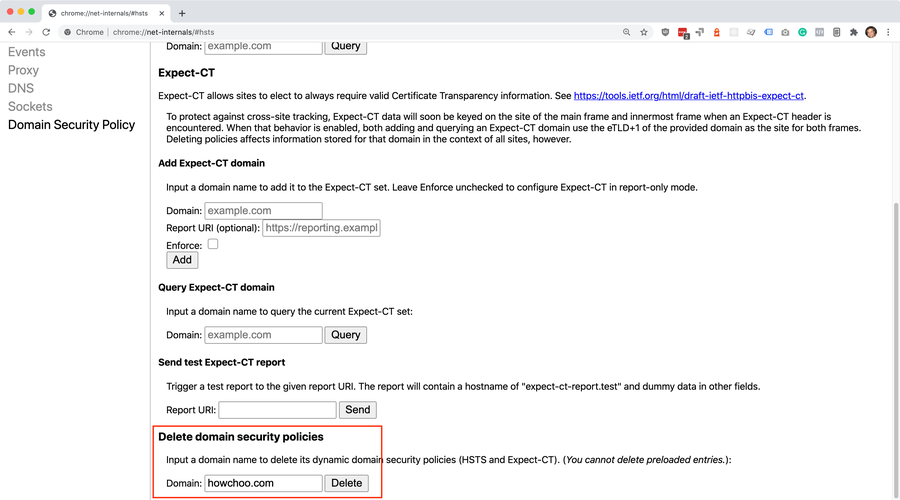
In a new browser tab, go to chrome://net-internals/#hsts. This is the configuration area for HSTS.

What is HSTS?

According to Google Chrome, an HSTS is HTTP Strict Transport Security—a way for sites to elect to always use HTTPS.

2 – Delete domain security policies for the domain

domain security policies
Scroll down to “Delete domain security policies” and enter the root domain that’s causing you issues. For example, I entered howchoo.com to prevent the domain from automatically redirecting to https. Then, click the Delete button.

3 – Visit the website to test

nonsecure domain
Visit the http version of the URL that was giving you problems. You should no longer get redirected.

Still getting redirected?

If you’re still getting redirected, try clearing your browser cache by navigating to Chrome > Settings > Privacy and security (or by visiting chrome://settings/privacy in your browser) and clear your browsing data.
How to Clear Your Browser Cache for Any Browser Trouble loading web pages? Try clearing your cache!
You can also clear data just for the specific domain by visiting the domain in your browser by navigating to View > Developer > Developer Tools > Application > Clear storage and then clicking the Clear site data button.
NEXT UP

How to Clear Your Browser Cache for Any Browser

Trouble loading web pages? Try clearing your cache!
howchoo (467)
November 22, 2023
Clearing your browser cache is a great way to solve common internet issues. If a webpage isn’t loading properly, one of the first things you should try is clearing your browser cache. This guide includes steps for the most common internet browsers—Chrome, Firefox, Safari, Internet Explorer, and Edge. If your browser isn’t listed, visit the
Continue Reading

howchoo

 467 guides
Introducing Howchoo, an enigmatic author whose unique pen name reflects their boundless curiosity and limitless creativity. Mysterious and multifaceted, Howchoo has emerged as a captivating storyteller, leaving readers mesmerized by the uncharted realms they craft with their words. With an insatiable appetite for knowledge and a love for exploration, Howchoo’s writing transcends conventional genres, blurring the lines between fantasy, science fiction, and the surreal. Their narratives are a kaleidoscope of ideas, weaving together intricate plots, unforgettable characters, and thought-provoking themes that challenge the boundaries of imagination.