Home Interests Fitbit

How to Reset a Fitbit Charge 3 & Charge 4

It’s like running though a maze to find the reset button on your Fitbit!
howchoo   (467)
August 17, 2023
5 minutes

Share

You’ll Need 1

What you’ll need
Interests
Howchoo is reader-supported. As an Amazon Associate, we may earn a small affiliate commission at no cost to you when you buy through our links.
Posted in these interests:
fitbit • 1 guides
fitness • 5 guides

Because of the Fitbit Charge 3 and Charge 4’s compact nature, Fitbit has crammed as much as they could into the small amount screen space available on the Charge, making it tricky to do simple tasks like changing the time. This includes the reset feature. I’ve had a Fitbit Charge 3 and now a Fitbit Charge 4, and I still make discoveries from time to time about a new app or feature I never knew existed.

So let us help guide you through the metaphorical maze that is the Fitbit Charge 3 and Charge 4, and get you to that reset button pronto!

1 – Press the left button to show screen

Press the left button to show the screen on your Fitbit Charge 3 or 4.

2 – Swipe to the left until “Settings”

  • Swipe left on your Fitbit Charge 3 or 4 screen, until you reach the “Settings” button.
  • Press Settings.

3 – Swipe up until “About”

  • Swipe up to scroll down and find the button labeled “About.”
  • Press About.

4 – Swipe up until “Clear User Data” and “Reboot Device”

Now, you’ll swipe up until you see the two buttons labeled “Clear User Data” and “Reboot Device.” Each of these buttons can reset your Fitbit Charge 3 or 4 in a different way.

Clear User Data

Selecting this will essentially factory reset your device. It will remove

  • Apps
  • Stored data
  • Personal information
  • Credit and debit cards (for Fitbit Pay-enabled devices)
  • Saved settings

On some other Fitbit devices, this is called “Factory Reset.” You’ll want to do this if you get a new Fitbit and sync it to your phone, for example.

Reboot Device

Selecting this will reboot the device itself. It will not reset or remove any user data. Rebooting the device troubleshoots many issues that Fitbit wearers might experience, such as when:

  • The device stops responding.
  • The device will not sync.
  • It stops tracking your stats and steps.
  • The buttons stop responding.

Your Fitbit Charge may need to plug in for the device to restart after being shut down.

NEXT UP

How to Clean Vibram Five Finger Toe Shoes Without Ruining Them

howchoo   (467)
November 22, 2023

Vibram Five Finger shoes are awesome pieces of running gear. But you can also use them for hiking and looking weird around town. Unfortunately, toe shoes start to smell if you don’t wear socks with them every time you wear them. While Vibram claims that the shoes are machine washable, you will ruin them if you wash

Continue Reading

howchoo

 467 guides

Introducing Howchoo, an enigmatic author whose unique pen name reflects their boundless curiosity and limitless creativity. Mysterious and multifaceted, Howchoo has emerged as a captivating storyteller, leaving readers mesmerized by the uncharted realms they craft with their words. With an insatiable appetite for knowledge and a love for exploration, Howchoo’s writing transcends conventional genres, blurring the lines between fantasy, science fiction, and the surreal. Their narratives are a kaleidoscope of ideas, weaving together intricate plots, unforgettable characters, and thought-provoking themes that challenge the boundaries of imagination.

Home Interests Comcast

How to Log in to a Comcast Business Router

howchoo
howchoo   (467)
August 17, 2023
4 minutes

Share

You’ll Need 2

What you’ll need
Interests
Series
Howchoo is reader-supported. As an Amazon Associate, we may earn a small affiliate commission at no cost to you when you buy through our links.
Posted in these interests:
comcast • 7 guides
internet • 36 guides
router • 32 guides

Supporting your business is easy with a Comcast router or gateway. The router dashboard gives you plenty of control to secure your network and protect any device that connects to it. In this guide, I’ll go over how to access this dashboard and reset the administrator password.

The Comcast Business Xfinity hardware is set up a little differently from home use devices. You’ll find different credentials are necessary to access the main router dashboard. If you’re looking for non-business login instructions, visit our residential Comcast router login guide. Otherwise, keep reading!

1 – Connect to the business network

Connect to the Comcast network that’s using the business router you want to log into. You can use WiFi or an Ethernet cable to connect.

2 – Use browser window to go to 10.1.10.1

Open a browser window. You can access the login screen by going to this address:

http://10.1.10.1

3 – Log in to the router

You will be prompted with a login screen. If it’s your first time logging in, you will need to use the default credentials. The password will be one of the two below:

Username: cusadmin
Password: highspeed
Alternate password: CantTouchThis

4 – Change the admin password

Changing the password is easy. Once you’re logged in, click Change Password in the upper right hand corner. After entering your new password, click Save to store the changes. The administrator username cannot be changed.

5 – Comcast Business router support

If you need further assistance with Comcast Business Xfinity, be sure to visit the official Comcast website for support.

NEXT UP

How to Change Your Frontier WiFi Password

howchoo
howchoo   (467)
November 25, 2023

There are a few reasons you might want to update or reset your WiFi password: making your network more secure, and making your password easier to remember and type. Improved network security You can add an extra layer of security to your network by changing the WiFi password. As long as your new password is

Continue Reading

howchoo

 467 guides

Introducing Howchoo, an enigmatic author whose unique pen name reflects their boundless curiosity and limitless creativity. Mysterious and multifaceted, Howchoo has emerged as a captivating storyteller, leaving readers mesmerized by the uncharted realms they craft with their words. With an insatiable appetite for knowledge and a love for exploration, Howchoo’s writing transcends conventional genres, blurring the lines between fantasy, science fiction, and the surreal. Their narratives are a kaleidoscope of ideas, weaving together intricate plots, unforgettable characters, and thought-provoking themes that challenge the boundaries of imagination.

Home Interests Raspberry Pi

How to Add a Fan to the Raspberry Pi 4 for Proper Cooling (You Need One)

how to add fan to raspberry pi 4
It’s getting hot in here, a fan will cool your Pi.
howchoo   (467)
August 17, 2023
9 minutes

Share

You’ll Need 6

What you’ll need
Interests
Series
Howchoo is reader-supported. As an Amazon Associate, we may earn a small affiliate commission at no cost to you when you buy through our links.
Posted in these interests:
pi • 92 guides

The Raspberry Pi 4 has been a hot topic since it’s release—and no one knows that better than Jeff Geerling. In a recent blog post, Jeff reveals a serious issue that’s impacting the performance of the Pi 4.

Be sure to also check out our guide on adding a Raspberry Pi fan that will turn itself on and off automatically!

control raspberry pi-fan and temperature with python

Automatically Control Your Raspberry Pi Fan (and Temperature) with Python
It’s getting hot in here (so hot), so let’s just write some code.

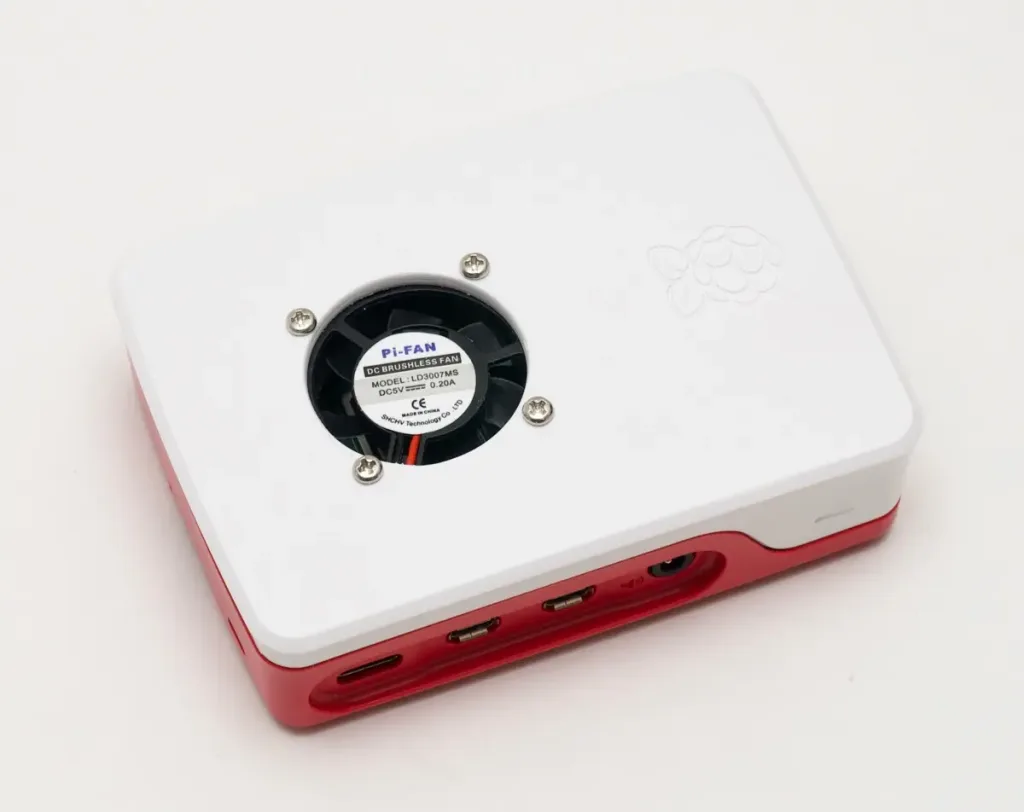
Update 11/30/20: An official Raspberry Pi 4 case fan was recently released. This is ideal for anyone who wants to cool their Pi with name-brand hardware. It’s specifically designed to fit the official Raspberry Pi 4 case, so if you’re using this case you can order this fan instead—doing away with the need to drill a hole!

1 – Why the Pi 4 needs a fan

why the pi 4 needs a fan
Jeff used his Seek thermal imager to identify the Pi 4 heat signature. (Jeff Geerling)

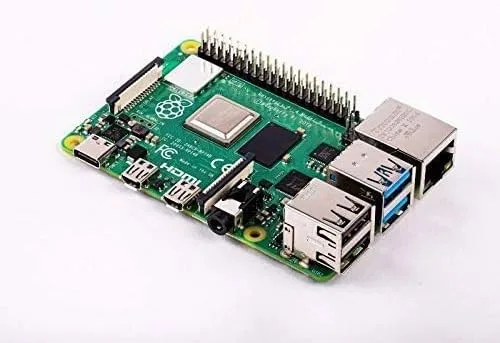
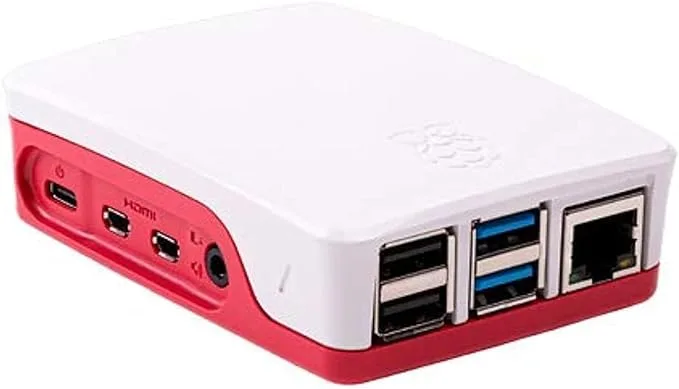
The Raspberry Pi Foundation released an official Raspberry Pi 4 Desktop Kit. The kit comes with a new plastic case featuring holes for every port on the Pi 4, but nothing at all for ventilation. This project uses the official Raspberry Pi 4 case, though you can use any other case to accomplish this project as well.

Most Raspberry Pi models don’t need fans or heatsinks for everyday use—but the Pi 4 is another story. The CPU idles around 60°C. Running heavy processes can heat the board so much it hurts to touch. Too much heat will cause the CPU to throttle, causing serious performance issues.

Jeff revealed some telling images by photographing the Pi 4 with a thermal imager. Most of the heat appears to come from the USB-C power circuitry. Since the heat has nowhere to leave inside the Pi 4 case, he decided to install a fan. Here’s a quick breakdown of the project.

2 – Drill a hole for the fan

raspberry pi 4 fan hole
Jeff Geerling

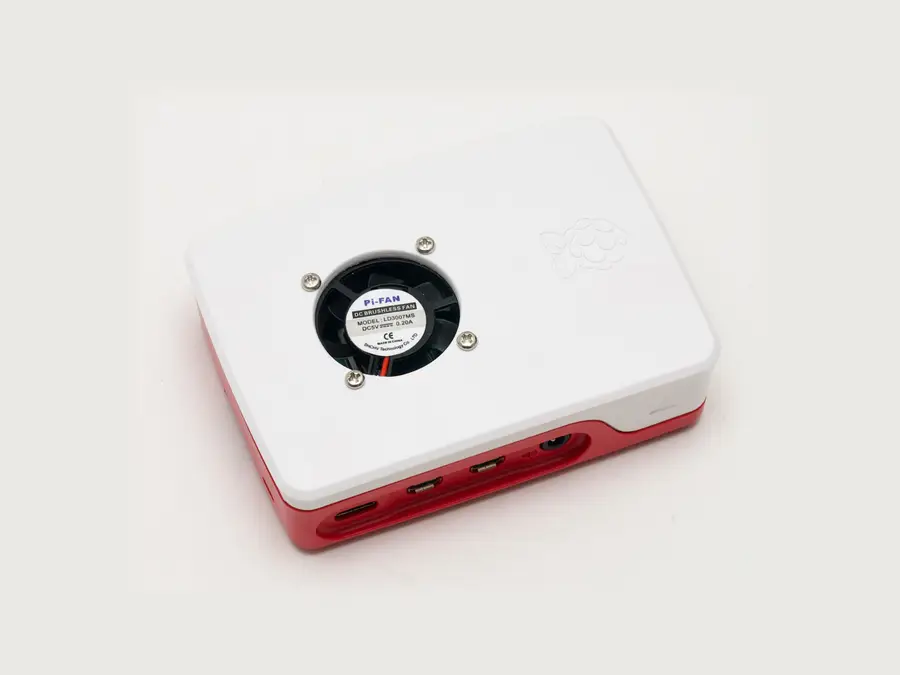
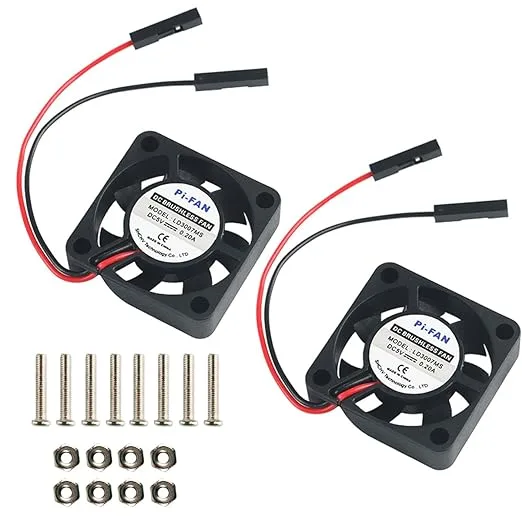
The Pi-Fan is attached to the top half of the Pi case. Drill a hole in the center using a 1-1/8″ hole saw. Be sure to smooth out the edges with a file or sandpaper.

🛈 Because the plastic is fragile, I recommend running the hole saw backwards to drill the hole more slowly and carefully.

3 – Drill holes for the fan screws

Line the fan up with the newly drilled hole and mark the screw holes with a pen or pencil. When drilling the screw holes, you will need a 7/64″ drill bit. Smooth out the edges and remove any remaining plastic.

4 – Mount the fan to the case

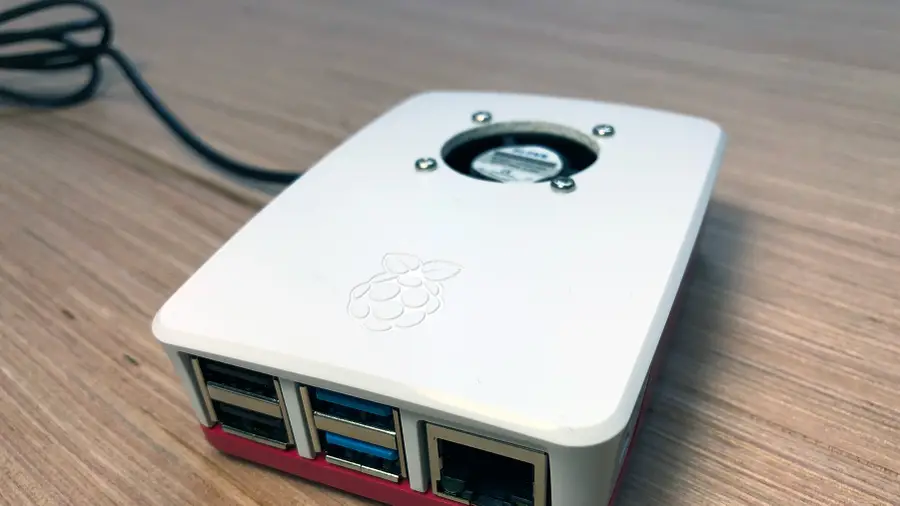
raspberry pi 4 case with fan
Jeff Geerling

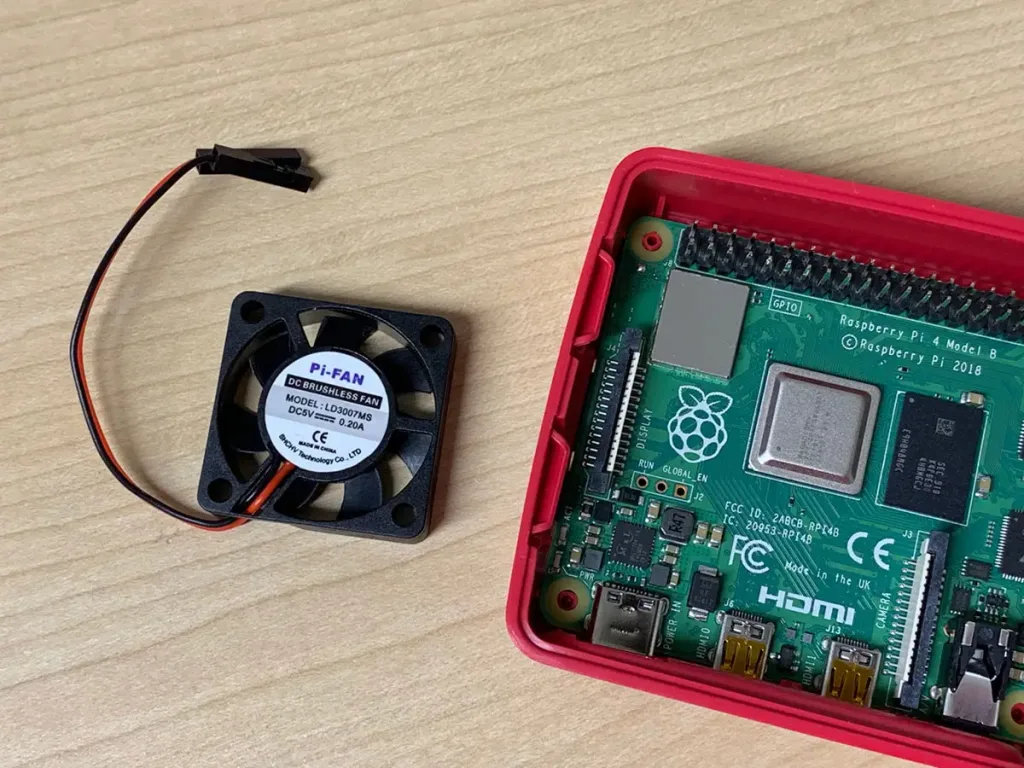
Place the fan inside of the Pi case with the “Pi-FAN” sticker facing up. Line up the fan and screw it into place.

5 – Connect the fan to the Pi

Connect the fan’s red wire to GPIO pin 4 (5V) and the black wire to GPIO pin 6 (ground). The fan should receive power automatically when the Pi is booted.

If you’d like your fan to only run when needed (based on Pi temperature), check out our Raspberry Pi fan controller guide.

control raspberry pi-fan and temperature with python

Automatically Control Your Raspberry Pi Fan (and Temperature) with Python
It’s getting hot in here (so hot), so let’s just write some code.

6 – Run a stress test (optional)

After installing the fan, you may want to initiate a stress test to see how it’s impacting the Pi. Jeff’s observation resulted in a lower temperature that kept the Pi 4 well under its throttling point by about 20°C. You can find more details on performing a stress test in his original post. Don’t forget to check out our guide on how to measure the core temperature of your Raspberry Pi.

Measure the Core Temperature of Your Raspberry Pi
Hot pie is delicious, but a hot Pi is not.

7 – Watch Jeff install a fan to the Pi 4

In this video, Jeff breaks down everything you need to add a fan to the Pi 4. Don’t forget to check out the full post on Jeff Geerling’s website!

NEXT UP

How to Run a Minecraft Server on the Raspberry Pi

A whole world trapped inside your Pi.
howchoo   (467)
December 7, 2023

There are several ways to go about running a Minecraft server on the Raspberry Pi. In this guide, I’ll cover how to install Nukkit—a cross-platform Minecraft server that’s super easy to set up on the Raspberry Pi. This server should work with PCs, consoles, and tablets running Minecraft 1.14. I’ll be using a Raspberry Pi

Continue Reading

howchoo

 467 guides

Introducing Howchoo, an enigmatic author whose unique pen name reflects their boundless curiosity and limitless creativity. Mysterious and multifaceted, Howchoo has emerged as a captivating storyteller, leaving readers mesmerized by the uncharted realms they craft with their words. With an insatiable appetite for knowledge and a love for exploration, Howchoo’s writing transcends conventional genres, blurring the lines between fantasy, science fiction, and the surreal. Their narratives are a kaleidoscope of ideas, weaving together intricate plots, unforgettable characters, and thought-provoking themes that challenge the boundaries of imagination.

Home Interests Supernote

How to Connect the Supernote A6X and A5X with Kindle

Connecting your Ratta Supernote to Amazon’s Kindle is a breeze.
howchoo   (467)
August 17, 2023
6 minutes

Share

Interests
Posted in these interests:
 
amazon • 5 guides
supernote • 5 guides
technology • 20 guides

While Supernote’s own built-in E-reader application is actually pretty good there are a whole host of reasons why someone would want to install the Kindle app. For one thing, Supernote really is one of the best small e-readers around, and the ability to gain access to your full Kindle library of books with a button press makes it the obvious replacement to the Kindle itself.

Personally, I use Kindle to access my library books, since I prefer to use libraries than purchase books from Amazon. The link in the Kindle app between Overdrive and Libby (which most libraries use for their ebook borrows) is swift and easy to navigate, so until the team at Ratta allow sideloading of Overdrive and Libby (something they’ve promised us as a future update!), the easiest way to read your library books on Supernote is through Kindle.

1 – Navigate to Supernote settings

Open Supernote settings

You’ll first need to head to your Supernote settings. This page can be accessed either by swiping down from the top of your Supernote screen or else by swiping down on the physical control bar and then selecting the word “Supernote” at the top.

  • Once you are in the Supernote’s settings, click on “Apps.”
In Supernote’s settings, click on Apps
  • In the Apps view you’ll be able to see a number of options, including the Supernote App Store. Tap on the Supernote App Store.
Click on Supernote App Store
  • You’ll see “Kindle” as an option, so just tap “Download!”
Download Kindle from the Supernote App Store
  • Supernote provides you with a percentage meter for the download and will then begin installing Kindle.
  • Once Kindle is installed, just click “Open” and you’ll be brought to your Kindle introduction page! Now you just need to sign in to your Amazon account.

2 – Sign in to Amazon Kindle on your Supernote

Signing in to Amazon Kindle on your Supernote

Now that Kindle is downloaded and installed on your Supernote, you just need to complete the process of signing in. Make sure you have another device nearby because Amazon will need to send you a security confirmation for your log-in.

  • Tap “More” from the bottom menu.
Click on More in the Kindle App
  • Tap “Sign in with Amazon” which is the topmost item on the following menu.
  • This will bring up the Amazon sign-in menu. Just enter your Amazon login information to continue.
Sign in with Amazon on Kindle to sync your Kindle and Supernote
  • Amazon will send you a confirmation sign-in approval. Use your other device to confirm.
  • And voila! That’s it. You’re now signed into Amazon Kindle from your Supernote.

Happy reading!

NEXT UP

How to See If I’m Eligible for Amazon Prime Free Same-Day Delivery

howchoo
howchoo   (467)
November 24, 2023

So Amazon just announced free same-day delivery in 14 different metro areas. How do you know if you apply? 1 – Check your zip code Go to this page. Wait for the page to finish loading completely, scroll down, and enter your zip code. This will tell you if you live in an area that is

Continue Reading

howchoo

 467 guides

Introducing Howchoo, an enigmatic author whose unique pen name reflects their boundless curiosity and limitless creativity. Mysterious and multifaceted, Howchoo has emerged as a captivating storyteller, leaving readers mesmerized by the uncharted realms they craft with their words. With an insatiable appetite for knowledge and a love for exploration, Howchoo’s writing transcends conventional genres, blurring the lines between fantasy, science fiction, and the surreal. Their narratives are a kaleidoscope of ideas, weaving together intricate plots, unforgettable characters, and thought-provoking themes that challenge the boundaries of imagination.

Home Interests Tumblr

How to Turn Off “Safe Mode” on Tumblr: An In-depth Look

Misinformation on Tumblr’s “Safe Mode” abounds, but there is a way through.
howchoo (467)
August 17, 2023
18 minutes

Share

Interests
Posted in these interests:
internet • 36 guides
socialmedia • 2 guides
tumblr • 1 guides
There is a lot of conflicting information on Tumblr’s “Safe Mode” (the content filter which hides explicit content from Tumblr search) as well as extensive user interest in the possibility of navigating around, or turning off, said mode. Unfortunately for those hoping for a latter option, there is none, but for those willing to take a few extra steps it is possible to still view “explicit” content hosted on Tumblr. This article provides an overview of the history of Tumblr and the evolution of its Safe Mode feature, and a comprehensive guide for accessing restricted content. Want to jump straight to the guide? Click the links below, or read on for an overview of what Tumblr’s “Safe Mode” really is.
  • Tumblr “Safe Mode” for PC, Mac, and Linux users
  • Tumblr “Safe Mode” for Android users
  • Tumblr “Safe Mode” for iOS users
  • Bonus: Tumbex for truly free browsing

A brief history of Tumblr’s content filter

Tumblr is a microblogging platform started in 2007 and now owned by Automattic (the company responsible for WordPress.com). Everybody has their own favorite social media platforms, but Tumblr users are an even more devoted group than normal, with the site now hosting almost 500 million blogs and over 21 million posts occurring every day. Despite its popularity however, Tumblr has had a rocky history, especially with its handling of adult content. In 2013 the analysis company TechCrunch showed that a whopping 22% of all Tumblr content was pornographic in nature, but this makes sense given the variety of communities that felt safe to flourish there and the broad definition of “pornographic” applied to the site’s content. More serious content, including a child pornography scandal in 2018 that got the iOS app removed from Apple’s App Store, would eventually prove to be the final nail in the coffin of Tumblr’s relationship with adult content. When Yahoo bought Tumblr in 2013, it began restricting adult content across the platform, and in 2018 a ban on adult content went into full effect. The initial ban was plagued by glitches created from the automatic process Tumblr put in place to find and delete blogs which broke its content restrictions. Blogs which posted artwork and health resources, as well as blogs which seemingly had no adult content whatsoever, were removed in droves alongside those that featured explicit content. Quickly backpedaling, Tumblr released a statement saying that various forms of nudity would still be allowed and that only explicit sexual imagery was being removed. Examples of exceptions that are permitted are exposed female-presenting nipples in connection with breastfeeding, birth or after-birth moments, and health-related situations, such as post-mastectomy or gender confirmation surgery. Written content such as erotica, nudity related to political or newsworthy speech, and nudity found in art, such as sculptures and illustrations, are also stuff that can be freely posted on Tumblr. Tumblr Zen Desk.

How to view Tumblr’s explicit content

Restrictions on adult content have remained in place after Automattic’s acquisition and this has led many who seek such content to abandon Tumblr altogether. However, for those willing to go through a few extra steps, it is still possible to view explicit blogs that remain on the social media platform. Be aware that this does not mean that explicit, adult, material is allowed on Tumblr — Tumblr merely decided to place a filter over all blogs which were self-identified as “Explicit” during their old pre-2018 rules. So, this option is only usable should you happen across links to posts by one of these old explicit blogs. Blogs that have been either self-flagged or flagged by us as “explicit” per our old policy and before December 17, 2018 will still be overlaid with a content filter when viewing these blogs directly. While some of the content on these blogs may now be in violation of our policies and will be actioned accordingly, the blog owners may choose to post content that is within our policies in the future, so we’d like to provide that option. Users under 18 will still not be allowed to click through to see the content of these blogs. The avatars and headers for these blogs will also be reverted to the default settings. Additionally, posts from these blogs are kept out of search results. Tumblr Zen Desk.

Turn off “Safe Mode” with PC, Mac, or Linux

1. Navigate to https://www.tumblr.com in your browser. Firefox, Safari, Chrome, and Edge all work for this method. 2. Log in using the button in the middle of the screen After entering your email, click “Next.” You can log in using your password, if you have it available. Or you can use Tumblr’s “Send me a magic link” option and Tumblr will send you a log-in link to the email address of your account. 3. Browse for content From your Dashboard (the landing area of your Tumblr where your feed is located) you can begin browsing, search for specific tags, or navigate to saved blogs. Remember, Tumblr by default hides content from search that it believes violates its content rules. Therefore, encountering such content will be a matter of stumbling across it (either reblogged from an explicit blog or as the original post). 4. Upon encountering an “explicit” blog A warning pops up when you encounter a link, or a blog considered by Tumblr to be “unsafe.” This message will appear in an overlay with the blog in question on the right side of your screen.
5. Click “View this Tumblr.” The blog will load in the sidebar overlay and you can peruse it at your leisure. Keep in mind that there is no way to save this choice — every time you wish to navigate to an unsafe blog you will need to repeat these steps. 6. Note: blogs only load in the side bar overlay If you click on the blog name and attempt to navigate to the blog directly, you’ll be referred to a page that redirects you to your dashboard (with the blog once more appearing in a sidebar overlay, thus making it easier to simply click “view this Tumblr” in the first place.

Tumblr “Safe Mode” for Android users

Android users will encounter almost the identical Tumblr content filter experience to those on a computer, only the “non-safe” blog will be shown in the full screen of the Android device rather than a side bar. If you do not already have the Tumblr app from Google Play, download it now. Otherwise, skip on. 1. Launch the Tumblr Android app and log in From your dashboard, begin browsing. Remember that specific “explicit” posts are hidden from Tumblr search but may show up as reblogs on otherwise “safe” blogs. From such posts you’ll be able to click on the link to the blog that originally posted the explicit item. 2. View filtered content in the Android app An identical message to the one experienced by computer users will appear once an explicit blog has been clicked on. Simply click the “View this Tumblr” button to browse. This will need to be repeated every time you want to view that blog.

Tumblr “Safe Mode” for iOS users

IOS users will find a process nearly identical to Android users. If you do not already have the Tumblr app from the Apple App Store, download it now. Otherwise, skip on. 1. Launch the Tumblr iOS app and log in From your dashboard, begin browsing. Remember that specific “explicit” posts are hidden from Tumblr search but may show up as reblogs on otherwise “safe” blogs. From such posts you’ll be able to click on the link to the blog that originally posted the explicit item. 2. View explicit content in the iOS app An identical message to the one experienced by android users will appear once an explicit blog has been clicked on. Simply click the “View this Tumblr” button to browse. This will need to be repeated every time you want to view that blog.

Bonus: Tumbex (the only way to fully bypass Tumblr’s content filter)

If you want to view Tumblr blogs that are marked as explicit and not deal with the repetition of encountering the “Sensitive media” warning, you can use an independent website named Tumbex. Tumbex allows you to browse Tumblr at your leisure, even if you don’t have a Tumblr account. Simply navigate to Tumbex and enter the URL of the blog or post that you would like to view and Tumbex will provide it free of warnings.
NEXT UP

How to Change Your Frontier WiFi Password

howchoo
howchoo (467)
November 25, 2023
There are a few reasons you might want to update or reset your WiFi password: making your network more secure, and making your password easier to remember and type. Improved network security You can add an extra layer of security to your network by changing the WiFi password. As long as your new password is
Continue Reading

howchoo

 467 guides
Introducing Howchoo, an enigmatic author whose unique pen name reflects their boundless curiosity and limitless creativity. Mysterious and multifaceted, Howchoo has emerged as a captivating storyteller, leaving readers mesmerized by the uncharted realms they craft with their words. With an insatiable appetite for knowledge and a love for exploration, Howchoo’s writing transcends conventional genres, blurring the lines between fantasy, science fiction, and the surreal. Their narratives are a kaleidoscope of ideas, weaving together intricate plots, unforgettable characters, and thought-provoking themes that challenge the boundaries of imagination.
Home Interests Robot Vacuum

How to Replace the Main Suction Fan on the Roborock S5 (S552-00)

Make your Roborock S5 suck more.
howchoo   (467)
August 17, 2023
6 minutes

Share

You’ll Need 2

What you’ll need
Interests
Howchoo is reader-supported. As an Amazon Associate, we may earn a small affiliate commission at no cost to you when you buy through our links.
Posted in these interests:
robotoverlords • 1 guides
robotvacuum • 4 guides

If your Roborock S5 (XIAOMI S552-00) sucks at sucking and you’re experiencing the “Fan speed lowered due to blocked strainer. Clean strainer to continue.” error, then your main suction fan assembly (or “engine ventilator”) needs to be replaced. This guide will show you how to do that.

1 – Remove the bottom cover

Remove the 7 screws from the bottom panel using a Philips-head screwdriver. Then, remove the main brush/roller and set it aside.

2 – Remove the side brush

Remove the single screw securing the spinning side brush in place.

3 – Remove the battery

Remove the battery and its 4-pin connector and set it aside.

4 – Remove the main bottom assembly

Remove the 12 recessed screws from the bottom of the assembly.

5 – Remove the bottom brush assembly

Remove the 4 screws from the bottom brush assembly.

6 – Remove the additional bottom screws

Sorry, this photo is missing the arrow for the 4th screw.

Remove the 4 bottom screws.

7 – Remove the wheel assemblies

Remove the 3 screws from each wheel assembly and set the wheels aside.

8 – Remove the spinning brush assembly

Remove the 3 screws securing the spinning brush assembly. Then, remove the single screw hiding beneath the brush assembly like a coward.

9 – Remove the hidden sticker screw

Remove the last remaining screw that’s hiding beneath a white sticker beneath the battery component.

🛈 It’s hiding beneath the sticker like a coward.

10 – Remove the front bumper

Remove the small 8 screws from the bumper assembly. Then, remove the two plastic bumper pieces and set them aside.

11 – Remove the bottom caster wheel

Remove the bottom caster wheel by pulling it upwards with your fingers.

12 – Remove the top front button panel

Using your hands, carefully pry the top front button panel off.

13 – Remove the top door

Remove the 6 hinge screws and then lift the top door off.

14 – Remove the LIDAR cover

Remove the 3 rubber screw covers and then remove the screws contained beneath. Then, remove the 2 screws from the top of the LIDAR cover.

Then, set the LIDAR cover aside.

15 – Remove the LIDAR assembly

Remove the 4 LIDAR assembly screws and lift the assembly out.

16 – Lift off the top panel

Now that all the screws are removed, the top panel should slide off effortlessly. If it doesn’t, you’ve missed a screw.

17 – Replace the fan assembly

Remove the connector and 2 screws securing the fan assembly. If the new assembly has no metal screen, carefully pry off and transfer the metal screen from the old one to the new one.

Then, install the new assembly in its place.

🛈 If your new fan has two long plastic tabs on it and your old does not, carefully snap them off using a pair of pliers.

18 – Put everything back together

As usual, reassembly is the reverse of disassembly!

NEXT UP

How to Replace the Edge-Sweeping Brush on Your Roomba i7

howchoo   (467)
November 20, 2023

Your Edge-Sweeping Brush needs to be replaced about once a year. Use this guide to learn how to replace the Edge-Sweeping Brush on your Roomba i7. What is the Edge-Sweeping Brush? The Edge-Sweeping Brush is the spinning brush on the right side of the robot. The Roomba uses this brush to clean around the edges

Continue Reading

howchoo

 467 guides

Introducing Howchoo, an enigmatic author whose unique pen name reflects their boundless curiosity and limitless creativity. Mysterious and multifaceted, Howchoo has emerged as a captivating storyteller, leaving readers mesmerized by the uncharted realms they craft with their words. With an insatiable appetite for knowledge and a love for exploration, Howchoo’s writing transcends conventional genres, blurring the lines between fantasy, science fiction, and the surreal. Their narratives are a kaleidoscope of ideas, weaving together intricate plots, unforgettable characters, and thought-provoking themes that challenge the boundaries of imagination.

Home Interests Minecraft

Three Ways To Transport Villagers in Minecraft

Because villagers are the worst!
howchoo   (467)
August 17, 2023
10 minutes

Share

Interests
Posted in these interests:
READY PLAYER 1
gaming • 85 guides
Minecraft is an epic sandbox video game developed by Swedish game developer Mojang Studios.
minecraft • 66 guides

In Minecraft, the fastest way to get emeralds is through villager trading. Depending on their profession, villagers will trade emeralds for various items (or vise versa). They spawn in villages or igloo basements and can sell items that players wouldn’t normally be able to find on their own.

One would think that the hardest mob to transport would be a bee or polar bear, but it’s actually the villagers that are the most excruciating mob to move around. While you could rely on traveling to and from a village for trading, most likely, you’re not building your base right next to a village.

Depending on the distance, there are various methods to get your villager to their destination. This guide will explain three different ways to transport villagers to your base so you can trade (or convert) them to prosper!

Short Distance: Job Blocks

This is, no doubt, the simplest way to transport villagers based on how few blocks it requires. Recommended for shorter distances, locate a village with an unemployed villager, or one that doesn’t have a profession and isn’t a nitwit. With this method, it’s recommended that you only try to lure one villager at a time.

Supplies Required:

  • Job Block: lectern, composter, smoker, barrel, brewing stand, blast furnace, cartography table, fletching table, cauldron, stonecutter, loom, smithing table, or grindstone

Once your target is within sight, place down the job block, and they will seek out a profession and be lured towards you. Keep in mind, they will seek employment by searching a 48 block horizontal radius.

If the villager doesn’t go for the job block, then either another one is on its way to claim it or they can’t find a path to it. You can continuously place and break the job block until your village is home, safe at your base!

Medium Distance: Boat

For those who live not far from a village, but also not beside it, a boat is the next best thing for transporting a villager. Boats are easy to craft and best for medium distance traveling. Whether its an unemployed villager or one that does have a profession, locate your target and begin prepping the area.

Supplies Required:

  • Boats: As many as your inventory can fit.
  • Blocks for a barrier: Dirt, planks, or cobblestone are the easiest to break and preferred.

Before trapping villagers, make sure you have a path figured out first. You can row a boat on the ground, but it isn’t a quick method. Use naturally spawned waterways when you can, or spend time creating a temporary river to where you want your villagers to live. Keep in mind that outside water, boats cannot move vertically upwardds and they require a width of two blocks.

Once the path is prepared, it’s time to try and trap a villager in a boat. The best method is to wait until a villager is inside a building, then block up the door with you inside it. Place down the boat (or as many as needed) and the villager will pop right into it! Now you can get into it yourself and row you both home safely!

Long Distance: Minecart and Rails

This method is for those who want the fastest way to transport multiple villagers across longer distances. It is a trickier method, however, and requires more supplies that aren’t easily available in early game.

Supplies Required:

  • Rails: Made with iron ingots and sticks.
  • Powered Rails: Made with gold ingots, sticks, and redstone.
  • Minecart
  • Redstone torch or block
  • Blocks for a barrier/path: Use blocks that are easiest to break down.

As with the above method, make sure to have a path prepared beforehand. Villagers require at least a two-block height, so make sure they won’t hit their heads going through tunnels. The best way to complete this method without risking the villager’s life is to have the entire rail placed before beginning transport. Depending on the distance, however, you might not have enough resources to make that happen. So ensure to light up the path, bring a bed, and have some sort of barrier between where the villager stops and any hostile mobs nearby.

Also place a powered rail every 38 blocks for maintained speed or as needed to go up inclines.

Getting villagers into a minecart is more difficult than a boat because they can only be placed down on rails. Rather than try and corral villagers out in the open, copy the method above by blocking them inside a structure. Once they’re in a minecart, you can connect the rails together and send them on their way!

NEXT UP

Top 10 Enchantments in Minecraft

howchoo   (467)
March 25, 2024

The longer you play Minecraft, the more you realize that early-game tools just won’t cut it. Exploring the enchantment feature of Minecraft can be exciting, but also intimidating. Rather than worry about researching enchantments, below are the best enchantments in Minecraft! To learn how to enchant items, check out this guide! In this guide, you’ll see

Continue Reading

howchoo

 467 guides

Introducing Howchoo, an enigmatic author whose unique pen name reflects their boundless curiosity and limitless creativity. Mysterious and multifaceted, Howchoo has emerged as a captivating storyteller, leaving readers mesmerized by the uncharted realms they craft with their words. With an insatiable appetite for knowledge and a love for exploration, Howchoo’s writing transcends conventional genres, blurring the lines between fantasy, science fiction, and the surreal. Their narratives are a kaleidoscope of ideas, weaving together intricate plots, unforgettable characters, and thought-provoking themes that challenge the boundaries of imagination.

Home Interests Raspberry Pi

How to Make a Shell Script Executable on the Raspberry Pi

howchoo
howchoo   (467)
August 17, 2023
3 minutes

Share

Interests
Posted in these interests:
linux • 12 guides
pi • 92 guides

If you’ve ever tried running a shell script, only to get a command not found error, it probably means your shell script isn’t executable:

sudo ./install.sh

This very short guide will show you how to make a shell (.sh) script executable on your Raspberry Pi. This assumes your Pi is running Raspberry Pi OS or some other Linux/Unix-based operating system.

1 – Navigate to the file

Navigate to the path of the directory where the file is:

cd ~/some/directory

You can confirm that the file is not executable by running ls -la, and observing there’s no x (for executable):

-rw-r--r--  1 pi pi   684 Dec 16 17:28 install.sh

2 – Make the script executable

To make the script executable, use the chmod command:

sudo chmod +x install.sh

If you run ls -la, you’ll see the file is now executable:

-rwxr-xr-x  1 pi pi   684 Dec 16 17:28 install.sh

You’ll now be able to execute the script successfully:

sudo ./install.sh

It’s worth mentioning that the file doesn’t have to be executable to run it. You can also use sudo sh install.sh, but making it executable is handy in order to execute the script directly.

NEXT UP

How to Run a Minecraft Server on the Raspberry Pi

A whole world trapped inside your Pi.
howchoo   (467)
December 7, 2023

There are several ways to go about running a Minecraft server on the Raspberry Pi. In this guide, I’ll cover how to install Nukkit—a cross-platform Minecraft server that’s super easy to set up on the Raspberry Pi. This server should work with PCs, consoles, and tablets running Minecraft 1.14. I’ll be using a Raspberry Pi

Continue Reading

howchoo

 467 guides

Introducing Howchoo, an enigmatic author whose unique pen name reflects their boundless curiosity and limitless creativity. Mysterious and multifaceted, Howchoo has emerged as a captivating storyteller, leaving readers mesmerized by the uncharted realms they craft with their words. With an insatiable appetite for knowledge and a love for exploration, Howchoo’s writing transcends conventional genres, blurring the lines between fantasy, science fiction, and the surreal. Their narratives are a kaleidoscope of ideas, weaving together intricate plots, unforgettable characters, and thought-provoking themes that challenge the boundaries of imagination.

Home Interests Raspberry Pi

How to Look Up Raspberry Pi Display Resolution

howchoo
howchoo   (467)
August 17, 2023
3 minutes

Share

You’ll Need 1

What you’ll need
Interests
Howchoo is reader-supported. As an Amazon Associate, we may earn a small affiliate commission at no cost to you when you buy through our links.
Posted in these interests:
pi • 92 guides

This short guide will show you how to find your Raspberry Pi’s screen or display resolution.

1 – Connect to the Pi

Open Terminal or Command Prompt and connect to your Pi via SSH to get to the command line.

How to Connect to a Raspberry Pi Remotely via SSH
The preferred (and most common) method of connecting to your Pi to run commands.

If you don’t want to log into the Pi remotely, you can alternatively connect a USB keyboard and plug your Pi into a monitor or TV.

If you’re running a system such as RetroPie, you’ll need to press F4 to exit to the command line.

2 – Run the following command

Once on the command line, run the fbset command:

fbset

You will now see your Pi’s display resolution represented in terms of pixels and the overall geometry. For example, the RetroFlag GPi resolution is 320×240 (WxH):

mode "320x240"
    geometry 320 240 320 240 32
    timings 0 0 0 0 0 0 0
    rgba 8/16,8/8,8/0,8/24
endmode
NEXT UP

How to Run a Minecraft Server on the Raspberry Pi

A whole world trapped inside your Pi.
howchoo   (467)
December 7, 2023

There are several ways to go about running a Minecraft server on the Raspberry Pi. In this guide, I’ll cover how to install Nukkit—a cross-platform Minecraft server that’s super easy to set up on the Raspberry Pi. This server should work with PCs, consoles, and tablets running Minecraft 1.14. I’ll be using a Raspberry Pi

Continue Reading

howchoo

 467 guides

Introducing Howchoo, an enigmatic author whose unique pen name reflects their boundless curiosity and limitless creativity. Mysterious and multifaceted, Howchoo has emerged as a captivating storyteller, leaving readers mesmerized by the uncharted realms they craft with their words. With an insatiable appetite for knowledge and a love for exploration, Howchoo’s writing transcends conventional genres, blurring the lines between fantasy, science fiction, and the surreal. Their narratives are a kaleidoscope of ideas, weaving together intricate plots, unforgettable characters, and thought-provoking themes that challenge the boundaries of imagination.

Home Interests Vim

How to Change Your Leader Key in Vim

howchoo
howchoo   (467)
August 17, 2023
4 minutes

Share

Interests
Posted in these interests:

Vim

vim • 5 guides

One of the strengths of Vim is that it’s highly customizable. And while remapping keys is possible, we often want to create shortcuts without changing the default key bindings. The leader key allows us to do this elegantly.

The leader key, which is basically a command prefix, allows us to create shortcuts to some of our most commonly used commands. Sadly, though, the default leader key is . So if you’re concerned with efficiency,  might cost you a few seconds a day, in contrast with something a little closer to home row.

1 – Use the mapleader variable in your .vimrc file

First, open your .vimrc file. This is typically found in your home directory:

vim ~/.vimrc

Now use the following to set the leader key.

let mapleader = ","

In the above example, I mapped the leader to ,. This is much easier to access than , but you can map the leader to whatever key you’d like!

For this change to take effect, you’ll have to re-launch Vim.

2 – An example shortcut using the leader key

Even though it isn’t the main purpose of this guide, I figured it would be useful to provide an example shortcut using the leader key.

One of the commands I use frequently is :buffdo e!. Sometimes the files in my current project have been changed by another program (like changing branches in git). This command force reloads the files in each of my buffers.

As you can imagine, typing this is a pain. Typing ,e is much easier. Add the following to your .vimrc file to create shortcuts like this one:

map e :bufdo e!

So whenever ,e is typed, it will be as if I typed :buffdo e! ( means return).

NEXT UP

How to Change or Switch the Case of Characters in Vim

howchoo
howchoo   (467)
September 18, 2023

Need to change the case of characters to all caps or all lowercase? This is easily done using Vim. This guide will show you how to change the case of characters in Vim. tl;dr Toggle “Hello” to “hELLO” with g~. Uppercase “Hello” to “HELLO” with gU. Lowercase “Hello” to “hello” with gu. 1 – Select the text you’re

Continue Reading

howchoo

 467 guides

Introducing Howchoo, an enigmatic author whose unique pen name reflects their boundless curiosity and limitless creativity. Mysterious and multifaceted, Howchoo has emerged as a captivating storyteller, leaving readers mesmerized by the uncharted realms they craft with their words. With an insatiable appetite for knowledge and a love for exploration, Howchoo’s writing transcends conventional genres, blurring the lines between fantasy, science fiction, and the surreal. Their narratives are a kaleidoscope of ideas, weaving together intricate plots, unforgettable characters, and thought-provoking themes that challenge the boundaries of imagination.