Home Interests Apple

How to Skip Songs on the AirPods Pro (And Skip Back)

Press twice to skip ahead; three times to skip back.
howchoo   (467)
September 14, 2023
2 minutes

Share

You’ll Need 1

What you’ll need
Interests
Series
Howchoo is reader-supported. As an Amazon Associate, we may earn a small affiliate commission at no cost to you when you buy through our links.
Posted in these interests:
 
apple • 18 guides
headphones • 3 guides

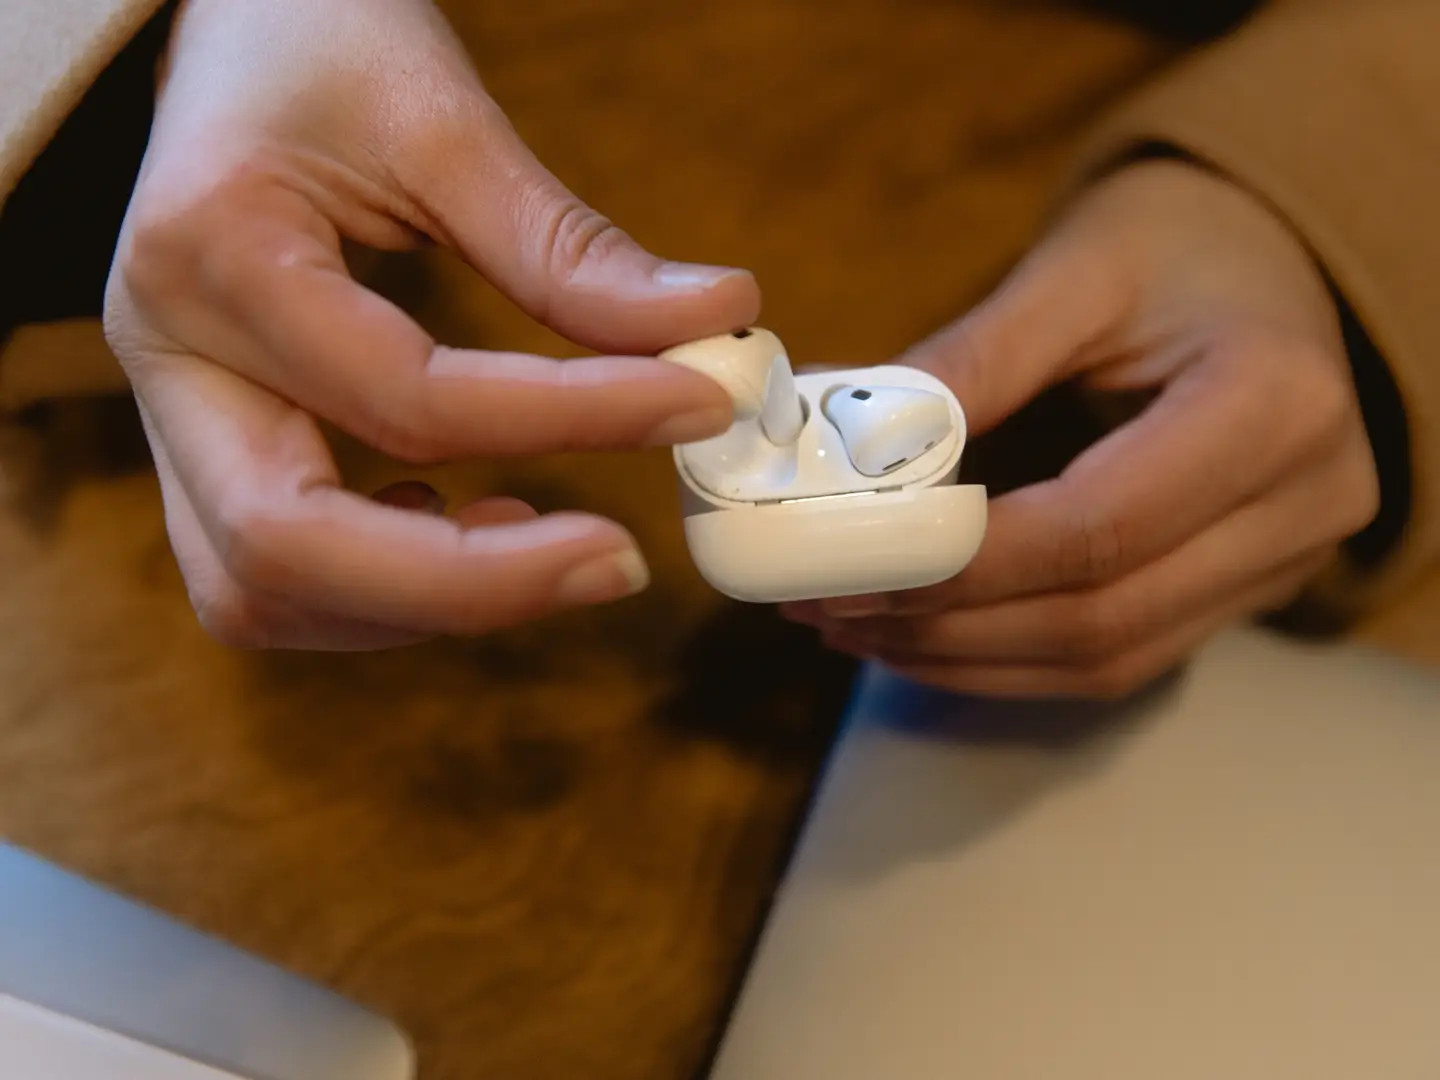
In this guide, we’ll show you how to skip songs/tracks while listening to music or audio on your Apple AirPods Pro. As an added bonus, we’ll also show you how to skip back with the force sensor.

Bonus: we’ll even show you how to do it on the original Apple AirPods too.

1 – Press the “force sensor” twice to skip ahead

While listening to your music or any audio with the AirPods Pro, press the force sensor twice to skip ahead to the next track.

On the original AirPods, you double-tap the AirPods to control Siri and tell her to skip ahead.

2 – Press the “force sensor” three times to skip back

While listening to music or audio, press three times on the force sensor of your AirPods Pro to skip back one track.

On the original AirPods, you double-tap the AirPods to control Siri and tell her to go back one track.

NEXT UP

How to Enable the “Popping” Sound When Adjusting the Volume on Your Mac

howchoo
howchoo   (467)
December 13, 2023

Starting with MacOS Sierra and High Sierra, your Mac will no longer play a “pop” sound when you adjust your volume. If you prefer to have this sound when you adjust volume up and down (as I do), this guide will teach you how to reenable it. 1 – Open Sound System Preferences Navigate to System

Continue Reading

howchoo

 467 guides

Introducing Howchoo, an enigmatic author whose unique pen name reflects their boundless curiosity and limitless creativity. Mysterious and multifaceted, Howchoo has emerged as a captivating storyteller, leaving readers mesmerized by the uncharted realms they craft with their words. With an insatiable appetite for knowledge and a love for exploration, Howchoo’s writing transcends conventional genres, blurring the lines between fantasy, science fiction, and the surreal. Their narratives are a kaleidoscope of ideas, weaving together intricate plots, unforgettable characters, and thought-provoking themes that challenge the boundaries of imagination.

Home Interests Raspberry Pi

How to Use Raspberry Pi Imager

New official Raspberry Pi imaging software.
howchoo   (467)
September 14, 2023
8 minutes

Share

Interests
Posted in these interests:
pi • 92 guides

The Raspberry Pi Foundation recently released a new imaging application for writing SD cards for the Raspberry Pi. The new program, known as Raspberry Pi Imager, debuted on March 5th, 2020.

How it works

Raspberry Pi Imager makes the imaging process much easier. It centralizes all of the most common imaging tools and software you need into one package. You don’t even need NOOBs to install Raspberry Pi OS (formerly Raspbian). Raspberry Pi Imager includes Raspbian as well as a few other operating systems. If something isn’t listed, you can use the custom image tool to add your own images.

Raspberry Pi NOOBS: How to Set Up, Configure, and Use NOOBS
Getting started with the Raspberry Pi OS installation program.

1 – How to install Raspberry Pi Imager

Raspberry Pi Imager is free to install from the official Raspberry Pi website. It’s available for MacOS, Windows, and Ubuntu systems.

  1. Visit the Raspberry Pi download page.
  2. Download the Raspberry Pi Imager installer for your Operating System.
  3. Run the installer and follow the prompts to complete the setup.

2 – Write a Raspberry Pi Imager built-in image

You can use Raspberry Pi Imager to write images to SD cards for the Raspberry Pi. Raspberry Pi Imager comes with a few operating systems to choose from, so you don’t have to download anything separately. If you want to install a custom image, you can follow the instructions on the next step.

  1. Launch Raspberry Pi Imager.
  2. Click Choose OS. The feature somewhat replaces NOOBS, providing a couple of basic operating systems like Raspberry Pi OS.
  3. Select an OS from the list.
  4. Click Choose SD card.
  5. Select from the list the SD card you want to write to.
  6. Click Write to begin the image writing process.

3 – Write a custom image

Custom Raspberry Pi image files (like .zip.img.tar.gz, etc) can be written using Raspberry Pi imager. You must download the image file from a third-party source. For example, to install RetroPie you need the image file from the download page on the RetroPie website.

  1. Launch Raspberry Pi Imager.
  2. Click Choose OS.
  3. Select Use custom to write an unlisted image.
  4. Click Choose SD card.
  5. Select from the list the SD card you want to write to.
  6. Click Write to begin the image writing process.

4 – Included operating systems

Raspberry Pi Imager comes with a small selection of operating systems. It doesn’t replace NOOBS, but it does provide a couple of operating systems to choose from. You can even install LibreELEC, an open-source Linux distro for Kodi.

Included Operating Systems
Raspberry Pi OS
LibreELEC
Ubuntu

5 – Additional tools

In addition to operating systems, there are a few tools available in Raspberry Pi Imager under the Choose OS option. These tools include:

  • EEPROM Recovery – This is only for the Raspberry Pi 4
  • Erase tool – This is used to format SD cards to Fat32.

6 – Raspberry Pi Imager alternatives

If for whatever reason you don’t want to or are unable to use Raspberry Pi Imager, you can opt to use an alternative application. Here are a couple we’ve relied on over the years leading up to the new imager release.

  • balenaEtcher – The application runs on Windows, MacOS, and Ubuntu operating systems.
  • Win32 Disk Imager – This imaging software is designed for Windows machines.

You may also be interested in our guide on how to install Raspberry Pi OS.

How to Install Raspberry Pi OS on Your Raspberry Pi
Get the new official Raspberry Pi OS on your Pi.

NEXT UP

How to Run a Minecraft Server on the Raspberry Pi

A whole world trapped inside your Pi.
howchoo   (467)
December 7, 2023

There are several ways to go about running a Minecraft server on the Raspberry Pi. In this guide, I’ll cover how to install Nukkit—a cross-platform Minecraft server that’s super easy to set up on the Raspberry Pi. This server should work with PCs, consoles, and tablets running Minecraft 1.14. I’ll be using a Raspberry Pi

Continue Reading

howchoo

 467 guides

Introducing Howchoo, an enigmatic author whose unique pen name reflects their boundless curiosity and limitless creativity. Mysterious and multifaceted, Howchoo has emerged as a captivating storyteller, leaving readers mesmerized by the uncharted realms they craft with their words. With an insatiable appetite for knowledge and a love for exploration, Howchoo’s writing transcends conventional genres, blurring the lines between fantasy, science fiction, and the surreal. Their narratives are a kaleidoscope of ideas, weaving together intricate plots, unforgettable characters, and thought-provoking themes that challenge the boundaries of imagination.

Home Interests Raspberry Pi

How to Automatically Boot into the Raspberry Pi Desktop (GUI)

howchoo
howchoo   (467)
September 14, 2023
2 minutes

Share

You’ll Need 1

What you’ll need
Interests
Howchoo is reader-supported. As an Amazon Associate, we may earn a small affiliate commission at no cost to you when you buy through our links.
Posted in these interests:
pi • 92 guides

Is your Raspberry Pi booting into the command line (CLI) by default? This short guide will show you how to boot into Raspberry Pi OS Desktop automatically instead!

1 – Connect to your Pi

Log into your Pi via SSH or connect a monitor and keyboard to get to the command line.

How to Connect to a Raspberry Pi Remotely via SSH
The preferred (and most common) method of connecting to your Pi to run commands.

2 – Configure to boot into Raspberry Pi OS Desktop (with raspi-config)

Type the following command:

sudo raspi-config

Then, use your arrow keys to navigate to Enable Boot to Desktop and press enter. Select the Desktop login option and press enter.

Reboot and you’re good to go!

3 – Configure to boot into Raspberry Pi OS Desktop (without raspi-config)

Alternatively, you can make the same change without using the raspi-config GUI by running the following command:

sudo update-rc.d lightdm disable
NEXT UP

How to Run a Minecraft Server on the Raspberry Pi

A whole world trapped inside your Pi.
howchoo   (467)
December 7, 2023

There are several ways to go about running a Minecraft server on the Raspberry Pi. In this guide, I’ll cover how to install Nukkit—a cross-platform Minecraft server that’s super easy to set up on the Raspberry Pi. This server should work with PCs, consoles, and tablets running Minecraft 1.14. I’ll be using a Raspberry Pi

Continue Reading

howchoo

 467 guides

Introducing Howchoo, an enigmatic author whose unique pen name reflects their boundless curiosity and limitless creativity. Mysterious and multifaceted, Howchoo has emerged as a captivating storyteller, leaving readers mesmerized by the uncharted realms they craft with their words. With an insatiable appetite for knowledge and a love for exploration, Howchoo’s writing transcends conventional genres, blurring the lines between fantasy, science fiction, and the surreal. Their narratives are a kaleidoscope of ideas, weaving together intricate plots, unforgettable characters, and thought-provoking themes that challenge the boundaries of imagination.

Home Interests Virtual Reality

How To Move the UI on the Oculus Quest 2

howchoo (467)
September 13, 2023
4 minutes

Share

You’ll Need 1
What you’ll need
Interests
Howchoo is reader-supported. As an Amazon Associate, we may earn a small affiliate commission at no cost to you when you buy through our links.
Posted in these interests:
READY PLAYER 1
gaming • 85 guides
oculusquest2 • 4 guides
vr • 4 guides
The graphics of the Oculus Quest 2 are impressive, there’s no doubt. What makes VR so enticing to users is how unique their experience is compared to others! The Quest 2 enables users to choose not only their background scene, but also where the UI is positioned.
 
This guide will show you how to move both the bottom menu toolbar and the window that appears above it.

1 – Moving the menu toolbar

Keep in mind that moving the bottom UI will move the entire screen interface. A main reason to move the UI is so that it’s easier to see and at a proper viewing height. We already look down at our phones too much, it doesn’t need to be the same for a VR experience. To move the UI, use the trigger button located at the back of the controller and grab the bar underneath the toolbar. Hold and drag the UI to wherever you want!

2 – Moving the top screen

You can move the top screen vertically to position it better for viewing, separate from the menu toolbar. To do this, hold and drag the bar underneath the window with the trigger button on the touch controller. The screen will adjust its view automatically if you drag it to the highest point possible. If you’d like to learn how to take photos or [videos] on the Oculus Quest 2, check out those respective guides!
NEXT UP

Top 10 Enchantments in Minecraft

howchoo (467)
March 25, 2024
The longer you play Minecraft, the more you realize that early-game tools just won’t cut it. Exploring the enchantment feature of Minecraft can be exciting, but also intimidating. Rather than worry about researching enchantments, below are the best enchantments in Minecraft! To learn how to enchant items, check out this guide! In this guide, you’ll see
Continue Reading

howchoo

 467 guides
Introducing Howchoo, an enigmatic author whose unique pen name reflects their boundless curiosity and limitless creativity. Mysterious and multifaceted, Howchoo has emerged as a captivating storyteller, leaving readers mesmerized by the uncharted realms they craft with their words. With an insatiable appetite for knowledge and a love for exploration, Howchoo’s writing transcends conventional genres, blurring the lines between fantasy, science fiction, and the surreal. Their narratives are a kaleidoscope of ideas, weaving together intricate plots, unforgettable characters, and thought-provoking themes that challenge the boundaries of imagination.
Home Interests Virtual Reality

A Brief Guide to the Menu Toolbar on Your Oculus Quest 2

howchoo (467)
September 13, 2023
7 minutes

Share

You’ll Need 1
What you’ll need
Interests
Howchoo is reader-supported. As an Amazon Associate, we may earn a small affiliate commission at no cost to you when you buy through our links.
Posted in these interests:
READY PLAYER 1
gaming • 85 guides
oculusquest2 • 4 guides
vr • 4 guides
The Oculus Quest 2 has plenty of new internal features available, but for beginners like me, even the visible features can seem overwhelming. As someone who’s never owned or played on a VR headset before, here’s a brief overview of what’s on the menu toolbar and how to access it!
Time to delve into virtual reality!

1 – Open the Oculus menu

If the menu toolbar at the bottom of the screen is already up, then you can skip this step. Press the “O” button on the right touch controller, as shown in the image above.

2 – Quick Settings

The quick settings window shows the most important information about your Oculus Quest 2 that you’ll need. Displayed here are:
  • Battery levels for the headset and controllers
  • Date and time
  • Wi-Fi connection
  • Volume and brightness settings
  • Mute/Un-mute microphone
  • Guardian settings
You can access further settings from the button at the top right of the window.

3 – Profile

To open the profile window, click the image icon as shown above. Here you can edit your profile, switch accounts, and even create an avatar!

4 – Notifications

Anytime a notification pops onto your screen, or you want to check on the status of a download, you can do so by clicking the bell icon on the menu toolbar.

5 – Explore

The explore window is a one-stop shop for Oculus updates, news, and friend’s activity. It’s a great way to get an overview of topics related to your Quest 2 experience. You can open the Explore window by clicking the blue compass icon.

6 – Shop

The Oculus shop is where you’ll spend most of your time (and money). Here is where you can search for new games or apps to add to your VR. It’s also where you can add to your wishlist, just in case you need to have a gift list ready for people. To open the shop, click the orange shopping bag icon!

7 – People

Whether you want to find your friends or people you recently played a game with, the People app is the place to go. Here, you’ll find:
  • Current friends
  • Suggested friends
  • Recently met Oculus users
  • Facebook Messenger
  • Oculus Chat
Open the People window by clicking the purple/pink icon.

8 – Sharing

This is the place where all streamers, gamers, or content creators will want to go. The Sharing window enables players to cast to other devices, take photo screenshots, and record videos! Click the pink/red arrow icon to open the sharing window.

9 – Library

The library is just as it sounds: it holds a list of all the apps and games downloaded to your Oculus Quest 2! You can sort it multiple ways to your preference, search, and filter by category. To open the library, click the gray icon on the menu toolbar.
 
NEXT UP

Top 10 Enchantments in Minecraft

howchoo (467)
March 25, 2024
The longer you play Minecraft, the more you realize that early-game tools just won’t cut it. Exploring the enchantment feature of Minecraft can be exciting, but also intimidating. Rather than worry about researching enchantments, below are the best enchantments in Minecraft! To learn how to enchant items, check out this guide! In this guide, you’ll see
Continue Reading

howchoo

 467 guides
Introducing Howchoo, an enigmatic author whose unique pen name reflects their boundless curiosity and limitless creativity. Mysterious and multifaceted, Howchoo has emerged as a captivating storyteller, leaving readers mesmerized by the uncharted realms they craft with their words. With an insatiable appetite for knowledge and a love for exploration, Howchoo’s writing transcends conventional genres, blurring the lines between fantasy, science fiction, and the surreal. Their narratives are a kaleidoscope of ideas, weaving together intricate plots, unforgettable characters, and thought-provoking themes that challenge the boundaries of imagination.
Home Interests Tennis

How to wrap overgrip tape on a tennis racket

howchoo (467)
September 13, 2023
7 minutes

Share

You’ll Need 1
What you’ll need
Interests
Howchoo is reader-supported. As an Amazon Associate, we may earn a small affiliate commission at no cost to you when you buy through our links.
Posted in these interests:
tennis • 1 guides
What is overgrip tape? Overgrip is a padded, often sticky, tape that is wrapped around the grip of the tennis racket. Tennis rackets come with a more permanent grip, but overgrip is placed over the grip and is designed to be replaced frequently. Many tennis players choose to use overgrip tape in order to get a better “grip” on the tennis racket and provide more comfort and shock absorption.

1 – Remove old overgrip tape

Removing old overgrip tape is easy. Simply remove the tape at the top of the handle that is securing the edge of the overgrip. Then unwrap until the old overgrip is completely removed.

2 – Unroll new overgrip and remove plastic

At this point you’ll want to completely unroll the new overgrip and remove the plastic. Depending on the kind of overgrip you buy, it may be secured by a piece of tape. This tape can be used later to secure the overgrip to the racket.

3 – Find the adhesive on one end of the overgrip

Some kinds of overgrip come with an adhesive strip on one end. If your overgrip doesn’t have it you can skip this step. If it does, find the end with the adhesive and remove the plastic covering it. This adhesive strip is helpful but not necessary.

4 – Begin wrapping

With the handle of your tennis racket up, place the end of the overgrip on the corner of the handle and begin to wrap from left to right. If your overgrip has adhesive, stick the adhesive strip to the corner of the racket.

5 – Make one full wrap and begin to overlap

To begin wrapping, you’ll want to spin the racket. This way the part of the handle where you are placing the overgrip is always facing you. This makes it much easier to place it evenly. Keep the overgrip very taught to avoid wrinkles. After making one full wrap you’ll begin to overlap and work your way down the handle. The overlap should be between 1/8″ and 1/4″. As you get more familiar with this process you will find what works best for you. The overgrip I’m using for this demonstration is angled at both ends. This helps set the correct angle for starting and finishing the wrap. If your overgrip does not have the angle you may want to begin with one and a quarter wraps before you start working up the handle. This will make the overgrip more secure at the base.

6 – Work your way up the handle

Continue spinning the racket and placing the overgrip maintaining a consistent overlap.

7 – Finish wrapping at the end of the handle

If you’ve maintained a consistent overlap of 1/4″ to 1/8″ you should have just the right amount of overgrip. Once you reach the end of the handle you may have to increase the size of the overlap.

8 – Place tape on the end to secure the overgrip in place

The overgrip likely came with a piece of tape that can be used to secure it in place. Place the tape at the end and wrap tightly.

howchoo

 467 guides
Introducing Howchoo, an enigmatic author whose unique pen name reflects their boundless curiosity and limitless creativity. Mysterious and multifaceted, Howchoo has emerged as a captivating storyteller, leaving readers mesmerized by the uncharted realms they craft with their words. With an insatiable appetite for knowledge and a love for exploration, Howchoo’s writing transcends conventional genres, blurring the lines between fantasy, science fiction, and the surreal. Their narratives are a kaleidoscope of ideas, weaving together intricate plots, unforgettable characters, and thought-provoking themes that challenge the boundaries of imagination.
Home Interests Code

Python time.sleep() – How to Make a Time Delay in Python

howchoo
howchoo   (467)
September 13, 2023
3 minutes

Share

You’ll Need 1

What you’ll need
Interests
python x 1
Howchoo is reader-supported. As an Amazon Associate, we may earn a small affiliate commission at no cost to you when you buy through our links.
Posted in these interests:
code • 11 guides
python • 18 guides

Learn how to use Python’s sleep function to make a timed delay.

tl;dr

import time
time.sleep(seconds)

1 – Import the time module

We will first want to import Python’s time module:

import time

This module ships with Python so it should be available on any system. Although it is not necessary for this guide, I highly recommend getting familiar with the time module. Read more about the time module here.

2 – Use time.sleep to set the delay

You can set a delay in your Python script by passing the number of seconds you want to delay to the sleep function:

time.sleep(5)

This means you want the script to delay 5 seconds before continuing. The sleep function also accepts floats if you want to give a more precise number:

time.sleep(1.75)

This will sleep for 1 second and 750 milliseconds. You can also use a float to delay for less than a second like this:

time.sleep(0.5)

This will sleep for half of a second. You can and should read more about Python’s sleep function here.

NEXT UP

Secure Your Sensitive Data with Kubernetes Secrets

Learn how to create and use Kubernetes secrets.
howchoo   (467)
November 26, 2023

Kubernetes secrets are objects that store and manage sensitive data inside your Kubernetes cluster. One mistake developers often make is storing sensitive information like database passwords, API credentials, etc in a settings file in their codebase. This is very bad practice (hopefully for obvious reasons). Most developers know this, but still choose the option because it’s easy.

Continue Reading

howchoo

 467 guides

Introducing Howchoo, an enigmatic author whose unique pen name reflects their boundless curiosity and limitless creativity. Mysterious and multifaceted, Howchoo has emerged as a captivating storyteller, leaving readers mesmerized by the uncharted realms they craft with their words. With an insatiable appetite for knowledge and a love for exploration, Howchoo’s writing transcends conventional genres, blurring the lines between fantasy, science fiction, and the surreal. Their narratives are a kaleidoscope of ideas, weaving together intricate plots, unforgettable characters, and thought-provoking themes that challenge the boundaries of imagination.

Home Interests Cisco

How to Log in to a Cisco Router

howchoo
howchoo   (467)
September 13, 2023
3 minutes

Share

You’ll Need 2

What you’ll need
Interests
Series
Howchoo is reader-supported. As an Amazon Associate, we may earn a small affiliate commission at no cost to you when you buy through our links.
Posted in these interests:
cisco • 2 guides
internet • 36 guides
router • 32 guides

There are plenty of reasons to log in to your router and many settings you can take advantage of to customize and secure your network. Fortunately, Cisco routers are as standard as they come. Continue reading to learn how to log in to your Cisco router.

1 – Make sure you’re connected to your network

This can be a wired or Wi-Fi connection.

2 – Open a browser, and go to 192.168.15.1

The router login can be accessed using almost any browser window. Navigate to the router’s IP address in the address bar.

Default Cisco router IP

http://192.168.15.1

3 – Enter the username and password

You will receive a pop-up asking for the Cisco router login information. Enter the current username and password for your router.

4 – Default login credentials

If you have a new or recently reset router, you will need the default login credentials.

username: admin
password: admin

Congratulations! Now you’re an unstoppable Network Administrator. Use your powers wisely.

5 – Next Up: Speed up your Wi-Fi connection

We’ve written a few practical tips to show you how to speed up your wifi connection.

Make Wi-Fi Faster: How to Speed Up Your Wi-Fi Connection
Speed up your Internet connection in just a few minutes.

NEXT UP

How to Change Your Frontier WiFi Password

howchoo
howchoo   (467)
November 25, 2023

There are a few reasons you might want to update or reset your WiFi password: making your network more secure, and making your password easier to remember and type. Improved network security You can add an extra layer of security to your network by changing the WiFi password. As long as your new password is

Continue Reading

howchoo

 467 guides

Introducing Howchoo, an enigmatic author whose unique pen name reflects their boundless curiosity and limitless creativity. Mysterious and multifaceted, Howchoo has emerged as a captivating storyteller, leaving readers mesmerized by the uncharted realms they craft with their words. With an insatiable appetite for knowledge and a love for exploration, Howchoo’s writing transcends conventional genres, blurring the lines between fantasy, science fiction, and the surreal. Their narratives are a kaleidoscope of ideas, weaving together intricate plots, unforgettable characters, and thought-provoking themes that challenge the boundaries of imagination.

Home Interests Raspberry Pi

How to Back Up a Raspberry Pi SD Card in Windows

Create a Pi backup using Windows.
howchoo (467)
September 13, 2023
6 minutes

Share

You’ll Need 1
What you’ll need
Interests
Howchoo is reader-supported. As an Amazon Associate, we may earn a small affiliate commission at no cost to you when you buy through our links.
Posted in these interests:
pi • 92 guides
 
windows • 6 guides
Backing up your Raspberry Pi is a crucial step for many projects. Maybe you’re about to update the OS or perhaps you’re experimenting with a cool new application. Whatever the reason, it’s never a bad idea to make a quick backup of your Raspberry Pi and its contents. In this guide, I’m going over the easiest way to back up your Raspberry Pi for Windows users. This guide will require the use of a third-party imaging program. Using a Mac? Use our MacOS Raspberry Pi backup guide instead!
How to Back Up and Restore Your Raspberry Pi SD Card on Mac Easily backup, restore, or clone your SD card!

1 – Put the SD card in your computer

Safely shut down your Raspberry Pi and put the SD card into your computer using a MicroSD card adapter.

2 – Download a Windows imaging program

Performing a Windows Raspberry Pi back up is easy. To accomplish this, you’ll need a disk imaging program. In this guide, I’ll be using Win32 Disk Imager. It’s a free tool available for a wide variety of Windows applications.

3 – Launch Win32 Disk Imager

To get started, launch Win32 Disk Imager. It can be helpful to launch the application with administrative privileges.

4 – Choose a location

The Raspberry Pi backup will be stored in a single file. You’ll need to choose a location to store your backup. Be sure to name the backup file and include the .img extension. Example: C:pibackup.img This will create a backup file named pibackup.img located in the top level of the C drive.

5 – Initiate the backup

Select the Read option to initiate the backup process. The amount of time this step takes can vary. You’ll have the opportunity to track the progress with a loading bar.

6 – Verify the backup process is successful

To confirm your success, Win32 Disk Imager will notify you via a pop-up alert. However, it’s best to double-check the location to ensure your backup file is actually there. It should have the .img extension following the name. Congratulations! Your Raspberry Pi’s contents are now backed up safely.

7 – How to restore your backup file contents

To restore your backup file to the Raspberry Pi, choose the backup image file, and set the device letter to your SD card. Click write to update the SD card with the image file you’ve selected. Note: If your Raspberry Pi’s file system is expanded to use all available space, be sure to load your backup image onto an SD card of the same size or larger.
NEXT UP

How to Run a Minecraft Server on the Raspberry Pi

A whole world trapped inside your Pi.
howchoo (467)
December 7, 2023
There are several ways to go about running a Minecraft server on the Raspberry Pi. In this guide, I’ll cover how to install Nukkit—a cross-platform Minecraft server that’s super easy to set up on the Raspberry Pi. This server should work with PCs, consoles, and tablets running Minecraft 1.14. I’ll be using a Raspberry Pi
Continue Reading

howchoo

 467 guides
Introducing Howchoo, an enigmatic author whose unique pen name reflects their boundless curiosity and limitless creativity. Mysterious and multifaceted, Howchoo has emerged as a captivating storyteller, leaving readers mesmerized by the uncharted realms they craft with their words. With an insatiable appetite for knowledge and a love for exploration, Howchoo’s writing transcends conventional genres, blurring the lines between fantasy, science fiction, and the surreal. Their narratives are a kaleidoscope of ideas, weaving together intricate plots, unforgettable characters, and thought-provoking themes that challenge the boundaries of imagination.
Home Interests Supernote

The Supernote A5X and A6X are “Super” for Kindle, PDFs, and Ebooks

Supernote’s a great E-reader as well as note-taker! Here’s why.
howchoo (467)
September 13, 2023
15 minutes

Share

Interests
Posted in these interests:
e-ink • 5 guides
supernote • 5 guides
technology • 20 guides
writing • 3 guides
It’s no secret that I love my Supernote devices and use it constantly. There are a bunch of different E-Ink devices hitting the market right now, but Ratta’s Supernote is one of the best, especially because their team’s commitment to providing a top-notch product is head-and-shoulders above the competition. They truly love their platform and care about their customers, which is rare in this day and age.
Ratta Supernote A6X and A5X: A Comprehensive E-ink Device Overview The Supernote is the best e-ink device around, this guide explains why.
Of course, while Supernote is clearly superior to Kobo or Kindle in terms of note-taking and drawing, many will question whether or not this little device can match the big brand names when it comes to providing a good e-reader experience. The answer is: yes. The Supernote works great as an e-reader, and the ability to annotate as you go by using the native e-reader application, allows me to handle a lot of work with things like copy-editing manuscripts that I wouldn’t be able to do half as easily on a different system. Sure, I do a lot of my reading through the Kindle app on Supernote because I like to borrow books from the library, but Supernote’s own E-reader application still sees a lot of use from me. For one thing, after the December 2021 update it’s really speedy, and for another, as I already mentioned, the ability to annotate as I read is a massive game-changer. The one real con of the Supernote native app is the lack of direct integration with Kindle, Overdrive, and Libby when it comes to annotating. I can’t directly annotate in a borrowed book and save that information for later use. Then again, that’s not any different than with a real borrowed library book, so I guess I can’t complain too much!

1 – E-reader on Supernote

E-reader on Supernote
Those of us who have been using the Supernote since it came out will recognize that after the 2021 December update, the speed of these devices shot through the roof. If you’re thinking about buying the Supernote and you keep coming across reviews from before January 2022, be wary because they are going to be largely out of date! There used to be noticeable page-turn delay when reading an Ebook in Supernote… not anymore. Supernote page-flips almost instantly now, even on extremely large and graphic-heavy PDF files, something few other products can boast. You can swipe with one or two fingers for a natural page-flip experience, or you can tap the page controls with your pen directly. This latter method is marginally faster just because the Supernote doesn’t need to parse your touch-movement into an action, but for most use-cases this won’t be noticeable either way. The reading experience for Mobi and EPub file formats is superb using the in-built application, so there’s really no need to switch to Kindle unless your library of books is owned by Amazon (it’s always better to try and find ways around buying ebooks that belong to a proprietary system). The Kindle is still necessary if you want to read library books, but from responses on the Supernote Reddit forums, it’s clear that a larger app library and deeper integrations are in the works for future updates to the Supernote that will hopefully fix that. You can easily change the size of the text, the line-spacing, and event the fonts. New fonts can be added to the Supernote either via a physical cable connection to your computer, or via the handy Supernote smartphone app. Right now, you cannot change these display settings if annotations exist within the document. So make sure you get your document set to a comfortable reading display before adding any marks with the pen. Annotations in ebooks also don’t seem to receive anti-aliasing in the program, so they’ll be sightly pixelated compared to the main note app. If there’s a solve for this, however, I’m confident that the Supernote team will implement it eventually.

Search, Bookmarks, and Contrast in the Supernote

The search function is extremely fast and responsive in both the Supernote’s native e-reader application, as well in the PDF reader. You can also add bookmarks to save important places and search for any points where you made annotations. I regularly work on editing projects, and reading 300-600 page manuscripts requires ways to easily navigate through the material. I’ve had no problem doing this with my Supernote, even with documents without native chapter markers, simply because I can annotate and search as needed. Finally, if you need to adjust the contrast in any of your ebooks or PDF files, Supernote offers a simple contrast bar that gives you fine-grain control for your black/white balance. I use it occasionally for books where images don’t translate well to black and white, or where I just need a little more sharpness.

2 – Kindle on Supernote

Kindle on Supernote
One of the biggest questions that I get as a Supernote owner is “will the Supernote work with Kindle?” The answer is: yes! Supernote comes bundled with the ability to side-load the Kindle app from the start and integrate it with your account. This is pretty vital for countless people who have already committed to building a library of Kindle books, as well as for those of us who want to read library books on our Supernote. Older reviews will note that the Supernote seems quite sluggish with Kindle, but don’t believe them. The big update at the end of 2021 took amazing steps toward efficiency and speed on the Supernote, and the Kindle app now works about as well on Supernote as it does on actual Amazon devices. You can learn how to set up Kindle on your Supernote here. Supernote has confirmed through posts on their Reddit forum that they fully intend to implement more side-loaded apps in the future, including Overdrive and Libby. This will be a massive boon for those of us who like borrowing ebooks from our local libraries without having to integrate with an Amazon product. Hopefully, Supernote will have a way to integrate with other proprietary ebook libraries in the future as well. For now, I recommend trying to escape the Amazon walled garden altogether. Suffice it to say, the Supernote is my go-to for reading ebooks, no matter the source platform. When I need to take notes directly on an ebook or PDF, Supernote’s own applications are smooth, incredibly responsive, and faster than I’ve seen in almost any other e-ink device. And, even with an outside app like Kindle, the Supernote is a speed-demon, offering a seamless reading experience for my wider library of books.
NEXT UP

How to Set Up Quick Connect on a Synology NAS

Get Synology’s powerful Quickconnect running in minutes on your NAS!
howchoo (467)
November 24, 2023
Synology is one of the most popular creators of Network Attached Storage devices on the market today, and for great reason — they’re really good at what they do. They consistently make devices that stand the test of time and feature top-notch software that makes the process of running a home server as easy as
Continue Reading

howchoo

 467 guides
Introducing Howchoo, an enigmatic author whose unique pen name reflects their boundless curiosity and limitless creativity. Mysterious and multifaceted, Howchoo has emerged as a captivating storyteller, leaving readers mesmerized by the uncharted realms they craft with their words. With an insatiable appetite for knowledge and a love for exploration, Howchoo’s writing transcends conventional genres, blurring the lines between fantasy, science fiction, and the surreal. Their narratives are a kaleidoscope of ideas, weaving together intricate plots, unforgettable characters, and thought-provoking themes that challenge the boundaries of imagination.