This short guide shows you various ways to find the IP address of your Raspberry Pi.
1 – Connect your Raspberry Pi to the network
Using an ethernet cable or WiFi, connect your Raspberry Pi to your local network. Make sure the device is powered on.
2 – Use `ping` to find your Raspberry Pi’s IP
Open a shell on Unix systems, or open the Command Prompt on Windows and run the following command:
ping raspi
This should ping your Raspberry Pi and return its IP address. If you see an error similar to cannot resolve raspi: Unknown host, try running the following instead:
ping raspberrypi
If you’re running RetroPie, you can try the following hostname:
ping retropie
If you’re having problems with this, or if you have multiple Raspberry Pi’s on the same network move on to the next step.
3 – Use `nmap` to find your Raspberry Pi’s IP
We can use nmap to scan our local network to find all devices that are connected. To do this we’ll have to find the IP address of our local computer.
macOS
On a Mac, open the Network Utility (cmd + space, then search for Network Utility).
Windows
On Windows, open the Network and Sharing Center (Control Panel > Network and Sharing Center > View network connections).
Linux
And on linux, type hostname -I in a shell.
You’re IP address will likely be something like: 192.168.1.181. So other devices on the same network are going to have addresses that share the first three octets: 192.168.1. The notation to describe the entire range of IP addresses between 192.168.1.0 and 192.168.1.255 is 192.168.1.0/24.
Once we determine the subnet range, we’ll use it with the nmap command:
nmap -sn 192.168.1.0/24
If you’re running on a unix system, you might be required to run this command using sudo:
sudo nmap -sn 192.168.1.0/24
You’ll then see a list of devices connected to the network:
Nmap scan report for Chromecast.attlocal.net (192.168.1.78)
Host is up (0.042s latency).
MAC Address: 54:60:09:06:76:0A (Google)
Nmap scan report for unknownc24b2b235d18.attlocal.net (192.168.1.178)
Host is up (0.038s latency).
MAC Address: C2:4B:2B:23:5D:18 (Unknown)
Nmap scan report for docker1.attlocal.net (192.168.1.181)
Host is up (0.51s latency).
MAC Address: B8:27:EB:79:49:F2 (Raspberry Pi Foundation)
Nmap scan report for raspberrypi.attlocal.net (192.168.1.183)
Host is up (0.51s latency).
MAC Address: B8:27:EB:95:6D:7A (Raspberry Pi Foundation)
You’ll notice here that I have a few devices, but after a quick scan you’ll notice a few Raspberry Pi’s connected to the network. From here you can discover the IP address for each Pi.
NEXT UP
How to Enable the “Popping” Sound When Adjusting the Volume on Your Mac
Starting with MacOS Sierra and High Sierra, your Mac will no longer play a “pop” sound when you adjust your volume. If you prefer to have this sound when you adjust volume up and down (as I do), this guide will teach you how to reenable it. 1 – Open Sound System Preferences Navigate to System
Introducing Howchoo, an enigmatic author whose unique pen name reflects their boundless curiosity and limitless creativity. Mysterious and multifaceted, Howchoo has emerged as a captivating storyteller, leaving readers mesmerized by the uncharted realms they craft with their words.
With an insatiable appetite for knowledge and a love for exploration, Howchoo’s writing transcends conventional genres, blurring the lines between fantasy, science fiction, and the surreal. Their narratives are a kaleidoscope of ideas, weaving together intricate plots, unforgettable characters, and thought-provoking themes that challenge the boundaries of imagination.
If your Mac is connected to both an Ethernet cable and Wi-Fi, you probably want to use Ethernet by default since it’s generally faster. This short guide will teach you how to prioritize the wired (Ethernet) connection when your Mac is connected to both Ethernet and Wi-Fi.
This approach is better than toggling Wi-Fi off when you connect your Ethernet cable since Wi-Fi is needed for things like unlocking your Mac using your Apple Watch.
Open the Network system preferences pane by navigating to Apple Icon > System Preferences > Network.
2 – Access the Service Order pane
Click on the settings “gear” icon and select Set Service Order… from the dropdown menu.
3 – Reorder macOS network services
You’ll see several network devices listed. I use a USB hub with tons of features, so your Ethernet connection might be aliased as “Thunderbolt Ethernet Slot 1” or “Thunderbolt Bridge”.
Either way, drag the Wi-Fi item to the bottom of the list to prioritize it lower than whichever Ethernet device your computer is using.
When you’re done, click OK and then the Apply button.
NEXT UP
How to Enable the “Popping” Sound When Adjusting the Volume on Your Mac
Starting with MacOS Sierra and High Sierra, your Mac will no longer play a “pop” sound when you adjust your volume. If you prefer to have this sound when you adjust volume up and down (as I do), this guide will teach you how to reenable it. 1 – Open Sound System Preferences Navigate to System
Introducing Howchoo, an enigmatic author whose unique pen name reflects their boundless curiosity and limitless creativity. Mysterious and multifaceted, Howchoo has emerged as a captivating storyteller, leaving readers mesmerized by the uncharted realms they craft with their words.
With an insatiable appetite for knowledge and a love for exploration, Howchoo’s writing transcends conventional genres, blurring the lines between fantasy, science fiction, and the surreal. Their narratives are a kaleidoscope of ideas, weaving together intricate plots, unforgettable characters, and thought-provoking themes that challenge the boundaries of imagination.
You’ve placed that great image into your InDesign document, but only want to use a portion of it. We’ve all been there.
Of course, you could crop your placed image in a separate software application like Photoshop or Lightroom. There’s really no need to open up another application, however. You can easily crop the image in InDesign.
In this guide, we’ll show you how!
We’re going to assume you’ve already placed and fit your image into the frame. If you need help with this, then see our guide on inserting images in InDesign.
1 – Click the gray circle in the center of your image
You should see a small gray circle in the center of your image’s frame. Click it. This should change the frame and box color to red. (See step image.)
This gray circle allows you to do a couple of things:
Select the image in the frame, as opposed to the frame.
Adjust the image, separate from its frame.
Think about the frame and image as a literal window frame with a cloudy sky in the background respectively. InDesign allows you to actually edit and move around the sky in the background while keeping the frame the same.
2 – Constrain your image proportions
In the “Transform” pane near the top-right of your InDesign screen, make sure the chain links are locked (as shown). This will ensure that your image does not lose its proportions as you enlarge it.
Also, note that if your original image was quite small, you may not be able to enlarge it enough for cropping into your frame (whether in InDesign or elsewhere). You’ll need a bigger image from which to work.
3 – Click and drag a corner out to expand the image
Click on one of the corner boxes and drag it outward to expand your image’s size.
Notice that:
The frame does not change. Just like a window, you can only see what’s showing through the frame.
Some of the image is missing and can’t be seen. (It’s what’s outside of the frame.)
4 – Drag the gray circle to crop the image
When you click and drag the gray circle now, you’ll essentially be cropping the image into your frame. Just drag the image until only the portion you want appears in the frame.
If you need to, you can enlarge or shrink the image (step 3) as needed to make the perfect crop.
NEXT UP
How to Resize an Image in InDesign
There are two options for resizing in InDesign: the easy way and the precise way.
You might think that resizing an image would be as simple as dragging the corner of the frame. Well, it is, and it isn’t! Remember that when resizing an image in InDesign, you’re essentially resizing the image’s frame. For more information, on inserting an image in InDesign and frames, check our guide. How to Insert an Image
Introducing Howchoo, an enigmatic author whose unique pen name reflects their boundless curiosity and limitless creativity. Mysterious and multifaceted, Howchoo has emerged as a captivating storyteller, leaving readers mesmerized by the uncharted realms they craft with their words.
With an insatiable appetite for knowledge and a love for exploration, Howchoo’s writing transcends conventional genres, blurring the lines between fantasy, science fiction, and the surreal. Their narratives are a kaleidoscope of ideas, weaving together intricate plots, unforgettable characters, and thought-provoking themes that challenge the boundaries of imagination.
LEDs can take your project from trashy to flashy but why waste valuable GPIO pins on something so simple when you could dedicate the control with something like the Raspberry Pi Pico?
If you’re not familiar with the Pico, it’s the latest (and first) microcontroller from the Raspberry Pi Foundation. It’s about the size of your thumb and costs only $4, making it a viable board for many simple microelectronics projects. It features the new RP2040 chip which can be found on a growing number of boards but today we’re focusing on the Pico module.
There are a few different ways to control LEDs using the Pico. In this guide, I’ll go over the three most common LEDs used:
The Pico has a built-in LED.
GPIO pins can be used to control individual LEDs.
The board can also control LED strips—some of which offer individual LED control.
1 – Set up and use MicroPython
Each of these methods will require the use of MicroPython. This relies on an application called Thonny which must be installed on a Windows, Linux, or Mac machine. We have a guide breaking down how to set up and use MicroPython for the first time.
Point Thonny to the Pico using the drop-down menu in the bottom-right corner.
Enter your MicroPython code into the top half of the Thonny window.
Save the script, be sure to choose the option to store the script on the Pico.
2 – Control the on-board LED
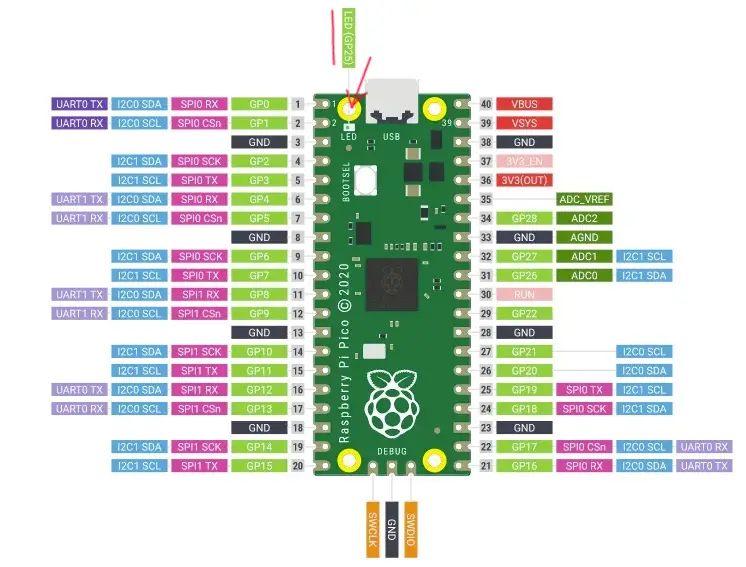
If you need a simple status indicator and don’t want to waste any GPIO pins, you can always use the built-in LED. This component is found on top of the Pico near the mounting button.
Here’s a quick sample script that shows how to call and address the onboard LED. Running this script will turn the LED off or on depending on its current state.
from machine import Pin
led = Pin(25, Pin.OUT)

led.toggle()
You can use this to develop your own code and control the onboard LED. However, you may find this doesn’t suit your project needs. If you need to control different colored LEDs or more than one, you need to use the GPIO pins.
3 – Control a separate LED
Individual LEDs can be easily programmed once wired into place. Single color LEDs will take up fewer GPIO pins than multicolored ones as RGB LEDs require pins for each color it supports in addition to the ground.
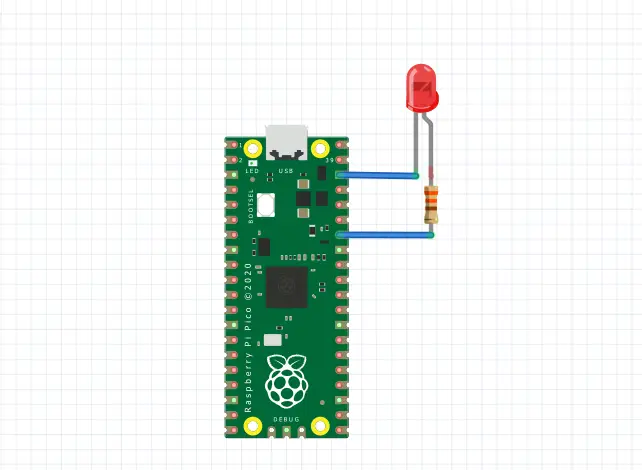
Wire the LED to the Pico
Once you choose what kind of and how many LEDs to use, you’ll need to wire them to the Pico. A resistor is required for the connection—a quick google search will let you know what resistance value is necessary for your LED but 330 ohms is a good rule of thumb.
You can solder the pins into place or use wires to add distance between the Pico and LED. The method you choose depends on what you’re using the LED for. The picture attached shows a general example of how to wire an LED to the Raspberry Pi Pico.
Program the LED
Here’s a sample script that demonstrates how to toggle an external LED. I’m using pin number 34, or GP28, in my sample code. Make sure your code uses the right GPIO pin number that corresponds with your LED.
from machine import Pin
led = Pin(28, Pin.OUT)

led.toggle()
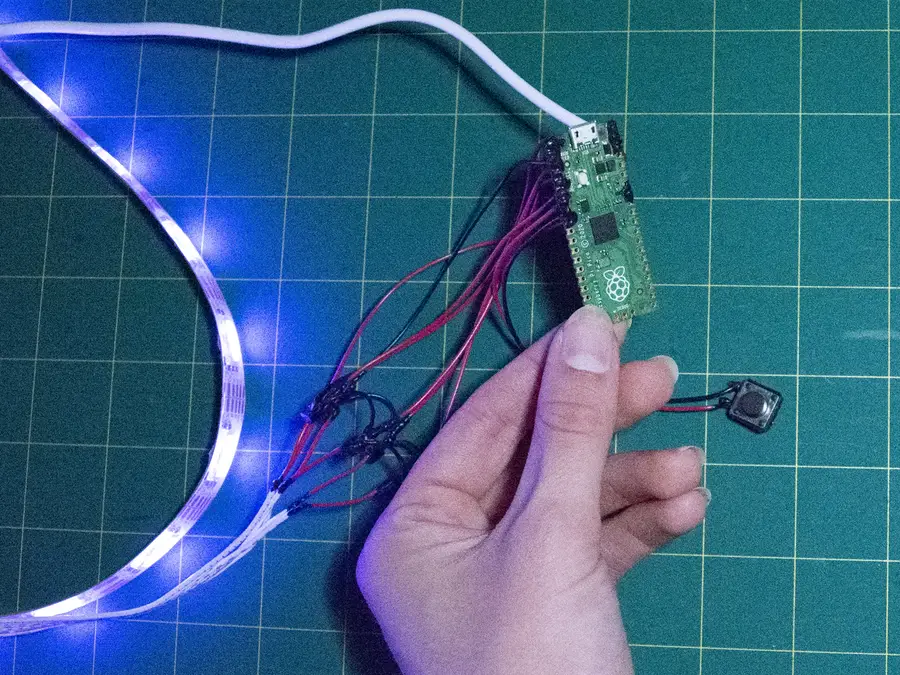
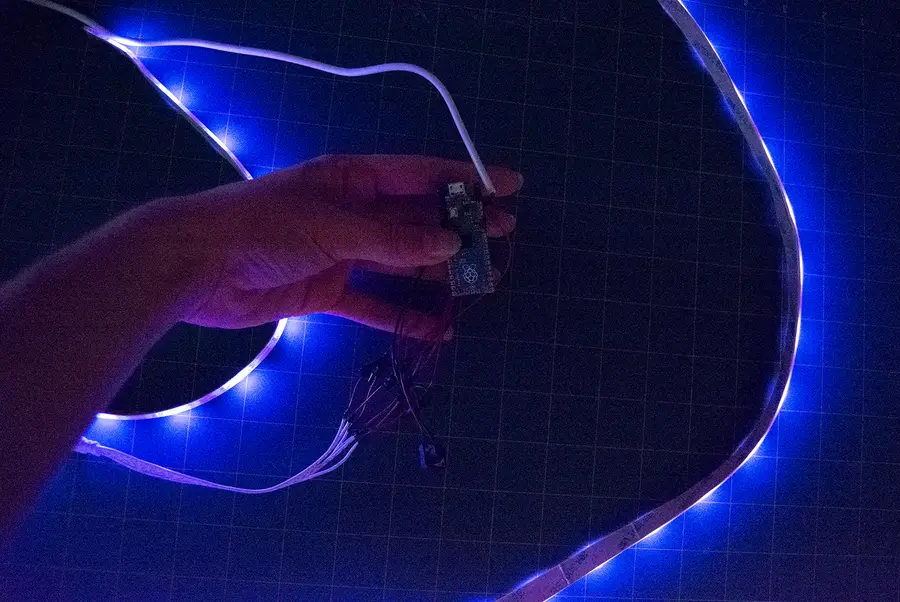
4 – Control a LED strip
It’s also possible to control a full-sized LED strip. I’m using a random, non-individually addressable strip I found at Walmart. It has RGB colors as well as cool/warm white options, this means that I need 5 open GPIO pins to control each color and one ground pin. A resistor is required for each color but not the ground wire.
Because the LEDs are not individually addressable, the entire strip will illuminate with the same color at the same time. Here’s some example code demonstrating how to set a custom color on the LED strip. The frequency values can be changed for each individual color. The values in this demo will create a soft blue glow. Experimenting with the values will cause colors to mix.
from machine import Pin, PWM

cool_white = PWM(Pin(0))
blue = PWM(Pin(1))
red = PWM(Pin(2))
green = PWM(Pin(3))
warm_white = PWM(Pin(4))

cool_white.freq(500)
blue.freq(10000)
red.freq(500)
green.freq(500)
warm_white.freq(500)
5 – Add your LEDs to a project
You can use these basic principles to incorporate LEDs into a myriad of projects. The Pico adapts easily into projects with Raspberry Pi’s and maintains flexibility at a low cost. At the end of the day, this $4 microcontroller is more than ready to help you build your next flashy project. Congratulations! You’re ready to master LED with the power of the Pico.
There are several ways to go about running a Minecraft server on the Raspberry Pi. In this guide, I’ll cover how to install Nukkit—a cross-platform Minecraft server that’s super easy to set up on the Raspberry Pi. This server should work with PCs, consoles, and tablets running Minecraft 1.14. I’ll be using a Raspberry Pi
Introducing Howchoo, an enigmatic author whose unique pen name reflects their boundless curiosity and limitless creativity. Mysterious and multifaceted, Howchoo has emerged as a captivating storyteller, leaving readers mesmerized by the uncharted realms they craft with their words.
With an insatiable appetite for knowledge and a love for exploration, Howchoo’s writing transcends conventional genres, blurring the lines between fantasy, science fiction, and the surreal. Their narratives are a kaleidoscope of ideas, weaving together intricate plots, unforgettable characters, and thought-provoking themes that challenge the boundaries of imagination.
The first few days of Minecraft are the most stressful, which means a good starter house is required to keep you safe from mobs and the elements (and have a place to spawn back to in the event of an unfortunate interaction with a skeleton or zombie).
What defines a good starter house?
Simplistic Design: Regardless of building skill level, large builds are realistic to starter houses. They should take a few days, at most, and even a new player should be able to build it.
Attainable Materials: The materials need to be easy to gather or find, which is why most builds are made of stone and wood.
Includes the Essentials: What good is a house if it doesn’t have a bed? It should also have space for farming and storage to help you survive long enough to get better tools and experience.
What makes up a cottagecore style house?
In Minecraft, there are blocks for all types of builds. Cottagecore starter house designs include a lot of stone, wood, and (of course) greenery. They’re great for early game in Minecraft because their resources are easily found in the Overworld. For those who have fallen down a TikTok cottagecore hole or simply just want a cozy cabin to escape to, cottagecore and fairycore Minecraft builds are meant for you.
However, that doesn’t mean concrete, sandstone, or even terracotta are out of the running. The following builds vary in shape and location so that anyone looking for a cottagecore starter base can build it!
From desert to flower forest (to even a mushroom), this list features cottagecore starter homes for all skill levels!
A delightful build which looks amazing with Mizuno’s 16 resource pack! For anyone looking for a simple but detailed cottage in the woods, look no further than this tutorial. If you’d like to use vanilla textures, then this build still looks great (just change up the indoor flooring).
While this cottage is perfectly tiny, with just enough room for starting tools, it can also be translated to a bigger scale if wanted! The structure is a simplistic design and made of materials easy to get in early game!
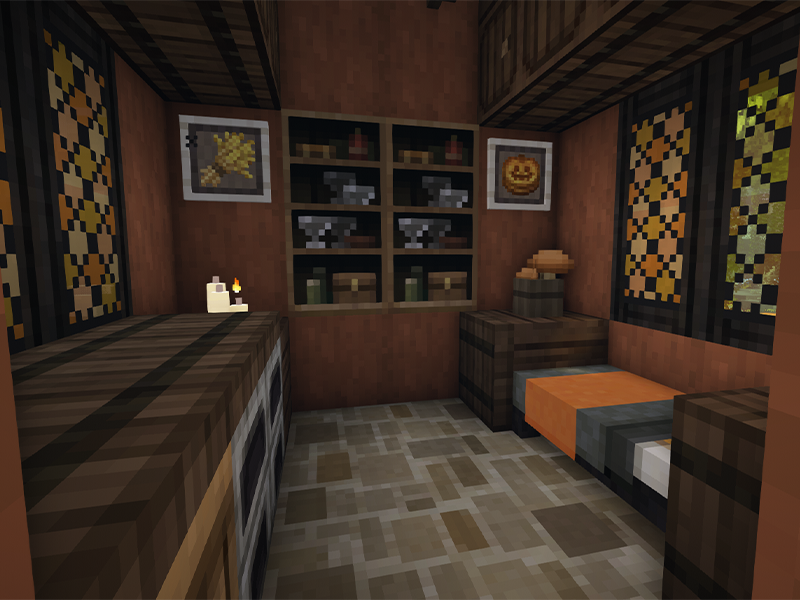
A perfect fall inspired house! Not only does it have easy-to-obtain blocks, but it’s a great build for anyone new to Minecraft to try. The outside decor is made of a simple palette, but still manages to fill up the space so that the house doesn’t feel foreign to the area. This build was done with Mizuno’s 16 resource pack.
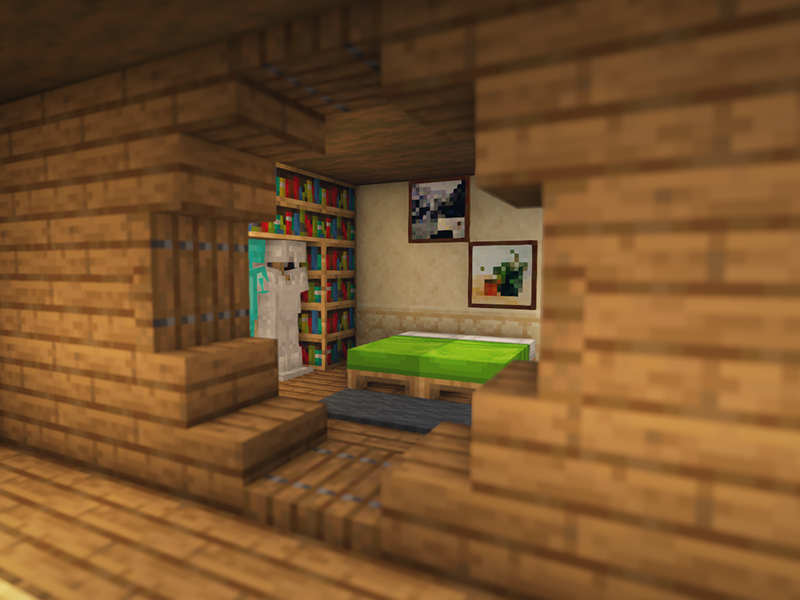
This specific design is one I’ve used in multiple servers and Minecraft gameplay. It’s such an easy build for those in early game or for those who want a home that blends in with the landscape. Our list of Traditional Starter Houses features a similar build if you’re looking for an alternative block palette!
This build is meant for those looking for an early game challenge. Or just want a nice greenhouse to store their crops. This might be the starter house that takes the longest to build on this list, but it’s so worth it! This cottage is meant to last you some time, as there’s room for anything you could want!
An alternative to TinyCraft’s design is this lovely home! It’s cozy, it’s cute, it’s just so cottagecore! Using Mizuno’s 16 resource pack, this home has space for all the flowers you could want. It’s a quick and easy build that fits just about any biome!
Similar to a traditional style home, it’s really a quaint starter house for any type of player. We love the farm area off to the side, and this building allows for a secret water source so that you can surround your house with farmland if you wanted!
Our favorite thing about this tutorial is that SheraNorm showcases how to build the base structure, and then offers up ways to alter it with different blocks and decorations! This build design is perfect for fitting all your needs compactly, even including a mine entrance!
We’ll preface this by saying the interior design should be altered to fit your needs. While this design has a small interior, it’s perfect for those looking to get shelter early in the game. What we love about this house is that all blocks can be altered to fit your preferred color scheme or aesthetic!
This build is absolutely beautiful and one of our favorites. We did deter the palette in our version, however. Rather than quartz, we switched to white concrete for an early-game friendly version. We also found that using Mizuno’s 16 resource pack made the build look even cozier!
Are you a witch, wizard, or wix looking for a quaint home to build in the forest? This fantasy cottage is made just for you! Using [JermsyBoy’s Vanilla Edits](https://www.curseforge.com/minecraft/texture-packs/jermsyboys-vanilla-edits], this overgrown roof is the perfect addition to any home wanting a more fantasy vibe. The tutorial is easy to follow, even offering up variations and ideas on what to do within and around the cottage.
Don’t go thinking that savanna biomes can’t also be cottagecore! This build is all about using sandstone and other warm biome blocks in a cottagecore design. Featuring a combination of sandstone, bricks, and spruce, this build fits right into the landscape that usually doesn’t feel so cozy.
In terms of cottagecore starter houses, this build is as simple and basic as they come. Each block is easy to get early on in the game. It’s even easy to switch out the wood or colors to whatever you want! This build is actually perfect for those who prefer modern architecture, but want to dip their toes into cottagecore in Minecraft.
Those looking for a challenge starter base should give this a try. Not only is it a treehouse with room for crafting and sleeping, but there’s an entire base underneath the lake and tree! There’s plenty of room to enchant, sleep, smelt, and even go to the Nether! Just make sure to put a gate by the Nether portal, since too many zombified piglins were coming through while building.
This video is packed with leaves and cottagecore! Not only will you learn how to build a large, homey cottage, but you’ll also learn how to make an entrance gate right out of a fairytale! This build is one of my favorites. Not just because of how many leaves I could place down, but because of how versatile the block palette can be. Don’t like birch? You can just replace it with some white terracotta, and it’ll still look like an overgrown cottage.
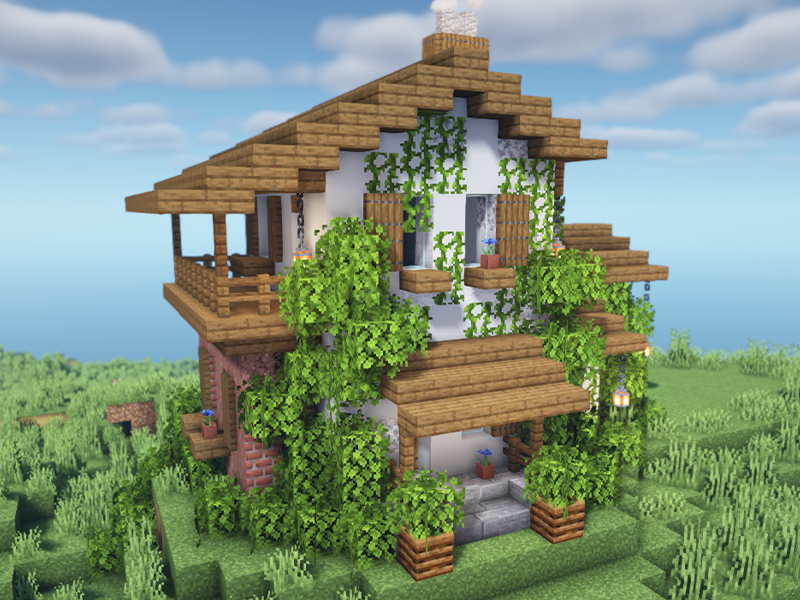
When you see “cottagecore” you immediately imagine a cottage looking much like this one! The vines and details are what turn this home into the perfect cozy cottage tucked away in the forest. It’s a decently sized home that’s easy to put together, no matter the skill.
Whether you’re risking the treacherous snowy peaks or just want a small cabin to retreat to, this winter cabin is simplistically cozy. With plenty of windows to view the landscape and a small chimney, this home is meant to be loved forever. Be careful of the front sweet berries, however, and make sure to stay safe while skating on the frozen pond.
I’d consider this to be a fairy-lite house. It’s enough of a fantastical design that you can still build more traditional style buildings around it. It’s very simple to build and perfectly sized for fairy activities!
What’s more cottagecore than a hobbit hole?! Perhaps nothing at all. Bringing classic Lord of the Rings architecture into Minecraft, this tutorial helps you create your hole-in-the-hill dreams come true. Who knew how simple making a hobbit home could be! It’s also a build that can grow with you as you gain more blocks, expand your enchantments, and more!
What better way to blend into the flower forest landscape than with a pop of color? This build takes you step-by-step into building a colorful and cozy cottage surrounded by a picturesque landscape.
This house showcases the classic cottagecore style of mixing bright blocks with vines and leaves. At first, the combination of so many blocks may seem like a bad design choice, but all together it forms a beautiful picture. We built this house right next to a village to show those villagers what true architecture genius looks like.
Dark forests may be hard to survive in (with all the mobs spawning), but this home will make it a little more liveable! While the tutorial itself only guides through building the exterior, the creator does go through a tour of the house and its surrounding area.
Live out your fairy dreams in this fantasy inspired home! Whether tucked away in a forest or alongside a farm in the plains, this home is made of blocks easily attainable early on. So there’s no need to worry about sacrificing your magical needs by gathering later game materials.
Any good fairycore or fantasy build can only be improved with a grass roof. This build combines many design elements of other builds on this list. The rounded doorway, natural roof, and wooden frame, all mix together to create a perfect fantasy home for any early game player.
It doesn’t take a rocket scientist to build a mushroom in Minecraft! This tiny home is perfect as a starter house, but it can also serve as a home for other mobs in Minecraft as well! Imagine a whole mushroom town filled with villagers to trade with!
The longer you play Minecraft, the more you realize that early-game tools just won’t cut it. Exploring the enchantment feature of Minecraft can be exciting, but also intimidating. Rather than worry about researching enchantments, below are the best enchantments in Minecraft! To learn how to enchant items, check out this guide! In this guide, you’ll see
Introducing Howchoo, an enigmatic author whose unique pen name reflects their boundless curiosity and limitless creativity. Mysterious and multifaceted, Howchoo has emerged as a captivating storyteller, leaving readers mesmerized by the uncharted realms they craft with their words.
With an insatiable appetite for knowledge and a love for exploration, Howchoo’s writing transcends conventional genres, blurring the lines between fantasy, science fiction, and the surreal. Their narratives are a kaleidoscope of ideas, weaving together intricate plots, unforgettable characters, and thought-provoking themes that challenge the boundaries of imagination.
So youâve taken screenshots and recorded videos that you want to share. But how do you access those files without the hassle of having someone else use your Quest 2? Thatâs simple enough with the right tools and guidance.
Below is our guide to accessing the media files on your Oculus Quest 2!
1 – Connect to the PC
Obviously, the first thing youâll need to do is connect the Oculus Quest 2 to the computer via USB. A popup will appear on the Quest 2 asking for access to data. Click “Allow”.
2 – View PC files
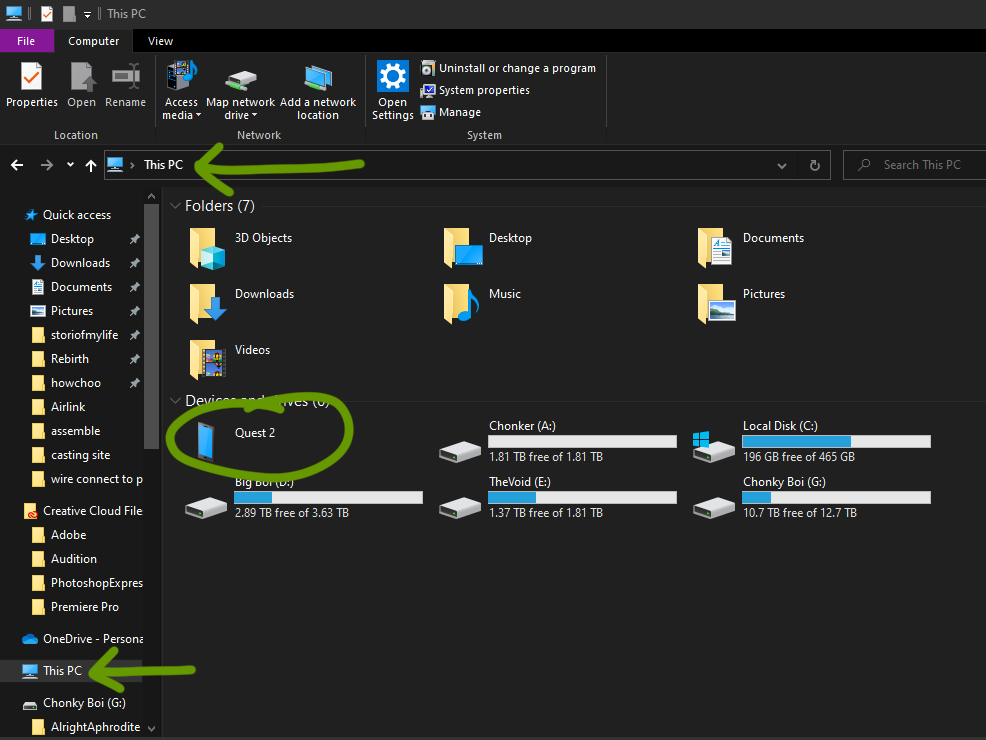
In the file explorer, locate âThis PCâ in the quick access sidebar for Windows or use the Finder app on Mac.
3 – Open Internal shared storage
The Oculus should be listed under devices and drivers. Depending on the computer, it will be called something different. If you have the Oculus app downloaded or if you have a decent USB cable, then it most likely will be listed as Quest 2.
Regardless, open that folder and go into the folder labeled âInternal shared storageâ.
4 – Open Oculus folder
For some reason, the photos and videos are saved where I hadn’t expected them to. Double click to open the Oculus folder.
5 – Open the wanted media folder
Within youâll find folders for your avatars, screenshots, and videos! Depending on what youâre looking for, you can access these files and edit them as you would with any DSLR or digital camera.
If youâre interested in learning how to take video or screenshots, visit the guides linked below:
The longer you play Minecraft, the more you realize that early-game tools just wonât cut it. Exploring the enchantment feature of Minecraft can be exciting, but also intimidating. Rather than worry about researching enchantments, below are the best enchantments in Minecraft! To learn how to enchant items, check out this guide! In this guide, youâll see
Introducing Howchoo, an enigmatic author whose unique pen name reflects their boundless curiosity and limitless creativity. Mysterious and multifaceted, Howchoo has emerged as a captivating storyteller, leaving readers mesmerized by the uncharted realms they craft with their words.
With an insatiable appetite for knowledge and a love for exploration, Howchoo’s writing transcends conventional genres, blurring the lines between fantasy, science fiction, and the surreal. Their narratives are a kaleidoscope of ideas, weaving together intricate plots, unforgettable characters, and thought-provoking themes that challenge the boundaries of imagination.
This is the simplest way to see the health of your iPhone’s battery. For a reminder, after 500 cycles, your battery is operating with roughly 80% of its full capacity*.
Screen time gives iPhone users the opportunity to track and manage their iPhone usage, making staying productive easier than ever before. Since screen time holds iPhone users accountable for their iPhone use, it’s become increasingly popular among those who want and need to unplug during various time frames. However, that’s not all screen time is capable
Introducing Howchoo, an enigmatic author whose unique pen name reflects their boundless curiosity and limitless creativity. Mysterious and multifaceted, Howchoo has emerged as a captivating storyteller, leaving readers mesmerized by the uncharted realms they craft with their words.
With an insatiable appetite for knowledge and a love for exploration, Howchoo’s writing transcends conventional genres, blurring the lines between fantasy, science fiction, and the surreal. Their narratives are a kaleidoscope of ideas, weaving together intricate plots, unforgettable characters, and thought-provoking themes that challenge the boundaries of imagination.
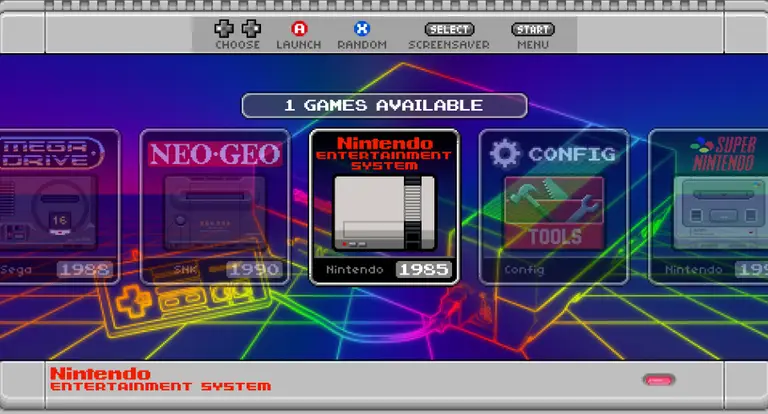
Choosing and setting up a controller to use with RetroPie is incredibly easy. Everything is almost completely automated and the software provides us the opportunity for plenty of customization.
This guide will teach you how to choose, set up, configure, and map both bluetooth and USB controllers in RetroPie.
1 – Bluetooth vs USB controllers for RetroPie
Best controller for RetroPie
Choosing the best RetroPie controller often boils down to preference. Are you looking for a budget friendly option or something with desirable specs? Either way, below are the best bluetooth and USB controllers for RetroPie that have a sufficient number of buttons to play a wide range of games.
Bluetooth controllers are typically the more expensive option, but these controllers provide excellent wireless capabilities. Most modern Bluetooth controllers are very responsive, much like their wired counterparts. Visit our full guide on RetroPie bluetooth controllers.
Looking for the best bluetooth controller for RetroPie? We recommend the SF30 from 8bitdo. It has no noticeable input lag and the LiPo battery lasts a long time.
RetroPie USB controllers
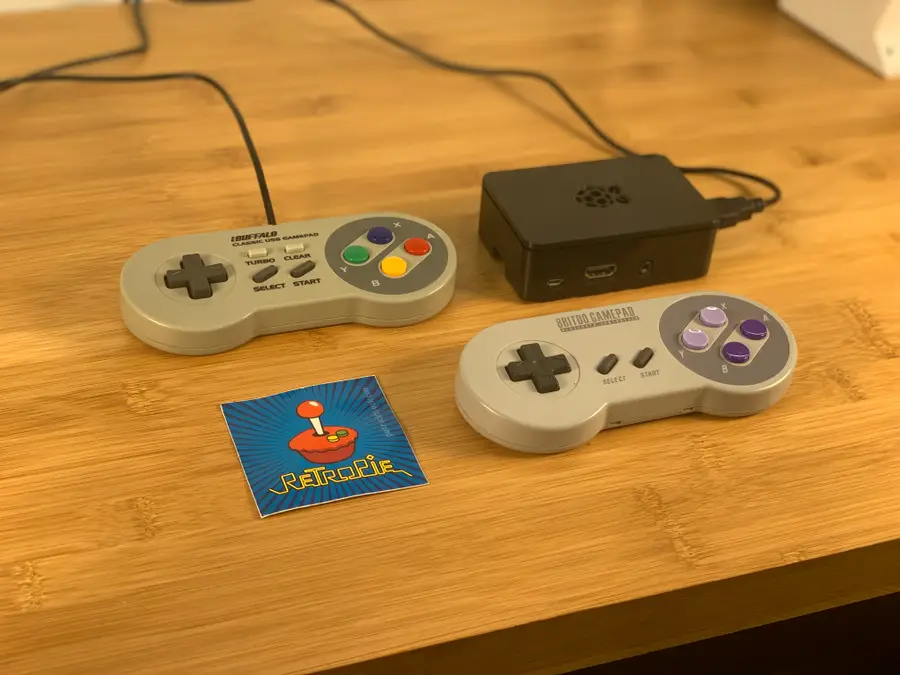
USB controllers are also a great option. Some users appreciate the direct wire for practical and nostalgic purposes. These controllers are much more affordable compared to Bluetooth devices. The downside is that USB controller cords are often short so it can be tough to sit back on the couch and relax.
Looking for the best USB controller for RetroPie? We recommend the iBuffalo from Buffalo. It’s inexpensive, has a nice weight to it, and is very responsive.
2 – Use a compatible controller
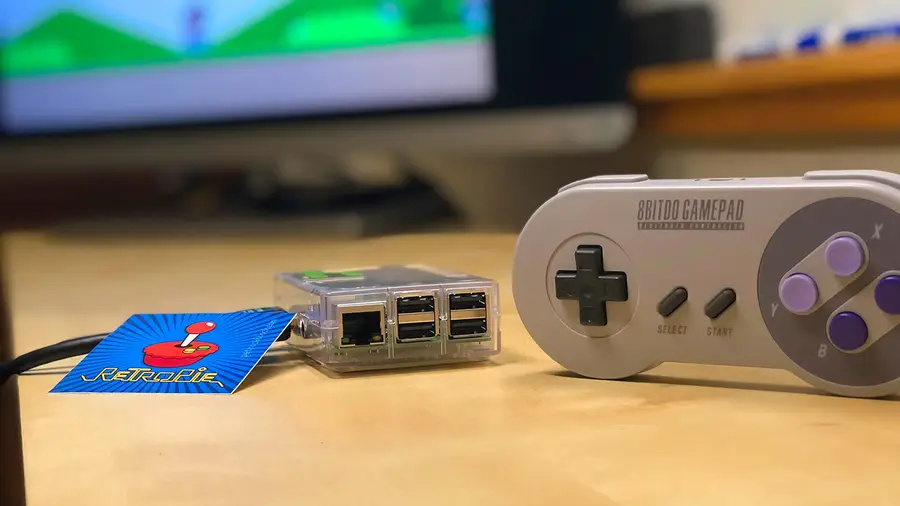
The Raspberry Pi comes with USB HID ports on the side. Newer models come with built in Bluetooth capabilities. Your RetroPie setup should be compatible with almost any controller. Wireless controllers with USB receivers can work with the system as well.
To make sure your controller is compatible, do a quick search online for the make and model of your controller. Alternatively, plug it in and see if RetroPie is responsive to the input.
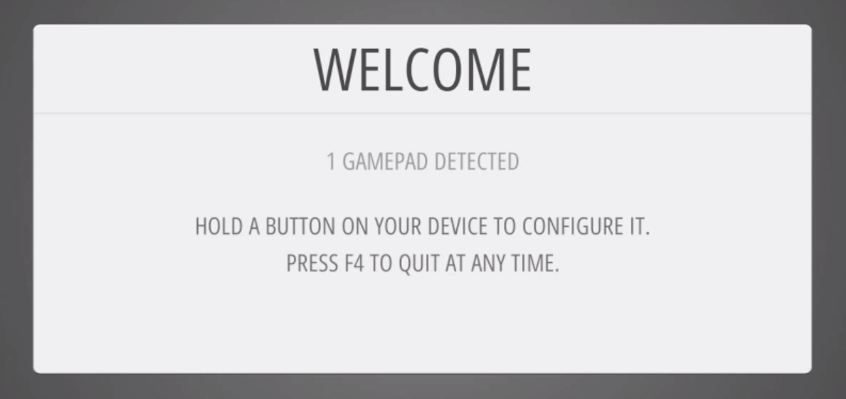
During the first time you set up RetroPie, an opportunity will arise to connect and configure your controller. The setup script will guide you through pairing the buttons.
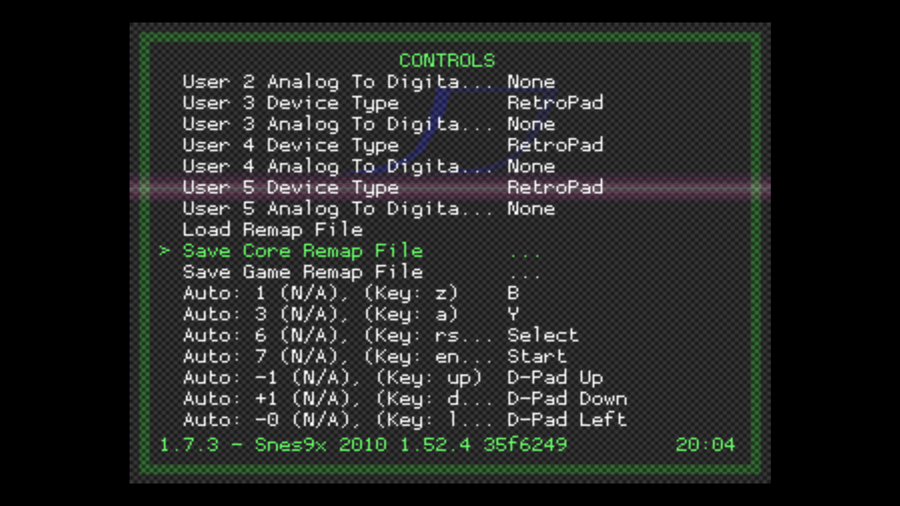
4 – Configure your RetroPie controller for a single console (gaming system)
To make your gaming experience feel more natural, you may need to swap a few buttons on occasion. But instead of changing the entire RetroPie controller configuration every time, all you need is a custom profile for the emulator core of your choosing.
To create a custom profile for a single console…
Open a game using the target console emulator
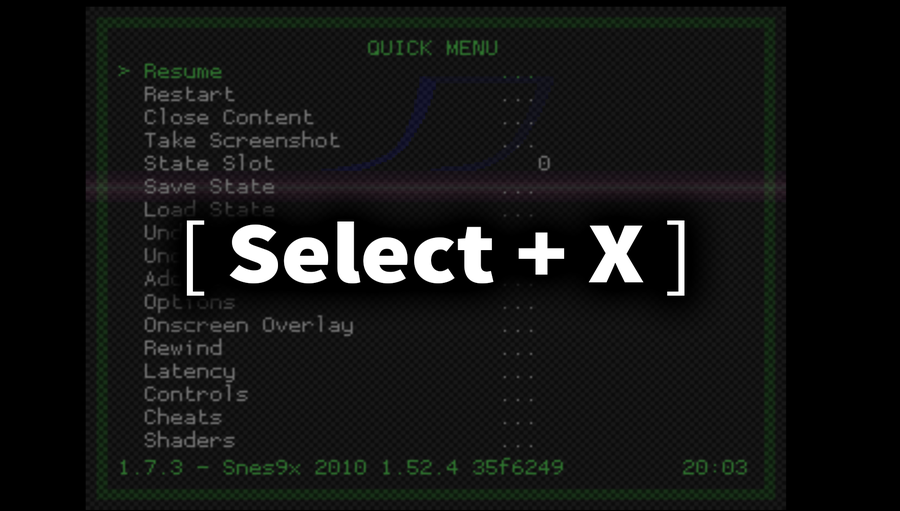
Hold the Select button and press X
Choose Controls
Optimize your button configuration as needed
Choose Save Core Remap File
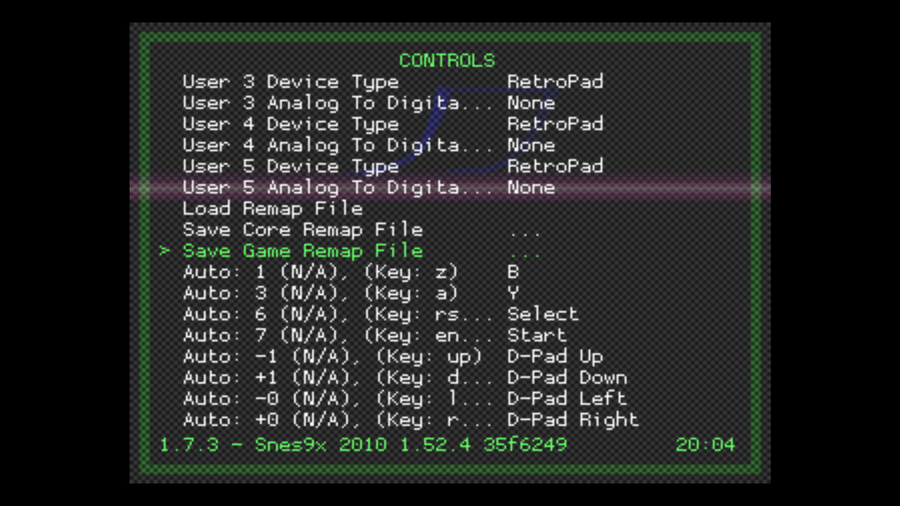
5 – Configure your RetroPie controller for a single game
Some games are easier to play with a unique controller profile of their own. Setting up a custom game profile is very similar to creating one for the emulator.
To create a custom profile for a single game…
Open the game you want to create a custom controller profile for
Hold the Select button and press X
Choose Controls
Optimize your button configuration as needed
Choose Save Game Remap File
6 – Useful RetroPie hotkeys and where to find more
Hotkeys are an easy way to perform certain tasks or access special menu screens. They’re usually comprised of a two button combination. We’ve gathered a quick list of the most useful hotkeys below.
As always, if something isn’t working right we’ve got you covered. These are some of the most common issues facing RetroPie users with controllers.
Controller input is slow or delayed
This issue is common with wireless controllers. However, it can happen with wired ones as well. Try testing the controller on another device or computer to isolate the problem. If the controller is only slow when using the Pi, you may need to restart the device and configure it once again.
Custom profile is missing
Verify you have taken the proper steps to save the custom controller configuration. If the file isn’t saving, you will need to make sure both the SD card and destination folders are writable.
The custom controller profiles are saved in the following file path:
/opt/retropie/configs/
RetroPie doesn’t recognize the controller
If RetroPie isn’t recognizing the controller, verify there are no obvious hardware issues causing the disconnect. The cable needs be completely inserted into the port, but shouldn’t require excessive force. Make sure the controller is working on other devices.
If the controller is working on other machines, it may be a compatibility issue with the Pi. You may need to restart the Pi and try to configure the controller once more. Search online, other users have encountered this problem using the same make and model controller.
There are several ways to go about running a Minecraft server on the Raspberry Pi. In this guide, I’ll cover how to install Nukkit—a cross-platform Minecraft server that’s super easy to set up on the Raspberry Pi. This server should work with PCs, consoles, and tablets running Minecraft 1.14. I’ll be using a Raspberry Pi
Introducing Howchoo, an enigmatic author whose unique pen name reflects their boundless curiosity and limitless creativity. Mysterious and multifaceted, Howchoo has emerged as a captivating storyteller, leaving readers mesmerized by the uncharted realms they craft with their words.
With an insatiable appetite for knowledge and a love for exploration, Howchoo’s writing transcends conventional genres, blurring the lines between fantasy, science fiction, and the surreal. Their narratives are a kaleidoscope of ideas, weaving together intricate plots, unforgettable characters, and thought-provoking themes that challenge the boundaries of imagination.
The Raspberry Pi works with many controllers—Xbox controllers are no exception. From wireless Xbox 360 controllers to Bluetooth Xbox One controllers, if you’ve got an Xbox controller it will most likely work with a Raspberry Pi.
This guide focuses on how to set up an Xbox controller with Raspberry Pi OS. RetroPie is a little bit different—most of these steps will work, but be sure to check out our Ultimate RetroPie Controller Guide for details on setting up a controller with RetroPie.
1 – Install or update to the latest version of Raspberry Pi OS
Before we begin, be sure you’ve got the latest version of Raspberry Pi OS installed on your Pi. Visit our guide on how to update Raspberry Pi OS for details on this process.
Xpad drivers are included with the latest version of Raspberry Pi OS—so this step is technically optional. We still recommend installing it in case you come across an application built around the old xboxdrv driver.
Run the following command to install it:
sudo apt-get install xboxdrv
3 – Connect a wireless Xbox controller
Wireless Xbox controllers use a USB wireless adapter. Connect the USB adapter to the Raspberry Pi. It should recognize and respond to the input as a normal USB controller.
4 – Connect an Xbox controller via USB cable
If you’re using a wired USB controller, plug the controller into a USB port on the Raspberry Pi. The Pi should detect the controller as a usable device.
5 – Connect a controller with Bluetooth
To connect an Xbox controller using Bluetooth, you’ll need a terminal window. Open one on Raspberry Pi OS or remote into the Pi using a terminal application of your choice.
1. Disable Enhanced Re-Transmission Mode (ERTM)
If ERTM is enabled, the controller won’t pair with the Pi. To disable the ERTM, run the following command:
echo 'options bluetooth disable_ertm=Y' | sudo tee -a /etc/modprobe.d/bluetooth.conf
Restart the Pi.
2. Start Bluetooth Tools
After the Pi reboots, start Bluetooth Tools with the following command:
sudo bluetoothctl
3. Search for the Xbox controller
Now we need to search for the Xbox controller. Don’t put the controller into pairing mode just yet. We have a few settings to adjust first. Enable agent with the following commands:
agent on
default-agent
Next, we’ll start scanning for available Bluetooth devices. Run this command to start scanning:
scan on
4. Connect to the Xbox controller
Put the Xbox controller into Pairing mode. It should appear in the list of devices with a unique MAC address and the words “wireless controller” at the end. Take note of the MAC address, we’ll need it to connect the controller. In the terminal window, enter the following command, replacing MAC_ADDRESS with the Xbox controller MAC address.
connect MAC_ADDRESS
After connecting the controller, make sure it’s listed as a trusted device with this command—again replacing MAC_ADDRESS with the one for the Xbox.
trust MAC_ADDRESS
Close the bluetoothctl application by typing quit
5. Test the connection
We’ll use the joystick toolset to make sure everything is working. Install it with this command:
sudo apt-get install joystick
When it finishes installing, run this command to start the test:
sudo jstest /dev/input/js0
You will see a screen of numbers. If everything is working properly, pressing buttons on the controller will cause them to change.
6 – Use an Xbox controller to replace mouse functions
Now that your controller is connected, you may want to use it in place of a mouse. Run the following command in a terminal window to enable this feature:
If you need a specific mouse button, check the chart below for a corresponding button on the Xbox controller. It also includes a few keyboard functions.
The longer you play Minecraft, the more you realize that early-game tools just won’t cut it. Exploring the enchantment feature of Minecraft can be exciting, but also intimidating. Rather than worry about researching enchantments, below are the best enchantments in Minecraft! To learn how to enchant items, check out this guide! In this guide, you’ll see
Introducing Howchoo, an enigmatic author whose unique pen name reflects their boundless curiosity and limitless creativity. Mysterious and multifaceted, Howchoo has emerged as a captivating storyteller, leaving readers mesmerized by the uncharted realms they craft with their words.
With an insatiable appetite for knowledge and a love for exploration, Howchoo’s writing transcends conventional genres, blurring the lines between fantasy, science fiction, and the surreal. Their narratives are a kaleidoscope of ideas, weaving together intricate plots, unforgettable characters, and thought-provoking themes that challenge the boundaries of imagination.
This guide will teach you how to set up a proxy server on macOS using SquidMan.
What’s a proxy server?
A proxy server is a computer that sits between a user and the Internet, and when using a proxy, all traffic between the end user and any website they visit is channeled through the proxy server. There are a number of reasons to use a proxy server, and one common reason is to make it look like traffic is coming from the proxy server’s location, not the end user’s location. This can give users access to content that is restricted by location. Proxies can also provide other functionality like data encryption, caching, network optimizations, and more.
1 – Install SquidMan
We’re going to use Squid as our proxy. We’re actually going to install SquidMan which is a manager for the Squid proxy cache. Installing SquidMan is all you need to get started.
After downloading SquidMan open the dmg file and move the SquidMan application into your Applications folder.
2 – Open the SquidMan app
You can open the app by using Finder to navigate to your Applications folder and clicking on the SquidMan icon.
Or you can simply type cmd + space bar, and search for squidman. The app will open up to the preferences page.
3 – Configure your proxy
This guide won’t cover all of the configuration details. No configuration is required for basic usage, but notice the default port is set to 8080.
Make sure to save your preferences.
4 – Enable the IP range for your client
To connect to this proxy you’ll need to enable the IP range for the client device you will connect with. To do this click on the Clients in SquidMan > Preferences. Then click on New, and add your IP range.
I used 192.168.1.0/24 to allow any device on my local network.
You’ll need to get the IP address of your Macbook. To do so you can open up the Network Utility on your Macbook. Make sure the Wi-Fi interface (en0) is selected. Use the IP address shown for the server. The port will be 8080 unless you changed it.
Example details
Server: 192.168.1.244
Port: 8080
NEXT UP
How to Enable the “Popping” Sound When Adjusting the Volume on Your Mac
Starting with MacOS Sierra and High Sierra, your Mac will no longer play a “pop” sound when you adjust your volume. If you prefer to have this sound when you adjust volume up and down (as I do), this guide will teach you how to reenable it. 1 – Open Sound System Preferences Navigate to System
Introducing Howchoo, an enigmatic author whose unique pen name reflects their boundless curiosity and limitless creativity. Mysterious and multifaceted, Howchoo has emerged as a captivating storyteller, leaving readers mesmerized by the uncharted realms they craft with their words.
With an insatiable appetite for knowledge and a love for exploration, Howchoo’s writing transcends conventional genres, blurring the lines between fantasy, science fiction, and the surreal. Their narratives are a kaleidoscope of ideas, weaving together intricate plots, unforgettable characters, and thought-provoking themes that challenge the boundaries of imagination.