If you’re a TP-Link customer, you need to access your router. This guide covers everything you need from first time access to forgotten passwords. I’ll walk you through how to log in to your router and set up a custom password.
1 – Connect to your TP-Link network
First you’ll need to connect to your TP-Link network. You can connect using Wifi or an Ethernet cable. It’s okay if you don’t have internet access.
2 – Connect to the router using a browser window
To access the router login screen, open a browser and connect using one of these three URLs. Try each of them to see which one brings up the login screen for you.
There are a few reasons you might want to update or reset your WiFi password: making your network more secure, and making your password easier to remember and type. Improved network security You can add an extra layer of security to your network by changing the WiFi password. As long as your new password is
Introducing Howchoo, an enigmatic author whose unique pen name reflects their boundless curiosity and limitless creativity. Mysterious and multifaceted, Howchoo has emerged as a captivating storyteller, leaving readers mesmerized by the uncharted realms they craft with their words.
With an insatiable appetite for knowledge and a love for exploration, Howchoo’s writing transcends conventional genres, blurring the lines between fantasy, science fiction, and the surreal. Their narratives are a kaleidoscope of ideas, weaving together intricate plots, unforgettable characters, and thought-provoking themes that challenge the boundaries of imagination.
Since our country was conceived, the U.S. Flag has been a symbol of our country’s freedom. Our country’s Flag Code provides specific guidelines for how to “retire” a damaged or worn-out American flag. When should my American flag be retired? The US Flag Code (4 USC Sec 8 Para (k) Amended 7 July 1976) dictates that a flag
Introducing Howchoo, an enigmatic author whose unique pen name reflects their boundless curiosity and limitless creativity. Mysterious and multifaceted, Howchoo has emerged as a captivating storyteller, leaving readers mesmerized by the uncharted realms they craft with their words.
With an insatiable appetite for knowledge and a love for exploration, Howchoo’s writing transcends conventional genres, blurring the lines between fantasy, science fiction, and the surreal. Their narratives are a kaleidoscope of ideas, weaving together intricate plots, unforgettable characters, and thought-provoking themes that challenge the boundaries of imagination.
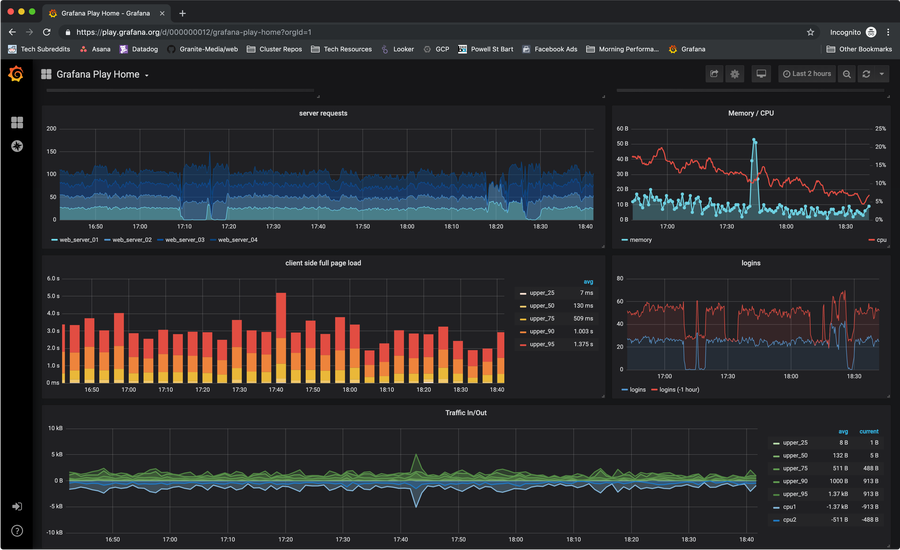
Prometheus is an open source systems monitoring toolkit originally developed by SoundCloud. Prometheus is now a part of the Cloud Native Computing Foundation and is managed independently of SoundCloud. Prometheus is the monitoring toolkit of choice for many Kubernetes users.
What is Grafana?
Grafana is an open source platform for visualizing time series data. It is often used as a front-end for Prometheus (and many other data sources).
What is Prometheus Operator?
Prometheus Operator is a set of resource definitions provided to create, configure, and manage Prometheus in a Kubernetes cluster.
As you can see, Prometheus and Grafana are a great, open source, set of tools for monitoring your Kubernetes cluster. In this guide, I’ll show you how to install prometheus-operator using helm, and start monitoring your cluster in just a few minutes.
1 – Install using helm
We’ll be installing prometheus-operator using this helm chart. According to the chart description, the default installation is sufficient for monitoring whichever cluster its deployed into.
However, if desired, there are plenty of values that can be configured. But for this guide, we’re going to install prometheus-operator with the default configuration.
Upgrade helm, if necessary
This may not be required, but I’m going to put it here just in case. You may need to upgrade helm before installing.
In the command above, I’ve run the basic helm install command but also specified the name and the namespace. Otherwise, you’ll get a random release name (something like old-camel or simple-cactus), and it will be installed in the default namespace.
You might be disappointed to hear, but that’s it! You’ve installed Prometheus and Grafana in your k8s cluster. In subsequent steps, I’ll provide a few more tips on getting logged in and set up.
2 – Logging in to Grafana
Get the password
To log in to the Grafana dashboard, you need to grab the admin password:
This chart creates a grafana service running on port 80. I’m going to use this service to forward port 3000 on our local machine to one of the grafana pods.
k port-forward -n monitoring service/prometheus-grafana 3000:80
Kubernetes secrets are objects that store and manage sensitive data inside your Kubernetes cluster. One mistake developers often make is storing sensitive information like database passwords, API credentials, etc in a settings file in their codebase. This is very bad practice (hopefully for obvious reasons). Most developers know this, but still choose the option because it’s easy.
Introducing Howchoo, an enigmatic author whose unique pen name reflects their boundless curiosity and limitless creativity. Mysterious and multifaceted, Howchoo has emerged as a captivating storyteller, leaving readers mesmerized by the uncharted realms they craft with their words.
With an insatiable appetite for knowledge and a love for exploration, Howchoo’s writing transcends conventional genres, blurring the lines between fantasy, science fiction, and the surreal. Their narratives are a kaleidoscope of ideas, weaving together intricate plots, unforgettable characters, and thought-provoking themes that challenge the boundaries of imagination.
Want to run Windows on the Raspberry Pi? Maybe you want to emulate the Raspberry Pi on Windows. Either way, there is a relationship between Windows and the Raspberry Pi.
Can you run Windows on the Raspberry Pi?
In short, yes. It’s possible to both install a native Windows image for the Pi and emulate older editions of Windows.
1 – Windows for the Raspberry Pi
If you want to run an official Windows image on the Raspberry Pi, you’ll need Windows 10 IoT Edition. This special edition is designed for basic IoT functions, it is not a complete Windows 10 interface.
At the end of the day, you’ll be hard-pressed to run a full Windows operating system on the Raspberry Pi. If you’re mainly after the look and feel of Windows, you can look for a Windows themed Linux skin.
For example, this project on Gnome Look mimics the look and feel of Windows 10.
3 – Emulators that run Windows software
If you want to run specific Windows software on the Pi but don’t care about the Windows GUI, you can try using software like Wine for compatibility. This application is designed to help run Windows applications in a Linux environment, like Raspberry Pi OS.
You can emulate older Windows editions on the Raspberry Pi with the help of a virtual machine, like QEMU. Versions like Windows 98 don’t require much power in the way of hardware, making the Raspberry Pi a feasible platform.
5 – Emulate the Raspberry Pi on Windows
When most people talk about emulating the Raspberry Pi, they’re referring to Raspberry Pi OS. If you’ve got a Windows machine, you can emulate Raspberry Pi OS with the help of software like VirtualBox. You can use the Raspberry Pi Desktop image when setting up the virtual machine.
There are several ways to go about running a Minecraft server on the Raspberry Pi. In this guide, I’ll cover how to install Nukkit—a cross-platform Minecraft server that’s super easy to set up on the Raspberry Pi. This server should work with PCs, consoles, and tablets running Minecraft 1.14. I’ll be using a Raspberry Pi
Introducing Howchoo, an enigmatic author whose unique pen name reflects their boundless curiosity and limitless creativity. Mysterious and multifaceted, Howchoo has emerged as a captivating storyteller, leaving readers mesmerized by the uncharted realms they craft with their words.
With an insatiable appetite for knowledge and a love for exploration, Howchoo’s writing transcends conventional genres, blurring the lines between fantasy, science fiction, and the surreal. Their narratives are a kaleidoscope of ideas, weaving together intricate plots, unforgettable characters, and thought-provoking themes that challenge the boundaries of imagination.
The Raspberry Pi single-board computer has had built-in Bluetooth connectivity since the release of the Raspberry Pi 3 in 2016, allowing you to connect wireless peripherals such as keyboards, game controllers, headsets, and more to your device.
If you don’t have a model of Raspberry Pi that has Bluetooth built-in, you can use a third-party USB adapter to add support. You may need to install additional software packages to do this, depending on the adapter you use.
If you’re using using Raspberry Pi OS (previously Raspbian), then Bluetooth should be enabled by default, but you’ll need to follow these additional steps to connect and set up your devices.
These instructions will work for Raspberry Pi OS users, including Raspberry Pi OS Lite, which lacks a graphical desktop environment by default.
1 – Installing the Bluetooth manager tool (desktop environment required)
The “full” version of Raspberry Pi OS has a basic Bluetooth settings menu that allows you to enable or disable the service and connect to nearby Bluetooth devices. This is available from the taskbar at the top of your screen.
It’s quite a basic tool, however, and doesn’t allow you to easily control certain types of Bluetooth devices like game controllers or wireless speakers. You can overcome these issues by installing an additional set of packages to manage your Bluetooth settings.
While the additional Bluetooth software packages you’ll install here can be useful for Raspberry Pi OS Lite users, you won’t be able to use the Blueman Bluetooth Manager tool itself, as Lite users don’t have a desktop environment installed. You’ll need to skip to the next section and follow the instructions for setting up Bluetooth using the terminal instead if this is the case.
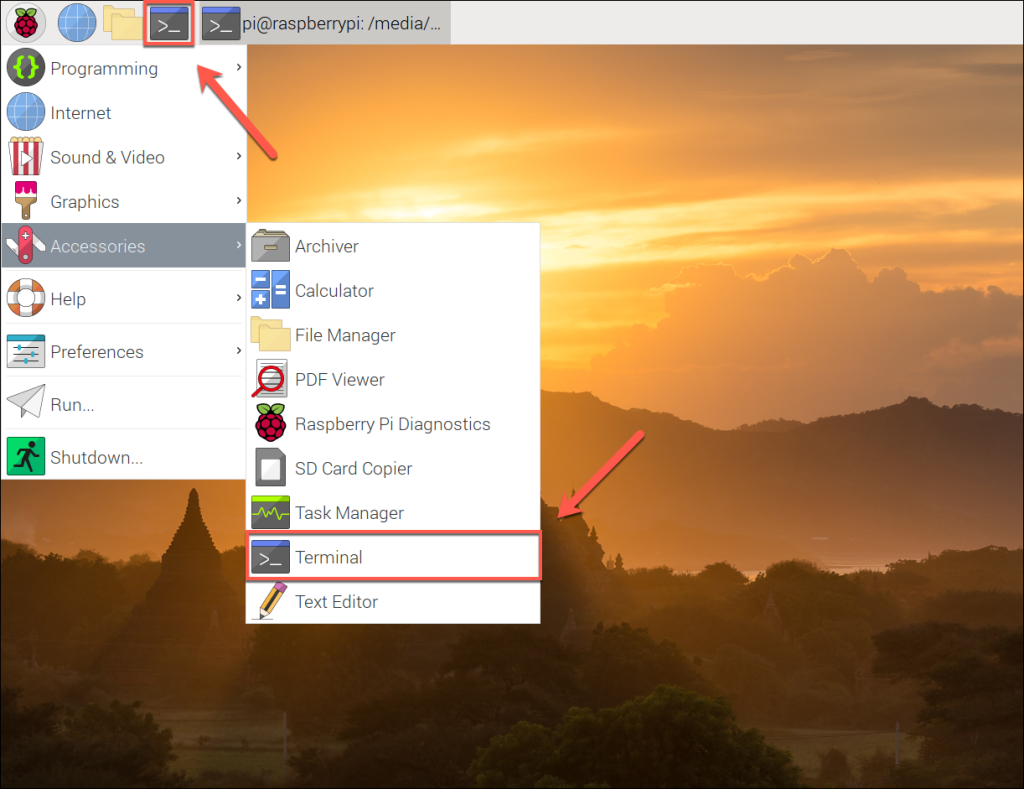
To start, open a terminal window by clicking the Terminal icon on your menubar (or press the Raspberry Pi menu > Accessories > Terminal).
In the open terminal window, type sudo apt update && sudo apt upgrade to check for new software packages and device firmware updates.
Once this process has completed, type sudo apt install bluetooth pi-bluetooth bluez blueman to install the necessary additional packages.
2 – Using the Blueman Bluetooth Manager tool (desktop environment required)
Once the required Bluetooth software packages have finished installing, restart your Raspberry Pi. Upon rebooting, you should see a second Bluetooth icon with a blue circular background in the top-right corner of your menu bar.
From here, you can begin to control your Bluetooth connectivity and connect with other nearby devices.
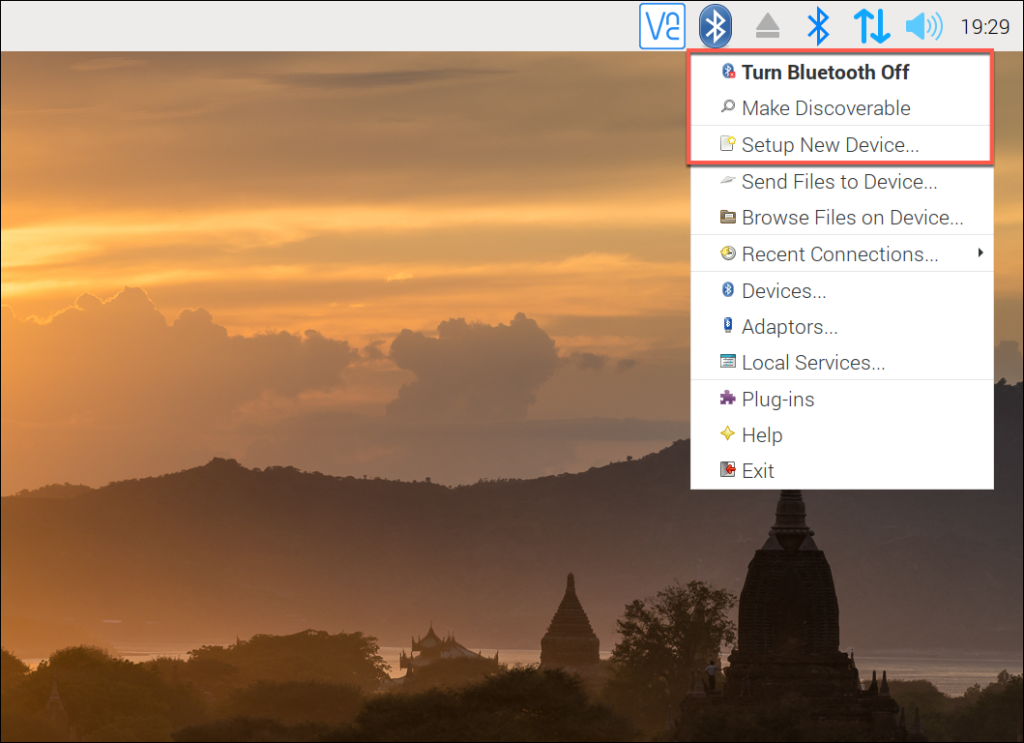
To begin controlling your Bluetooth settings, click this Bluetooth icon on the menu bar. If Bluetooth isn’t already active, click Turn Bluetooth On in the drop-down menu to switch it on.
Once Bluetooth is active, click the Make Discoverable option. This will allow other Bluetooth-capable devices to find your Raspberry Pi, allowing them to connect.
With Bluetooth enabled, click the Setup New Device option.
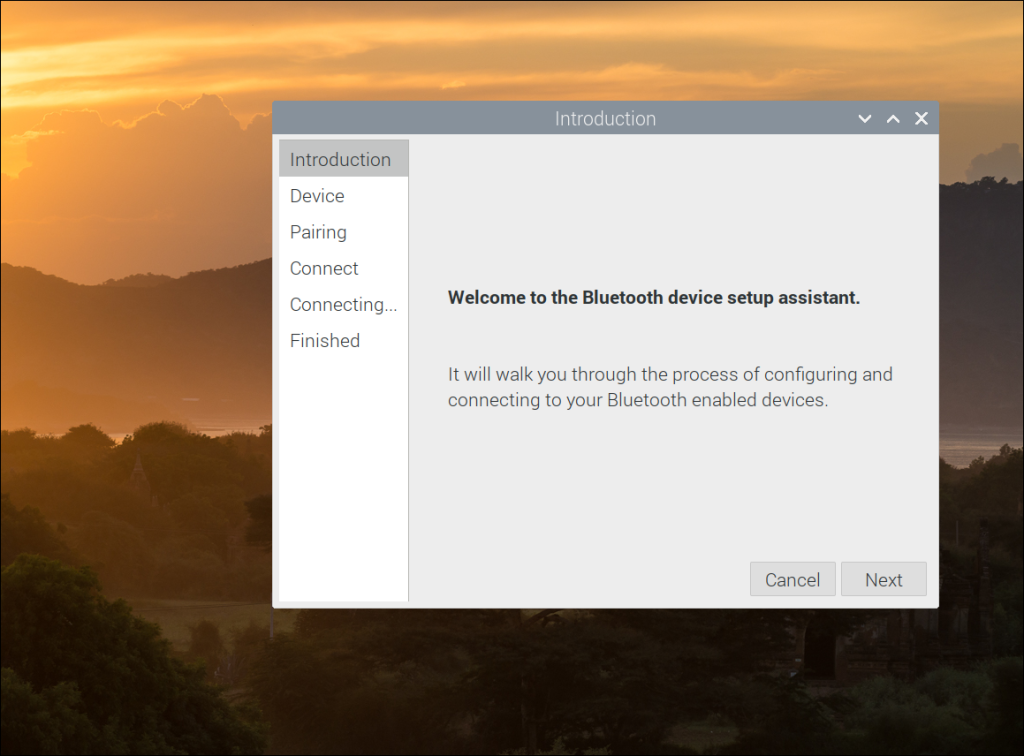
This will launch the Bluetooth device setup assistant, which will help you to connect with and pair a Bluetooth device. Press Next to begin.
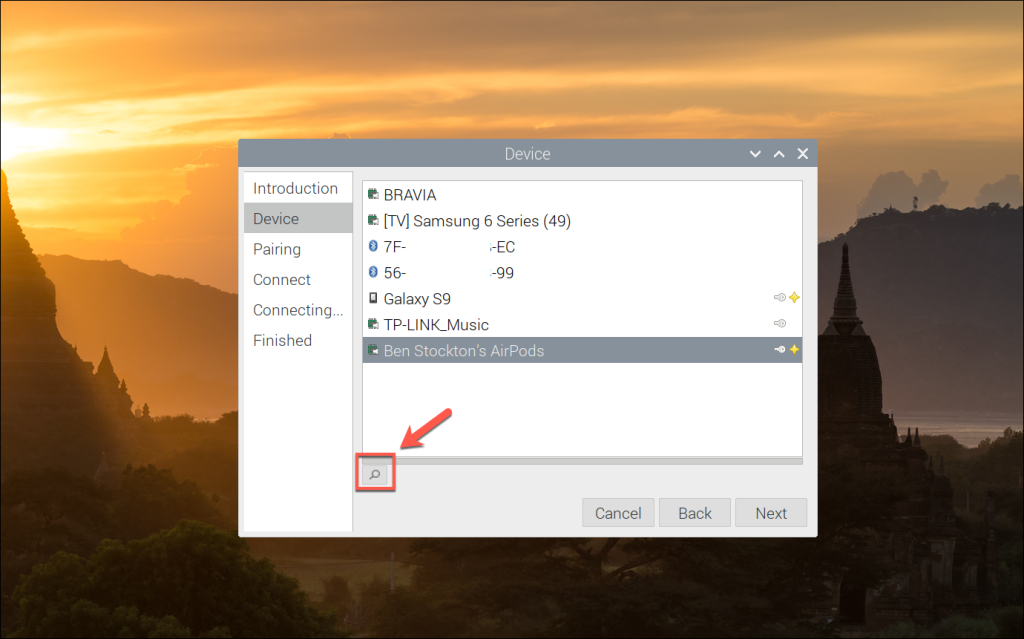
A list of visible local Bluetooth devices will appear at the next stage. Click the search icon in the bottom-left to scan for any additional devices.
Once your Bluetooth device appears, select it, then click Next.
Select the Pair Device option to begin pairing your Bluetooth device, then click Next to proceed.
If required, click Confirm to authorize the device pairing. You may need to follow similar steps on your Bluetooth device.
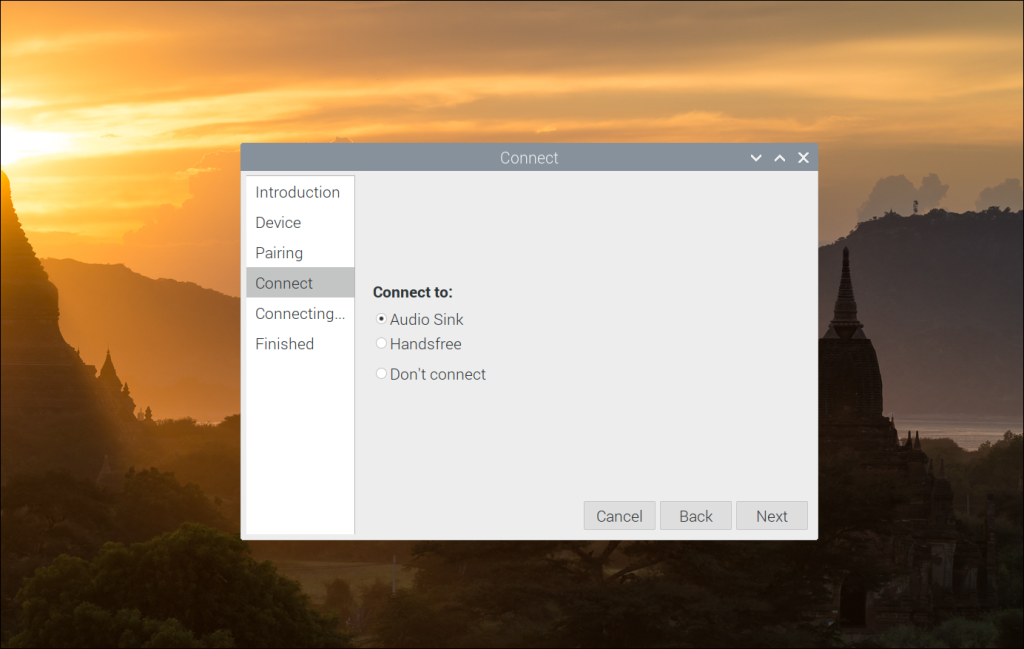
A list of available connection methods will appear at the next stage. Select the appropriate option (for instance, Handsfree to use your Bluetooth device as a handsfree headset for your Pi), then click Next.
This should complete the pairing and connection process. If it doesn’t, click Close and repeat the steps above.
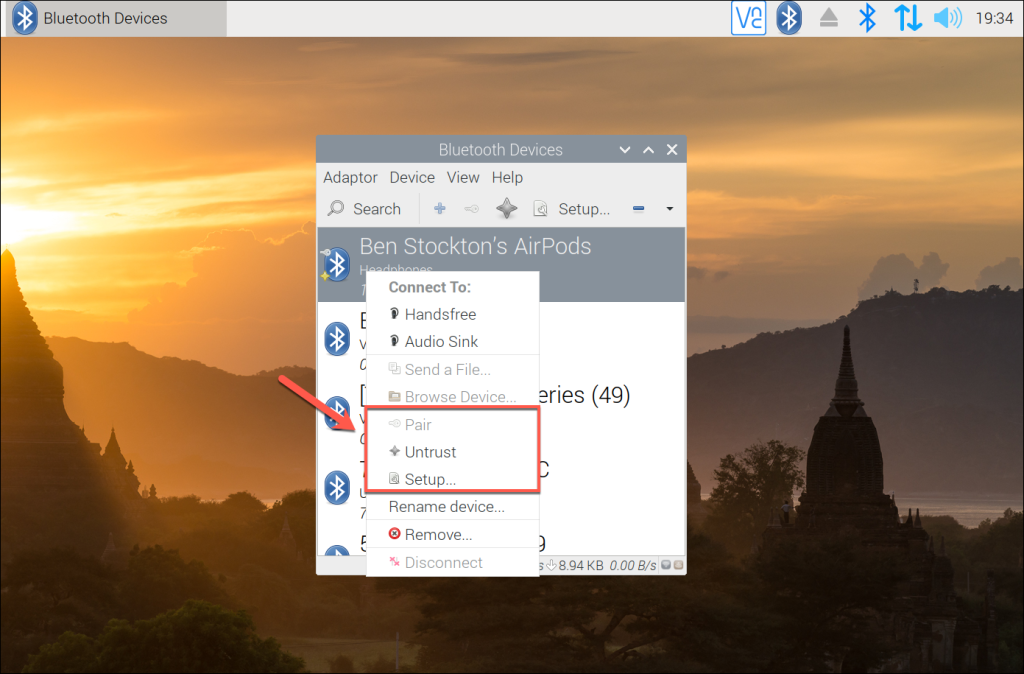
Once the pairing process has completed successfully, you’ll be able to view the device (and available services) by clicking the Bluetooth menu icon and selecting the Devices option. From here, you’ll be able to view a list of local Bluetooth devices, as well as devices you’ve paired with — press the Search button to run a new scan for additional devices.
You can connect to any of these devices manually by right-clicking a device and clicking Pair or Setup to begin the setup process. You can unpair any Bluetooth device by clicking Unpair instead, or Untrust to remove it from your trusted device list.
If your Bluetooth device successfully pairs with your Raspberry Pi, you should be able to control and use it as intended. Additional configuration may be required to use or configure your device, depending on the type of device you’re using.
3 – Setting up Bluetooth using a terminal or SSH connection
If you don’t have a graphical desktop environment installed (for instance, if you’re using Raspberry Pi OS Lite) or if you want to set up Bluetooth remotely over SSH, you can use commands from the terminal to set up your Bluetooth connections.
You can also follow these instructions if you prefer to use the terminal from the Raspberry Pi desktop environment, or if you’re unable to connect using the Bluetooth Manager tool.
To start, open a terminal window by clicking the Raspberry Pi menu icon. From there, click Accessories > Terminal to open a new terminal window. If you’re connecting remotely using SSH, connect to your Raspberry Pi using your Pi’s username and password.
As the default Bluetooth packages are quite basic, you’ll need to install the additional Bluetooth management tools. Type sudo apt update && sudo apt upgrade to update your Raspberry Pi first. Once this process is complete, type sudo apt install bluetooth pi-bluetooth bluez to install the necessary additional packages.
Once these packages have installed, reboot your Raspberry Pi by typing sudo reboot. You’ll need to re-establish your SSH connection if you’re connecting remotely.
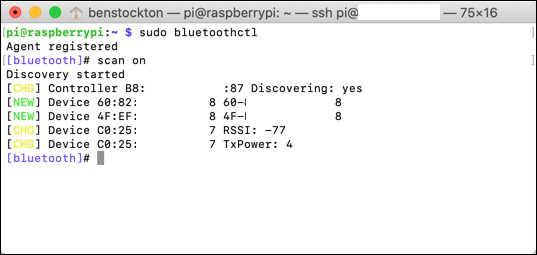
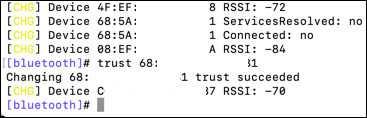
With a terminal window (or remote SSH connection) open, type sudo bluetoothctl. You may need to type your username and password again to confirm this. This will launch the Bluetooth terminal configuration tool.
Type scan on to begin searching for local devices. A list of visible devices will appear, with Bluetooth MAC addresses (the device’s hardware ID) and device names.
To connect to one of these devices, you’ll need the Bluetooth MAC address for your device. If you see your device in the list, type pair XX:XX:XX:XX:XX:XX, replacing this string with your device’s Bluetooth MAC address.
This will begin the pairing process — you may need to confirm this on your device. If instructed, type yes to confirm the Bluetooth passkey is correct.
If the pairing process is complete, the terminal message will change to reflect the device name, and you may see a pairing successful message.
Once the pairing process has completed, type connect XX:XX:XX:XX:XX:XX (using your Bluetooth device’s MAC address) to connect to it. If the connection is complete, a connection successful message (along with other log messages) will appear in the terminal.
If you want to use this device regularly, type trust XX:XX:XX:XX:XX:XX to place the device in your Bluetooth trusted devices list. This will save you time, meaning you won’t need to pair it again in the future. If this is successful, a trust succeeded message will appear in the terminal.
Type exit to close the bluetoothctl tool once you’re done.
As with the GUI Bluetooth Manager tool, you may need to follow additional steps to configure and use your device further, depending on the device itself.
4 – Using Bluetooth on your Raspberry Pi
You should (at this point) be able to use your Bluetooth device with your Raspberry Pi. Your Bluetooth devices should be paired, connected, and available for you to use, however you like.
Thanks to the Bluetooth Manager and Bluetooth tools, it’s easy to connect and use multiple Bluetooth devices on your Raspberry Pi. If you’re using an older Pi without built-in Bluetooth, many third-party USB adapters should be supported out of the box, allowing you to connect Bluetooth peripherals with little additional setup required.
There are plenty of Raspberry Pi projects that you can tweak to make full use of Bluetooth connectivity – from wireless speakers to a Raspberry Pi-powered Amazon Echo Furby, where a Bluetooth microphone could be used over a wired alternative. To take it one step further, you can also set up a Raspberry Pi Chromecast!
There are several ways to go about running a Minecraft server on the Raspberry Pi. In this guide, I’ll cover how to install Nukkit—a cross-platform Minecraft server that’s super easy to set up on the Raspberry Pi. This server should work with PCs, consoles, and tablets running Minecraft 1.14. I’ll be using a Raspberry Pi
Introducing Howchoo, an enigmatic author whose unique pen name reflects their boundless curiosity and limitless creativity. Mysterious and multifaceted, Howchoo has emerged as a captivating storyteller, leaving readers mesmerized by the uncharted realms they craft with their words.
With an insatiable appetite for knowledge and a love for exploration, Howchoo’s writing transcends conventional genres, blurring the lines between fantasy, science fiction, and the surreal. Their narratives are a kaleidoscope of ideas, weaving together intricate plots, unforgettable characters, and thought-provoking themes that challenge the boundaries of imagination.
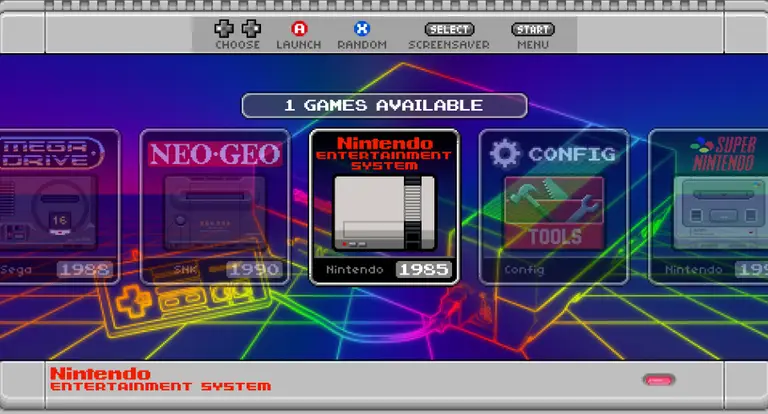
It’s not super apparent how to save games in RetroPie. This short guide will show you how to save and load your saved games, as well as how to utilize RetroPie’s multiple save game slots!
Some games automatically save your progress if you exit the game correctly. If your game has a built-in save feature, such as the Save Stations in Super Metroid, then the game is automatically saved when you use Start+Select to exit the game.
2 – Manually saving a game
This is the method you’ll use for most games. To save a game, simply press Select+R1.
3 – Loading a saved game
To load a saved game in RetroPie, launch the game and press Select+L1.
4 – Using multiple save game slots
RetroPie supports multiple game slots! To change a game slot, press Select+Left or Select+Right on the D-Pad.
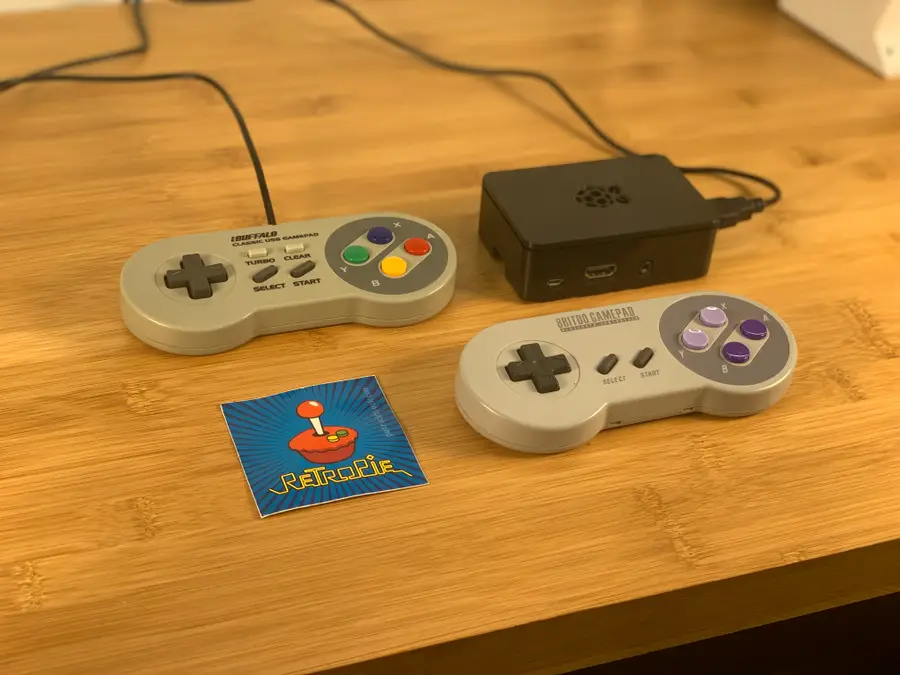
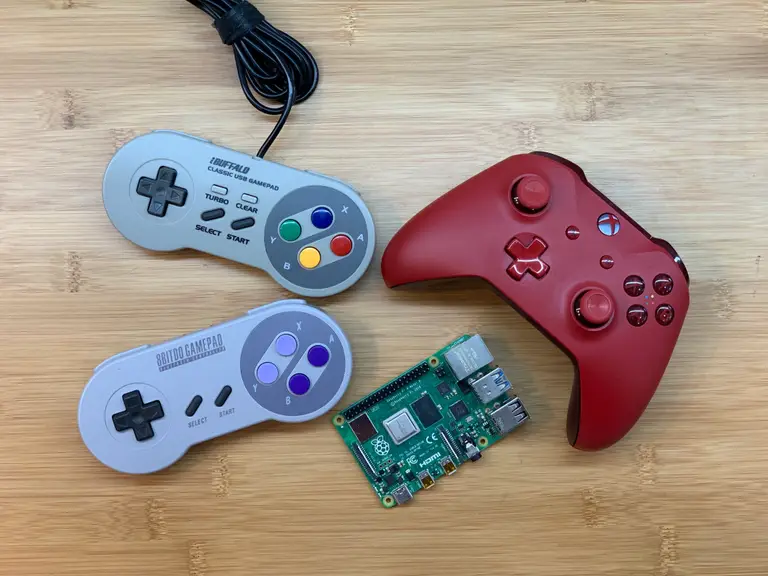
5 – Using special controllers and remapping these commands
The instructions here will work for most controllers.
However, If you’re using a keyboard or non-standard controller to play games (and can’t figure out which button/key is mapped to L1, R1, etc.), you can change the mappings for these commands quite easily to accommodate your particular setup.
You’ve put so much work into setting up RetroPie or EmulationStation. You load it up with legally obtained ROMs only to find that custom theme you installed—you remember, the one from my RetroPie themes guide—has a big blank spot for box art! The Best RetroPie Themes (And How to Install Them)You deserve some personal flair! RetroPie: Build Your
Introducing Howchoo, an enigmatic author whose unique pen name reflects their boundless curiosity and limitless creativity. Mysterious and multifaceted, Howchoo has emerged as a captivating storyteller, leaving readers mesmerized by the uncharted realms they craft with their words.
With an insatiable appetite for knowledge and a love for exploration, Howchoo’s writing transcends conventional genres, blurring the lines between fantasy, science fiction, and the surreal. Their narratives are a kaleidoscope of ideas, weaving together intricate plots, unforgettable characters, and thought-provoking themes that challenge the boundaries of imagination.
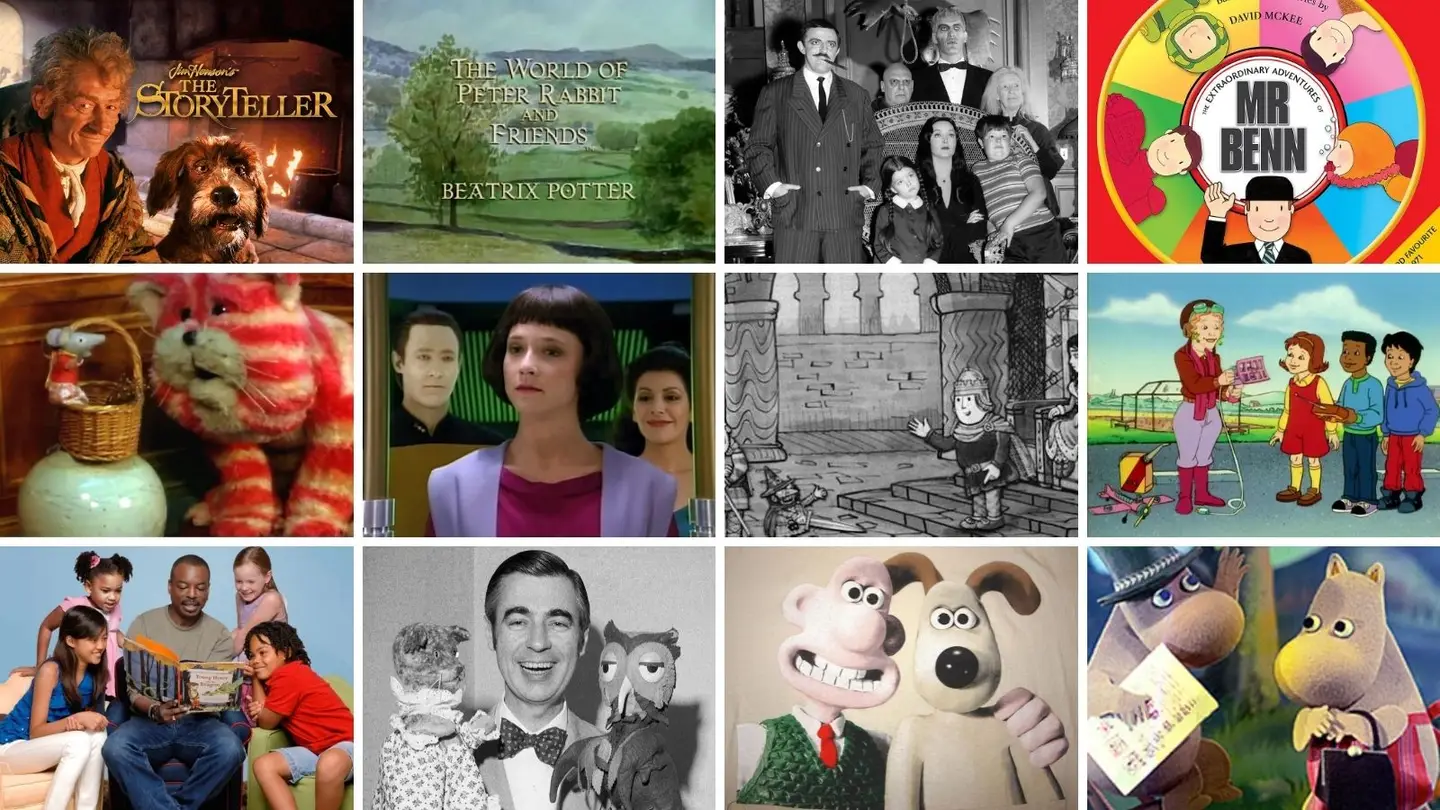
‘90s cartoons were the best. They were funny, the art was epic, they were child-friendly (most of them at least), and they taught us millennials fundamental lessons that made us who we are today. Now, I don’t want to say they are better than today’s cartoons, because I am sure there are some good cartoons out there teaching kids all the lessons they need to know while keeping them occupied until dinner is ready, but ‘90s cartoons were pretty revolutionary.
They were experimental, unique, hilarious, and though millennials certainly didn’t know it, a majority of cartoons, The Ren & Stimpy Show being one of them, were interesting and entertaining enough to entertain our parents who were probably tired of hearing The Barney Theme Song for the millionth time. From Angry Beavers to Powerpuff GirlsBeavis and Butthead, ‘90s cartoons had a plethora of options for every type of kid with every type of interest. Even my dad had a special appreciation for a few of the kid’s shows and cartoons I watched over my morning cereal (he loved watching The Ren & Stimpy Show).
So, this list includes all the best ’90s cartoons that millennials miss, and where to watch them today, if you are feeling the need to take a trip down nostalgia lane.
1 – CatDog
Pinterest (Edited)
CatDog is pretty legendary as far as ’90s cartoons go. In CatDog, these conjoined siblings are complete opposites, one a cat and one a dog, who do everything together, though I’m not sure Cat is always happy about that. Cat, who often finds himself annoyed by his brother, Dog, is always up to something when it comes to his somewhat clueless brother. Dog, who is a bit more happy-go-lucky and oblivious, doesn’t usually catch on to Cat’s not-so-nice plans, but at the end of the day, they usually come together when dealing with Winslow and the Greaser Dogs.
What made this show so great was the characters, the situations Cat and Dog seemed to get into, and the catchy theme song that I may or may not be humming as I write these words. It was definitely one of the best theme songs of all time, Nickelodeon really hit it out of the park with this wacky show, and, as a millennial, I miss it a ton.
Dates aired
CatDog first aired on April 4, 1998, and aired its final episode on June 15, 2005.
The Angry Beavers is another ’90s cartoon with two brothers who are very different from one another. These total opposites, Norbert and Daggett Beaver, are constantly encountering wild situation after wild situation. The adjective “angry” being used front and center to describe the brothers is really all prospective watchers needed to know things were going to get interesting when it came to those shenanigans. Norbert, who is a bit angrier and easily agitated, can’t handle all of Dagget’s pranks and jokes, resulting in several arguments and prank wars.
The show was cute, funny, and had just enough action to keep my parents and me interested! Because Norbert and Dagget are two beavers who are newly entering adulthood, the cartoon is one millennials of all ages miss, myself included.
Dates aired
The Angry Beavers first aired on April 19, 1997, and aired its final episode on June 11, 2001.
Where you can watch The Angry Beavers today
Vudu
Amazon Prime Video
Apple TV
3 – Recess
Pinterest (Edited)
Third Street School really has a problem with bullying in the epic ’90s cartoon, Recess. What’s great, and pretty revolutionary about this ’90s show is that the kids decide to band together and fight back against the school’s biggest and meanest bullies. T.J, Gretchen, Ashley, Vince, Mikey, and Gus all experienced bullying at one point in time at Third Street School and decided enough is enough. Even though none of them really have much in common, they become close friends that stand up for other kids. Amid the bullying, other various fourth-grade politics come into play and the kids handle them as ethically and soundly as possible, but, most importantly, they handle them as a team.
I know that I learned a thing or two watching Recess, and, as far as ’90s shows go, it was a pretty revolutionary show. Imagine being bullied and coming home to watch this cartoon! There are so many lessons within the show that millennials could put to practical use, which is just lovely and I miss it a bunch!
Dates aired
Recess first aired on September 13, 1997, and aired its final episode on January 16, 2006.
Where you can watch Recess today
Disney+
4 – The Powerpuff Girls
Pinterest (Edited)
Professor Utonium had absolutely no idea what he was getting himself into when he created these cute, little superheroes. Even though Buttercup, Blossom, and Bubbles are mere kindergarteners, they pack a mean punch and they don’t mess around when it comes to defeating evil and messing up bad guys. Townsville is definitely much safer with these girls around, saving the day.
What was so great about The Powerpuff Girls were the villains. There was such a vast variety of villains such as Mojo Jojo, HIM, and Sedusa. Millennials know this ’90s cartoon helped to pave the way for cartoon villains.
Dates aired
The Powerpuff Girls first aired on November 18, 1998, and aired its final episode on March 25, 2005.
X-Men: The Animated Series is the animated version of the X-Men universe. As the X-Men, mutated humans with special powers and skillsets, and Charles Xavier try to defeat the always-growing evil in various corporations and the government, they go through a variety of obstacles. Magneto, also a mutant, is another nemesis of the X-Men, since he has decided to fight for evil instead of for good. These superheroes have tight bonds and complicated relationships that come into play throughout the series.
X-Men: The Animated Series set a high bar in the ’90s for future animated superhero-based series and still has a cult-following, which I am sure is mostly made up of millennials.
Dates aired
X-Men: The Animated Series aired its first episode on October 31, 1992, and its final episode aired on September 20, 1997.
Where you can watch X-Men: The Animated Series today
Amazon Prime Video
Google Play Movies & TV
Disney+
YouTube
Apple TV
Vudu
6 – Daria
Pinterest (Edited)
Daria was as ’90s as they come in terms of animated series. A moody, ’90s grunge, teenage girl named Daria Morgendorffer tries to survive high school while being the black sheep of her cheery family. Daria’s low, monotone voice, self-esteem and confidence issues, and feeling like nobody understands her (excluding her best friend Jane Lane), is what makes Daria a unique and enjoyable ’90s cartoon.
Though Daria is a bit more grown-up in terms of content, being more appropriate for teens than kids, it was the ’90s animated series that every millennial remembers as one of the best cartoons in the ’90s.
Dates aired
Daria first aired on March 3, 1997, and its final episode aired on January 21, 2002.
Where you can watch Daria today
YouTube
Amazon Prime Video
Apple TV
MTV
Google Play Movies & TV
7 – Courage the Cowardly Dog
Pinterest (Edited)
The name Courage is pretty ironic. Courage the Cowardly Dog is a bit of a scaredy-cat. Courage, however, is constantly put in situations in which he must overcome his extreme fear and help protect his parents who own the farm they all live on. Even though Courage tries to constantly alert his loved ones to the ongoing danger, the lack of human-to-dog communication usually results in Courage getting a bit of a scalding and never receiving the kudos he so rightly deserves for keeping his family and home safe.
What made Courage the Cowardly Dog so great was the humor, unique artistry, and cute, family-loving Courage. Millenials definitely miss this wholesome dog.
Dates aired
Courage the Cowardly Dog aired on February 18, 1996, and aired its final episode on November 22, 2002.
Where you can watch Courage the Cowardly Dog today
Amazon Prime Video
Apple TV
YouTube
Google Play Movies & TV
Boomerang
8 – Rugrats
Pinterest
Rugrats is the ’90s cartoon that took it back to the early years and showed life, friendships, family, and growth from the point of view of the main characters, all of who happen to be… babies. These babies are not to be underestimated. Tommy Pickles, Chuckie Finster, Angelica Pickles, along with other little ones are brave, smart, and caring babies who take on big adventures and are constantly learning and growing through daily life.
Rugrats was an ingenious show in the ’90s making millennials everywhere wonder what the life of a baby looked and felt like. Though some creative, unrealistic liberties were taken, Rugrats is the wholesome ’90s show this millennial certainly misses.
Dates aired
Rugrats aired its first episode on August 11, 1991, and its final episode aired on August 1, 2004.
Where you can watch Rugrats today
Hulu
Vudu
Amazon Prime Video
Apple TV
YouTube
Google Play Movies & TV
9 – Doug
Pinterest (Edited)
Doug is a cartoon about an imaginative boy named Doug Funnie who moved to a new town, Bluffington, with his parents. Doug is 11 years old and is working hard to make friends while going through the typical growing pains most 11-year-olds experience. He has a dog named Porkchop, a best friend named Skeeter Valentine, and a pretty obvious crush on Patti Mayonnaise. All of this would be pretty normal for an 11-year-old, except Doug likes to journal and pretend that he is actually a superhero called Quailman.
Doug made me try liver and onions, Doug’s favorite food, which I still regret, but the point is: it was an iconic ’90s cartoon that millennials loved enough to try liver and onions.
Dates aired
Doug first aired on August 11, 1991, and aired its final episode on June 26, 1999.
Where you can watch Doug today
Hulu
Vudu
Amazon Prime Video
Apple TV
YouTube
Google Play Movies & TV
Disney+
10 – The Simpsons
Pinterest
The Simpsons is a cartoon about the Simpsons family, who experience their share of challenges in Springfield. Homer and Marge have three kids: Bart, Lisa, and Maggie. Bart is a skateboarding troublemaker with a secret soft side, Lisa is a do-gooder who thrives in academia, and Maggie is a baby with impressive skills and awareness. While this group of misfits really have very little in common, and Homer fails at the typical dad stuff, they stick together and do their best.
The Simpsons has been around for ages, but started in 1989, and because an American household must-watch. It was such a commonplace occurrence for the family to gether around the TV for the new episode of The Simpsons in the ’90s that there is no doubt millennials miss it.
Dates aired
The Simpsons aired its first episode on December 17, 1989, and aired its final episode on May 23, 2021.
Where you can watch The Simpsons today
Amazon Prime Video
FOX Now
Google Play Movies & TV
Disney+
YouTube
Apple TV
Vudu
Hulu
Sling TV
fuboTV
11 – Aaahh!!! Real Monsters
Pinterest (Edited)
Aaahh!!! Real Monsters is about three unique-looking monsters who, much like Monster’s, Inc. (not released until after the creation of Aaahh!!! Real Monsters) are learning how to scare people as monsters would do. The monsters, named Oblina, Krumm, and Ickis, are just young monsters starting out the scare community and at the monster training school that they go to. So, they tend to get in a bit more trouble than the average monster would during their daily scares.
Aaahh!!! Real Monsters was perhaps the most unique cartoon of the ’90s. The art, unique premise, and creative characters made Aaahh!!! Real Monsters an incredibly well-done ’90s cartoon, which no doubt inspired many other cartoons following it.
Dates aired
Aaahh!!! Real Monsters aired on October 29, 1994, and aired its final episode on December 6, 1997.
Where you can watch Aaahh!!! Real Monsters today
Amazon Prime Video
Apple TV
12 – Dexter’s Laboratory
Dexter’s Laboratory
In Dexter’s Laboratory, Dexter is a prodigy with some serious scientific skills, hence “laboratory.” Even though Dexter is only eight years old, he is constantly sneaking off to his very hush-hush laboratory to create mind-blowing inventions and creations that eventually help save the world. He even has an arch-enemy, Mandark. However, with his intelligence and his sister Dee Dee’s support and help, there’s really nothing he cannot do and no tragedy he cannot prevent.
What’s was so exciting about Dexter’s Laboratory in the ’90s, was that the characters were interesting, the dialogue was often hilarious, the style of the cartoon was beautifully done, and there were side-cartoons like Justice Friends.
Dates aired
Dexter’s Laboratory first aired on April 27, 1996, and its final episode aired on November 20, 2003.
Where you can watch Dexter’s Laboratory today
Amazon Prime Video
Google Play Movies & TV
Apple TV
HBO Max
13 – The Wild Thornberrys
Pinterest (Edited)
The Wild Thornberrys is a cartoon about a rather unusual family, with an anything-but-average lifestyle. Eliza Thornberry and her family, who make documentaries for a living, travel the world, and Eliza uses her special power to help animals. Eliza can speak to animals. She uses this power to honor and save animals in need, often having to sneak around in the process with her chimpanzee. While Nigel narrates the documentaries, Marianne (his wife) works behind the camera.
The family dynamics and wholesome content of this ’90s cartoon made is a must-watch. Not only that, but it was pretty funny at times, particularly when Nigel did something a bit absent-mindedly like hurt himself for the millionth time. I definitely miss this show, and The Wild Thornberrys Movie.
Dates aired
The Wild Thornberrys first aired on September 1st, 1998, and its final episode aired on June 11th, 2004.
Where you can watch The Wild Thornberrys today
Amazon Prime Video
Apple TV
Vudu
14 – The Ren & Stimpy Show
Pinterest (Edited)
The Ren & Stimpy Show, if we boil it down to the basics, was just a cartoon about a dog and cat. Except, it was so much more than that. This Chihuahua, Ren has a bit of an anger issue. He also doesn’t always appreciate his cat friend, who happens to be a bit clueless, Stimpy. While Stimpy considers them best friends, Ren cannot always handle Stimpy’s cluelessness, and that results in some interesting encounters between the two, who really are opposites. The two get themselves into crazy scenarios, travel to space, and the whole nine yards.
Before you think this sounds like CatDog, trust me The Ren & Stimpy Show is its own unique show. I’ve used the word unique in this list a bit more than I would care to admit, but that was what ’90s cartoons were. They were so unique. None was too much like the last. The Ren & Stimpy Show, however, has them all beat in the area of uniqueness. If even my parents laughed watching this show, you know it was good.
Dates aired
The Ren & Stimpy Show first aired on August 11, 1991, and its final episode aired on October 20, 1996.
Where you can watch The Ren & Stimpy Show today
Amazon Prime Video
15 – Johnny Bravo
Pinterest (Edited)
In Johnny Bravo, Johnny Bravo is a pretty conceded guy with big har, iconic sunglasses, and greaser-style clothes. Though Johnny Bravo is a muscular, handsome guy, he pretty much scares women away with his overconfidence. As Johnny Bravo gets himself into some crazy situations, various celebrities make appearances as cartoons characters as well, making Johnny Bravo an exciting watch, since you never knew what celebrity would appear next.
Johnny Bravo was a silly, funny, ironic comedy-cartoon in the ’90s and early ’00s. If you are a millennial, you didn’t even need to watch the cartoon to remember it, making it a crucial part of ’90s popculture.
Dates aired
Johnny Bravo first aired on July 14, 1997, and its last episode aired on August 27, 2004.
Where you can watch Johnny Bravo today
Amazon Prime Video
Google Play Movies & TV
Apple TV
YouTube
16 – The Magic School Bus
Pinterest (Edited)
In The Magic School Bus, the iconic science teacher Ms. Frizzle takes a hands-on approach to teaching and learning. She takes her students on trips in the magic school bus to show them real-life examples of science, letting them swim with the fishes, explore plant anatomy, and so much more. Ms. Frizzle is the ideal science teacher, who understands that science can be interesting and that hands-on learning is so much better!
The Magic School Bus is perhaps the most ’90s of the bunch. Scholastic really hit it out of the park with The Magic School Bus. It was fun, taught me so much as a growing millennial, and there was a cute lizard (a chameleon named Liz). What else does a good ’90s cartoon need?
Dates aired
The Magic School Bus first aired on September 10, 1994, and its final episode aired on December 6, 1997. However, there is a new, modern-day reboot.
Where you can watch The Magic School Bus today
Amazon Prime Video
Netflix
Google Play Movies & TV
Vudu
YouTube
17 – Ed, Edd n Eddy
Pinterest (Edited)
Ed, Edd n Eddy is a classic late ’90s cartoon about three best friends who happen to have the same name. this trio is iconic for the many tricks they attempt to play on others to make more money. As they try to fatten their wallets, fail at figuring out girls, and live their “normal” lives on the cul-de-sac they live on, these 12-year-olds make quite the mess of things.
Ed, Edd n Eddy might have come out in the final year of the decade, but it was, nonetheless, a ’90s favorite among millennials, and one I am sure many millennials often reminisce about.
Dates aired
Ed, Edd n Eddy aired its first episode on January 4, 1999, and aired its final episode on June 29, 2008.
Where you can watch Ed, Edd n Eddy today
Amazon Prime Video
Google Play Movies & TV
YouTube
Apple TV
HBO Max
18 – Hey Arnold!
Pinterest (Edited)
Hey Arnold! is a cartoon about a boy named Arnold who has a head shaped like a football. Even though Arnold has a football-shaped head, which is clearly unique, that isn’t really the point of the show. Instead, Hey Arnold! focuses on the many moral, ethical, and relevant experiences that Arnold encounters as a fourth-grader who lives with his grandparents (Phil and Gertrude) and misses his parents. As Arnold navigates life without them, he makes friends, deals with bullies, and deals with a girl who has a major crush on him but isn’t very nice about it, named Helga.
The beautiful ethical moments throughout this before-its-time cartoon, are what made it one of the best ’90s cartoons ever and so memorable for millennials.
Dates aired
Hey Arnold! aired its first episode on July 10, 1996, and its final episode aired on June 8, 2004.
Where you can watch Hey Arnold! today
Hulu
Vudu
Amazon Prime Video
Apple TV
YouTube
Google Play Movies & TV
19 – Rocko’s Modern Life
Pinterest
Rocko is a wallaby in Rocko’s Modern Life, who is living daily life in his new place after moving from Australia (as a wallaby would). Rocko makes finds some genuine friendships in Filburt (a turtle) and Heffer (a cow), plus he has a dog named Spunky. However, Rocko is overwhelmed by his new life in the states, adulthood, and his rude neighbor, Mr. Bighead (a toad). Rocko is really like most modern-day adults who are trying t survive adulthood in this cartoon that is entertaining for kids and adults alike.
Rocko’s Modern Life was this millennial’s favorite ’90s cartoon. Hands down, absolutely obsessed with this cartoon as a kid. What makes it so relevant is the topic, of course, but the art and humor were quintessential ’90s gold. I miss this show so much.
Dates aired
Rocko’s Modern Life first aired on September 18, 1993, and its final episode aired on November 24, 1996.
Where you can watch Rocko’s Modern Life today
Amazon Prime Video
Netflix
Google Play Movies & TV
Vudu
YouTube
Apple TV
20 – Pinky and the Brain
Pinterest (Edited)
In Pinky and the Brain, Brain is a diabolical genius who also happens to be a mouse. Pinky, his right-hand mouse, who is not his first pick, tries his best to assist Brain in his evil plans to take over the world, but doesn’t quite grasp the plans and ends up being a constant source of frustration for Brain. These lab mice have actually been genetically altered at Acme Labs, where they are tested on, making Brain’s plans even more difficult. If only he had a better side-kick!
Pinky and the Brain is a super ’90s cartoon with an inventive and unique premise: lab mice taking over the world, or trying to at least. Every millennial knows this show was fun and funny and packed with twists and turns we never saw coming.
Dates aired
Pinky and the Brain first aired on September 9, 1995, and its final episode aired on November 14, 1998.
Where you can watch Pinky and the Brain today
Amazon Prime Video
Google Play Movies & TV
Hulu
YouTube
Apple TV
21 – Pepper Ann
Pinterest (Edited)
Pepper Ann Pearson is a young girl’s hero in this cartoon, Pepper Ann. She is a radical girl who stands up for herself and what she believes in as she goes through the growing pains of middle school at Hazelnut Middle School. Pepper Ann was pretty before its time in the ’90s, showcasing a girl who defied the norm, followed her heart, and was really a bit of a feminist in her time. She was constantly speaking out about wrongdoing she experiences as a 12-year-old in middle school, and she still knew how to have a good time and enjoy life in the process.
Pepper Ann was another one of my favorite shows, because I so related to her struggles and mindset. Pepper Ann is another big miss for me and many fellow millennials.
Dates aired
Pepper Ann aired its first episode on September 13, 1997, and aired its final episode on November 18, 2000.
Where you can watch Pepper Ann today
Amazon Prime Video
Google Play Movies & TV
Hulu
YouTube
Apple TV
22 – Pokémon (Animated TV Series)
Pinterest (Edited)
In Pokémon (Animated TV Series), Ash Ketchum has to catch all the Pokémon with Pikachu. Ash beating the Pokémon League is a big deal. So, he explores, catches Pokémon, and works toward being a Pokémon Master. Ash has a nemesis and a ton of obstacles during the process, but he never gives up hope and never stops working toward his goal.
Pokémon is one of the highest grossing anime franchises of all time, with its start in the ’90s. Growing up in the ’90s meant getting gold Pokémon cards with your happy meal, carrying Pokémon trading cards everywhere you went, and watching this genius animated series. While Pokémon is still going strong, there is nothing like the oldies, especially when it comes to cartoons.
Dates aired
Pokémon aired its first episode on April 1, 1997, and though many changes have occurred over the years, is still going strong… kind of. The original release was exponentially different than the show many watch today.
Where you can watch Pokémon today
Google Play Movies & TV
YouTube TV
Disney NOW
Netflix
Hulu
Amazon Prime Video
YouTube
Apple TV
23 – Franklin and Friends
Pinterest
Franklin and Friends is another book-based cartoon series with an animal cast. Franklin and his best friend Bear, along with some of the other neighborhood pals their age, tackle some serious, real-life stuff. They learn lessons, grow, develop long-lasting friendships, and teach their watchers how to do the same.
Franklin and Friends is another cute watch that holds a special place in my millennial heart. Watching this show in the late ’90s and early ’00s with my little brother is a priceless memory I cherish, as I’m sure many millennials do!
Dates aired
Franklin and Friends aired its first episode on November 3, 1997, and its final episode aired on August 8, 2004.
Where you can watch Franklin and Friends today
Vudu
Sling TV
Amazon Prime Video
24 – Arthur
Pinterest
In Arthur, Arthur Read and his best friend Buster Baster deal with a variety of unfortunate everyday scenarios that most kids encounter while attending school as many eight-year-olds do. Arthur is shy and a bit unsure of himself as he grows and tries to thrive. As he overcomes many obstacles with his two sisters, who often seem to be in a rivalry with him, he finds a way to deal with things and learn from difficult scenarios and discovers they are usually on the same team.
Arthur is chock-full of life lessons, meaningful relationships, and mindful examinations, making it ’90s gold. Arthur is surely missed greatly by millennials everywhere.
Dates aired
Arthur aired its first episode on October 7, 1996, and it is still running today!
Where you can watch Arthur today
Google Play Movies & TV
YouTube TV
Amazon Prime Video
Vudu
YouTube
PBS Kids
25 – Animaniacs
Pinterest (Edited)
Animaniacs is an extremely comedic cartoon with Dot, Yakko, Wakko, and other various characters that tend to have a knack for chaos. There is always something bonkers happening on the Warne Bros. Studio and the water tower the siblings live in. While they mean well, they are known for the messes they create and bring into the lives of friends and acquaintances. Where the animaniacs go, trust me, chaos follows.
Animaniacs is major ’90s popculture. Millennials all know the show, even though the timeframe of the cartoon was short-lived in comparison to many other ’90s cartoons. Perhaps, the revivals of the original show or the premise and humor kept it alive. Regardless, Millennials loved and miss this show dearly.
Dates aired
Animaniacs aired its first episode on September 13, 1993, and aired its final episode on November 14, 1998. However, there were revivals. So, the show didn’t stop there.
Where you can watch Animaniacs today
Amazon Prime Video
Google Play Movies & TV
Hulu
YouTube
Apple TV
Vudu
26 – Beavis and Butt-Head
Pinterest (Edited)
Beavis and Butt-Head is a comedic show about two brothers, known as Beavis and Butt-Head, who comment on ’90s popculture from the comfort of their couch. Though their comments are all pretty unintelligent and immature, they do tend to be funny in a slapstick comedy kind of way.
Beavis and Butt-Head is known for the brother’s iconic laughs, ridiculous comments, and popculture significance, since the ’90s were extremly MTV-centric. Definitely an iconic, if not a bit unrefined, duo.
Dates aired
Beavis and Butt-head aired its first episode on March 8, 1993, and its final episode aired on November 28, 1997. However, there have been two revivals since, and one of those revivals is currently in the works.
Where you can watch Beavis and Butt-head today
Google Play Movies & TV
Vudu
YouTube
Apple TV
27 – Chip ‘n Dale Rescue Rangers
Pinterest (Edited)
Chip ‘n Dale Rescue Rangers was a cartoon about cute, lovable, and talented chipmunk detectives. These chipmunks, Chip and Dale and their friends, run Rescue Rangers. Rescue Rangers is their detective agency, and when it comes to solving crimes these guys don’t mess around! They get hands-on, go on adventures, and solve the crimes. These little guys are the real deal and have a lot of passion for what they do.
Chip ‘n Dale Rescue Rangers is perhaps the cutest of all ’90s cartoons. Millennials are sure to reminisce about these chipmunk heroes.
Dates aired
Chip ‘n Dale Rescue Rangers first aired on March 4, 1989, and aired its final episode on November 19, 1990.
Where you can watch Chip ‘n Dale Rescue Rangers today
Google Play Movies & TV
YouTube
Disney+
28 – Tiny Toon Adventures
Pinterest (Edited)
Tiny Toon Adventures was a classic ’90s show including all the memorable Acme characters such as Bugs Bunny, Tasmanian Devil, and Hamton J. Pig (my personal favorite). However, this is only a small part of a ginormous cast of lovable characters. Tiny Toon Adventures follows those characters as they train at Acme Looniversity to become official Looney Tunes! The cast was bright, funny, and a little chaotic, much like Animaniacs.
Though Animaniacs ended up acting as the cartoon’s replacement, it was a lovely ’90s show with iconic characters, bright and happy art, and nonstop action.
Dates aired
Tiny Toon Adventures aired its first episode on September 14, 1990, and its final episode aired on December 6, 1992.
Where you can watch Tiny Toon Adventures today
Amazon Prime Video
Google Play Movies & TV
YouTube
Apple TV
Hulu
29 – Little Bear
Pinterest (Edited)
Little Bear is a cartoon based on a book series by Else Holmelund Minarik. This bear cub, the main character, has some amazing friendships that he’s built with Cat, Owl, Hen, and Emily. They explore the world of play, letting their imaginations go to wondrous places. They also learn valuable lessons and build meaningful bonds.
Little Bear is another wholesome addition to this list. These cute friends stick together through thick and thin, took play time very seriously, and I know they taught this millennial a lesson or two.
Dates aired
Little Bear aired its first episode on November 6, 1995, and its final episode aired on November 7, 2003.
Where you can watch Little Bear today
Apple TV
Sling TV
Amazon Prime Video
30 – TaleSpin
Pinterest (Edited)
In TaleSpin, and the city of Cape Suzette, millennials take a trip back to the 1930s with Baloo von Bruinwald XIII. Baloo is a pilot who hauls cargo and makes different deliveries, all while his pal Kit Cloudkicker is by his side. This The Jungle Book spinoff is wholesome, sweet, and all about true friendship. Balloo, in a way, unofficially adopts Kit, making this show unbelievably sweet and heartwarming. Together they encounter many dangerous adventures, where they work together as a team to pull through.
As far as the ’90s go, I am not sure a cartoon got sweeter than this. Kit and Balloo are missed by this millennial big time.
Dates aired
TaleSpin aired its first episode on September 7, 1990, and aired its final episode on August 8, 1991.
Where you can watch TaleSpin today
Google Play Movies & TV
Disney+
YouTube
31 – Spider-Man: The Animated Series
Pinterest (Edited)
Spider-Man: The Animated Series is the animated story of Peter Parker and his evolution into Spider-Man. From the super-smart boy next door to the Spider-Man responsible for saving the city all day every day, Spider-Man: The Animated Series. How he saves the city, attends Empire State University, works as a photographer, and maintains his sanity is beyond my comprehension. However, this once normal boy does his best.
The Spider-Man franchise was huge in the ’90s and early ’00s, remember Tobey McGuire and Kirsten Dunst kissing upside down in the rain? This animated series was a huge part of that. It even maintains a pretty big following to this day!
Dates aired
Spider-Man: The Animated Series aired its first episode on November 19, 1994, and its final episode aired on January 31, 1998.
Where you can watch Spider-Man: The Animated Series today
Board games may not be the first thing on your mind when you think of collectibles, and yet there is a deep and not-so-hidden world of board game hoarding, collecting, and trading as complex as that found within any other area of interest — perhaps deeper! There is a huge range of wonderful old games
Introducing Howchoo, an enigmatic author whose unique pen name reflects their boundless curiosity and limitless creativity. Mysterious and multifaceted, Howchoo has emerged as a captivating storyteller, leaving readers mesmerized by the uncharted realms they craft with their words.
With an insatiable appetite for knowledge and a love for exploration, Howchoo’s writing transcends conventional genres, blurring the lines between fantasy, science fiction, and the surreal. Their narratives are a kaleidoscope of ideas, weaving together intricate plots, unforgettable characters, and thought-provoking themes that challenge the boundaries of imagination.
This guide teaches you how to run a Bitcoin full node, which is not the same as mining. You won’t earn bitcoins by running a full node. You run a full node because you love Bitcoin and want to support the network.
What is a full node?
The beauty of a fully decentralized currency, like Bitcoin, is that it doesn’t require a financial institution to govern the network. Rather, government happens by consensus. This means that transactions and the full historical ledger of transactions (blockchain) are determined and verified by computers (nodes) attached to the Bitcoin network.
Some nodes, called miners, record new transactions by publishing them in “blocks”. Other nodes, simply called full nodes, verify the transactions and ensure that miners are following the consensus rules. If a miner tries to publish a block that doesn’t follow the rules, it will simply be ignored.
When a miner (or mining pool) is the first to publish a new block, it receives a mining reward. And while mining can be lucrative, it also requires an upfront investment and uses a considerable amount of energy.
In order for the Bitcoin network to operate securely, it requires many additional full nodes to ensure the miners are following the consensus rules and help relay transactions to other nodes in the network.
And since there is no direct financial incentive to run a full node (unlike mining), it requires good Bitcoin citizens to step up and help out.
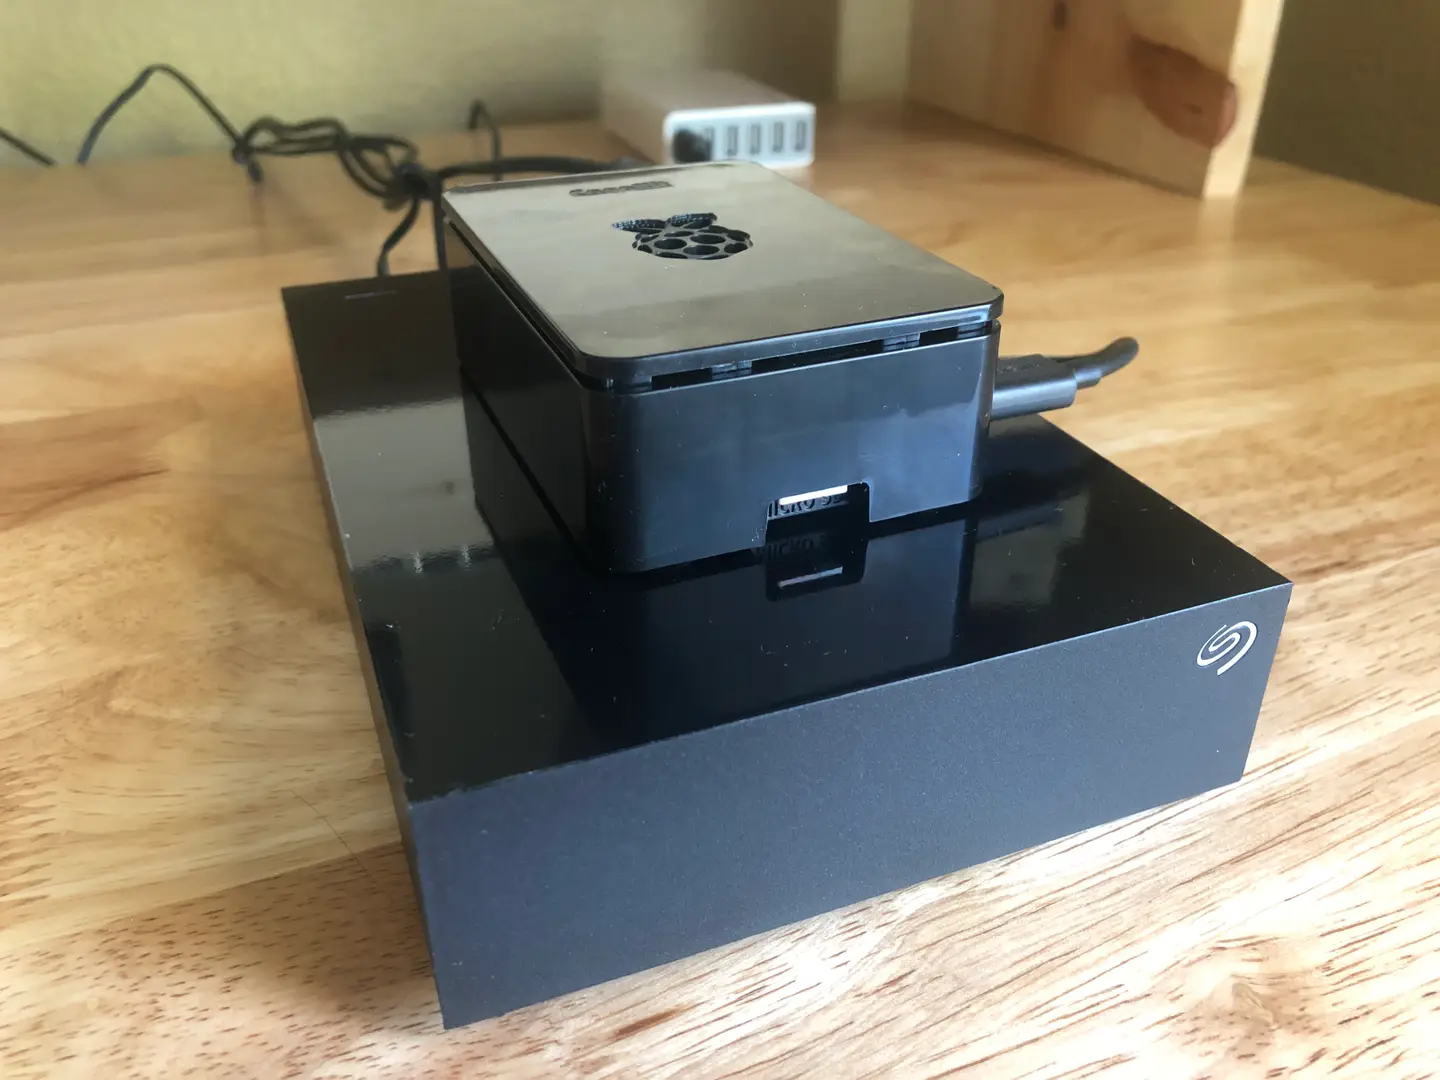
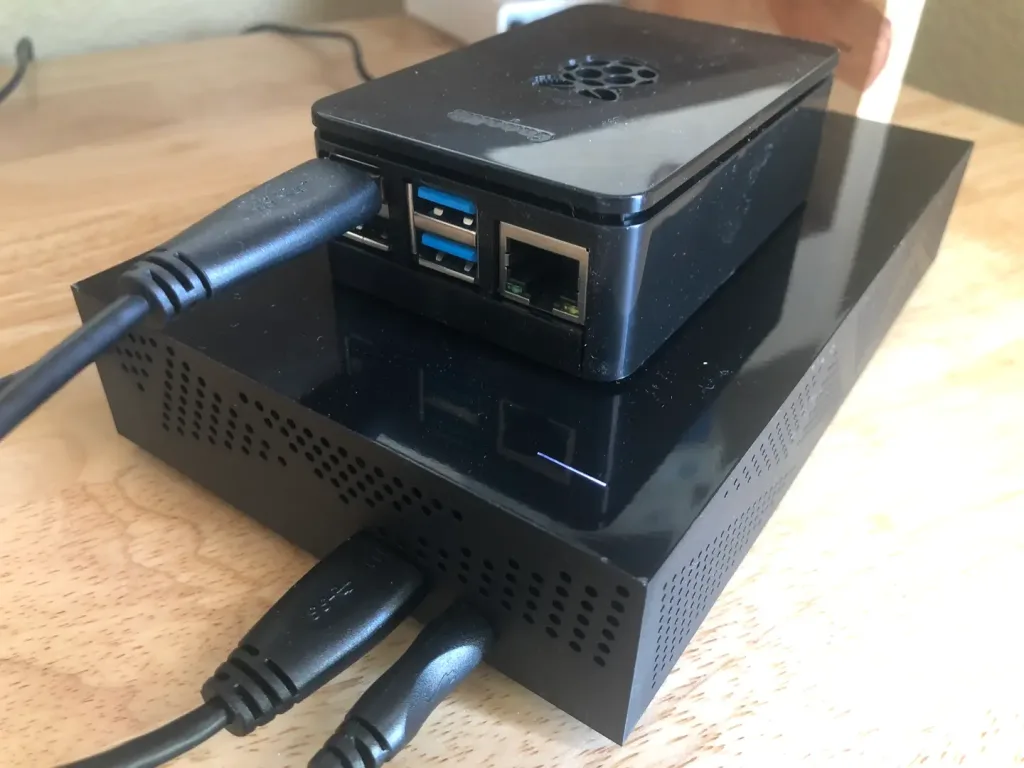
In this guide, we’re going to learn how to run a full node using a Raspberry Pi 4 and an external hard drive.
Why Raspberry Pi?
The Raspberry Pi is small, inexpensive, and meets the minimum requirements for running a Bitcoin full node. A machine running a full node can also be used for other tasks, but because a full node should be connected to the network at least six hours a day (and ideally continuously), it makes sense to use an inexpensive computer dedicated to the task.
One thing you might notice is that the Raspberry Pi doesn’t ship with storage. So generally Raspberry Pi users will run the operating system on a small-ish micro SD card. But because running a full node involves downloading the entire Bitcoin blockchain, which is a few hundred gigabytes (and growing), we’re going to add an external hard drive to the setup. You could also use a high capacity micro SD card or a high capacity thumb drive. Just make sure that with any option you choose, you have over 350GB of available space.
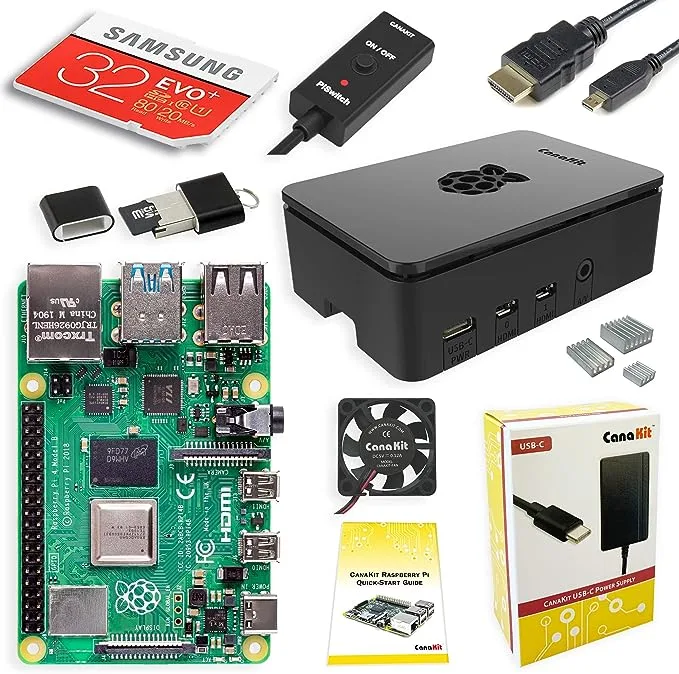
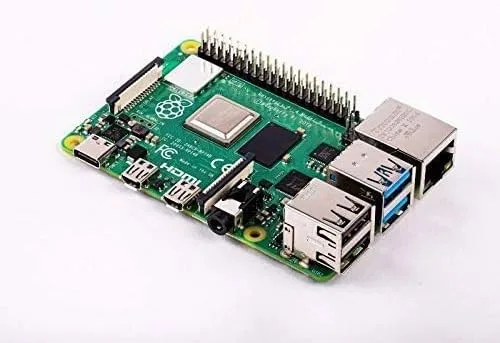
If you’re new to Raspberry Pi, then you’ll likely want to get a kit like the Canakit for the Raspberry Pi 4 that I’m using for this guide.
CLI vs GUI
As we get started, please note that I prefer command-line tools to graphical tools, especially for a project like this. So throughout this guide, you’ll be exposed to commands that need to be executed in the Terminal application running a Unix-based shell. The reason for choosing CLI (command-line interface) over GUI (graphical user interface) is that graphical tools require peripherals (monitor, keyboard, mouse).
If you prefer graphical tools, you can still follow along with this guide, and I will point out which steps will need to be modified.
While you’ve got your SD card mounted on your laptop, now is a good time to configure WiFi and enable SSH.
2 – Connect the external hard drive
Connect the Raspberry Pi to the External Hard Drive
Because the entire blockchain is a few hundred gigabytes, you’ll need to either get a massive SD card or use an external hard drive. I recommend using an external hard drive as long as the read/write speeds are sufficient. The bitcoin.org documentation recommends a storage device with at least 100 MB/s. I’m using a hard drive with 160 MB/s, but I after having gone through this process, I highly recommend using a 1TB+ SSD (solid-state drive). The initial block download (that we’ll cover in more depth later) will take quite a bit of time and using an SSD will make your life easier.
With the hard drive connected, you can now boot the Raspberry Pi.
3 – Connect to the Raspberry Pi
If you’re using the Raspberry Pi desktop and have a monitor, keyboard, and mouse available, you can go ahead and boot the operating system and log in.
Otherwise, you’ll need to connect to the Pi via SSH. We’ve written a detailed guide on how to connect to your Raspberry Pi via SSH, so please refer to that guide if you need additional help.
Unless you’ve changed it, the password is “raspberry”.
4 – Configure the external hard drive
In order to use the hard drive to store blockchain data, you’ll need to configure the Pi and mount the drive.
Install the necessary storage drivers
Depending on the hard drive you purchase, you’ll need to install the necessary storage driver for the Pi. The storage driver depends on the file system type used on the hard drive.
You can also reformat the hard drive using a different file system type, but that’s beyond the scope of this guide.
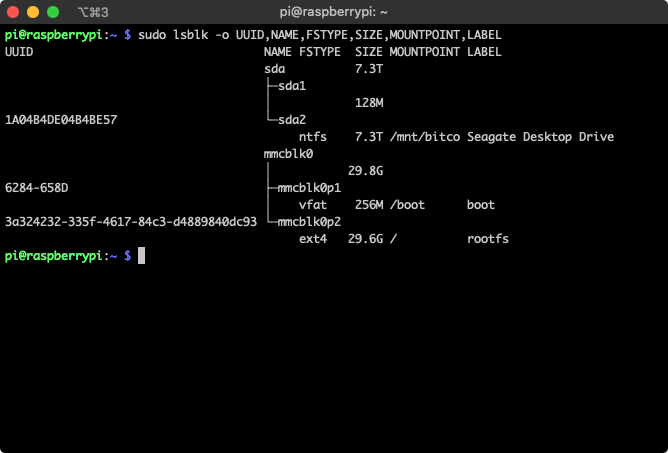
To find the file system type of your hard drive, you can type:
Use the LABEL column to identify your storage device and the FSTYPE column to find the file system type.
ntfs
For ntfs devices, use:
sudo apt-get update
sudo apt install ntfs-3g
exFAT
For exFAT, use:
sudo apt-get update
sudo apt install exfat-fuse
Mount the drive
Get the disk partition location
Next, you’ll need to mount the storage device onto your Raspberry Pi. First, get the location of the disk partition we want to mount using:
sudo blkid
Again, look for the label and copy the first column. It’s often something like /dev/sda1 or /dev/sda2. Mine is /dev/sda2.
Create the mount point and mount the disk
It’s customary (but not required) to put disk mounts in /mnt. Because the device will hold Bitcoin data, we’ll name the mount point “bitcoin”.
sudo mkdir /mnt/bitcoin
sudo mount /dev/sda2 /mnt/bitcoin
Verify the disk was mounted properly
To verify that the disk was mounted correctly, run:
df -h
You should see something like the following:
Filesystem      Size  Used Avail Use% Mounted on
/dev/root        30G  3.0G   25G  11% /
...
/dev/sda2       7.3T  320M  7.3T   1% /mnt/bitcoin
Set up automatic mounts
So far, you’ve mounted the external hard drive manually, but the next time you boot the machine you’ll have to do it again. Fortunately, we can automatically mount the device each time we boot using fstab.
To do this, we’ll need to get the PARTUUID. To get this value, run:
sudo blkid
Again, find the device by the LABEL and take note of the PARTUUID.
Now open /etc/fstab to edit, and append the following line:
PARTUUID= defaults,auto,users,rw,nofail 0 0
Replace , , and with the correct values. If the fstype is ntfs or fat, add ,umask=000 immediately after nofail.
Now it’s time to download and install bitcoind. To do so, go to the bitcoin downloads page and find the option to download Bitcoin Core for ARM Linux. Right click, and copy the link URL.
Back in your shell session on your Raspberry Pi, type:
That’s it! You should be able to see output with the following commands:
bitcoind --help
bitcoin-cli --help
6 – Run the bitcoind daemon
At this point, if you’re using the Raspberry Pi OS Desktop and would prefer to use a GUI, you can skip this step and follow the instructions found here.
With the external hard drive configured and bitcoind installed, you can now run the bitcoind daemon. Using the following command will start the bitcoind daemon specifying our external hard drive as the data directory.
bitcoind -daemon --datadir=/mnt/bitcoin
If everything is successful, you should see the following output:
Bitcoin Core starting
A note on the data directory
Since we’re starting the daemon with a non-standard data directory, we’ll need to specify the datadir every time we use the bitcoin-cli command, like this:
bitcoin-cli -datadir=/mnt/bitcoin
However, if you want to avoid this, you can simply add an alias in your bashrc file. Open ~/.bashrc and append the following:
alias bitcoin-cli='bitcoin-cli -datadir=/mnt/bitcoin'
Save the file, then run:
source ~/.bashrc
What is happening?
The daemon will take some time to start up, but once it does your node will begin to download the entire Bitcoin blockchain.
The entire blockchain is just under 300GB at the moment, so you can imagine that this will take some time. If you need to pause for whatever reason, you can simply run:
bitcoin-cli stop
This will pause everything. When you start up the daemon again, it will pick up where it left off.
7 – Starting the daemon on startup
In the previous step, you manually started the daemon. But if you’re using the Raspberry Pi as a dedicated Bitcoin full node, you’ll likely want the daemon to start whenever the machine boots.
To do so, edit your crontab by running the following command:
Save the file and exit. Now the bitcoin daemon will start whenever your system boots.
8 – Test your connection
Enter your IP address and click “Check Node”.
Assuming you’re using your full node to support the Bitcoin network, you’ll need to make sure your node accepts inbound connections.
You can test inbound connections by visiting https://bitnodes.io/#join-the-network. Enter your IP address and the port, if you happened to modify it (the default port is 8333).
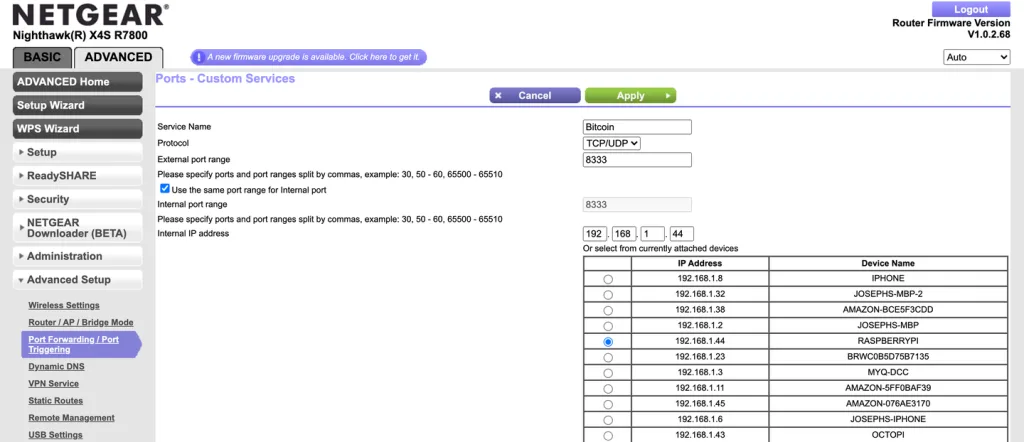
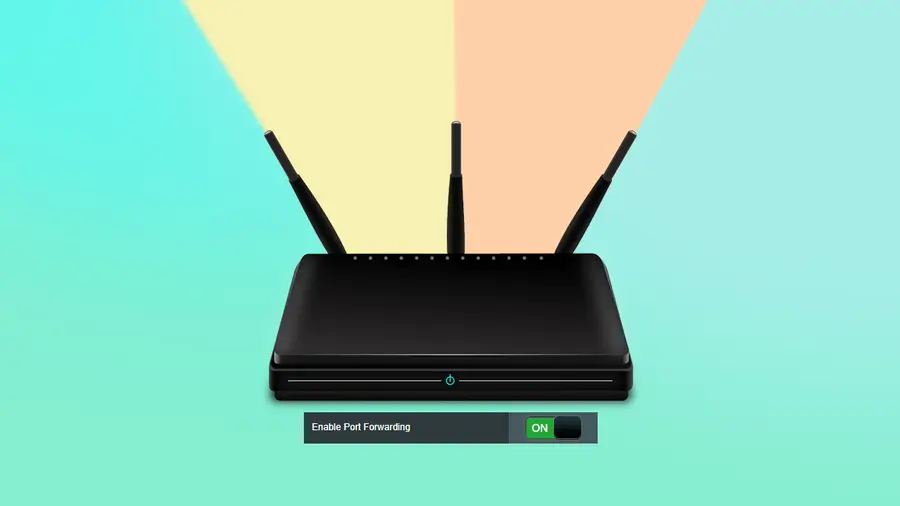
9 – Forward port 8333 to your Raspberry Pi, if necessary
The port forwarding configuration may be under “Advanced”. Every router is different.
Chances are you’re running your full node on your home network, which means you likely saw an error in the previous step. To resolve this, you’ll need to forward port 8333 from your WiFi router to your Raspberry Pi.
Every router is different, so you may have to do some digging around. Fortunately, we’ve written a guide on how to open a port on your router that should give you some direction.
How to Open a Port on a Router Manually configure the port settings on your router.
After you’ve set up port forwarding, test your connection again using the instructions from the previous step.
10 – Tips for speeding up the IBD (initial block download)
When you spin up your full node for the first time, your node will have no knowledge of the existing blockchain history. So the very first thing it needs to do is sync with the rest of the network by downloading and verifying all blocks. This is a very time and resource consuming operation because it needs to download and verify over 340Gb of data (at the time I’m writing this).
So in this step I’ll provide a few optional suggestions for speeding up the initial block download.
Use an SSD
As I mentioned previously, I opted for an 8TB HDD but should’ve gone with a 1TB SSD at a similar price. Read/write speeds are much faster on the SSD, so this is the best way to eliminate a potential bottleneck on disk IO.
Use a more powerful computer to do the initial download
While doing the initial block download on my Raspberry Pi, I noticed that it was CPU constrained the entire time. So to speed things up, I opted to spin up a powerful, compute-optimized virtual machine on GCE. If you’re curious, I used a c2-standard-8, which comes with 8 CPUs and 32GB of memory. I attached a 500GB SSD and a 500GB HDD (I would’ve just used a 1TB SSD, but I needed to get a quota lifted first). The entire blockchain was downloaded and verified within 12 hours.
If you’d like to use this method, be warned that you’ll still need to transfer the entire blocks and chainstate directories from the virtual machine to your Pi, replacing the existing directories.
If using a high-power virtual machine on GCP or AWS isn’t an option, you can try any other more powerful desktop or laptop you have available.
11 – What’s next?
Downloading the blockchain will take a LONG time. Check your ISP account and make sure you have enough data available on your plan; otherwise, you might get throttled or shut down. Once the blockchain downloads, you’ll be in business.
bitcoin-cli
Take some time to learn the bitcoin-cli. You can start by listing all of the commands:
bitcoin-cli help
Use your wallet
If you’d like, you can use the wallet on your full node to store Bitcoin. In reality, this isn’t the most convenient or safe way to store Bitcoin, as it’s hard to use and connected to the Internet at all times.
There are several ways to go about running a Minecraft server on the Raspberry Pi. In this guide, I’ll cover how to install Nukkit—a cross-platform Minecraft server that’s super easy to set up on the Raspberry Pi. This server should work with PCs, consoles, and tablets running Minecraft 1.14. I’ll be using a Raspberry Pi
Introducing Howchoo, an enigmatic author whose unique pen name reflects their boundless curiosity and limitless creativity. Mysterious and multifaceted, Howchoo has emerged as a captivating storyteller, leaving readers mesmerized by the uncharted realms they craft with their words.
With an insatiable appetite for knowledge and a love for exploration, Howchoo’s writing transcends conventional genres, blurring the lines between fantasy, science fiction, and the surreal. Their narratives are a kaleidoscope of ideas, weaving together intricate plots, unforgettable characters, and thought-provoking themes that challenge the boundaries of imagination.
If you’re like me, you’ve got way more Raspberry Pi’s than you have monitors. While I typically use a headless Pi for most projects, there are some that require a display. Recently, I got my hands on the official Raspberry Pi 7″ touch display, and I wanted to get it set up for daily use. In this guide, I’m going to show you how to get the touchscreen display completely set up, as well as a few other tips for using it.
You’ll need to supply your own Raspberry Pi, but fortunately, everything else you need is included with the touch display.
2 – Connect the ribbon cable to the display
We will install the ribbon cable first because it’s much more difficult after the Pi is mounted. The connector is very similar on both the Pi and the display board. Start by pulling the black tabs (one on each side) away from the display board’s connector. Then insert the cable with the blue strip facing down.
After the cable is inserted, press the black tabs back into the connector. This will lock the cable in place.
🛈 Be careful when locking and unlocking the cable. The black tabs can break if you use too much force.
3 – Secure the Pi to the display
The touchscreen display kindly provides standoffs and screws that can be used to mount the Raspberry Pi. Position the Pi on the standoffs (with the display connector on the same side as the ribbon cable). Use a small Philips head screwdriver to fasten the Pi to the standoffs.
A keen eye will notice that the image shows the ribbon cable already connected to the Pi. Yes, I assembled this in a slightly different order, but I wanted to re-order things for this guide because it makes more sense to connect the cable after the Pi is secured.
4 – Insert the ribbon cable on the Pi
With the Raspberry Pi in place, go ahead and insert the other end of the ribbon cable. You attach this cable the same way you did on the display board. Pull the black tabs out, insert the cable with the blue side facing away from the board, and push the black tabs back to lock it in place.
5 – Connect the jumper cables to power the display
There are a few options for powering the Pi and the display. If you wanted, you could power the Pi and the display using separate power adapters, but we’re going to power the Pi directly, then use jumper cables to supply power to the display board.
The kit comes with four jumper cables, but, for a Raspberry Pi 4, you need cables for only two pins: 5V and GND. Connect one cable to the 5V pin on the Pi and the 5V pin on the display board. Then connect to a GND pin on the Pi and the GND pin on the display board. See the image for details.
6 – (Optional) Use a case or stand
There are many options for cases and stands, and what you need depends entirely on your use case. I’m going to keep my Pi and touchscreen display at my desk, and I don’t mind the boards and wiring exposed (I think it looks cool), so I designed and printed a minimalist stand. If you’ve got a 3D-printer and want to print the stand I designed, here’s the model on Thingiverse.
7 – (Optional) Install the on-screen keyboard
Again, depending on your use case, you might find yourself wanting to type something! To do so, you’ll either need to connect a physical keyboard or install the on-screen keyboard. In this step, we’ll cover how to install and use the on-screen keyboard.
To open the on-screen keyboard, click on the Pi icon at the top left. Then choose Accessories then Keyboard. To close the keyboard, just hit the X at the top right of the keyboard.
8 – Enjoy!
Hopefully, this guide is enough to get you up and running with the Raspberry Pi 7″ Touch Display. If you have any questions or feedback, feel free to comment below!
There are several ways to go about running a Minecraft server on the Raspberry Pi. In this guide, I’ll cover how to install Nukkit—a cross-platform Minecraft server that’s super easy to set up on the Raspberry Pi. This server should work with PCs, consoles, and tablets running Minecraft 1.14. I’ll be using a Raspberry Pi
Introducing Howchoo, an enigmatic author whose unique pen name reflects their boundless curiosity and limitless creativity. Mysterious and multifaceted, Howchoo has emerged as a captivating storyteller, leaving readers mesmerized by the uncharted realms they craft with their words.
With an insatiable appetite for knowledge and a love for exploration, Howchoo’s writing transcends conventional genres, blurring the lines between fantasy, science fiction, and the surreal. Their narratives are a kaleidoscope of ideas, weaving together intricate plots, unforgettable characters, and thought-provoking themes that challenge the boundaries of imagination.
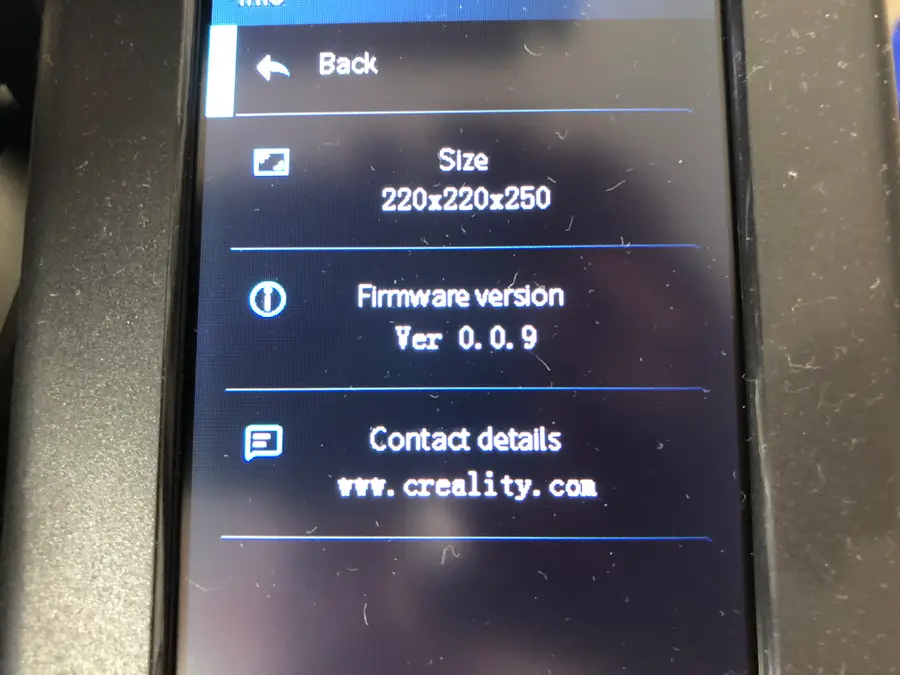
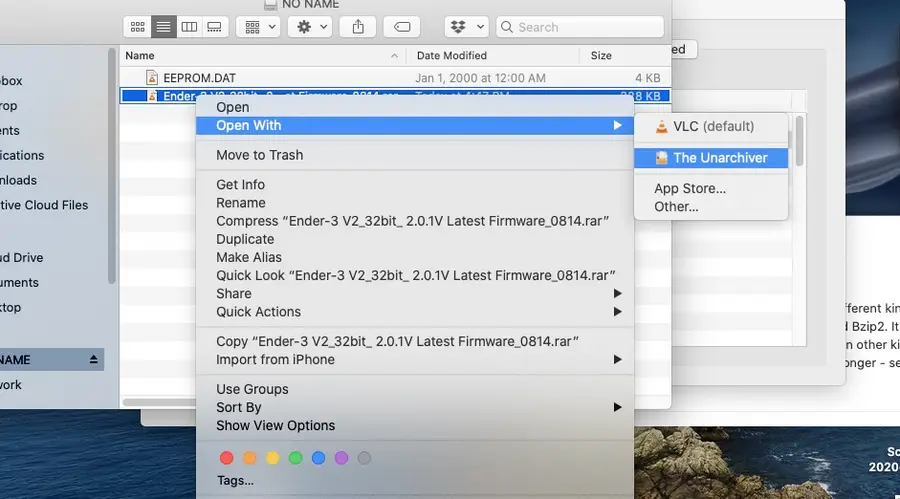
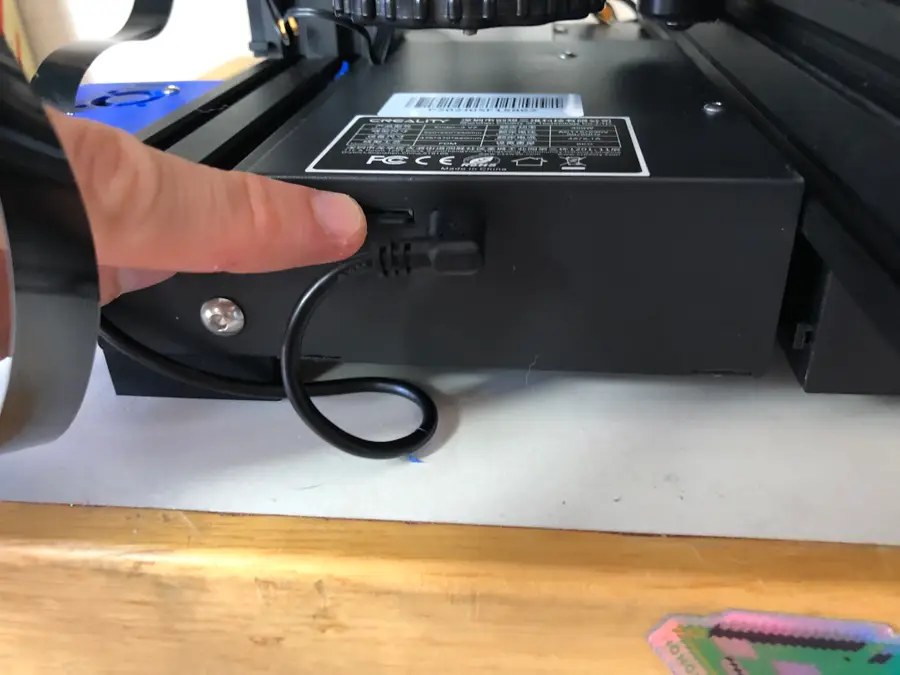
Before my recent firmware update on my Ender 3 V2, my firmware was at least three versions behind the latest. This caused some issues when I updated my Cura slicer and set up OctoPrint on my Ender 3 V2. Creality updates its firmware to ensure that the printer works properly with third-party applications, among other things.
Not updating your firmware will eventually cause issues, so spend the five minutes running the update before your next print. It might just save a big print project from failure (which is the worst!).
On the left side of the page, navigate to Ender Series > Ender-3 V2 3D Printer.
Do not select the original Ender 3. Make sure you select the V2.
Find the download link for the “Latest Firmware.” They will be Zip files containing the different firmware versions. As of this writing, they look like this:
Note that there are now two different firmware versions depending on whether your Ender 3 V2 is running the 4.2.2 motherboard or the quiet 4.2.7 motherboard.
Blender is one of the most popular open-source 3D creation suites today. It doesn’t cost a dime to use and everything you create is yours to own for good. The community is robust and the dev team still releases new updates on the regular. If you want to get the latest version, you may have
Introducing Howchoo, an enigmatic author whose unique pen name reflects their boundless curiosity and limitless creativity. Mysterious and multifaceted, Howchoo has emerged as a captivating storyteller, leaving readers mesmerized by the uncharted realms they craft with their words.
With an insatiable appetite for knowledge and a love for exploration, Howchoo’s writing transcends conventional genres, blurring the lines between fantasy, science fiction, and the surreal. Their narratives are a kaleidoscope of ideas, weaving together intricate plots, unforgettable characters, and thought-provoking themes that challenge the boundaries of imagination.