Home Interests Kids

How to Access the Parent Dashboard on Messenger Kids

howchoo   (467)
August 14, 2023
4 minutes

Share

Interests
Posted in these interests:
kids • 3 guides

Facebook’s Messenger Kids is a free app that allows children to make video calls and send messages on smartphones and tablets, but with more control than just giving your child access to a phone. With Messenger Kids, parents can control their child’s online experience through a variety of functions that allow them to have a safe and secure online experience.

The Parent Dashboard is the hub for all the means to control your child’s online experience in Messenger Kids. Here, you’ll be able to add and remove contacts, block contacts, edit your child’s information, see the images your child is sending and receiving, and more.

This guide will show you how to access the Parent Dashboard in Messenger Kids.

1 – How to Access Parent Dashboard on iPhone or Android

  1. Open the Facebook app and tap the three horizontal lines in the bottom right.
  2. Scroll down and select ‘Messenger Kids
  3. Click your child’s photo

The Parent Dashboard is organized in to three sections: Activity – View recent contacts, groups, blocked contacts, reports, and images sent and received in chats. Contacts – add and remove contacts here. * Controls – access parent controls. You can add additional parents and guardians here.

2 – How to Access Parent Dashboard on Desktop

Please Note: there are some Parent Dashboard features that are exclusively available on mobile.

  1. Open Facebook on your desktop and navigate to the ‘Explore‘ section on the left side.
  2. Select ‘Messenger Kids
  3. Select your child’s name.
NEXT UP

Slow Media Modern Waldorf & Montessori Kids Can Watch!

If you’re looking for slow media for your modern Waldorf child, this list is for you.
howchoo   (467)
September 27, 2023

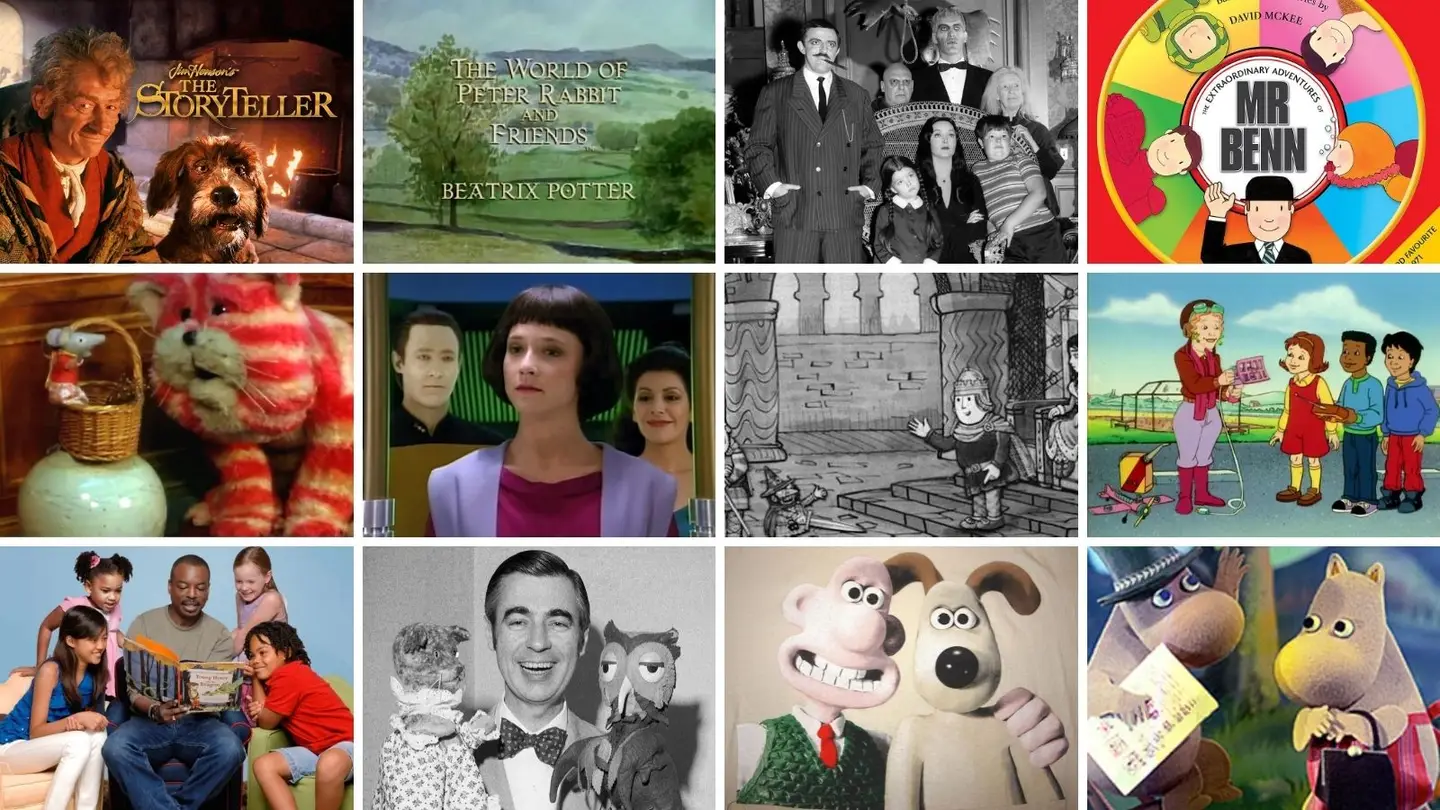
Figuring out what constitutes “slow media” for Waldorf-inspired education is not easy. But media that Waldorf kids can watch does exist! However, the criteria for what media is acceptable to expose kids to is so vastly different for media-conscious parents than the typical age recommendations. Common Sense Media, for instance, offers age recommendations for kids, but

Continue Reading

howchoo

 467 guides

Introducing Howchoo, an enigmatic author whose unique pen name reflects their boundless curiosity and limitless creativity. Mysterious and multifaceted, Howchoo has emerged as a captivating storyteller, leaving readers mesmerized by the uncharted realms they craft with their words. With an insatiable appetite for knowledge and a love for exploration, Howchoo’s writing transcends conventional genres, blurring the lines between fantasy, science fiction, and the surreal. Their narratives are a kaleidoscope of ideas, weaving together intricate plots, unforgettable characters, and thought-provoking themes that challenge the boundaries of imagination.

Home Interests Minecraft

How To Create a World With a Custom Seed in Minecraft

howchoo   (467)
August 14, 2023
4 minutes

Share

Interests
Posted in these interests:
READY PLAYER 1
gaming • 85 guides
Minecraft is an epic sandbox video game developed by Swedish game developer Mojang Studios.
minecraft • 66 guides

Minecraft’s worlds are infinitely generated, and each new world has its own unique seed code. What you might not know, is that you can generate a world with a specific seed. Whether you want to write in something silly, or found a fantastic seed online, follow our guide on how to generate a custom seed world!

1 – Open Minecraft

Open up Minecraft from wherever it’s installed. You can use CurseForge and other mod loaders for this guide!

2 – Create a Singleplayer world

To create a custom world, press “Singleplayer”.

3 – Open the Create a World menu

As shown above, click the “Create New World” button at the bottom.

4 – Add a custom seed

To generate the world with a custom seed, press “More World Options” and an additional menu will appear. Here you can add your custom seed, change the world type, or choose to generate structures.

In the text box at the top of the screen, add in whatever seed you want. Since version 1.18, Mojang has added the seed parity feature. This allows it that all seeds can be shared between Bedrock and Java editions.

You can enter letters and numbers into the text box, as shown above!

5 – Generate a world

At the bottom of the screen, press “Create New World” and your new world will generate.

If you’d like to view a seed map of your world, read this easy guide!

Happy travels!

NEXT UP

Top 10 Enchantments in Minecraft

howchoo   (467)
March 25, 2024

The longer you play Minecraft, the more you realize that early-game tools just won’t cut it. Exploring the enchantment feature of Minecraft can be exciting, but also intimidating. Rather than worry about researching enchantments, below are the best enchantments in Minecraft! To learn how to enchant items, check out this guide! In this guide, you’ll see

Continue Reading

howchoo

 467 guides

Introducing Howchoo, an enigmatic author whose unique pen name reflects their boundless curiosity and limitless creativity. Mysterious and multifaceted, Howchoo has emerged as a captivating storyteller, leaving readers mesmerized by the uncharted realms they craft with their words. With an insatiable appetite for knowledge and a love for exploration, Howchoo’s writing transcends conventional genres, blurring the lines between fantasy, science fiction, and the surreal. Their narratives are a kaleidoscope of ideas, weaving together intricate plots, unforgettable characters, and thought-provoking themes that challenge the boundaries of imagination.

Home Interests Nintendo

How to Connect a GameCube Controller to the Wii

It’s easier than it sounds!
howchoo   (467)
August 14, 2023
5 minutes

Share

You’ll Need 1

What you’ll need
Interests
Howchoo is reader-supported. As an Amazon Associate, we may earn a small affiliate commission at no cost to you when you buy through our links.
Posted in these interests:
nintendo • 13 guides
retrogaming • 29 guides

The Nintendo Wii is compatible with GameCube controllers. The console natively supports them and even has dedicated ports just for them. Setting everything up is easy, all you need is a Nintendo Wii and a GameCube controller.

For more information, check out the Nintendo website for details about how the original GameCube hardware is officially supported.

1 – Choose a GameCube controller

Any style of GameCube controller will work, including most third-party controllers that use the GameCube proprietary port like this GameCube controller by Cippon. USB controllers will not work.

If you’re using an old original GameCube controller, you may have to test it to see if it’s working. You can do that on a GameCube or the Wii by following through this guide.

The wireless GameCube controller known as the WaveBird is also compatible with the Wii.

GameCube controllers can also be connected to your PC, or even to a Nintendo Switch, if you’re wanting to upgrade your gaming setup on either of those devices.

2 – Locate the GameCube controller ports

The port location for connecting GameCube controllers is on the side of the Wii. If you’re propping yours upright, they will be accessible through the top. You need to open a small hatch to access them.

3 – Connect your GameCube controller

Plug the GameCube controller into the Wii. If you’re using a WaveBird, connect the wireless adapter to the Wii.

4 – Use the GameCube controller on the Wii

The GameCube controller should be automatically recognized. If you aren’t able to maneuver through the menu with it, try launching a game with the Wiimote that you want to use it with.

5 – Troubleshooting

No technical endeavor is complete without a hangup or two! Here are a few common issues encountered when using a GameCube controller on the Wii.

  • No input from controller – Double-check the connection, unplug, and reconnect the controller. You can also try restarting the Wii. As a last resort, you may have to test the controller on another console to see if it’s still working.
  • WaveBird not working – Always use a fresh set of batteries when digging out an old WaveBird. These guys also need to be dialed into the right channel to communicate properly with the receiver. Double-check to confirm the controller and receiver dials are on the same channel number.
NEXT UP

RetroPie scrapers: what they are and how to use them

Wait, which game is this?
howchoo   (467)
September 29, 2023

You’ve put so much work into setting up RetroPie or EmulationStation. You load it up with legally obtained ROMs only to find that custom theme you installed—you remember, the one from my RetroPie themes guide—has a big blank spot for box art! The Best RetroPie Themes (And How to Install Them)You deserve some personal flair! RetroPie: Build Your

Continue Reading

howchoo

 467 guides

Introducing Howchoo, an enigmatic author whose unique pen name reflects their boundless curiosity and limitless creativity. Mysterious and multifaceted, Howchoo has emerged as a captivating storyteller, leaving readers mesmerized by the uncharted realms they craft with their words. With an insatiable appetite for knowledge and a love for exploration, Howchoo’s writing transcends conventional genres, blurring the lines between fantasy, science fiction, and the surreal. Their narratives are a kaleidoscope of ideas, weaving together intricate plots, unforgettable characters, and thought-provoking themes that challenge the boundaries of imagination.

Home Interests MacOS

How to partition a hard drive on macOS

One hard drive—many partitions.
howchoo   (467)
August 14, 2023
5 minutes

Share

Interests
Posted in these interests:
 
apple • 18 guides
macos • 20 guides

Today we’re covering the easiest way to partition a hard drive on macOS. These steps will work on both internal hard drives and external devices like USB drives. Partitioning is useful for things like virtual machines or dual boot rigs. But it can also be a useful troubleshooting tool.

Partitioning involves splitting a hard drive into individually usable chunks. The capacity of the hard drive is split between the partitions, not shared. So a 100GB hard drive can make two 50GB partitions. But the split doesn’t have to be even. You can specify any amount you need. One partition can be 22Gb while the other is 78GB.

1 – Partition a hard drive using Disk Utility

Navigate to Applications > Utilities > Disk Utility. Or search for Disk Utility in Mac’s Spotlight Search.

When Disk Utility is open, select the hard drive you want to break into a partition on the left side of the window.

  • Click Partition from the top menu bar.
  • Select Add Volume to create a new partition.
  • Choose a size and name for your new partition.
  • Click Apply.

It may take a few minutes for the process to complete.

2 – Partition a hard drive using Terminal

Navigate to Applications > Utilities > Terminal.

Use the diskutil list command to see a list of drives connected to your computer. Take note of the disk name on the drive you want to partition.

This is the command to create a single partition:

diskutil partitionDisk /dev/disk2 GPT JHFS+ NewPartition 0b

Replace /dev/disk2 with the name of your hard drive. Replace JHFS+ with the formatting of your choice. Changing NewPartition will change the name of your new partition. Lastly, 0b represents the size of the new partition. Adjust this to create a specific partition size.

Here’s an example showing the creation of multiple 10GB partitions:

diskutil partitionDisk /dev/disk2 GPT JHFS+ Partition1 10g JHFS+ Partition2 10g

It may take a few minutes for the partition to be created. Congratulations! You’ve successfully split your hard drive.

NEXT UP

How to Enable the “Popping” Sound When Adjusting the Volume on Your Mac

howchoo
howchoo   (467)
December 13, 2023

Starting with MacOS Sierra and High Sierra, your Mac will no longer play a “pop” sound when you adjust your volume. If you prefer to have this sound when you adjust volume up and down (as I do), this guide will teach you how to reenable it. 1 – Open Sound System Preferences Navigate to System

Continue Reading

howchoo

 467 guides

Introducing Howchoo, an enigmatic author whose unique pen name reflects their boundless curiosity and limitless creativity. Mysterious and multifaceted, Howchoo has emerged as a captivating storyteller, leaving readers mesmerized by the uncharted realms they craft with their words. With an insatiable appetite for knowledge and a love for exploration, Howchoo’s writing transcends conventional genres, blurring the lines between fantasy, science fiction, and the surreal. Their narratives are a kaleidoscope of ideas, weaving together intricate plots, unforgettable characters, and thought-provoking themes that challenge the boundaries of imagination.

Home Interests Raspberry Pi

Install or Recover Your Raspberry Pi 4 Bootloader

howchoo
howchoo   (467)
August 14, 2023
6 minutes

Share

You’ll Need 2

What you’ll need
Interests
Howchoo is reader-supported. As an Amazon Associate, we may earn a small affiliate commission at no cost to you when you buy through our links.
Posted in these interests:
pi • 92 guides

In this guide we’ll learn how to install a new bootloader on the Raspberry Pi 4. In most cases, the only reason you’d want to do this is if you’re having trouble booting your Pi. But there are some cases where, like I ran into recently, you want to load a custom bootloader.

In either case, this guide will show you how to load a new bootloader onto your Raspberry Pi 4.

What is a bootloader?

A bootloader is a program that loads the operating system. On the Raspberry Pi, the bootloader is stored on an EEPROM (basically just memory that persists even when the the device is powered off). Sometimes, for various reasons, that EEPROM can become corrupt, and needs to be reprogrammed.

1 – Check if your bootloader is working correctly

If you’re unable to boot the Pi, let’s check to see if your bootloader is working correctly before going through the steps to fix it. First, turn off the power, and unplug everything from the Pi, including the SD card. Then turn the power back on.

If the green LED is blinking in a repeating pattern then the bootloader is running properly, otherwise you’ve got an issue and the bootloader needs to be reinstalled.

2 – Download the bootloader

Go to the Raspberry Pi downloads page, and download the bootloader.

3 – Format a second Micro SD card

Format a second SD card using FAT (can be FAT16 or FAT32).

We’ll need to keep the operating system on the original SD card, that is, unless you want to scrap it and start over. If that’s the case, you can use a single SD card. Then follow our guide to install Raspberry Pi OS again when this process is complete.

How to Install Raspberry Pi OS on Your Raspberry Pi
Get the new official Raspberry Pi OS on your Pi.


4 – Extract the bootloader onto the Micro SD card

Since we downloaded a zip file containing the bootloader, we’ll need to extract it. You can typically do this by double-clicking on the file, and then dragging the contents onto the SD card, using a program like Finder or File Explorer.

If you’re comfortable with the CLI you can do something like this:

cd ~/Downloads
unzip rpi-boot-eeprom-recovery-2019-05-10.zip -d /Volumes/boot/

5 – Insert the Micro SD card into the Pi and power it back on

Now you can put the SD card back into the Pi, and turn the power back on. Wait at least 10 seconds. If the process is successful, you’ll see the green LED blink rapidly (forever). If you don’t see this blinking pattern, it failed, and you’ll need to repeat the process.

6 – Insert the original Micro SD card and boot the OS

Now you should be able to insert the original SD card and boot the operating system!

NEXT UP

How to Run a Minecraft Server on the Raspberry Pi

A whole world trapped inside your Pi.
howchoo   (467)
December 7, 2023

There are several ways to go about running a Minecraft server on the Raspberry Pi. In this guide, I’ll cover how to install Nukkit—a cross-platform Minecraft server that’s super easy to set up on the Raspberry Pi. This server should work with PCs, consoles, and tablets running Minecraft 1.14. I’ll be using a Raspberry Pi

Continue Reading

howchoo

 467 guides

Introducing Howchoo, an enigmatic author whose unique pen name reflects their boundless curiosity and limitless creativity. Mysterious and multifaceted, Howchoo has emerged as a captivating storyteller, leaving readers mesmerized by the uncharted realms they craft with their words. With an insatiable appetite for knowledge and a love for exploration, Howchoo’s writing transcends conventional genres, blurring the lines between fantasy, science fiction, and the surreal. Their narratives are a kaleidoscope of ideas, weaving together intricate plots, unforgettable characters, and thought-provoking themes that challenge the boundaries of imagination.

Home Interests Router

How to Reset a Charter Spectrum Router or Modem

howchoo
howchoo   (467)
August 14, 2023
5 minutes

Share

You’ll Need 1

What you’ll need
Interests
Series
Howchoo is reader-supported. As an Amazon Associate, we may earn a small affiliate commission at no cost to you when you buy through our links.
Posted in these interests:
internet • 36 guides
router • 32 guides

If you’re having trouble with your Spectrum internet connection, it may be necessary to reset the router/modem combination or gateway to factory defaults. We’ll also show you how to reset a standalone Spectrum modem used with a separate router.

This is one of the most useful troubleshooting steps and definitely one of the first things you should try before contacting tech support.

1 – Reset gateway (modem/router combination)

If you have a modem/router combination device, also known as a gateway, you can easily reset it.

  1. Disconnect the modem from power. Unplug the power cords and remove any batteries from the device.
  2. Leave the gateway alone for at least 30 seconds.
  3. Reinsert the batteries and reconnect the power cord.
  4. Leave the device alone for at least 2 minutes. The lights will be solid for this step instead of blinking.
  5. Verify your network connection. You should be able to reach the internet.

If this doesn’t work, attempt to locate a small recessed button on the back of your modem. If this reset button exists, depress it with a pen for 30 seconds until the router reboots itself.

2 – Reset modem with a separate router

If you use two devices—a modem and router—you will need to follow this process to reset them both.

  1. Disconnect the modem from power by unplugging the power cord and taking out any batteries.
  2. Disconnect the power cord from the router.
  3. Leave both devices alone for at least 30 seconds.
  4. Plug the power cord back into the modem and put any removed batteries back in place.
  5. Leave the modem alone for 2 minutes, at a minimum. The lights on the modem will be solid instead of blinking.
  6. Plug the power cord back into the router.
  7. Leave the router alone for about 2 minutes while it comes back online.
  8. Verify your network connection. You should be able to reach the internet.

3 – More help

It’s possible that resetting the devices won’t resolve your issue. It may be necessary to factory reset the devices. For further assistance, Charter Spectrum recommends contacting their support team or using their Internet Troubleshooting Tool.

NEXT UP

How to Change Your Frontier WiFi Password

howchoo
howchoo   (467)
November 25, 2023

There are a few reasons you might want to update or reset your WiFi password: making your network more secure, and making your password easier to remember and type. Improved network security You can add an extra layer of security to your network by changing the WiFi password. As long as your new password is

Continue Reading

howchoo

 467 guides

Introducing Howchoo, an enigmatic author whose unique pen name reflects their boundless curiosity and limitless creativity. Mysterious and multifaceted, Howchoo has emerged as a captivating storyteller, leaving readers mesmerized by the uncharted realms they craft with their words. With an insatiable appetite for knowledge and a love for exploration, Howchoo’s writing transcends conventional genres, blurring the lines between fantasy, science fiction, and the surreal. Their narratives are a kaleidoscope of ideas, weaving together intricate plots, unforgettable characters, and thought-provoking themes that challenge the boundaries of imagination.

Home Interests Anycubic

Anycubic Mega X: Cura Machine Settings and Cura Profile

Here’s how to add the new Anycubic Mega X to Cura.
howchoo   (467)
August 14, 2023
8 minutes

Share

You’ll Need 1

What you’ll need
Interests
Series
Howchoo is reader-supported. As an Amazon Associate, we may earn a small affiliate commission at no cost to you when you buy through our links.
Posted in these interests:
3dprinting • 36 guides
anycubic • 6 guides

The Anycubic Mega X is new enough that the machine doesn’t appear in Cura’s “Add a printer” interface. This short guide will show you how to add the Anycubic Mega X to Cura and set up the correct Anycubic Mega X Cura profile.

Anycubic Mega X Review (2023)
A budget 3D printer with a MASSIVE build volume.

1 – Add a placeholder printer

Open Cura and navigate to Preferences > Printers > Add and select Add a non-networked printer.

Then, select Anycubic > Anycubic i3 Mega. We’ll use this as the base for the Anycubic Mega X since it’s similar and then modify the profile from there.

Finally, change the printer name from “Anycubic i3 Mega” to “Anycubic Mega X” and click Add.

🛈 If you see “Anycubic Mega X” as a selectable option, it means Cura has been updated to include the Mega X natively. In this case, select it instead and proceed to the next step to double-check that the settings are correct.

2 – Edit the placeholder machine settings

In the preferences window, select Anycubic Mega X under Local printers and then click the Machine Settings button.

This will open the Machine Settings panel that we can customize for the Mega X.

3 – Set the Anycubic Mega X Cura Machine Settings

Make sure the following Anycubic Mega X Cura settings are selected:

Mega X Printer Settings

Printer Settings
Z (Width)300mm
Y (Depth)300mm
Z (Height)305mm
Build plate shapeRectangular
Origin at centerNo (unchecked)
Heated bedYes (checked)
G-code flavorMarlin

Mega X Printhead Settings

Printhead Settings
X min20mm
Y min10mm
X max10mm
Y max10mm
Gantry Height0
Number of Extruders1

Mega X Start G-code

G21 ;metric values
G90 ;absolute positioning
M82 ;set extruder to absolute mode
M107 ;start with the fan off
G28 X0 Y0 ;move X/Y to min endstops
G28 Z0 ;move Z to min endstops
G1 Z15.0 F{speed_travel} ;move the platform down 15mm
G92 E0 ;zero the extruded length
G1 F200 E3 ;extrude 3mm of feed stock
G92 E0 ;zero the extruded length again
G1 F{speed_travel}
M117 Printing...
G5

Mega X End G-code

M104 S0 ; turn off extruder
M140 S0 ; turn off bed
M84 ; disable motors
M107
G91 ;relative positioning
G1 E-1 F300 ;retract the filament a bit before lifting the nozzle, to release some of the pressure
G1 Z+0.5 E-5 ;X-20 Y-20 F{speed_travel} ;move Z up a bit and retract filament even more
G28 X0 ;Y0 ;move X/Y to min endstops, so the head is out of the way
G1 Y180 F2000
M84 ;steppers off
G90
M300 P300 S4000

When you’re finished, click Close to save.

4 – Optional: Change recommended print settings

Now that the machine itself is configured, you can optionally change a few print profile settings for the Mega X. The default print settings inherited from the i3 Mega should work great for the Mega X, except that I recommend updating a few values (below).

Download the Mega X Cura profile

You can find importable Cura profiles for PLA and TPU on the USB drive that came with your printer, or mirrored on our GitHub repo. Download those profiles and import them in Preferences > Profiles.

Or, manual setup

Navigate to Preferences > Profiles > Normal, click Duplicate, and give it a name such as “Mega X Profile” or “Mega X Normal Profile”. I generally use a single profile and update quality from there, but that’s up to you.

Close the settings panel. In the normal “Print settings” Cura panel, change the following settings:

Print Settings
Infill Density20%
Infill PatternGrid
Print Speed50mm/s
Outer Wall Speed30mm/s
Travel Speed120mm/s
Z Hop When RetractedYes (checked)

When you’re done, reopen the profile in Preferences > Profiles and click Update profile with current settings/overrides.

NEXT UP

How to Update Blender

Get the latest Blender has to offer.
howchoo   (467)
November 24, 2023

Blender is one of the most popular open-source 3D creation suites today. It doesn’t cost a dime to use and everything you create is yours to own for good. The community is robust and the dev team still releases new updates on the regular. If you want to get the latest version, you may have

Continue Reading

howchoo

 467 guides

Introducing Howchoo, an enigmatic author whose unique pen name reflects their boundless curiosity and limitless creativity. Mysterious and multifaceted, Howchoo has emerged as a captivating storyteller, leaving readers mesmerized by the uncharted realms they craft with their words. With an insatiable appetite for knowledge and a love for exploration, Howchoo’s writing transcends conventional genres, blurring the lines between fantasy, science fiction, and the surreal. Their narratives are a kaleidoscope of ideas, weaving together intricate plots, unforgettable characters, and thought-provoking themes that challenge the boundaries of imagination.

Home Interests Raspberry Pi

How to Forget a Saved Wi-Fi Network on Your Raspberry Pi

Learn how to remove a saved wireless network in about a minute.
howchoo   (467)
August 14, 2023
6 minutes

Share

You’ll Need 1

What you’ll need
Interests
Howchoo is reader-supported. As an Amazon Associate, we may earn a small affiliate commission at no cost to you when you buy through our links.
Posted in these interests:
networking • 8 guides
pi • 92 guides

This short guide will show you how to delete, or “forget,” a saved wireless network from your Raspberry Pi. This is useful for changing networks or troubleshooting connectivity issues.

1 – Access the command line

Access the Raspberry Pi terminal using SSH or by connecting a keyboard, mouse, and monitor to your Pi.

How to Connect to a Raspberry Pi Remotely via SSH
The preferred (and most common) method of connecting to your Pi to run commands.

2 – Modify the existing wpa_supplicant config

Use the following command to access the full list of configured wireless networks:

/etc/wpa_supplicant/wpa_supplicant.conf

You’ll be prompted to enter your Raspberry Pi password—the default Raspberry Pi password is raspberrypi. If you haven’t already, I highly recommend you change your Raspberry Pi’s password after logging in by running the following command:

passwd

3 – Delete a wireless network

To forget a specific Pi wireless network, delete the corresponding network block, surrounded by opening and closing {} curly braces. For example, deleting the following will “forget” the serenity network:

network={
    ssid="serenity"
    psk="shepherdBookHasScaryHair$1"
    key_mgmt=WPA-PSK
}

If you want to forget a network but keep the configuration in place for later, you can uncomment the block instead by adding a # symbol to the beginning of each line. For example, uncommenting the following will “forget” the serenity network while keeping the details in the file for future use:

#network={
#    ssid="serenity"
#    psk="shepherdBookHasScaryHair$1"
#    key_mgmt=WPA-PSK
#}

When you’re done, save and exit by pressing CTRL-X, typing Y, and pressing enter.

A recommendation before deleting

Of course, if you’re connected to your Pi via the network you want to remove, you’ll be disconnected from the Pi as soon as your Pi forgets the network.

Therefore, I recommend adding a new network before deleting the other network—this makes it slightly easier to add your “new” network. If you need to, finding which network your Pi is connected to is easy.

How to Find the Current Raspberry Pi Wi-Fi Network Name (SSID)
Finding your Pi’s current network name is easy.

4 – Connect to a new network

Connecting to a new network is as simple as generating a new wpa_supplicant.conf file or by running the raspi-config utility.

NEXT UP

How to Run a Minecraft Server on the Raspberry Pi

A whole world trapped inside your Pi.
howchoo   (467)
December 7, 2023

There are several ways to go about running a Minecraft server on the Raspberry Pi. In this guide, I’ll cover how to install Nukkit—a cross-platform Minecraft server that’s super easy to set up on the Raspberry Pi. This server should work with PCs, consoles, and tablets running Minecraft 1.14. I’ll be using a Raspberry Pi

Continue Reading

howchoo

 467 guides

Introducing Howchoo, an enigmatic author whose unique pen name reflects their boundless curiosity and limitless creativity. Mysterious and multifaceted, Howchoo has emerged as a captivating storyteller, leaving readers mesmerized by the uncharted realms they craft with their words. With an insatiable appetite for knowledge and a love for exploration, Howchoo’s writing transcends conventional genres, blurring the lines between fantasy, science fiction, and the surreal. Their narratives are a kaleidoscope of ideas, weaving together intricate plots, unforgettable characters, and thought-provoking themes that challenge the boundaries of imagination.

Home Interests Illustrator

How to Embed Images in Illustrator

Storing image files in Illustrator projects.
howchoo   (467)
August 14, 2023
4 minutes

Share

You’ll Need 1

What you’ll need
Interests
Series
Howchoo is reader-supported. As an Amazon Associate, we may earn a small affiliate commission at no cost to you when you buy through our links.
Posted in these interests:
 
adobe • 7 guides
illustrator • 3 guides

Embedding an image in Illustrator will store a copy of the image file within the AI project. This will make the project size bigger, as it now accommodates the whole image rather than linking to it.

Any version of Illustrator will work, but I’ll be using Illustrator 2020 for this guide.

1 – Start a new project

Open the project you need to embed an image in, or start a new project in Illustrator.

You can import an image by dragging and dropping an image file on to the workspace or using the File > Open menu. Place the image inside the artboard.

How to Add and Use an Artboard in Illustrator
Everything you need to master artboards in Illustrator.

2 – Open the links window

To embed an image, we need to use the Links window. To access it, open the Window tab, and select Links.

3 – Select an image to embed

This window will show a list of images used in your Adobe Illustrator document. Select the image you want to embed by clicking on it in this list.

4 – Embed the image

There is a drop-down menu in the Links window that can be accessed in the upper right-hand corner. Open this menu and choose Embed Image(s). Congratulations! The image is now embedded.

5 – How to unembed an image

Select the embedded image in the Links Window. Open the drop-down menu and choose Unembed.

You may also be interested in our guide on how to disable the start screen in Illustrator.

NEXT UP

How to Resize an Image in InDesign

There are two options for resizing in InDesign: the easy way and the precise way.
howchoo   (467)
December 7, 2023

You might think that resizing an image would be as simple as dragging the corner of the frame. Well, it is, and it isn’t! Remember that when resizing an image in InDesign, you’re essentially resizing the image’s frame. For more information, on inserting an image in InDesign and frames, check our guide. How to Insert an Image

Continue Reading

howchoo

 467 guides

Introducing Howchoo, an enigmatic author whose unique pen name reflects their boundless curiosity and limitless creativity. Mysterious and multifaceted, Howchoo has emerged as a captivating storyteller, leaving readers mesmerized by the uncharted realms they craft with their words. With an insatiable appetite for knowledge and a love for exploration, Howchoo’s writing transcends conventional genres, blurring the lines between fantasy, science fiction, and the surreal. Their narratives are a kaleidoscope of ideas, weaving together intricate plots, unforgettable characters, and thought-provoking themes that challenge the boundaries of imagination.

Home Interests Raspberry Pi

How to Rotate Raspberry Pi Screen or Display (and Touchscreen) Output

Screen upside down? No problem.
howchoo   (467)
August 14, 2023
7 minutes

Share

You’ll Need 1

What you’ll need
Interests
Howchoo is reader-supported. As an Amazon Associate, we may earn a small affiliate commission at no cost to you when you buy through our links.
Posted in these interests:
pi • 92 guides

So you’ve just finished setting up your Raspberry Pi touchscreen, and it’s upside-down. This guide will show you how to rotate or flip your Raspberry Pi’s display and touchscreen output between landscape and portrait modes. This is useful if you want to display your Raspberry Pi screen output in portrait mode or if your screen is upside down!

This guide will also show you how to flip your screen (as if you’re looking at it in a mirror), which is an odd request but might be necessary for some projects.

This should work for any display or touchscreen you might be using, including those on our list of the best touchscreens for the Raspberry Pi. If you need to know what resolution your Pi is outputting, check out this guide to look up your Raspberry Pi display resolution.

1 – Edit boot/config.txt

There are two methods for editing the boot/config.txt file required to change screen rotation:

SD card method

Put your Pi’s SD card in your computer and open the /boot/config.txt file in a plain-text editor such as Notepad or Sublime Text.

Connect remotely

From your computer, open Terminal (Mac) or Command Prompt (Windows) and connect to your Raspberry Pi via SSH.

How to Connect to a Raspberry Pi Remotely via SSH
The preferred (and most common) method of connecting to your Pi to run commands.

Then, run the following command to edit the file:

sudo nano /boot/config.txt

2 – Rotate the Raspberry Pi display

If you’re using a touchscreen, skip this step.

If you have a value for dtoverlay that contains the rotate=90 command, change that value to your desired rotation:

dtoverlay=pitft35-resistive,rotate=90,speed=20000000,fps=20

Note: The dtoverlay value likely won’t be the same as the lcd_rotate value. For example, the default “normal” screen rotation would be rotate=90lcd_rotate=0. Therefore, you may need to test multiple configurations.

If you have no dtoverlay “rotate” value, insert one of the following values instead:

display_rotate=0 # Normal (landscape)
display_rotate=1 # 90 degrees (portrait, upside down)
display_rotate=2 # 180 degrees (landscape)
display_rotate=3 # 270 degrees (portrait, upside down)
display_rotate=0x10000 # horizontal flip
display_rotate=0x20000 # vertical flip
🛈 If a value is already set for display_rotate (WITHOUT a # before it), you can edit that value instead.

3 – Rotate the Raspberry Pi touchscreen

If you’re using a touchscreen, you’ll also need to adjust touchscreen rotation. Otherwise, your taps will all be on the wrong part of the screen! This will adjust both display and touchscreen rotation.

Insert one of the following values at the end of the file:

lcd_rotate=0 # default (normal landscape)
lcd_rotate=1 # 90 degrees (portrait, upside down)
lcd_rotate=2 # 180 degrees (landscape)
lcd_rotate=3 # 270 degrees (portrait, upside down)

4 – Restart your Pi

Restart your Pi for things to take effect:

sudo reboot
NEXT UP

How to Run a Minecraft Server on the Raspberry Pi

A whole world trapped inside your Pi.
howchoo   (467)
December 7, 2023

There are several ways to go about running a Minecraft server on the Raspberry Pi. In this guide, I’ll cover how to install Nukkit—a cross-platform Minecraft server that’s super easy to set up on the Raspberry Pi. This server should work with PCs, consoles, and tablets running Minecraft 1.14. I’ll be using a Raspberry Pi

Continue Reading

howchoo

 467 guides

Introducing Howchoo, an enigmatic author whose unique pen name reflects their boundless curiosity and limitless creativity. Mysterious and multifaceted, Howchoo has emerged as a captivating storyteller, leaving readers mesmerized by the uncharted realms they craft with their words. With an insatiable appetite for knowledge and a love for exploration, Howchoo’s writing transcends conventional genres, blurring the lines between fantasy, science fiction, and the surreal. Their narratives are a kaleidoscope of ideas, weaving together intricate plots, unforgettable characters, and thought-provoking themes that challenge the boundaries of imagination.