Changing your Wi-Fi network name has never been easier. From web interfaces to mobile support, Verizon has prepared its users with many options for network security. This guide covers the network tools you need to change your Wi-Fi network name on your Verizon FiOS Router.
1 – Change Wi-Fi name via router (192.168.1.1)
To begin, open a browser window to access your FiOS router web interface. FiOS routers can typically be accessed using the following IP address: 192.168.1.1 For authentication help, visit our guide on how to log into a Verizon FiOS router.
How to Log into a Verizon FiOS Router
Log in to your FiOS router
Choose Wireless Settings
Select Basic Security Settings
Change the SSID to reflect your new desired Wi-Fi network name
Save the changes
Some routers have a different menu structure. Your web interface may not match the instructions above. If that’s the case, Verizon has a list of official FiOS routers on their website. Use this list to find your FiOS router manual for further instructions.
2 – Change Wi-Fi name via My FiOS app
Updating the Wi-Fi network name can be done through the My FiOS app. Users can download the mobile app and make critical changes to their network settings at the touch of a button.
Open the My Fios app
Select Internet
Choose your wireless network under My Networks
Select Edit
Set a new Wi-Fi network name
Save the changes
3 – Change Wi-Fi name via My Verizon
You can find a variety of tools within the My Verizon app to make changes to your FiOS network. To change the Wi-Fi network name, you will need to install the My Verizon app.
Log in to your My Verizon account
Select Internet
Choose your wireless network under My Networks
Select Manage
Set a new Wi-Fi network name
Save the changes
4 – Test the Wi-Fi network name change
Congratulations! You should be able to detect your FiOS Wi-Fi with the new network name. Testing is as easy as searching for a wireless network. If you’re unable to find your network under the new name, double-check the new information is entered correctly in both the router settings and wireless device.
For official support, visit the official documentation provided by Verizon on how to change your FiOS network name.
While you’re changing the network name, you may want to take a moment to change your Verizon FiOS WiFi Password, as well.NEXT UP
Call forwarding is the process of directing phone calls from one number to another. Verizon allows its customers to enable call forwarding at no additional charge. Your typical call rates will still apply. This process works for all Verizon customers regardless of your carrier—including Samsung, Apple, LG, Lenovo, and more. Note: International numbers can not
Introducing Howchoo, an enigmatic author whose unique pen name reflects their boundless curiosity and limitless creativity. Mysterious and multifaceted, Howchoo has emerged as a captivating storyteller, leaving readers mesmerized by the uncharted realms they craft with their words.
With an insatiable appetite for knowledge and a love for exploration, Howchoo’s writing transcends conventional genres, blurring the lines between fantasy, science fiction, and the surreal. Their narratives are a kaleidoscope of ideas, weaving together intricate plots, unforgettable characters, and thought-provoking themes that challenge the boundaries of imagination.
If you’re a Charter WiFi user, you need to keep your network secure. Changing your WiFi password is a simple and effective way to add an additional layer of security to your network. This guide covers the best ways to manage your Charter Spectrum Network password.
1 – Change Wifi Password
You can change the Charter WiFi password using a browser. First, connect to the network. If you’re not sure what the WiFi password is, then use our guide to help you locate your network security key. Alternatively, you can use an ethernet cable to connect directly to your router.
Open a browser window and go to this address: http://192.168.0.1
Log in to your router with the admin username and password.
Look through the menu options for an option to edit your WiFi network. The name of the network may be labeled with SSID, Gateway name, or Wireless Network.
The password field will probably be labeled WPA Pre-Shared Key. Once you find it, create a new WiFi password and save the changes.
2 – View current WiFi information
You can view your WiFi network name and password using the official Charter Spectrum website. There are two ways to access the information.
You can locate the default network login information on your Charter Spectrum WiFi router. Look underneath for a sticker containing your network name and key. Sometimes a technician will give you a separate note with the default Wi-Fi information.
There are a few reasons you might want to update or reset your WiFi password: making your network more secure, and making your password easier to remember and type. Improved network security You can add an extra layer of security to your network by changing the WiFi password. As long as your new password is
Introducing Howchoo, an enigmatic author whose unique pen name reflects their boundless curiosity and limitless creativity. Mysterious and multifaceted, Howchoo has emerged as a captivating storyteller, leaving readers mesmerized by the uncharted realms they craft with their words.
With an insatiable appetite for knowledge and a love for exploration, Howchoo’s writing transcends conventional genres, blurring the lines between fantasy, science fiction, and the surreal. Their narratives are a kaleidoscope of ideas, weaving together intricate plots, unforgettable characters, and thought-provoking themes that challenge the boundaries of imagination.
1 – Apply cap full of bleach to top of the trash can
This will only keep the raccoons away from the trash can for several hours. However if you know when the garbage men are coming, you only need an hour or so.
2 – Reapply
Reapply the bleach as needed. You can use larger amounts when your trash can will be out for a longer period of time—like weekends or holidays where there’s a trash-pickup delay.
3 – You’re done!
Raccoons should be repelled by the bleach and leave your garbage alone.
NEXT UP
How to Properly Dispose of a Worn or Damaged American Flag
Since our country was conceived, the U.S. Flag has been a symbol of our country’s freedom. Our country’s Flag Code provides specific guidelines for how to “retire” a damaged or worn-out American flag. When should my American flag be retired? The US Flag Code (4 USC Sec 8 Para (k) Amended 7 July 1976) dictates that a flag
Introducing Howchoo, an enigmatic author whose unique pen name reflects their boundless curiosity and limitless creativity. Mysterious and multifaceted, Howchoo has emerged as a captivating storyteller, leaving readers mesmerized by the uncharted realms they craft with their words.
With an insatiable appetite for knowledge and a love for exploration, Howchoo’s writing transcends conventional genres, blurring the lines between fantasy, science fiction, and the surreal. Their narratives are a kaleidoscope of ideas, weaving together intricate plots, unforgettable characters, and thought-provoking themes that challenge the boundaries of imagination.
I love Plex, the self-hosting solution for movies, TV shows, music, and even audiobooks (though this last is still only partly supported). I usually try to go more towards the FOSS (or at least Open Source) end of the market, but, while Jellyfin and Kodi are friggen awesome, their development lags way behind Plex and even Emby.
I have a massive media library that I’ve built over the years, and I wanted to be able to access it quickly and easily without having to pay out monthly fees. The one-time $100 fee to become a lifetime PlexPass member was absolutely worth it in terms of how many services I was able to compress into a single app.
In the last couple of years, PlexAmp (Plex’s music-centered app that plays content stored in your Plex server) has become known as one of the go-to music clients out there, offering a modern and powerful app for your music collection needs. But, as with any app, it still needs work, and Plex’s development has always been a little laggy in odd ways. The largest lag I’ve encountered with PlexAmp is the inability to easily create playlists from within the app. Sure, you can create a playlist by manually clicking on each song and choosing “add to playlist”, but if you’re like me and have playlists featuring hundreds of songs that are already curated, then this feature just doesn’t make sense.
The other problem is that because PlexAmp is just a client app, it doesn’t let you create playlists from inside the app that anyone with access to your server can see! If you want to share your cool music collection with your family, therefore, what are you supposed to do?
The answer is surprisingly simple and comes about by setting things up in the main Plex web-app. By setting things up directly inside your server, you can not only create customized playlists from your music with ease, you can set up collections that everyone with server access will be able to create their own playlists from in just two clicks, offering massive library customization for all of your server members.
1 – Using Plex to create collections for music in PlexAmp
Using Plex to create collections for music in PlexAmp
The first thing you’ll want to do is set up a collection from inside the main Plex web-app.
Navigate to music library and change the search view to “albums”
You could also change it to “tracks”, just don’t leave it on “Artists” or, when you create collections, it will create links to artist profiles in your library instead of their actual media, and that will mess up how Plex transfers music to PlexAmp
2 – Add an album to a collection in Plex
Add an album to a collection in Plex
Select the album you want to move to a collection
Click the vertical ellipsis (or “kebab” menu icon)
Select “add to”
Select “add to collection”
Set the name of your collection if creating a new one, or add to an existing one!
3 – Add multiple albums to music collections in Plex
Add an album to a collection in Plex
This also makes adding multiple items to a collection really easy. Just click the little transparent circle in the upper right of the album artwork to mark it with an orange check mark. Then continue for as many albums as you would like! The top of the screen will now display how many items you have selected and provide the controls for adding to a collection.
4 – Add multiple songs to a collection in Plex for PlexAmp
Add an album to a collection in Plex
It’s really easy to add multiple songs from an album to a collection as well, by selecting the transparent circle next to a song’s name, check marking it, and then using the menu that appears at the top of the screen to add them wherever you want.
5 – Find your new music collection in the Plex collections tab
Find your new music collection in the Plex collections tab
You’ll see your new collection in the Plex collections tab, and you can continue to add music to it however you wish! The best part about collections in Plex is that they can be accessible to users across the server, not just a single user. This means that anyone who has access to your server cans see the collections you have created. However, collections will not show up in PlexAmp. For that, you need playlists that are curated to individual user accounts.
6 – Create your first Plex playlist
Create your first Plex playlist
Now that you have a collection created in which you have your cool music stored, you need to turn it into a playlist. Luckily, this is really simple.
Select your playlist
Click on the vertical ellipses (kebab menu)
Select “Add to”
Select “Add to Playlist”
You can either create a new playlist (the name will automatically fill in the name of the collection that you’re adding), or add to an existing playlist.
7 – Profit in PlexAmp with your new Plex-created Playlist!
Profit in PlexAmp with your new Plex-created Playlist!
As soon as you launch PlexAmp you’ll see your new playlist that you created over in Plex appear in the “Recent Playlists” tab of the home screen.
8 – Finding your playlists in PlexAmp
Finding your playlists in PlexAmp
If you don’t just want to see the latest playlist but actually find all your created playlists, just click on the library tab.
Once on the library window, tap playlists
Note: there’s sometimes an error regarding how PlexAmp sees playlists, and it may read your library as having an incorrect number of playlists (in this image, zero). If you’ve followed the previous steps, ignore it and click through anyway, you’ll see them all there!
9 – Your new Plex Playlist is now added to PlexAmp’s Playlists section
Your new Plex Playlist is now added to PlexAmp’s Playlists section
And, just like that, your new playlist is visible in your PlexAmp application! This makes curating your music really easy in Plex, since PlexAmp itself doesn’t really have any features for managing the library (only for playing from the server).
10 – Sharing your Plex music playlists with other server members for PlexAmp?
Sharing your Plex music playlists with other server members for PlexAmp?
Collections are shared across your Plex server, but playlists are not! If you create collections, anyone can view them, making it easy to share your cool music playlists, but it’s up to each individual member to go through the trouble of adding those collections to their own playlists and therefore being able to then view the playlist inside PlexAmp. This allows each server member to curate their own content as they see fit, even going so far as to add or remove their own tracks and albums from a specific playlist without affecting the main collection and any other member’s listening experience.
NEXT UP
The 30 Most Viewed YouTube Videos of All Time (2021)
Did you know that the number of views on the most-viewed YouTube video is higher than the number of people on the entire globe?! Yup. We’re talking in the billions…and then some. While YouTube formed YouTube Music, due to music videos and music playlists’ popularity, people still tend to head over to YouTube to listen
Introducing Howchoo, an enigmatic author whose unique pen name reflects their boundless curiosity and limitless creativity. Mysterious and multifaceted, Howchoo has emerged as a captivating storyteller, leaving readers mesmerized by the uncharted realms they craft with their words.
With an insatiable appetite for knowledge and a love for exploration, Howchoo’s writing transcends conventional genres, blurring the lines between fantasy, science fiction, and the surreal. Their narratives are a kaleidoscope of ideas, weaving together intricate plots, unforgettable characters, and thought-provoking themes that challenge the boundaries of imagination.
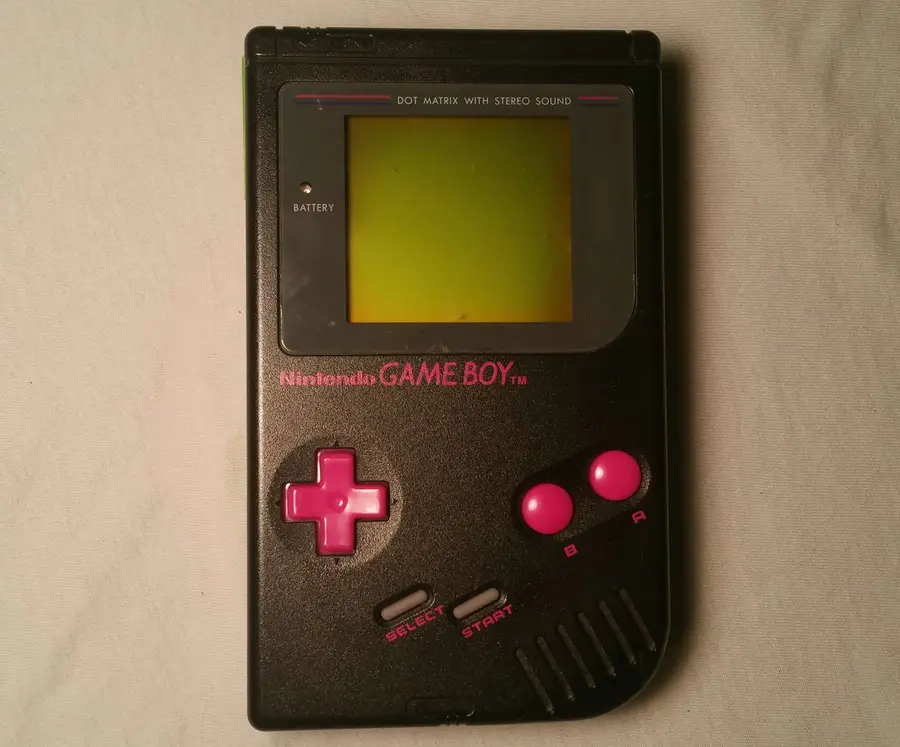
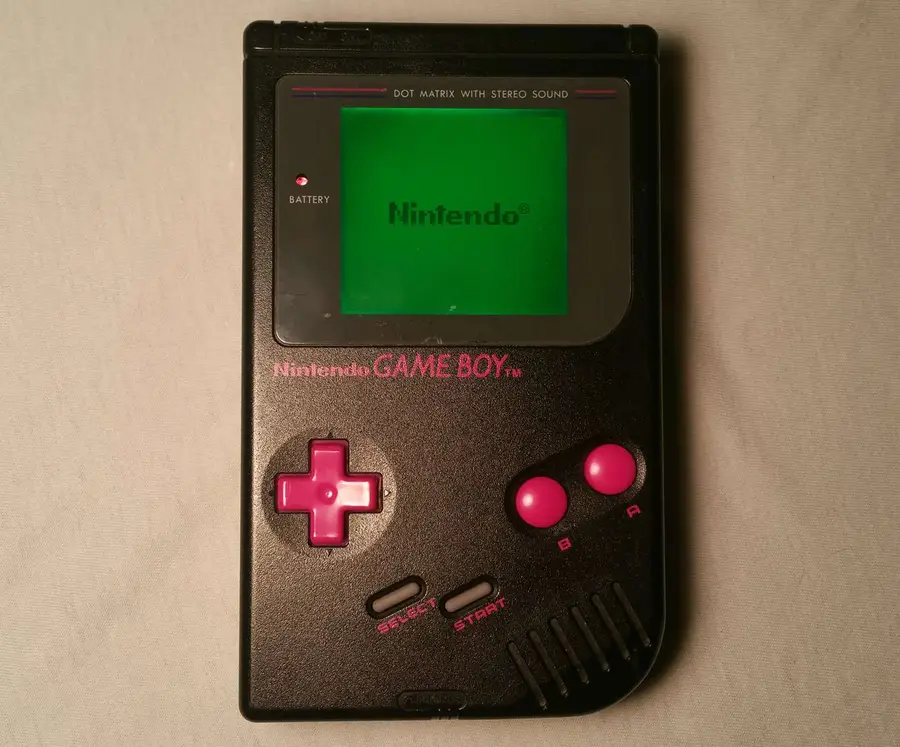
Are you struggling to see the pixels on your Game Boy?
Why bother with ambient light fixtures when you could install your very own backlight? That’s right! In 2018, we no longer need the burden of a carefully placed lamp to make or break our gaming experience.
With the power of a Game Boy backlight kit from Hand-Held Legend, you can take your Game Boy DMG experiences into the night!
Today I’ll be installing a green backlight in my Gameboy. To get started, we will need a few things…
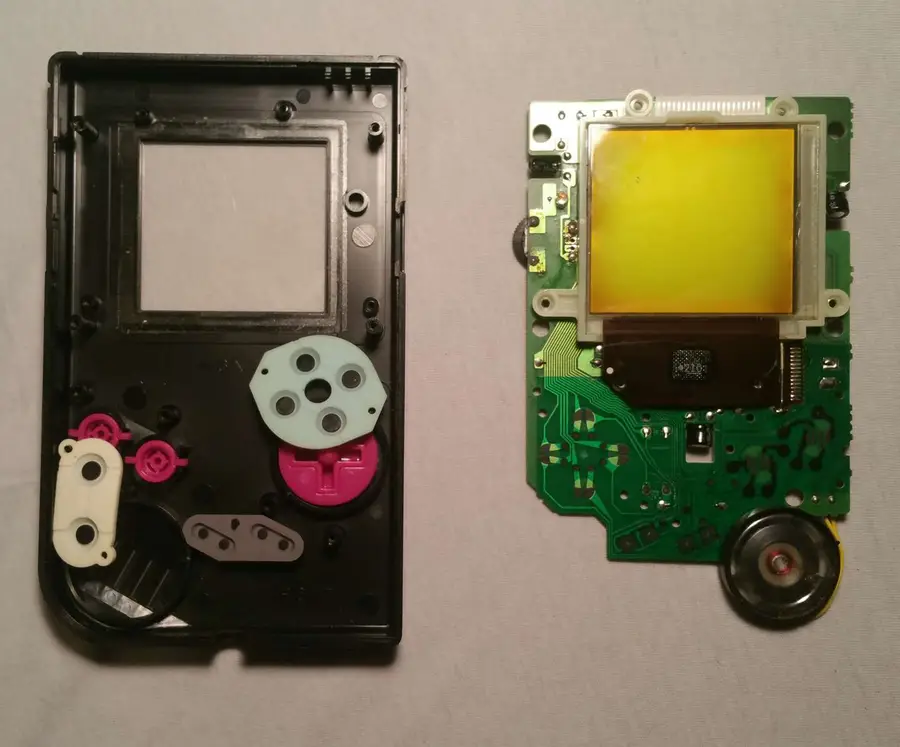
1 – Examine the Game Boy
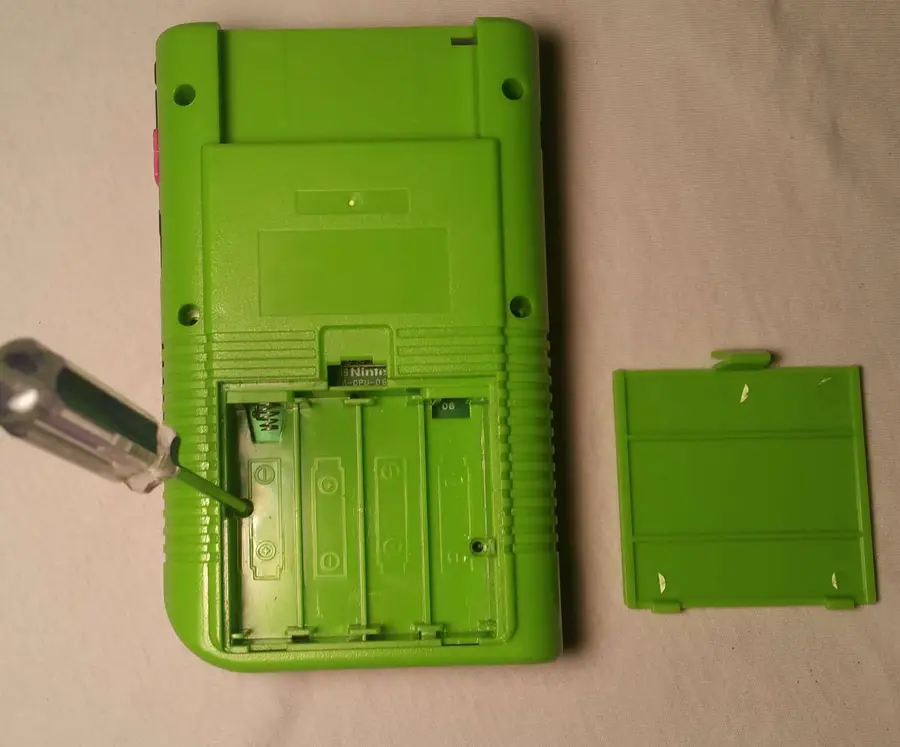
First we’ll need to turn the Game Boy off for a physical examination.
The Game Boy is held together with 6 screws—take note of any that may be missing. Most Game Boys use tri-wing screws to hold the outer shell. Occasionally you’ll find an older model held together with Phillips screws.
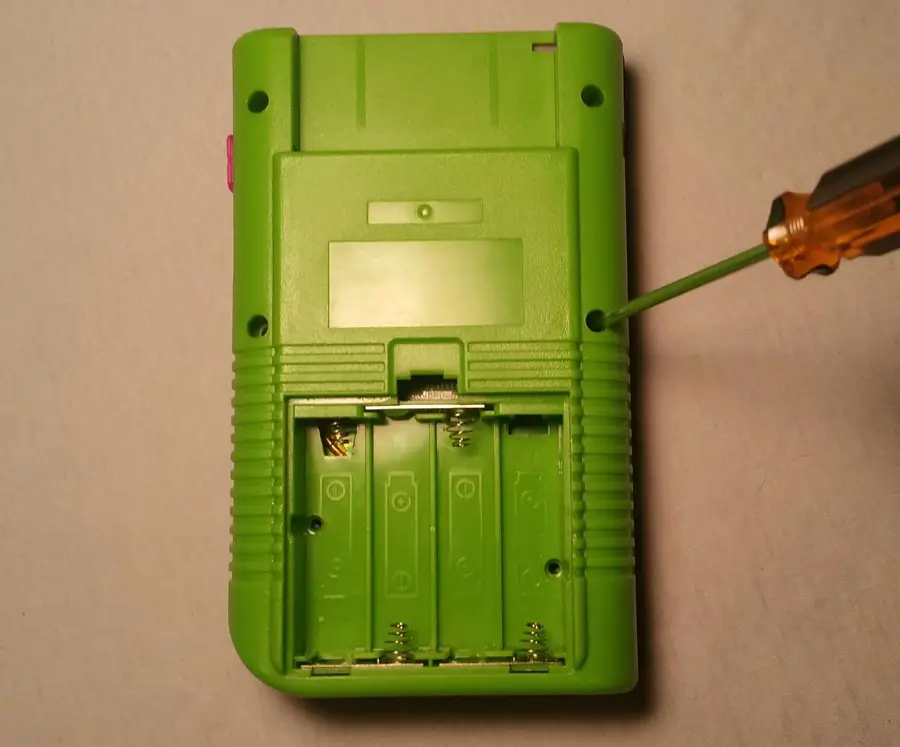
Identify the best screwdriver to use and remove the screws from the back of the Game Boy. The battery cover and batteries will need to be removed to expose the final 2 screws. You will need to account for 6 screws total.
Gently separate the halves. There will be a delicate ribbon cable connecting the two halves together. We need to unplug this cable from the back motherboard. This ribbon cable is very sensitive and bending the wires may render the screen irreparable. Be extra cautious when disconnecting this ribbon cable.
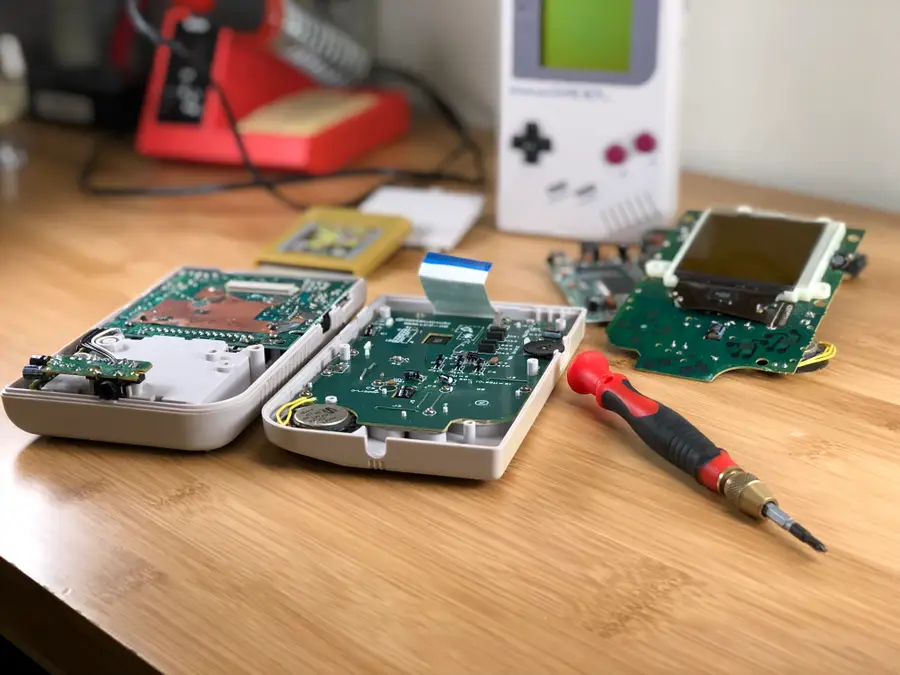
3 – Remove the front motherboard
The front motherboard needs to be removed with a Phillips number 1 screwdriver. You will need to account for 10 screws total.
Without using too much force, remove the motherboard from the front shell. There will be several components to account for.
A Button
B Button
A/B Buttons Silicone Pad
D-Pad Button
D-Pad Button Silicone Pad
Start/Select Buttons (One Piece)
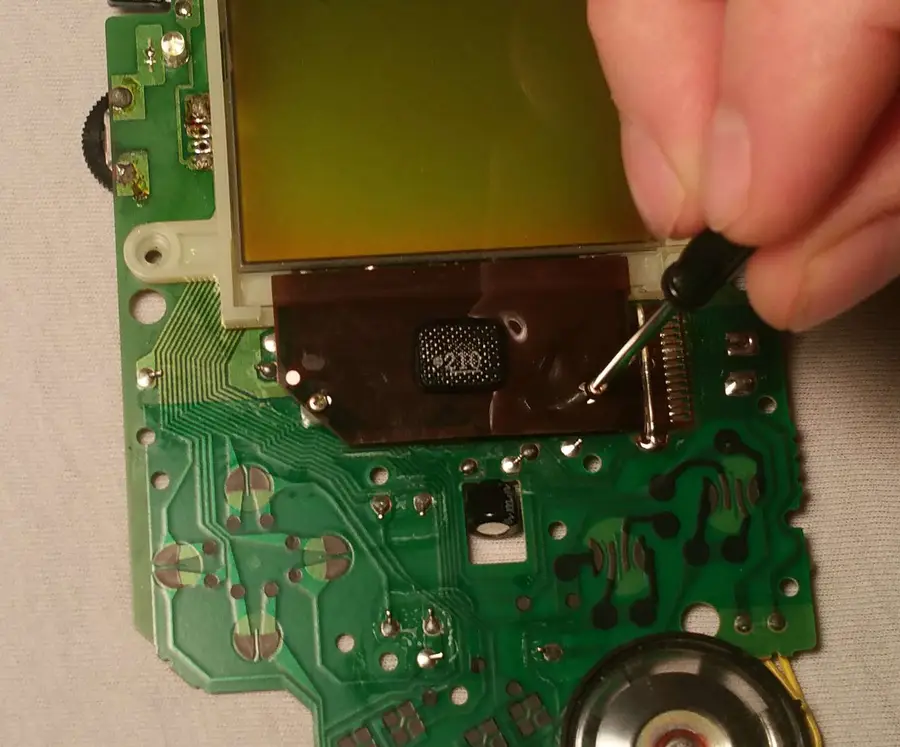
4 – Unscrew the LCD
Using a Phillips screwdriver number 0, remove the two screws below the LCD screen.
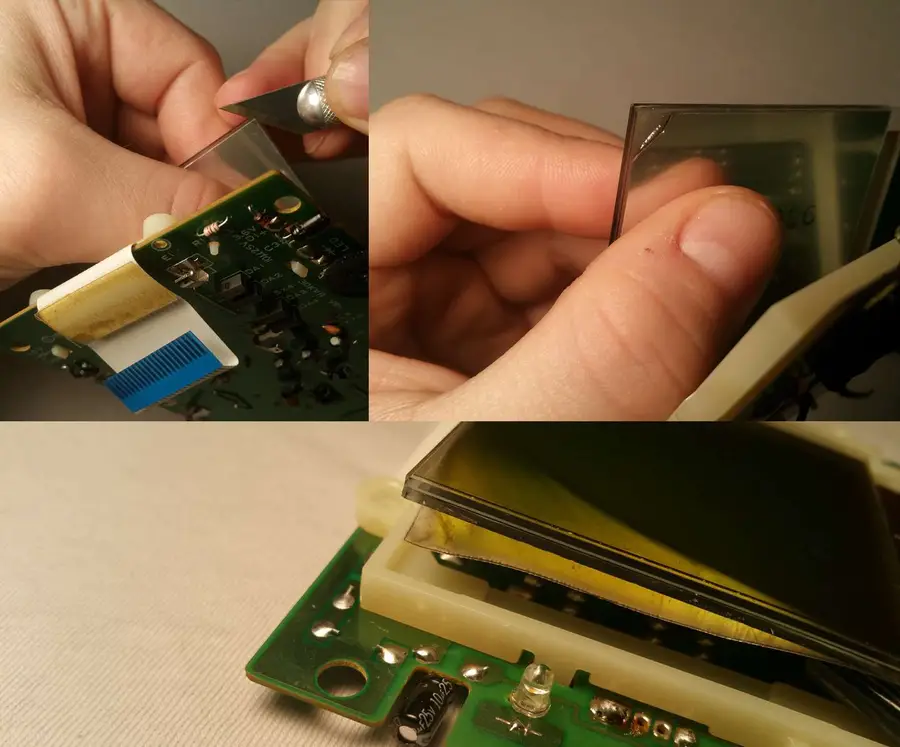
5 – Carefully remove the polarizing film
This step is very critical and can damage the Game Boy screen permanently. Exercise extreme caution!
The Game Boy screen uses a polarizing film which needs to be removed. It will be replaced with a new polarizing film from the backlight kit.
Lift the screen from the board. The polarizing film is under a reflective layer. Both need to be removed. Using an x-acto knife, start peeling the corner of the polarizing film. Be sure you have both layers peeling, not just the reflective layer.
Carefully work with the film to remove it from the screen. Be mindful of how you are holding the screen.
DO NOT APPLY PRESSURE to the screen.
DO NOT SQUEEZE the screen.
DO NOT USE EXCESS FORCE to remove the polarizing film.
You may need to clean remaining glue using an alcohol soaked cotton swab.
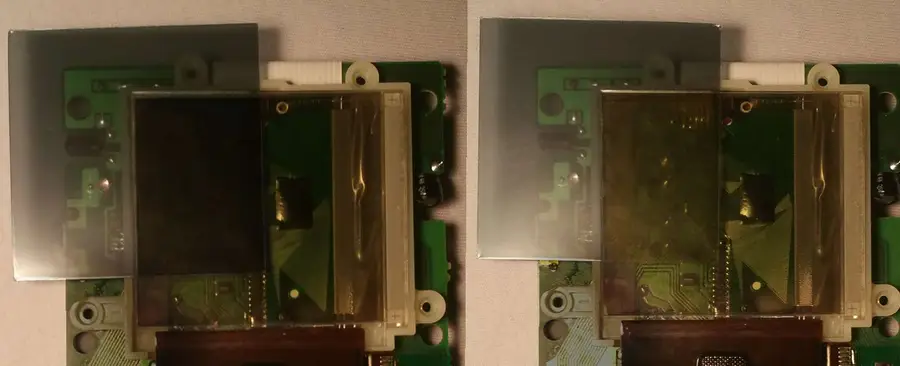
6 – Prepare the new polarizing film
Open the new kit to retrieve the replacement polarizing film.
Place the new film behind the Game Boy screen. The polarizing film will appear darker or lighter when rotated 90°. We will need to choose the right orientation for our backlight mod.
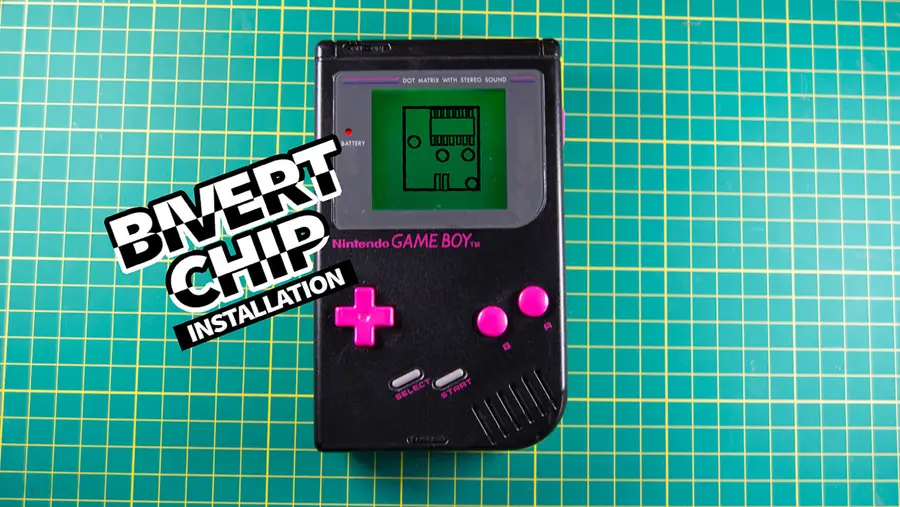
If the Game Boy will be using a bivert chip, the polarizing screen needs to be tilted 90° until it appears dark.
If you will not be installing a bivert chip, the polarizing screen needs to be tilted 90° until it appears clear.
Be aware of the two protective stickers covering each side of the polarizing film. It’s best to leave these in place until the backlight is slid into place.
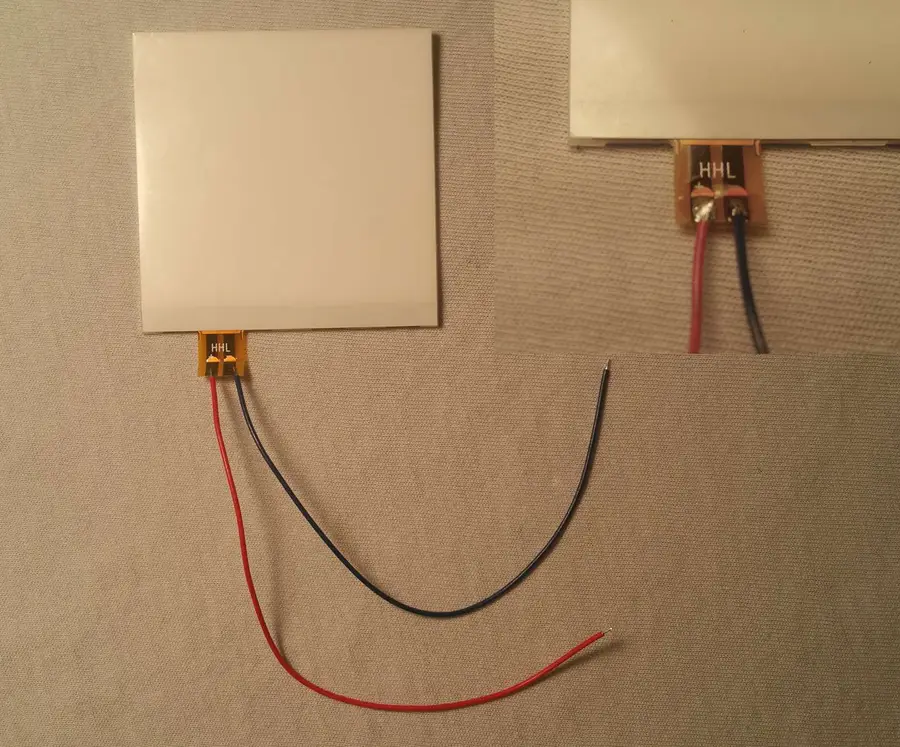
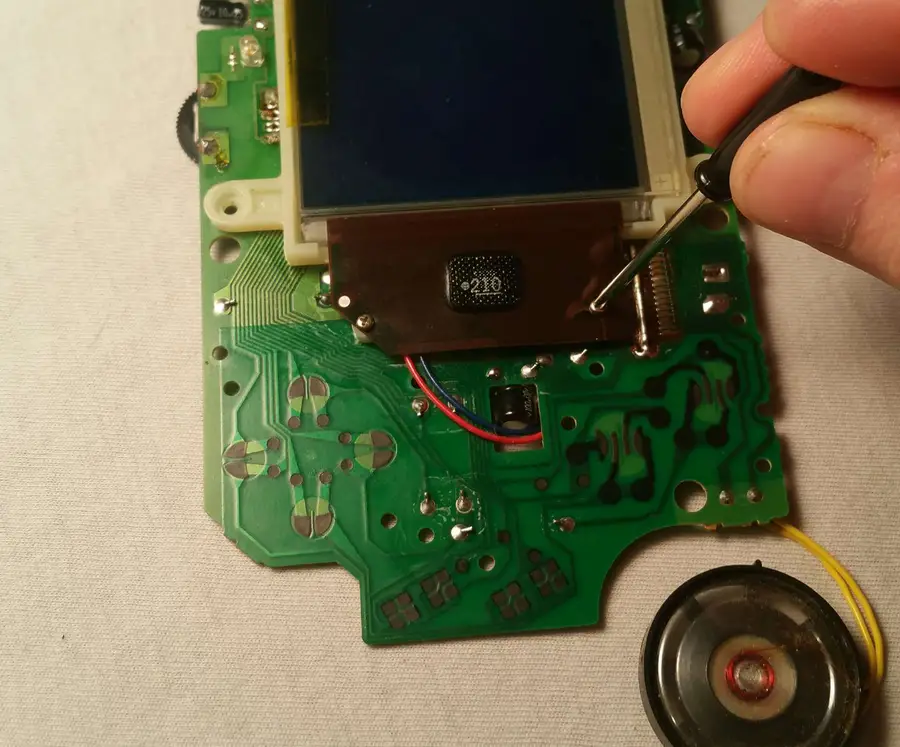
7 – Solder the wires to the backlight
The backlight comes with two wires. They will need to be soldered to the backlight.
Using a soldering iron, carefully solder the wires to the backlight terminal. One wire will need to be soldered to the positive side, the other negative. In my example, I’ve soldered the red wire to the positive terminal. Keep track of which color you’re using for each terminal!
8 – Place the backlight
This is the best opportunity to clear the screen of potential debris. Using a microfiber cloth, clean every side of each new layer. This includes the LCD, the polarizing film, and backlight.
You may need to pry the screen up using an x-acto knife. Be careful not to chip the screen. There is a small groove above the display that should give a little bit of leverage.
Remove the two white foam rectangles from behind the screen and discard them. Place the new backlight behind the LCD screen. Now is the best time to remove the protective stickers from the polarizing film. Holding the sides of the polarizing film, carefully place it between the backlight and LCD. Be mindful of the orientation you need from step 7.
You may choose to use a piece of kapton tape to prevent the backlight from falling out during installation, as seen in the example.
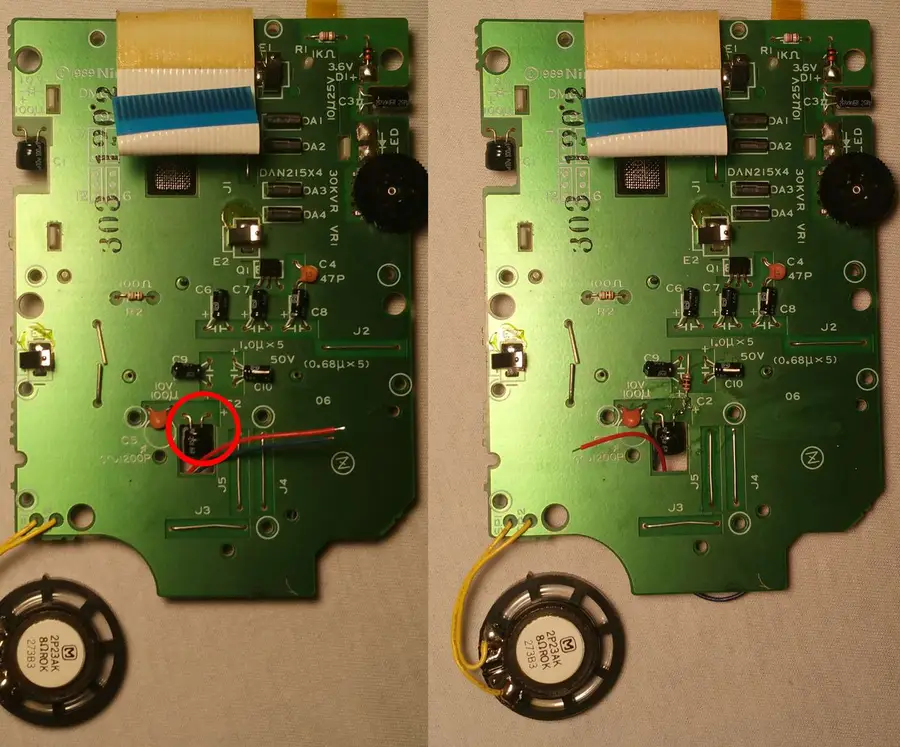
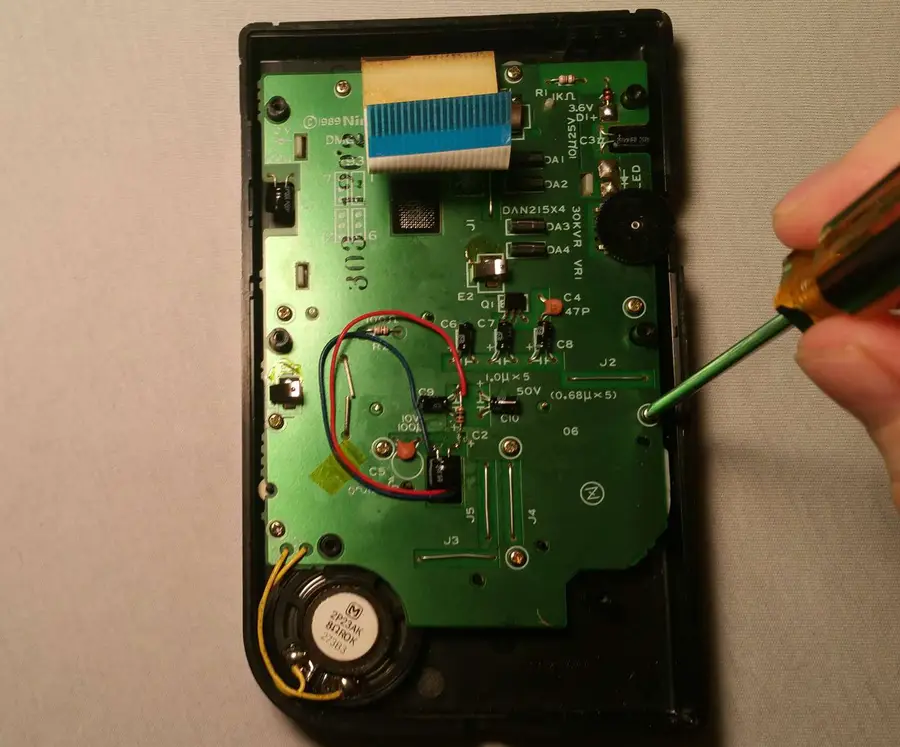
9 – Install the resistor (if applicable)
Older backlight kits require a resistor to properly regulate voltage in the Game Boy. Your kit may not have a resistor, in which case you can skip ahead to the next step.
Holding the LCD in place, flip the motherboard over. The resistor will need to be trimmed and soldered to the positive leg of the capacitor circled above.
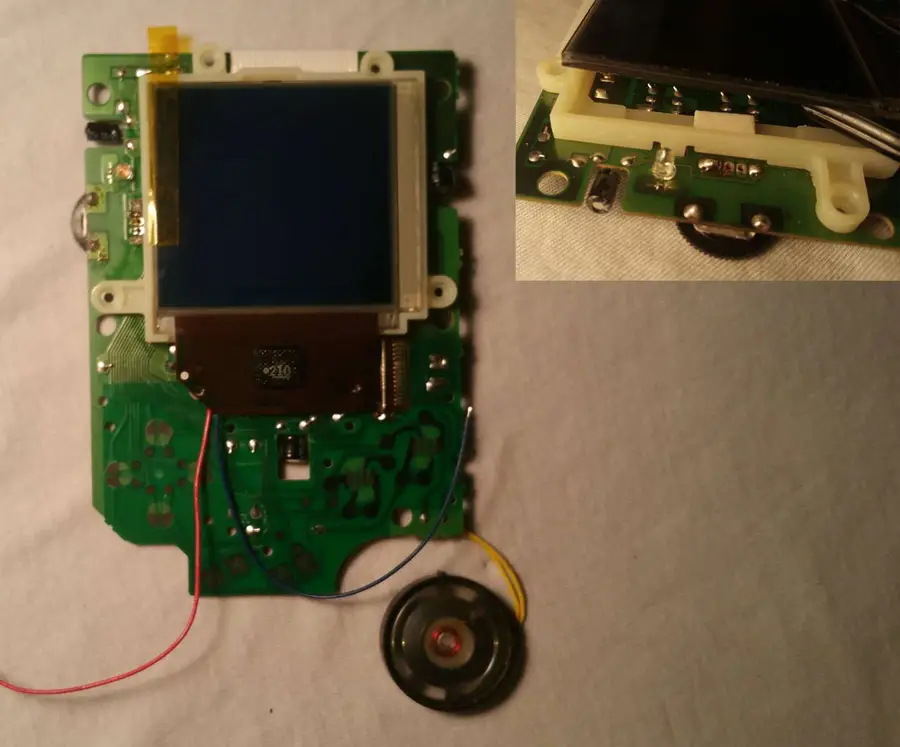
10 – Solder the backlight
Feed the wires through the hole shown above. These wires can easily work themselves under the buttons if not properly managed.
Once the wires are tucked away, solder the positive wire to the resistor.
Solder the negative wire to the negative leg of the capacitor.
For a professional finish, apply flux before soldering and seal your new connections with liquid electrical tape.
11 – Screw the LCD into place
Using a Phillips screwdriver number 0, screw the tiny LCD screws into place.
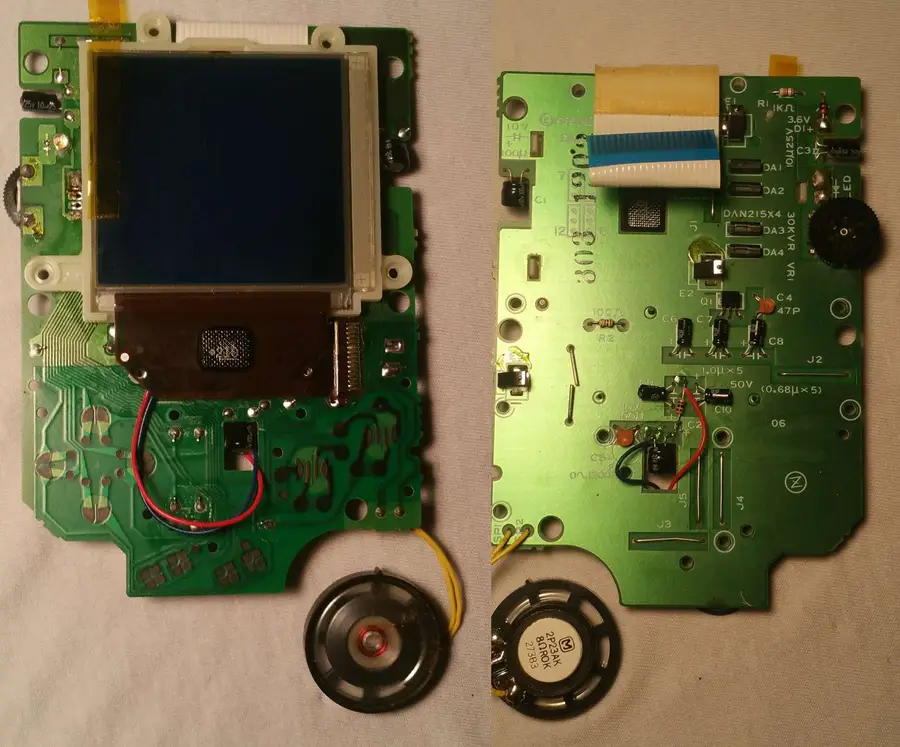
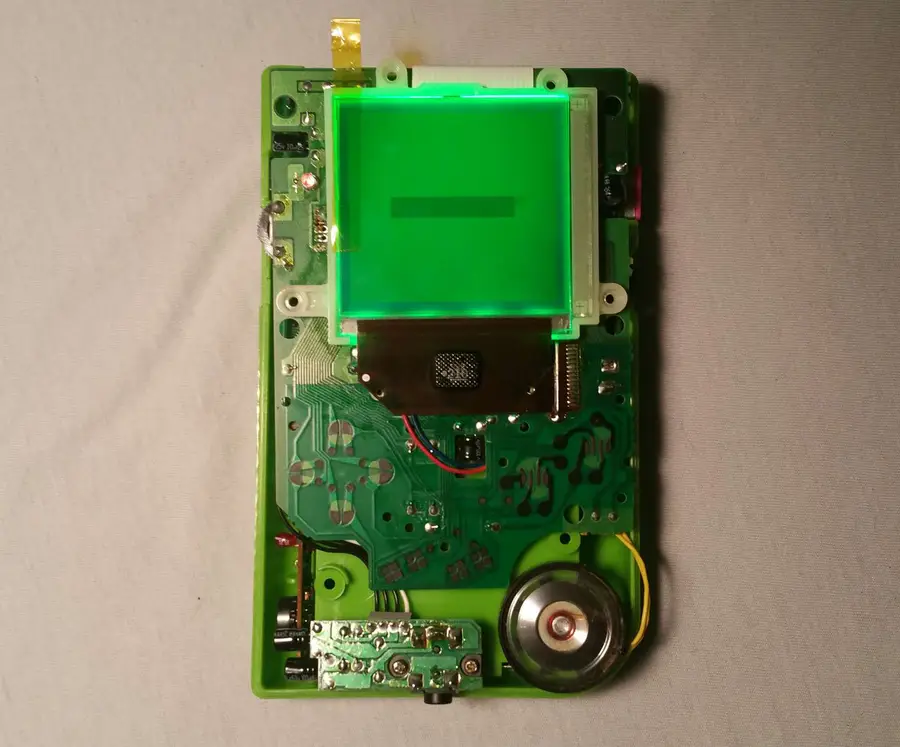
12 – Quick test
Before you sew up your 8-bit patient, it’s best to pop in a few batteries and test out the operation.
Reconnect the motherboards by carefully plugging the ribbon cable into place. Insert 4 AA batteries and power it up! If everything worked, you should see magnificent glow of an LED screen gleaming behind your pixels.
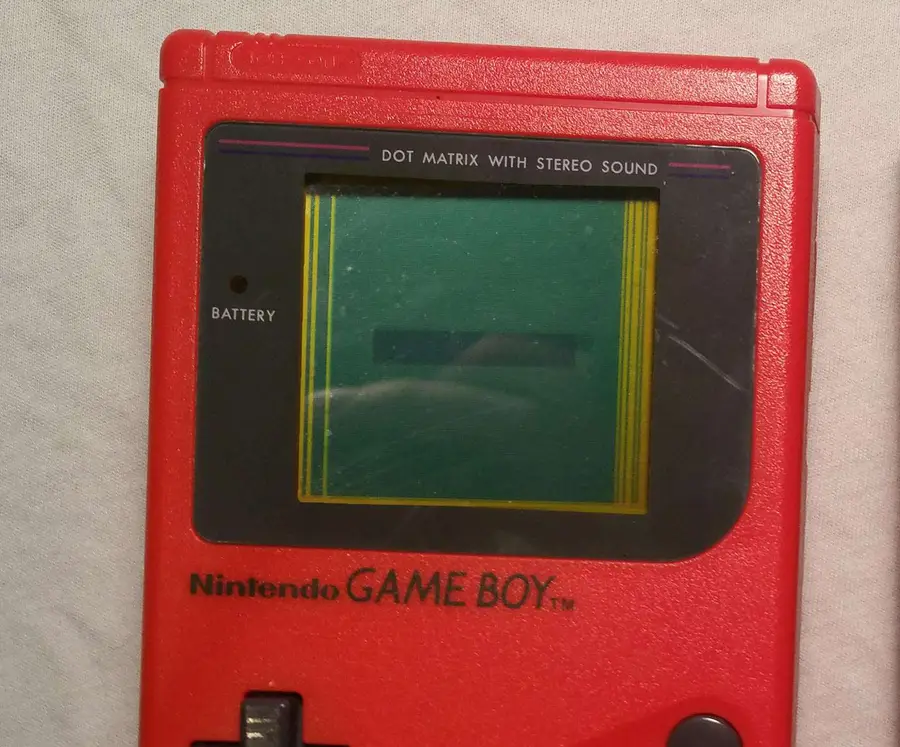
NOTE: If the backlight is not illuminated, double check the Game Boy is receiving power. If it is, turn off the Game Boy and remove the batteries. You will need to revisit your soldering connections to ensure the backlight is properly installed. Vertical lines may appear and are often repairable with a soldering iron.
If you used a piece of kapton tape to hold the screen in place, now is the time to remove it. Place the buttons, silicone button pads, speaker, and motherboard into the front shell. Each component will be guided into place with a small notch.
You may need to feed the backlight wires through the hole further to make room for the buttons. Make sure the wires are not blocking any crucial screw holes.
Using a Phillips number 1 screwdriver, screw the front motherboard into place. There will be 10 screws used for this step.
14 – Seal the Game Boy together
Carefully place both halves together. Using an appropriate screwdriver, screw the shell together. There will be 6 screws used for this step.
15 – Final test run
It’s time to give it one more test to make sure everything works.
Congratulations! You should now have a working, backlit Game Boy on your hands.
Next: The backlight mod can sometimes cause your speaker to generate a whining noise. If you have that issue, read my guide on fixing this speaker noise.
The orientation of the polarizing film in your new backlight Game Boy can adversely affect its pixel quality; it’s common practice to install a bivert chip to essentially invert the screen twice, improving display quality drastically. 🙂 Check out my guide on this!
You’ve put so much work into setting up RetroPie or EmulationStation. You load it up with legally obtained ROMs only to find that custom theme you installed—you remember, the one from my RetroPie themes guide—has a big blank spot for box art! The Best RetroPie Themes (And How to Install Them)You deserve some personal flair! RetroPie: Build Your
Introducing Howchoo, an enigmatic author whose unique pen name reflects their boundless curiosity and limitless creativity. Mysterious and multifaceted, Howchoo has emerged as a captivating storyteller, leaving readers mesmerized by the uncharted realms they craft with their words.
With an insatiable appetite for knowledge and a love for exploration, Howchoo’s writing transcends conventional genres, blurring the lines between fantasy, science fiction, and the surreal. Their narratives are a kaleidoscope of ideas, weaving together intricate plots, unforgettable characters, and thought-provoking themes that challenge the boundaries of imagination.
Occasionally, however, these cool drones capture some pretty terrifying shots of sharks (sometimes as big as great whites) coming dangerously close to surfers or swimmers off the coast.
Please note that in each drone sighting listed, NO ONE was harmed. There are no images of anyone being harmed by sharks below.
1 – Western Australia (Great White Shark)
Crystal clear waters and an excellent drone camera combine to bring you one of the best shots of a Great White shark heading straight for a group of kayakers and one swimmer off the coast of Australia.
What happened?
In the video of the incident, you can clearly see the Great White shark circling the kayakers. Then, he takes a dangerous turn toward the surfer. Those in the kayaks yell out to the surfer to get away.
And thankfully the surfer is able to ride the next wave back to shore.
2 – Maldives (Nurse Sharks)
This might be the craziest scene we’ve seen of someone swimming near sharks. The sharks surrounding the woman in the ocean are nurse sharks.
What happened?
While it’s hard to imagine someone intentionally jumping into the water with sharks swarming, that’s exactly what Instagram user ShadowPalmMaldives did—all for this incredible footage.
Nurse sharks are some of the most harmless sharks and are not known to attack humans. Still…who would have the courage to float around hundreds of them?!
3 – Eastern Australia (Great White Shark)
Beautiful drone footage captures a curious Great White shark approaching two children swimming on the shore. The children and man on the shore seem pretty unsuspecting and likely don’t even know the shark is so close.
What happened?
Like most encounters with sharks, the sharks appear to be more curious than threatening to the children. While the shark does get close to the kids playing, it eventually veers off toward the breakers and looks elsewhere for his next meal. The children were fine.
4 – New South Wales (Great White Shark)
Unsuspecting surfer Matt Wilkinson has the closest encounter of his life off of Ballina in New South Wales. World champion surfer, Wilkinson, heard a splash and felt something odd. Then he stopped and looked back.
What happened?
A lifesaving drone program called Surf Life Saving NSW spotted the Great White shark eying Wilkinson. The drone was able to broadcast to Wilkinson to head back to the beach. He made it safely back to shore.
In the drone video, you can see just how close the shark came to biting on Wilkinson’s feet before it swam away.
5 – Plattenburg Bay, South Africa (Great White Shark)
Sea Rescue South Africa (NSRI), a non-profit organization, released a Twitter warning to surfers and swimmers in the ocean off of the Capetown coast. The tweet included this drone footage of a Great White shark circling a group of surfers in the ocean.
What happened?
This encounter went viral and stirred up fears about sharks along the beach. No one was injured in the event, but it did cause the South African officials to close the shoreline until the shark activity subsided.
Referred to as the Gold Coast of Australia, the Palm Beach area is popular with surfers for its wicked waves. But, as you can see, there’s something else that’s wicked lurking just underneath of them.
What happened?
A drone was dispatched to keep an eye on the coastline after several surfers reported spotting sharks in the water. Sure enough, the drone spotted the shark circling a group of surfers.
No one was hurt, but one surfer had an almost fatal near miss when the shark swiped at his board.
7 – Pismo Beach, California
Groups of surfers off the beautiful coast of Pismo Beach in California are caught unaware as a pair of 10-foot sharks come out of nowhere right below them. (The Stork captured this incredible footage on their DJI Phantom 3 drone.)
What happened?
While this was a surprise for the drone operators, it wasn’t completely surprising to see at least a shark or two in the water. To see one so close to the surfer…well, that was scary! Luckily, the surfer caught a wave to shore and escaped unharmed.
8 – Western Australia (Tiger Sharks)
While no human was in danger during this video, this is some incredible drone footage captured by Eco Abrolhos. Nearly 100 tiger sharks swarm and feast on a dead humpback whale.
What happened?
We can only imagine what it must have been like to be on one of those tourist boats and spot the massacre of a lifetime right below! No one was in danger; though, we’re certain that danger was felt by those there.
Once the sharks finished eating, some people on the boat decided to try touching them. The sharks were very docile (having just eaten) and allowed themselves to be touched.
9 – Miami Beach, Florida (Hammerhead Shark)
Jason McIntosh, a Miami resident, was casually shooting some drone footage of a swimmer at the beach when he got the surprise of his life! Hammerheads are rare sightings, and it’s even rarer to see one so close to the shore.
What happened?
Shark attacks by hammerheads are extremely rare, so the swimmer was in relatively little-to-no danger. The swimmer was not harmed but was sure in for a shock when he finally saw just how close he was to the shark.
He was only about 40 feet away from shore at the time and gave an ominous thumbs-up to the camera as he was swimming.
10 – Kiami Beach, Australia
On Kiami Beach in southern Australia, a drone operator caught a shark circling dangerously close to some unsuspecting swimmers enjoying the good weather.
What happened?
David Finlay, the drone operator, called the surf lifesavers on the phone and notified them immediately of the situation. The lifeguards then notified the swimmers to come in immediately, and no one was harmed.
The surfers caught the next wave into the shore. Their dangling feet came awfully close to the swarming sharks, however.
11 – Florida Coast (Blacktip Sharks)
Sharks, like birds, migrate naturally to find the right water temperature for breeding. A group of surfers happened to be in the wrong place at the wrong time when this group of blacktip sharks circled nearby.
What happened?
Though there were literally hundreds of sharks surrounding the surfers, none of the sharks showed any threat to the people. They appeared to be more curious about the surfers than anything else.
This kind of response is common with sharks, who generally don’t attack humans for food.
12 – Pismo Beach, California
Wait. Is that seaweed? Or is it a shark? This drone footage was captured just off the coast of Pismo Beach in sunny California—a popular spot for surfers year-round.
What happened?
The surfers initially claimed that they thought the black spots under the water were seaweed. It wasn’t until they saw the frightening drone footage that they learned how close they came to a pair of rather large sharks.
None of the surfers were harmed or attacked.
13 – The Bahamas
The Bahamas are known as one of the best places to swim in the ocean. Sometimes danger does lurk below, however.
Here, a small boy jumped into the water to swim. A second later, a drone flown by Artem Tkachenko, captured four sharks heading right for the unsuspecting boy.
What happened?
The drone operator yelled out to the boy to run as soon as he noticed the sharks on the drone video. Luckily, the boy heard the man in time and swam quickly to safety. At one moment, the sharks were only about five feet away from the boy.
A large shark is seen circling a swimmer who decided to swim out far from the coastline at New Brighten State Beach in California.
What happened?
The swimmer apparently was aware of the danger around him. He spotted the signs on the beach and heard the drone operator notify him of the shark situation. He probably remembered just how unlikely a shark attack really is for a human. No harm came to him.
Often when you’re snorkeling and swimming with whale sharks and rays, you don’t get to see just how incredible it looks from a birds-eye view.
What happened?
For these lucky swimmers, a drone just off the coast of Isla Mujeres captured the breathtaking scene in all its glory! What makes this sighting even more special is that whale sharks are rarely seen in groups in the wild, even if they are the largest fish in the sea.
16 – Quiz time: shark or dolphin?
Researchers at Southern Cross University and NSW Department of Primary Industries have been monitoring the beaches off the coast of New South Wales in south-eastern Australia with drones for a number of years.
They note that most “shark” sightings, particularly those that appear to be close to swimmers and surfers, are actually dolphins.
So can you tell the difference in the above image? What do you think? Dolphin…or a shark?
Which is it?
The researchers at Southern Cross University say that this is most likely a dolphin. (It’s even hard for them to tell sometimes when looking from the height of the drone.)
Maybe this will alleviate some fears about sharks swarming near beaches for some!
17 – Malibu, California
TheMalibuArtist is known for capturing some incredible shots with his ocean drones. But even he couldn’t have known just how scary the footage would be as his drone spied a great white shark getting very close to a family of kayakers.
What happened?
As he explains in the video, he was able to warn the kayakers of the imminent danger below. They stopped paddling, which caused the shark to lose interest and swim off eventually. No one was hurt, but that family sure does have the story of a lifetime to tell.
18 – Miami, Florida
Tiger sharks are rarely seen anywhere near beaches. They tend not to get too close to shore. But drone operator Kenny Melendez, as reported by CBS Miami, was in for a shock when he saw a large shadow near this swimmer just off the beach.
It’s amazing just how clear the water is off the coast of the Bahamas. The water is so clear that drones can easily see straight to the bottom of the ocean floor. So when The Cub Life flew his drone near the beaches, it was easy to spot this shark eyeing a swimmer.
This shark seen approaching swimmer at Bondi beach in Australia may look small, but even a small shark can do some major damage and prove lethal. (Bondi Beach is a favorite destination for snorkelers and surfers, as shown in the beautiful footage of Bondi Nation.)
What happened?
Sharks are fairly common sightings at Bondi Beach in Australia—so common, in fact, that swimmers know that they will likely get close to at least one when they head out in the ocean there. The shark locals, including a nurse shark and a hammerhead shark, haven’t been known to attack humans. So no one was hurt.
Introducing Howchoo, an enigmatic author whose unique pen name reflects their boundless curiosity and limitless creativity. Mysterious and multifaceted, Howchoo has emerged as a captivating storyteller, leaving readers mesmerized by the uncharted realms they craft with their words.
With an insatiable appetite for knowledge and a love for exploration, Howchoo’s writing transcends conventional genres, blurring the lines between fantasy, science fiction, and the surreal. Their narratives are a kaleidoscope of ideas, weaving together intricate plots, unforgettable characters, and thought-provoking themes that challenge the boundaries of imagination.
There are plenty of helpful videos on this subject, but I find guides with pictures to be useful with a project like this. I’ve added a lot of close ups for each step so the pictures should help guide you.
1 – Determine which piece of wood will be the tail board and which will be the pin board
The tail board is designed to withstand more pulling tension. If you look at the diagram below you’ll understand why. So it depends on what you’re building as to how you’ll want to situate the pins and tails.
2 – Use your marking gauge to measure the depth of the pin board
The depth of the pin board matters. Use your marking gauge to take this measurement and adjust it to the thickness of the pin board.
3 – Mark all the way around the tail board with the marking gauge
With the depth set from the pin board, make a mark on all four side of the tail board.
4 – Mark and measure the tails
You’ll need to determine the size and number of tails. For this project I’m going to use two tails. I’m also using a handy dovetail marker and a marking knife to mark the angle.
How you mark the tails will depend on the tool you’re using. In my case, I’m going to use a pencil to mark 1/4 inch from each edge. Then, I’m going to find the center and mark 1/8 inch on each side of the center. This will leave 1/4 inch in the center of the board.
Next, I’m going to use the dovetail marker to mark the angles. Start with one side of the board, and use your marking knife to mark down to your depth. Then, mark four lines across the top of the board, and use the dovetail marker again to mark the other side. The picture will be much more helpful than the paragraph above.
5 – Cut the tails starting at the top
Using your dovetail saw, cut along the line you made with your marking knife. Do not cut past the line you made with your marking gauge.
🛈 Make sure you do not cut past the line you made with your marking gauge.
6 – Cut towards the base of the tails on both sides
Now we are going to cut away the wood to leave the tails. Use the dovetail saw to cut across the wood to the base of the tail on each side of the wood. Make sure to follow your mark. Do this on both sides.
7 – To remove the wood between the tails, begin by chiseling along your mark
Tap the top of the chisel with a mallet. Don’t try to chisel too much at a time. Four or five soft hits should be plenty.
8 – Chisel away from the front
Now chisel away from the front of the wood removing only small pieces of wood at a time. This process will take some time and you shouldn’t try to rush it by chiseling away too much at once. Alternate back and forth between step 7 and step 8 until you’ve reached the center.
9 – Once you’ve reached the center, flip the board and continue
It’s important not to chisel all the way through to the other side of the wood because you’ll risk damaging the other side. So once you reach the center of the board you should flip it over and start again from the other side.
10 – Clean up the tail board
Your tail board is almost finished. You can clean up any uneven or rough edges with a file or sandpaper. You want the edges to be as straight as possible, but don’t remove too much of the wood.
11 – Measure the depth of the tail board and mark all four sides of the pin board
Just as we did with the tail board, we need measure the depth of the tail board and mark the pin board.
12 – Line up the wood to measure your pin board
There are many ways to do this, but I like to use clamps to position the boards in place.
13 – With your marking knife, trace the edges of your tail board onto the end of the pin board
Using your marking knife, trace the edges of your tail board onto the end of the pin board. Using the marking knife leaves a tight, clean line—especially compared to something rough like a pencil.
14 – Mark the edges of the pin board
Using the marks along the top of the pin board as a guide, mark straight down on both sides. You’ll want to use a square to ensure the marks are straight.
15 – Cut down the top of the pin board
Just as you did with the tail board, clamp the pin board so that you can begin cutting. Use the dovetail saw to cut down the top of the board on all four marks.
16 – Use a chisel to remove the wood in between the pins
You may have noticed the one side of the pin board has wider pins. You’ll want to start chiseling on the side with wide pins. Because the area you’re chiseling is angled, you need to be careful not to chisel into the edge of the pin. Just as you did with the tail board, remove small pieces of wood until you reach the center of the board, then flip it.
17 – Clean up the pin board
Once you’ve chiseled away in between the pins, you’re ready to clean up the wood. Again use a file or sandpaper to flat uneven edges or remove wood leftover from the saw.
18 – Place your pieces together and admire your work
Don’t worry, dovetails require practice. I’m still improving on my technique every time I make one. If the wood doesn’t fit together well don’t force it, but you may need to tap lightly with the mallet in order to make them fit. You may also need to examine where the wood is too tight and fix this with a file or sandpaper.
When I was first offered a beverage flavored with whiskey simple syrup, I was in a coffee shop in San Jose, California. I wasn’t even really interested in drinking coffee. It was later in the day; I was already feeling a little tired; I figured coffee was the last thing I needed. But when the
Introducing Howchoo, an enigmatic author whose unique pen name reflects their boundless curiosity and limitless creativity. Mysterious and multifaceted, Howchoo has emerged as a captivating storyteller, leaving readers mesmerized by the uncharted realms they craft with their words.
With an insatiable appetite for knowledge and a love for exploration, Howchoo’s writing transcends conventional genres, blurring the lines between fantasy, science fiction, and the surreal. Their narratives are a kaleidoscope of ideas, weaving together intricate plots, unforgettable characters, and thought-provoking themes that challenge the boundaries of imagination.
Surprisingly, normal YouTube embeds are not automatically sized to the browser window as it is resized. Luckily, you can make YouTube videos responsive and mobile-friendly with some simple HTML and CSS. 1 – The HTML Wrap your embed code in a unique video wrapper (the class name is arbitrary). I chose to use embed-youtube as the selector.
Introducing Howchoo, an enigmatic author whose unique pen name reflects their boundless curiosity and limitless creativity. Mysterious and multifaceted, Howchoo has emerged as a captivating storyteller, leaving readers mesmerized by the uncharted realms they craft with their words.
With an insatiable appetite for knowledge and a love for exploration, Howchoo’s writing transcends conventional genres, blurring the lines between fantasy, science fiction, and the surreal. Their narratives are a kaleidoscope of ideas, weaving together intricate plots, unforgettable characters, and thought-provoking themes that challenge the boundaries of imagination.
Sendmail is an open source smtp server. Many different languages and frameworks interface with sendmail, and when debugging it’s good to be able to quickly test whether or not sendmail is working.
The following is a quick way to verify that sendmail is working.
This guide will show you how to install SSHFS on various operating systems. 1 – On macOS Using brew, install FUSE. Now install SSHFS: 2 – On Ubuntu/Debian 3 – On Windows Find the desired version of win-sshfs from this page and download it.
Introducing Howchoo, an enigmatic author whose unique pen name reflects their boundless curiosity and limitless creativity. Mysterious and multifaceted, Howchoo has emerged as a captivating storyteller, leaving readers mesmerized by the uncharted realms they craft with their words.
With an insatiable appetite for knowledge and a love for exploration, Howchoo’s writing transcends conventional genres, blurring the lines between fantasy, science fiction, and the surreal. Their narratives are a kaleidoscope of ideas, weaving together intricate plots, unforgettable characters, and thought-provoking themes that challenge the boundaries of imagination.
Recently, Apple’s been pushing their AirPods Pro hard, offering steep discounts for the holiday season. This leaves many people wondering whether they are worth the investment for themselves or as a gift for someone else. In fact, I received the AirPods Pro as a gift and wanted to share my thoughts on them for anyone else considering purchasing these.
What I look for in a good review of a product like the AirPods Pro are honest ratings on the most important aspects of wireless headphones—things like:
Sound quality
Ease of use
Features
Battery life
Workout use
Etc.
So you can be sure that we’ll touch on those and other aspects in our comprehensive review of the Apple AirPods Pro. Note that we are not getting paid for this review and even purchased the AirPods Pro ourselves.
What are wireless Bluetooth earbuds like the AirPods Pro?
Just like traditional headphones, the AirPods Pro play music and sounds from a supported device, such as a laptop, phone, or tablet. Because they are Bluetooth headphones, the AirPods do not need to be plugged into the device to which they are connected (or “paired”). The AirPods Pro are completely wireless and do not even need to be connected to one another to operate as a whole pair.
How do we know about them?
I always like to include this in my reviews. I’ve been using the Apple AirPods Pro for a few weeks now, after switching over from the Beats Powerbeats Pro (the AirPods Pro closest competitor). So I can give you my take on the good and bad about the AirPods Pro, as well as help you make your decision between these and the Beats version.
Maybe you don’t want to read a lengthy review before making your decision on the AirPods Pro. If the only thing you read is this section, then you should have plenty of information on whether the latest Apple earbuds are worth the investment or not.
Pros
Good sound quality (noticeably so)
Noise cancellation (that isn’t bad)
Size (easy to travel with)
Fit (comfortable to wear)
Cons
Price (though Apple has been offering sale prices on these of late)
Awkward to learn for first-time owners
Average battery life
Pick these up on sale
That’s where we’ve landed on the AirPods Pro. The next time Apple has a big sale on these, then definitely scoop them up. This seems to be the one Apple product that Apple is actually willing to discount during the holidays—so keep your eyes out. Otherwise, I’m just not sure they are worth the steep price over say the Amazon Echo Buds at half the cost — or over other comparable models. Of course, if you absolutely have to have the Apple products, then the AirPods Pro are a good wireless earbud that aspires to greatness at times.
2 – Specs
Spec
Apple AirPods Pro
Weight of earbuds
0.19 ounce (5.4 grams)
Weight of case
1.61 ounces (45.6 grams)
Size of earbuds
1.22 inches (30.9 mm) x 0.86 inch (21.8 mm) x 0.94 inch (24.0 mm)
Size of case
1.78 inches (45.2 mm) x 2.39 inches (60.6 mm) x 0.85 inch (21.7 mm)
Battery life of earbuds
4.5 hrs listening time / 3.5 hrs talking time
Battery life of charging case
24 hrs charging capacity / 5 minutes in case = ~1 hr of earbud time
Connectivity
Bluetooth 5.0
Compatability
iPhone 6s + / Apple Watch all models / iPad 2nd generation + / Mac all models 2012 +
Sweat and Water Resistant
Yes (IPX4)
Active noise cancellation
Yes
Chip
Apple H1
3 – What’s in the box?
Included when you buy the Apple AirPods Pro:
AirPods Pro
Wireless Charging Case
Silicone ear tips (three sizes)
Lightning to USB-C Cable
Documentation
4 – Who are the AirPods Pro best for?
I wouldn’t recommend these to just everyone. But I would recommend the AirPods Pro for people who are looking for specific uses of the earbuds.
1. Exercisers
The AirPods Pro stay in your ear really well. This is important for those looking to do any kind of strenuous activity while wearing these. I’ve worn these lifting weights, running, and doing a variety of calisthenics. They never fell out of my ear, nor did the AirPods Pro get damaged by my sweat. And the relatively low battery life of 4-5 hours shouldn’t be an issue for most workout routines. (I mean…who has time to work out for 6 + hours at a time.)
2. Multitaskers
Okay. You know what I mean here. If you’re someone who calls your parents while also wanting to get some chores done, then these are perfect. They are just really comfortable to wear while taking on the phone—so much so that you’ll likely forget you’re wearing them at all. And no judgment if you multi-task while on the phone with your parents. (I only mention it because I do it myself!)
3. The video conference attendee
The AirPods Pro are actually perfect for use with video conferencing like Zoom or Meet. You won’t have the embarrassing wires hanging across your face while talking to your boss, and you’ll hear and speak clearly through the advanced microphone. And the low battery life shouldn’t be a problem for work uses like these.
Who are they not best for?
If you are the kind of person to leave Bluetooth earbuds in your ears for long periods of time, then these are decidedly not going to work for you. Maybe you like to listen to music with them while working all day? Or maybe you listen to Youtube with them for long stretches? Either way, you’re going to run out of juice and have to charge the AirPods Pro.
Also keep in mind that if you’re using the AirPods Pro on a long flight, you’ll likely run out of battery power after about 4-5 hours. If that’s an issue, then look elsewhere for your next pair of earbuds.
5 – How do the AirPods Pro work?
Great question! (I should know because I asked it.) It’s a good question because the actual functionality of the Apple AirPods Pro (how they work) tend to be the biggest hurdle to overcome with these. Seriously…for a while, I barely used these because I was so used to the simpler functionality of the PowerBeats Pro. I would simply choose not to deal with the complexity of using the AirPods Pro.
Luckily, I’m over that now and have a deeper understanding of how to use these.
Charging
The case itself holds a charge that can be used to charge the Apple AirPods Pro earbuds. You can either just charge the case, which can then be used to charge the earbuds—or you can charge the case with the earbuds inside. Apple claims that the case holds around 24 hours of battery life that can be transferred to the earbuds, which seems about right in our testing.
Syncing
I found this relatively easy. With the AirPods Pro earbuds in the case, you simply hold down on the back button of the case until the light flashes white. Then, you search for the AirPods Pro on your device—and connect the AirPods Pro to your Android phone or iPhone.
Listening
When you put the earbuds of the AirPods Pro into your ears, they will automatically connect to the last device that is nearby enough to use. If you need to, you’ll have to disconnect them from one device to move to another. I found this can be a hassle sometimes, and I wish that Apple would add just one more feature that allows these to be switched between devices.
We’ve written guides on using the audio features of the AirPods Pro, such as:
So check those out for further information on the functionality of the Apple AirPods Pro.
Phone calls
If you need to answer the phone with the AirPods Pro, you can do that by simply pressing the “force sensor” or small white button on the AirPods Pro themselves.
6 – Noise cancellation
Wikipedia
The active noise cancellation feature in the Apple AirPods Pro are one of its biggest draws. So does it work?
Yes! When you have active noise cancellation activated, you will notice that the external sounds in your environment will be effectively neutralized. You’ll find yourself in a comfy, noiseless meadow listening to your music (even if that music is not so comfy).
I’ve tried a few different headphones and earbuds with active noise cancellation, and I can say that the AirPods Pro do a great job for earbuds of canceling external sound. The over-ear Bose headphones, for example, will certainly be noticeably better at this—but they are 10x the size of the AirPods Pro earbuds.
How does active noise cancellation work?
Essentially, a small external microphone on the earbuds of the AirPods Pro will detect the external sound waves around you. They will match that noise with active anti-noise to cancel your ability to hear the sound from those waves. In the above image, you can see how the combination of sound waves can result in a nearly neutralized wave.
7 – Sound Quality
Most of the best wireless earbuds on the market are actually using Apple’s H1 chip to power their audio, so Apple is setting the industry standard when comes to over sound quality for earbuds.
I know what you’re likely thinking…so are the AirPods Pro better than competitors when it comes to this? Yes. And No. What I mean is that they are a very pleasant earbud in terms of sound quality, which many (like me) actually prefer over the kind of raw sound quality you’ll get from say…Bose. But, honestly, the quality is good, and I found it better than the PowerBeats Pro.
Bud fitting
For one, Apple has worked hard to make sure that the earbuds of the AirPods Pro fit properly in your ear by adding dynamic earbud tips that adapt to the shape of your ears. You can even test to make sure that your earbuds aren’t improperly fit on your iPhone or Mac. This greatly affects sounds loss and quality.
Microphone quality
In our own testing with the microphone, the quality was really good for an earbud microphone. The AirPods Pro might not get the job done if you’re needing professional-level sound for videos or projects, but they’ll certainly be a nice upgrade for phone conversations and Zoom usage.
8 – Spatial Audio
Apple
Spatial Audio is Apple’s version of surround sound. I wanted to mention this feature of the AirPods Pro because it’s finally a thing now that Apple has released its Big Sur OS.
When you turn on Spatial Audio when viewing content that supports it, such as Netflix, Prime, or HBO shows, then you can feel like you’re right in the middle of the action. Apple actually did a pretty good job of simulating this in a pair of earbuds. As a runner, I’m interested in the ways that virtual running can be simulated…because when I’m virtually running in Paris, I’d love to be immersed in the sounds of the street!
This feature is still in its infancy on the AirPods Pro, so we’ll have to see how this develops.
9 – Battery life
True wireless earbuds, like the Apple AirPods Pro, will have noticeably less battery life than wired earbuds/earphones. Still, this has to be a major consideration when deciding to invest in a pair of earbuds. (It doesn’t make sense to use these if they run out of juice an hour after using them.)
4.5 hours of battery life when listening
That’s Apple’s figure. In practice, I found this to be a little closer to 4 hours. And if you’re using these to talk on the phone, then that number will be a little less still—closer to 3.5 hours. That’s not bad. Compare that to the PowerBeats Pro, however, which have around 9 hours of battery life—and it feels a little disappointing.
10 – Bottom line
Not for the budget-conscious
If you’re a budget-conscious consumer for whom spending more than $200 will be a huge investment, then I actually recommend you go with a less expensive alternative to the AirPods Pro that will give you plenty of sound quality at a far less expensive price. I mentioned the Amazon Echo Buds earlier as a nice alternative that cost only $79.
Good for those who are sound enthusiasts, movie watchers, and music lovers
The overall quality of the AirPods Pro is very high, and with the H1 chip, Apple can continue to offer updates to these to improve overall sound quality and add features. The sound itself is great, and I can imagine these being great for solo-watching a movie with surround sound or really wanting a great listening experience while checking out that new album.
They also would be a great gift for anyone in the hospital, as they will allow them to talk on the phone without needing to use their hands or have wires hanging down. (They’ll already have a bunch of those!)
Note the battery life
Note that the battery life of the Apple AirPods Pro is around 4-5 hours. So if you need them for extended periods, then you should definitely look to something like the PowerBeats Pro, which last almost 9 hours before needing to be charged.
NEXT UP
How to Enable the “Popping” Sound When Adjusting the Volume on Your Mac
Starting with MacOS Sierra and High Sierra, your Mac will no longer play a “pop” sound when you adjust your volume. If you prefer to have this sound when you adjust volume up and down (as I do), this guide will teach you how to reenable it. 1 – Open Sound System Preferences Navigate to System
Introducing Howchoo, an enigmatic author whose unique pen name reflects their boundless curiosity and limitless creativity. Mysterious and multifaceted, Howchoo has emerged as a captivating storyteller, leaving readers mesmerized by the uncharted realms they craft with their words.
With an insatiable appetite for knowledge and a love for exploration, Howchoo’s writing transcends conventional genres, blurring the lines between fantasy, science fiction, and the surreal. Their narratives are a kaleidoscope of ideas, weaving together intricate plots, unforgettable characters, and thought-provoking themes that challenge the boundaries of imagination.