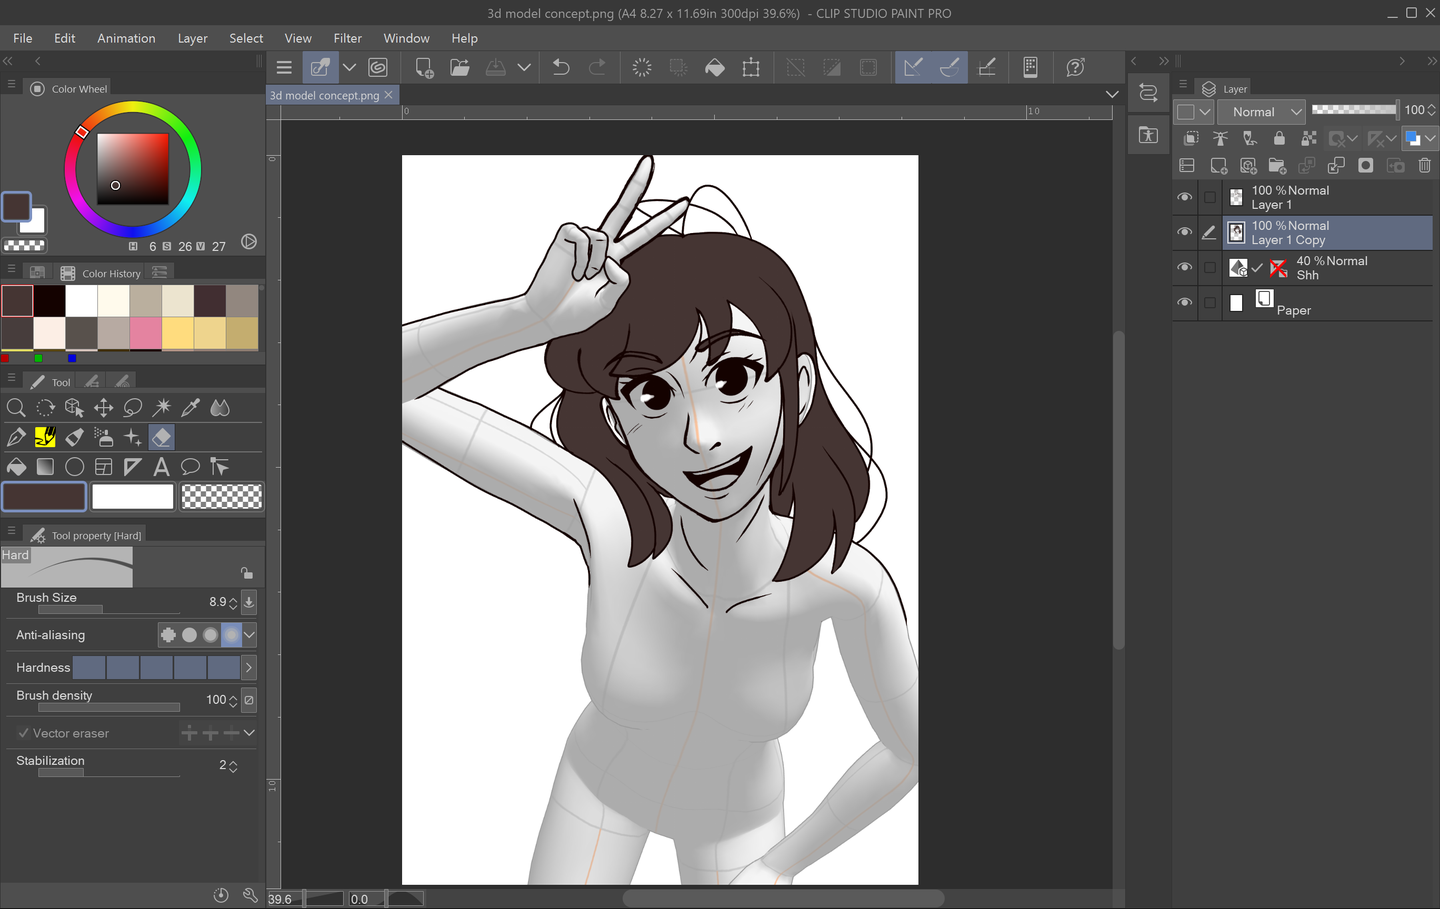
Have you ever struggled with dynamic poses or trying to find a precise reference photo? Having good references is an important part of the prep process when it comes to drawing. Traditionally, many art classes have students practice figure and anatomy drawing by studying a real life model in class. Thankfully, now, there are other ways to gain access to models and poses through digital software! Clip Studio Paint’s 3D models and 3D Modeler Asset is one of those options and is genuinely a great and customizable tool. This guide will show you how to import and manipulate 3D models in CSP so that you, too, can get just the right pose for your character!
1 – Choose and Import Your Model
First, you need to import your model. To do this, you will need to open up the Materials tab. If you don’t already have a shortcut for this, then you can go to Window > Material > 3D Materials. Once you have the Materials tab popped out, you can select from a variety of options from scenes to objects and people!
For human 3D models, click the 3D drop down menu in the Materials tab and select Body Type. CSP already comes with two types of models to choose from, both having male and female counterparts.
To import your desired model, simply drag and drop it on to the canvas.
If you want a further variety of models to choose from, you can download more via Clip Studio Paint Assets!
From there, you can browse a wide selection of user-made models and assets. Although some assets and models may require payment, there are also tons of free ones as well! If you would like to know how to access CSP Assets and download materials, then check out this tutorial. This tutorial uses downloading brushes as an example, but it’s the same process for all CSP Asset materials, so have fun browsing!
Downloading and Adding Assets in Clip Studio Paint
2 – Adjust Perspective, Placement, and Size
After you import your model, two smaller toolbars will appear on your screen above and below your model. The smaller one above your model with the blue icons adjusts the “camera” or how your model will be viewed on the canvas.
With the icons on this toolbar, you can adjust the size, angle, and perspective of your model.
You also have access to a cheat sheet via the Angle Presets menu, which is located in the Tool Properties tab on the left-hand side. If you don’t want to spend too much time fiddling with your model, you can select a preset angle from this drop down menu.
At the bottom of the Tool Properties for 3D modeling, there is a small drop down next to Display Settings for Editing. I highly recommend selecting the Fast setting from this drop down before start posing your model. This setting effectively helps Clip Studio Paint run a little smoother while you’re finagling your model and moving it around.
3 – Pose Your Model
Now, it’s time to pose your model! This process may take a bit of time learning and getting used to, but once you do, you can get some really dynamic poses from adjusting your model.
You can start with clicking on a large portion of your model and grabbing the blue dots where major joints would be. When it comes to limbs and individual appendages, you can then drag the motion lines that encircle the selected part to change the angle on them. The motion grid around the selected body part indicates the range of motion for that particular piece. For example, you can twist the model’s hand around on this circular grid to face the model’s palm upwards.
While you’re posing your model, you might want to keep a portion of the body still. To do this, you will need to lock specific joints. This is where the bottom toolbar comes into play. On this toolbar, you can flip your model, return it to its standard position, lock joints, and play with body proportions. In this example, you can lock the joints by selecting each body part you want to remain still and clicking the dandelion-looking icon on the bottom toolbar.
While I highly recommend playing with the model’s pose and creating one from scratch to get a better understanding of this tool, you can also import preset poses as well. To do this, go back to the 3D drop down menu in your Materials tab and select Pose. From there, you can scroll through a list of presets that automatically come with Clip Studio Paint. After you find a pose you like, drag and drop that pose on to the model on your canvas.
You can also do the same process with hands! This is probably my favorite cheat when it comes to the 3D modeler. There are hand pose presets in CSP that you can drag and drop on to the individual hands of your model. So useful!
4 – Touch Ups and Fine Tuning
If you want to get into the real nitty gritty of your pose, then check out the 3D Drawing Figure Sub Tool. You can pop this menu out by either clicking the wrench at the bottom of the Tool Properties menu on the left or by click the people icon on the far right of the bottom toolbar.
In this menu, you can adjust the individual fingers of your character, how open or closed the hands are, the muscle mass, height, and body weight of your model, and even the light source! Be sure to experiment in this menu. If you’re ever stuck trying to get the pose of your model just right, you might be able to make some smaller adjustments via this menu.
5 – Finalize Settings and Draw!
Once your model is all posed and ready, you can start drawing over it! However, you can’t change the opacity of the model’s layer while CSP is still set to Fast. To fix this, simply go back to the bottom of the 3D Model Properties menu and set Display Settings for Editing back to Normal. Afterwards, click out of that menu, and adjust the model layer’s opacity to your preferred settings. Now, you can create a new sketch layer over your fully posed model and begin sketching!
Adobe Illustrator has a few tools available that allow users to remove the background from their work. This process makes it possible to create artwork with transparent areas anywhere they want. In guide this, I’ll go over the easiest ways to do this, as there are more complex processes don’t always apply to general use
Introducing Howchoo, an enigmatic author whose unique pen name reflects their boundless curiosity and limitless creativity. Mysterious and multifaceted, Howchoo has emerged as a captivating storyteller, leaving readers mesmerized by the uncharted realms they craft with their words.
With an insatiable appetite for knowledge and a love for exploration, Howchoo’s writing transcends conventional genres, blurring the lines between fantasy, science fiction, and the surreal. Their narratives are a kaleidoscope of ideas, weaving together intricate plots, unforgettable characters, and thought-provoking themes that challenge the boundaries of imagination.
Using a Bluetooth controller with RetroPie is a piece of cake — this guide will show you how. Works on all Raspberry Pi versions (including the Pi Zero).
I chose to use an 8Bitdo SNES-style gamepad as the 8Bitdo quality and compatibility is superb. There are cheaper Bluetooth gamepads out there, but you may have issues getting the controller to work properly.
This guide will focus primarily on setting up an 8Bitdo Bluetooth controller; however, the steps here will be extremely similar for other Bluetooth controllers, including Xbox controllers. Be sure to check out our master RetroPie controller guide to explore other options, too!
If you’re using a Raspberry Pi Zero W, Raspberry Pi 3, or newer, skip this step.
If you’re using an older Pi that doesn’t have Bluetooth, you’ll need to add this, or a similar, USB Bluetooth adapter.
Power down your Pi. Then, connect your USB Bluetooth adapter to any available USB port. If you followed my NES PiCart guide, there’s a free USB port on the rear of the USB hub (lucky you!)
🛈 There are some very small bluetooth adapters out there! You can barely see mine plugged into the rear of my hub.
2 – Connect a wired USB controller (or keyboard)
You’ll need to use a wired device — like a USB controller or keyboard — to navigate the RetroPie UI and update the Raspberry Pi’s configuration to accept your new bluetooth controller.
Connect a wired gamepad or keyboard. Then, connect your Pi to your display and boot it up.
3 – Update your controller’s firmware
It’s important that your controller firmware is up to date.
If using an 8Bitdo controller, select “Firmware” and then click “Download” next to your specific controller.
The process is super simple; follow the instructions on that page to update your controller’s firmware.
4 – Verify RetroPie version
Bluetooth controllers (and 8Bitdo support) work best when using RetroPie v4.0 or above — if you installed RetroPie between August 2016 and now, you’re already running v4.0+. If you aren’t, I recommend updating to the latest version of RetroPie or you may encounter issues. If you don’t want to update, you can still use bluetooth controllers, but the process is much more involved.
5 – Open RetroPie Setup
Inside the RetroPie interface, navigate to the right and select the RetroPie icon/system. Then, select RetroPie Setup.
6 – Open Bluetooth device config
Once inside the RetroPie Setup menu, navigate to Configuration/Tools and select bluetooth – Configure Bluetooth Devices.
Next, turn the 8Bitdo hack option off by selecting the 8Bitdo mapping hack (ON – old firmware) option so that it now says 8Bitdo mapping hack (OFF – new firmware).
7 – Register a new Bluetooth device to pair the controller with your Pi
Power on your Bluetooth controller and make sure it is searching for a connection — this is normally done by holding a combination of buttons for a few seconds. The exact button sequence varies based on which Bluetooth gamepad you have, but the method will be listed in the manual that came with your controller. For my controller (the SNES30), this is done by holding down the Start button for 3 seconds until the blue light starts flashing.
Once your wireless controller is in searching mode, use your wired controller to select Register and Connect to Bluetooth Device. You’ll see a “Searching…” box and then a list of Bluetooth devices by MAC address. If you don’t see the name of your device here, select Cancel and then search again. It seems that the Bluetooth device name doesn’t always appear after searching for the first time.
After selecting your device, choose the DisplayYesNo security option. If the SNES30 is paired properly, the blue light will now be solid.
8 – Tell Emulation Station to recognize the controller on boot
Finally, you need to tell Emulation Station to search for and recognize your new Bluetooth gamepad on system boot. From the same Bluetooth Setup menu, select Set up udev rule for Joypad (required for Joypads from 8Bitdo etc). Select your controller from this list.
Select Cancel to exit Bluetooth Setup and RetroPie Configuration. Finally, reboot your Pi.
While it’s rebooting, go ahead and unplug your wired controller. After your Pi boots to the Configure Device menu, hold down any button on your Bluetooth controller and you will be prompted to map it. You’re good to go!
🛈 The L and R bumper buttons on the SNES30 controller should be mapped as “shoulder” buttons, not “bumper” buttons.
9 – You’re good to go!
Now you can sit back on your couch and play retro games the modern way.
🛈 Remember — RetroPie supports multiple bluetooth controllers 😉
There are several ways to go about running a Minecraft server on the Raspberry Pi. In this guide, I’ll cover how to install Nukkit—a cross-platform Minecraft server that’s super easy to set up on the Raspberry Pi. This server should work with PCs, consoles, and tablets running Minecraft 1.14. I’ll be using a Raspberry Pi
Introducing Howchoo, an enigmatic author whose unique pen name reflects their boundless curiosity and limitless creativity. Mysterious and multifaceted, Howchoo has emerged as a captivating storyteller, leaving readers mesmerized by the uncharted realms they craft with their words.
With an insatiable appetite for knowledge and a love for exploration, Howchoo’s writing transcends conventional genres, blurring the lines between fantasy, science fiction, and the surreal. Their narratives are a kaleidoscope of ideas, weaving together intricate plots, unforgettable characters, and thought-provoking themes that challenge the boundaries of imagination.
Tablets that use electronic ink (or “e-ink”) displays win big over the sort of screens used in iPads or other multi-use tablets, especially when it comes to reading and writing.
Studies have suggested that, because reading on an e-ink screen is more like reading on paper, heavy use causes significantly lower levels of eye strain, as well as better levels of recall for the information being read!
This is because e-ink displays work differently than traditional screens. Rather than individual glowing pixels that beam light to your eyes, an e-ink screen uses special bubble-like capsules that have different micro-particles within them, of different colors on different sides of the capsule sphere.
By applying an electrical charge, the capsule flips, and the color it displays can be switched. This technology means that an e-ink display reads like ordinary paper by reflecting ambient light, uses zero power when not updating, and can hold an image more or less indefinitely!
Because of these features, e-ink devices generally have incredible battery life and work far better than devices like iPads for extensive reading or note-taking. With the latest designs improving on e-ink technology, with increased durability and greatly reduced cost, it seems likely that this technology will be the way of the future for many types of devices across the market.
What matters
Confused? We make it easy to figure out which product has the features you need. Canva
What matters most to me when I’m looking at buying a new piece of tech is how well it functions for daily use. It doesn’t really matter how awesome the hardware is if the design and the implementation don’t follow through. I try to focus on the specifics that matter most to me, offering a user-eye view of the products on the market.
1 – Supernote A5X & A6X
The Supernote is one of the best products on the market.
The Supernote products by Ratta have remained at the top of my list for two simple reasons: communication and innovation. Supernote provides extremely robust community interaction through their Reddit community, and their devices are extremely solid both in physical design and in terms of the feature progression of the software.
Ratta has continued to develop new software features for its older, Linux-based Supernote series at the same time as they’ve forged ahead with the more powerful and feature-dense products in the “X” line, such as the Supernote A5X and Supernote A6X (which feature their own Android build). What I want, when I buy a device, is to know that the company stands behind that device, and that’s what Ratta has shown they can do.
Main features
The Supernote is a powerful tool. Canva
The Supernote offers a plethora of powerful features, but the highlights are the following:
“Paperlike” sensation while writing. There’s a special film on the screen that creates resistance and really gives a pleasant writing experience. It’s not really like writing on paper, but it’s a thousand times better than writing on an iPad screen.
Ceramic pens, which means that the pen nib never runs down.
Physical page refresh bar that clears ghosting with a flick of your thumb.
Full support for Dropbox integration (with manual syncing).
Advanced features like handwritten note searching, bookmarking, and more.
Supports Amazon Kindle (and also has its own in-built eReader software). This is cool because you can read library books through Kindle’s Overdrive and Libby integration.
Supports Microsoft Word documents! What originally sold me on the Supernote. It’s great being able to work on important documents wherever I am, then I can quickly sync when I get home and keep working on my desktop. Even more exciting is that Word Documents can be proofread using pen strokes!
Bluetooth keyboards are supported (just make sure to get a higher-end one that supports low-latency BT 5.0.
Pressure-sensitivity, low-latency writing and drawing, and layers for drawing.
Full PDF support and good annotation features, including functional highlighting (that is colored when transferred out).
Handwriting to type conversion.
4+ days of battery life with moderate to heavy usage.
Honestly, the feature list is superb, and their team is still actively working to improve and expand what this little device can do.
Differences between the Supernote A6X and Supernote A5X
The Supernote has a lot of awesome accessories and pen types. Canva
The biggest difference between the two models is size: the A6X is 7.8 inches and the A5X is 10.3. But the technology behind the A5X screen is also better, using a more modern plastic screen design that dramatically increases the durability of the device. This isn’t to say that I fear for the well-being of my A6X — it’s a sturdy build, with a strong plastic frame that feels robust, especially inside its leather folio. This is an important thing to be aware of, however. For both ease of access to larger documents and better device longevity, I recommend grabbing the A5X. If you really want the smaller A6X, you’ll be happy, as long as smaller really is what you want.
Cons?
There are only a few cons to this device from my perspective. – It’s not cheap, coming in at around $400 for the A6X and $600 for the A5X. That’s a bit pricey. And since the return policy doesn’t allow for open returns there is no way to send it back if you try it and find that you don’t like it. – Some features need improvement, especially the Anti-aliasing (how smooth the drawing looks) and further filtering. It’s fine on the device but printed out the edges look blocky. As of July 2021, the team was aware of this and had major updates planned to fix this in the future. – It would be nice if the device had an unlimited canvas feature. – More Android apps will be supported in the future, but aren’t yet integrated.
2 – Quirklogic Papyr
The Papyr is one of the best collaborative tools around. Pinterest
The Quirklogic Papyr is an absolutely brilliant device by a company that has long had its feet in the e-ink industry, albeit with a professional-scale product that, at 44 inches, isn’t going to be finding a home outside of a business.
The Papyr, however, at a perfect 13 inches, is ideal for anyone who needs a digital canvas on which to work and collaborate. And that’s where Papyr shines; collaboration.
The Papyr utilizes innovative software to bring the collaborative experience to life through the following major features: – Unlimited canvas. Documents in the Papyr can be placed onto an endless canvas that’s perfect for large-scale collaboration. Toss in whatever you want, write, draw, add images and documents, and see it all on one gigantic whiteboard. This space can be a collaborative project as well, viewable by others through the Papyr app. – Cross-platform real-time annotation that functions forwards and backwards. You can add a comment (or drawing, or whatever) in the Papyr and anyone with access to the document will see it instantly. They can also add to the document and their additions will be instantly viewable. This is a multi-platform option, so users with an iPad, for instance, can collaborate with the Papyr user. – Linked to Google Drive. With easy syncing options, it’s possible to maintain your workflow through the Google suite without having to deal with proprietary roadblocks. This is a huge win for modern teams. – Claims that it offers up to four weeks of battery life, actual under heavy usage is a lower, but still impressive.
How does it hold up?
We love the functionality and collaborative power of the Papyr. Pinterest
This is absolutely my recommendation if you’re working on collaboration-specific projects, where the need to interface with teams and work on shared documents is paramount. If you don’t need to prioritize that, you should probably go for either the Supernote if you want something better for e-reading as well as writing, or the reMarkable if you basically want a digital paper replacement.
The Quirklogic Papyr also has incredible quality when it comes to exporting drawings and text, something you don’t get from the Supernote (at least not yet).
3 – reMarkable 2
The reMarkable 2 outperforms the original and offers the best writing feel. Pinterest
The reMarkable made huge waves for being an e-ink device that gave buyers an experience that really felt like writing on paper.
With the reMarkable 2, major design updates provide a writing experience that is so crisp it’s hard to believe and a slowly evolving feature set that makes this one of the best paper journal replacements on the market.
The main thing to be aware of with the reMarkable 2 is that “paper journal replacement” is the most accurate descriptor. reMarkable wanted to create a note-taking experience that provided the benefits of technology without any of technology’s normal distractions. That means that it does what it was designed to do very, very well, but it doesn’t really do that much else.
The reMarkable 2 is a great device for writing but its reading features lag behind, and so far it only supports PDF files that are manually imported into the device. With no other connectivity features to speak of, it’s aiming to be the top of a very select and specialty market, ruling the roost of its own small kingdom.
The big takeaway?
There is no better paper journal replacement than the reMarkable 2. Pinterest
I wanted to love the reMarkable 2 so much when I first learned about it, but the steep price tag doesn’t come with an equally steep feature list, nor does it come with the sort of interaction from the company that you see from Ratta with Supernote or with QuirkLogic for the Paypr.
I’d still highly recommend this product for those who want the specific writing experience that reMarkable 2 offers which is, pardon the pun, remarkable. It’s about as close to actually writing on paper as you can get, and the response time and incredibly slick physical design are a treat.
It is, certainly, not a tablet replacement, and it’s hard to say how likely it is to take off since it necessitates carrying around yet another object on top of the normal electronics, but it does represent the current peak in digital paper technology.
4 – BOOX Nova 3 Color
Boox is a trusted designer and the Nova 3 Color is sure to pave the way for more color devices!
BOOX is known for creating excellent e-readers and e-notebooks, but they’re the first modern company to release a colorized e-ink tablet that allows for writing. It’s incredibly exciting because the color screen is the future of e-ink devices since most devices on the market are grayscale only.
The pros of the BOOX Nova 3 Color are obvious: – Color e-ink screen – Wide range of features and apps. BOOX has consistently tried to offer a traditional tablet replacement, with this color model being their largest step toward that goal.
But the cons are clear as well. The pen is somewhat simplistic and the overall experience of drawing and writing isn’t that special. It’s definitely not a paper-like writing experience, offering little to recommend it over more traditional tablets. Some of the physical design elements are likewise behind the curve of modern e-ink devices. There are also some general issues with the way the new screen functions and how well it works with its underlying hardware.
But should I buy it?
The best color e-ink product on the market. Pinterest
It depends. Do you really want a color screen? If that’s what matters most to you, and you need it now, this is worthwhile. But if it’s that important, looking outside e-ink is still probably your best bet. The BOOX Nova 3 (non-color) is a more solid option that handles the resources of the hardware better than its colorized cousin.
But, that said, what BOOX has done is offer the first step in revolutionizing modern e-ink expectations, and this device isn’t “bad”. I wouldn’t go for it necessarily on the fact that it’s color alone, but it does seem to promise the color screen may become a more normal part of this industry in the near future.
NEXT UP
How to Set Up Quick Connect on a Synology NAS
Get Synology’s powerful Quickconnect running in minutes on your NAS!
Synology is one of the most popular creators of Network Attached Storage devices on the market today, and for great reason — they’re really good at what they do. They consistently make devices that stand the test of time and feature top-notch software that makes the process of running a home server as easy as
Introducing Howchoo, an enigmatic author whose unique pen name reflects their boundless curiosity and limitless creativity. Mysterious and multifaceted, Howchoo has emerged as a captivating storyteller, leaving readers mesmerized by the uncharted realms they craft with their words.
With an insatiable appetite for knowledge and a love for exploration, Howchoo’s writing transcends conventional genres, blurring the lines between fantasy, science fiction, and the surreal. Their narratives are a kaleidoscope of ideas, weaving together intricate plots, unforgettable characters, and thought-provoking themes that challenge the boundaries of imagination.
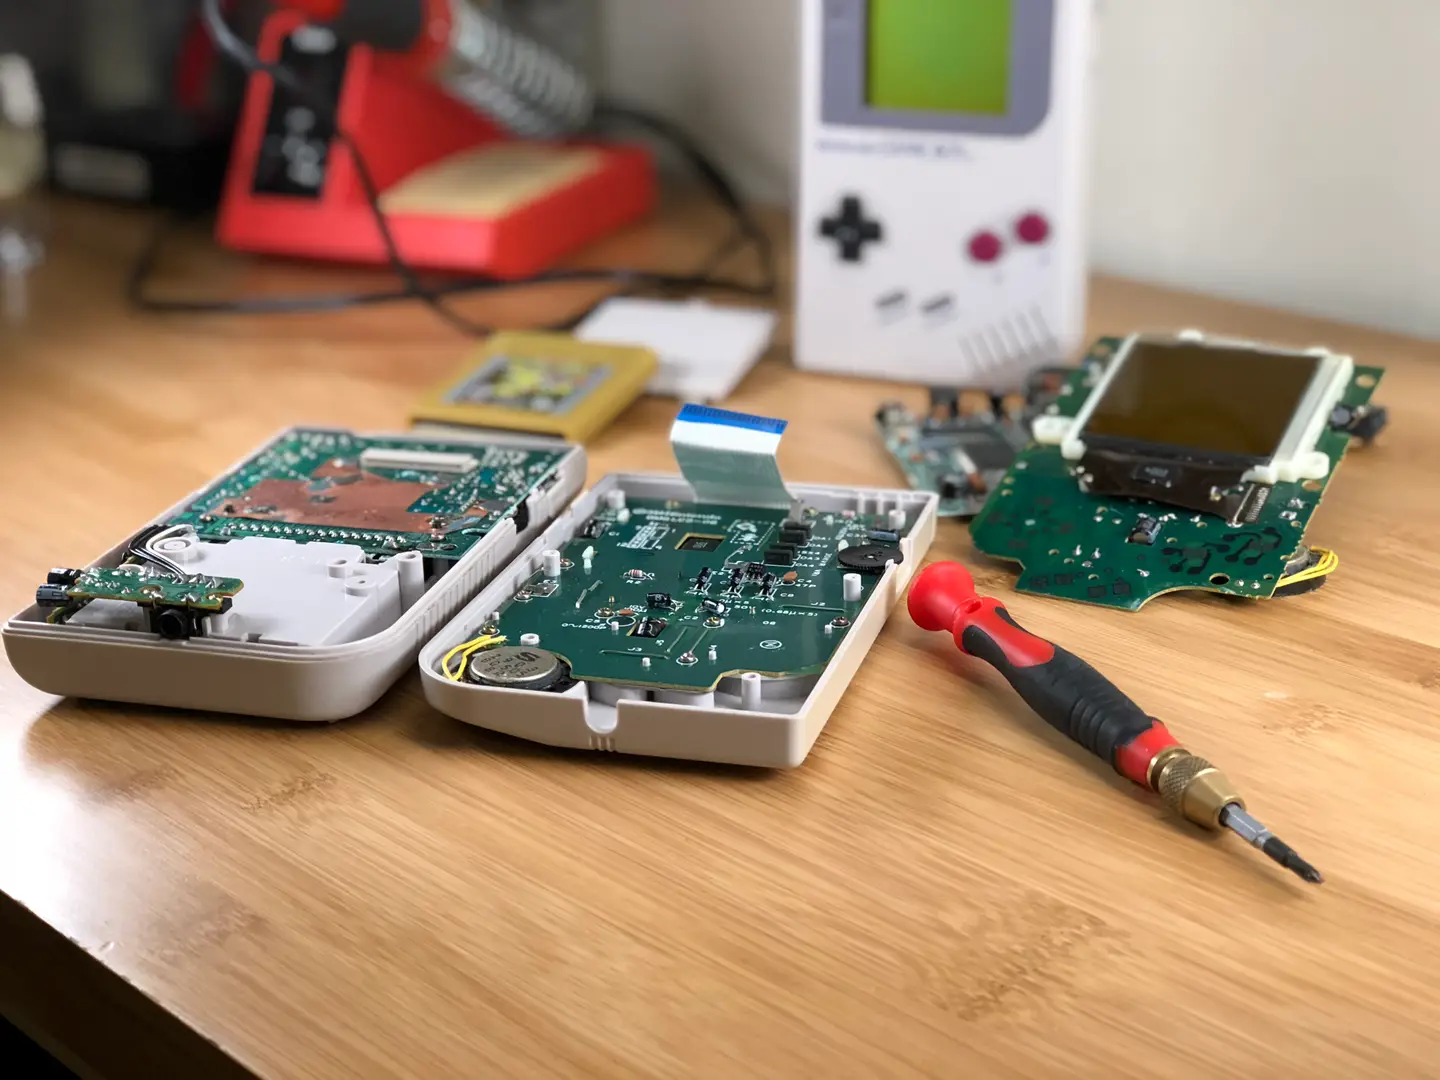
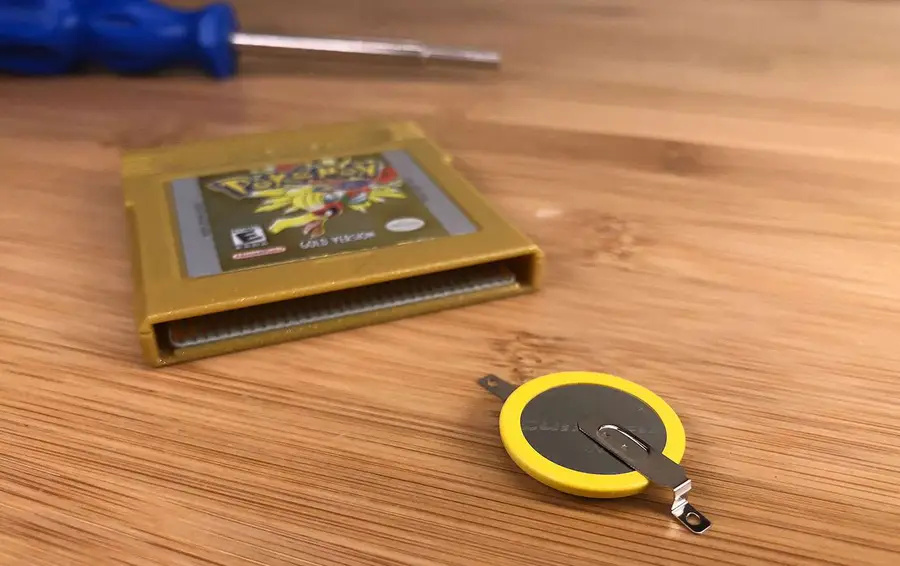
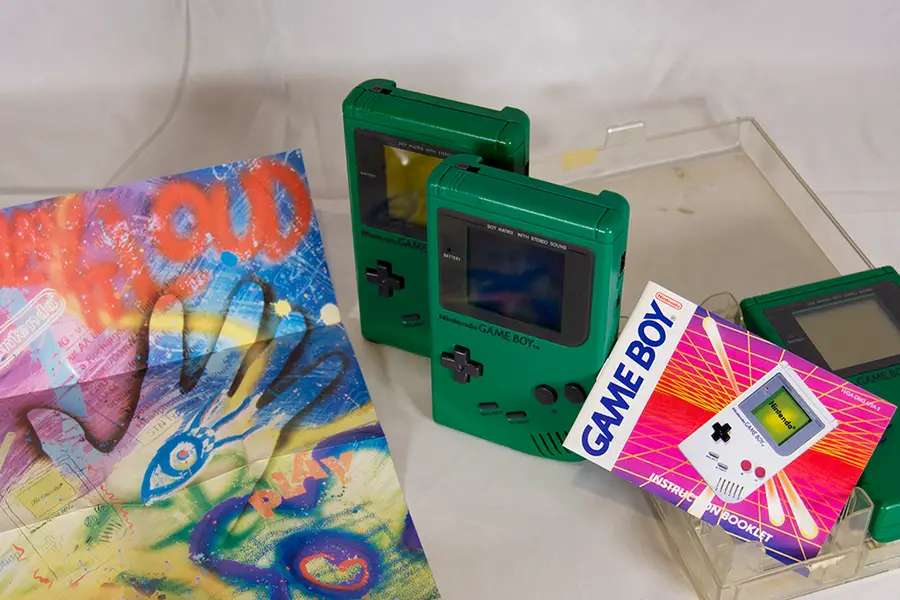
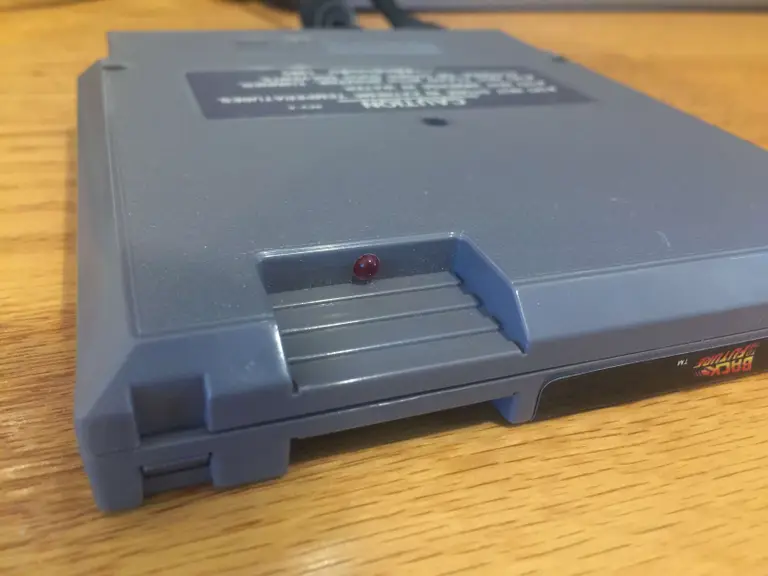
I recently bought a non-working Gameboy from eBay with the intention of hacking it to run RetroPie using a Raspberry Pi Zero. I chose a non-working Game Boy not only to reduce cost but also so that I wouldn’t have to destroy an original, perfectly fine Game Boy.
The listing stated that it suddenly stopped working — and when I received it, I noticed the battery terminals were extremely corroded, caked with a greenish residue. It seemed obvious to me that this is why it stopped working. This is an extremely common reason for these old Game Boys to not power on.
I plan on getting this one to work, keeping it, and then ordering another non-working Game Boy for my Raspberry Pi Zero emulator project (check back later as I’ll be writing that guide here on howchoo).
For this guide, I’ll show you how to clean your Game Boy’s battery terminals, hopefully restoring your Game Boy to a working order.
Watch the video, or read on below
1 – Identify the corrosion
If your terminals are covered in a blue-white or blue-green substance, then they are definitely corroded — this happens when batteries are left in the device for a long period of time.
2 – Remove the back case
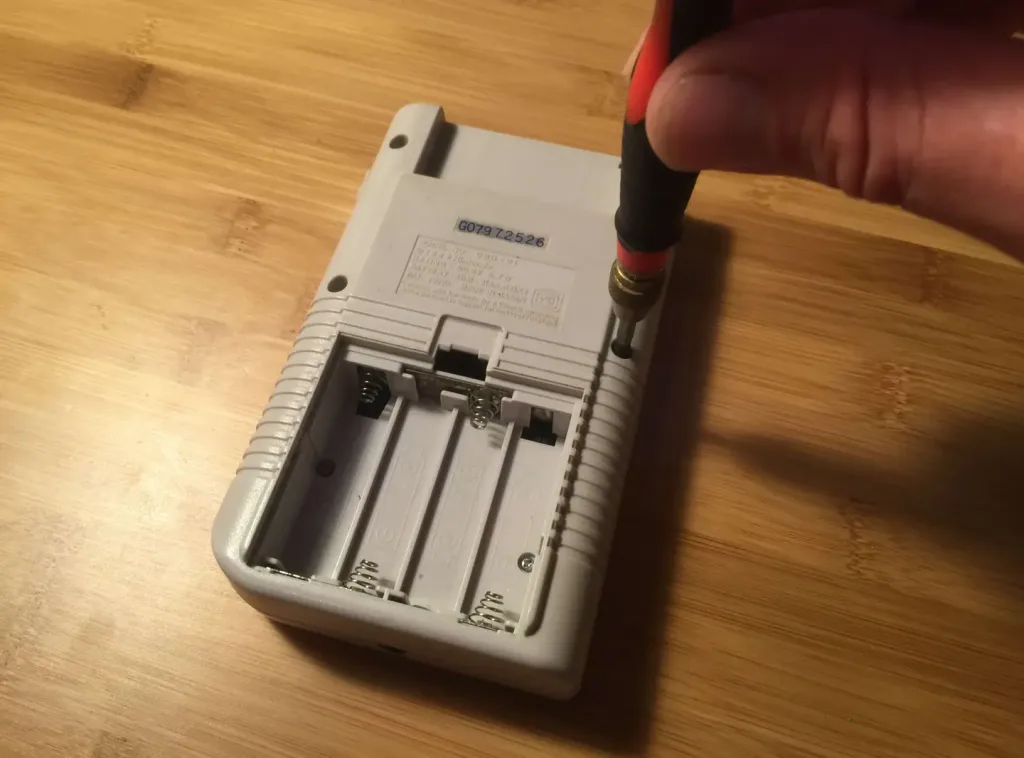
There are six screws you need to remove in order to get the case apart. If you’re lucky, these are normal Phillips screws — but Nintendo used Y-shaped security screws on some Game Boys, which require a different bit (I’ve linked to it at the top of this guide).
3 – Separate the back case from the front
After removing all six screws, carefully slide and disconnect the ribbon cable (pictured) that’s connecting the two halves.
4 – Remove the logic board and audio port
There are two screws holding the logic board in and two screws holding the audio port on. Remove all 4 screws and carefully remove both boards (and the power button!) from the back case.
🛈 Sorry I didn’t get a photo of this one — I was busy making the video. But check it out (above) if you need help with this part.
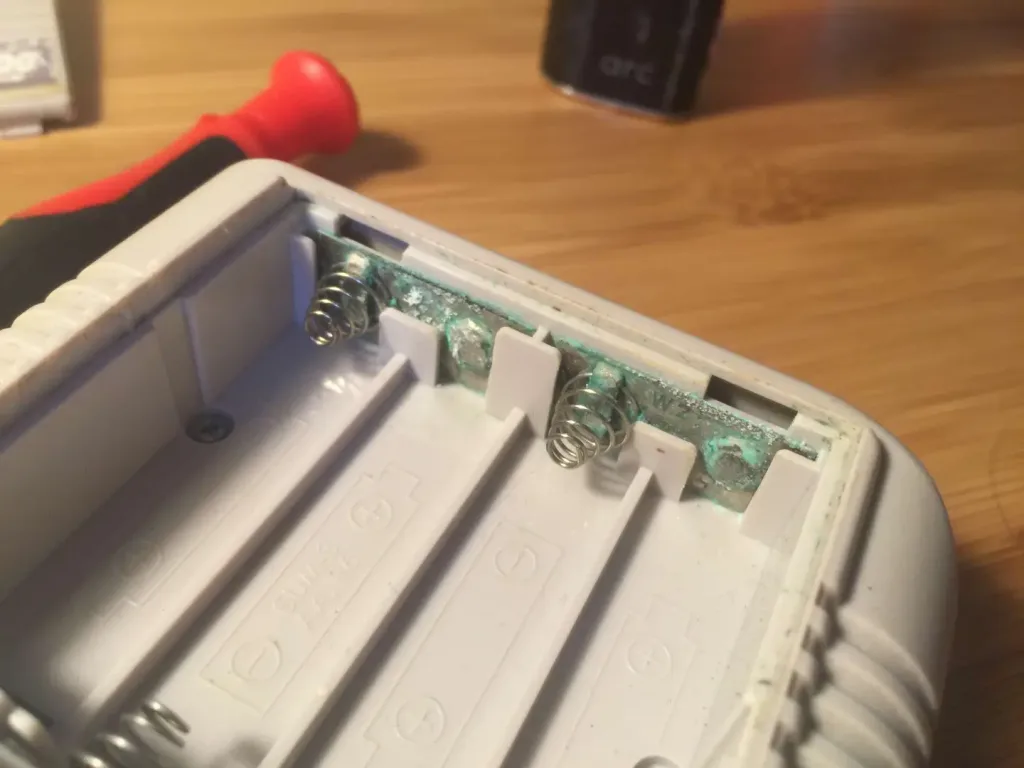
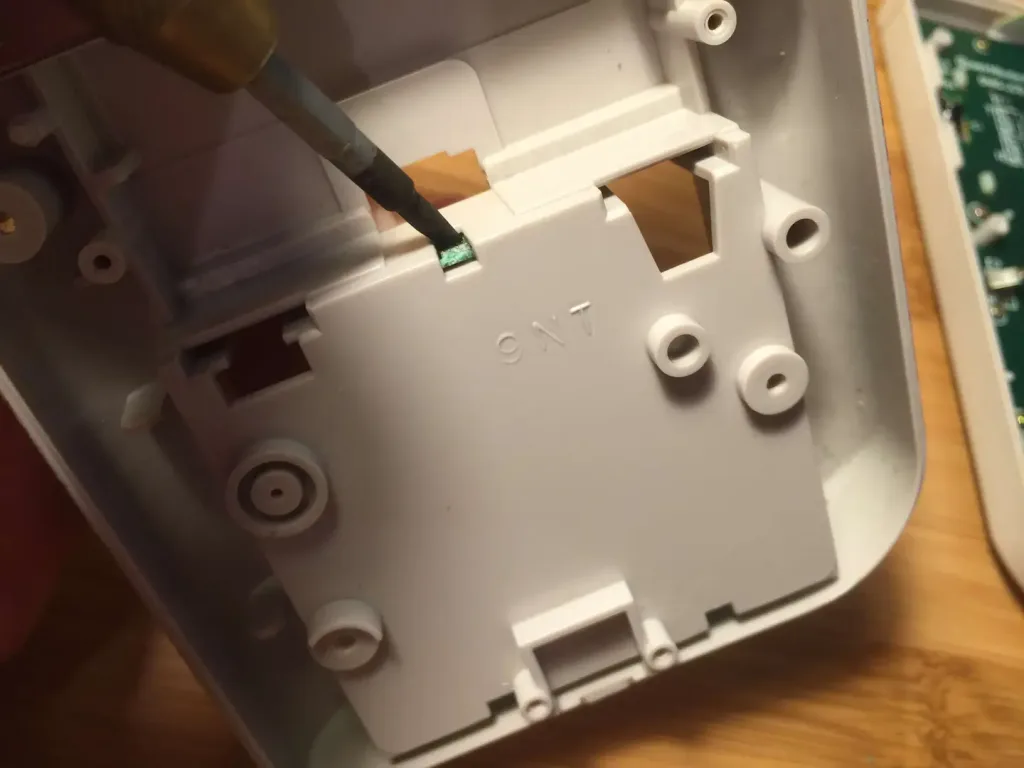
5 – Remove the battery contacts
We’re going to remove the three battery contacts/terminals using a small flathead screwdriver so that we can clean them more easily. There are two removal contacts at the bottom of the battery compartment and a single centered one at the top of the battery compartment.
To remove these contacts, use a small flathead screwdriver to get behind the contact and then extract it using a pair of needle-nose pliers. This process is made super easy because the clips are easy to access from the back. Carefully remove the top contact and two bottom contacts.
6 – Soak the contacts
To remove the corrosion, soak the three contacts in a small container of distilled white vinegar. You may need to scrub them slightly using an old toothbrush or your flathead screwdriver to get them squeaky clean.
Let them soak for about five minutes, rinse them with water, and then soak them in rubbing alcohol for about a minute. This will remove any impurities created by the vinegar. Finally, dry them with a paper towel.
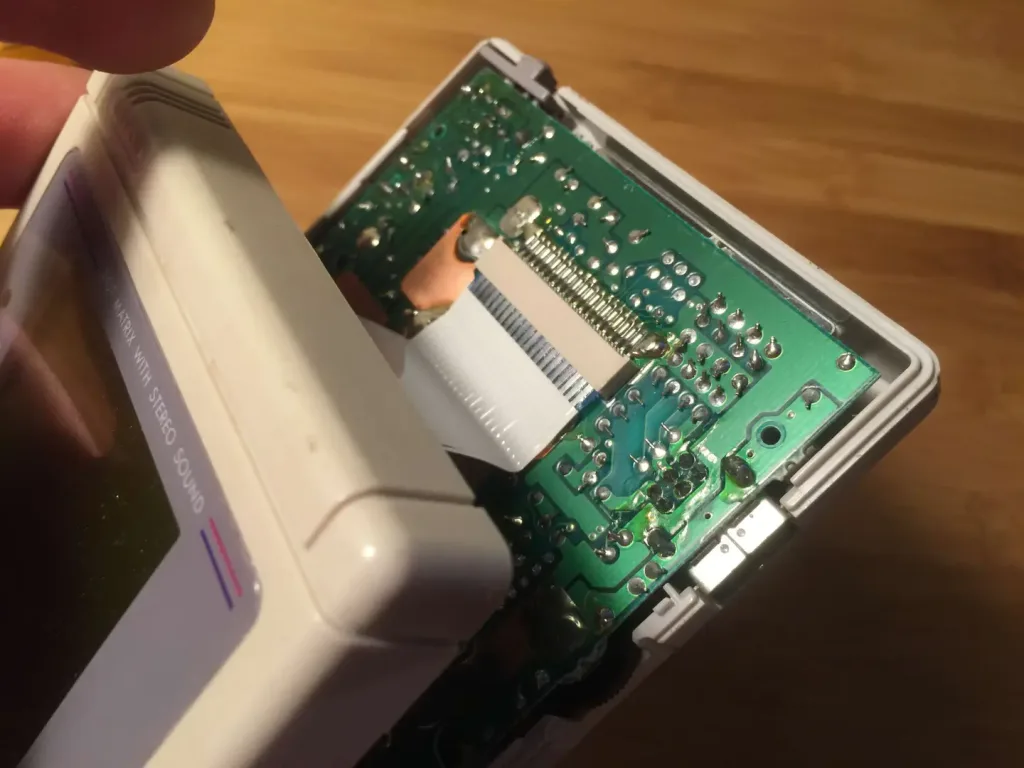
7 – Clean the remaining two contacts
We removed the back of our Game Boy so that we can clean the two non-removable contacts at the top of the battery compartment. Dip a bit of paper towel in some rubbing alcohol and carefully clean the two contacts that are soldered to the board.
8 – Reassemble everything
Make sure everything is dry. Replace the contacts, put the case back together, insert the batteries, and test your Game Boy out!
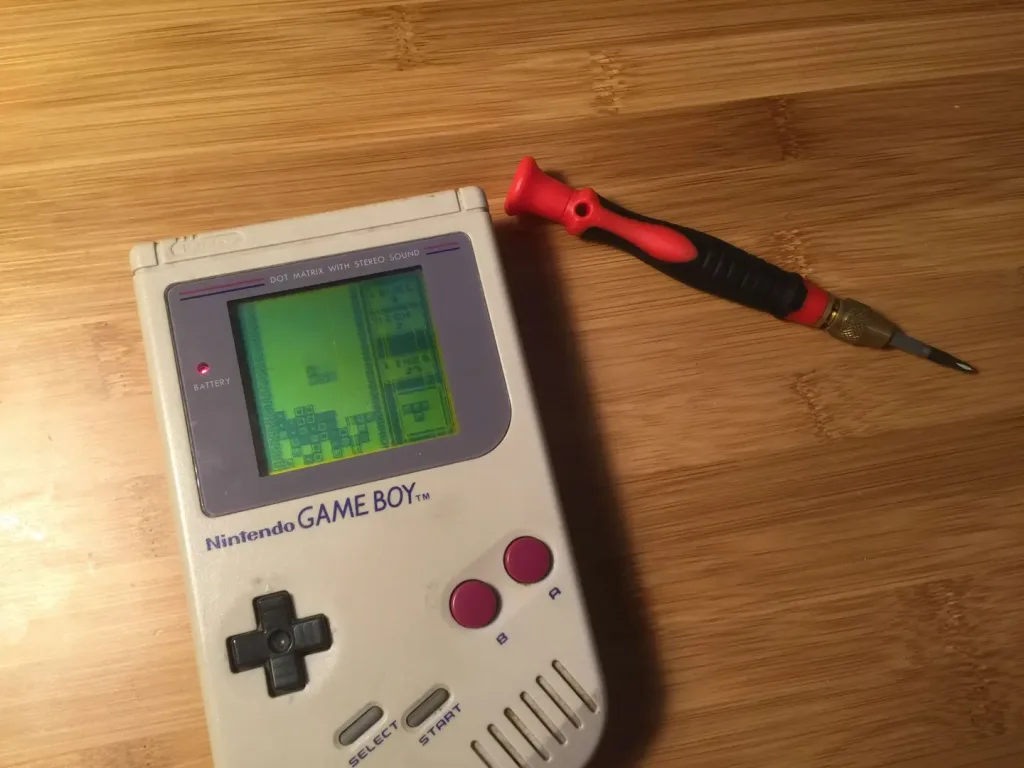
9 – It works!
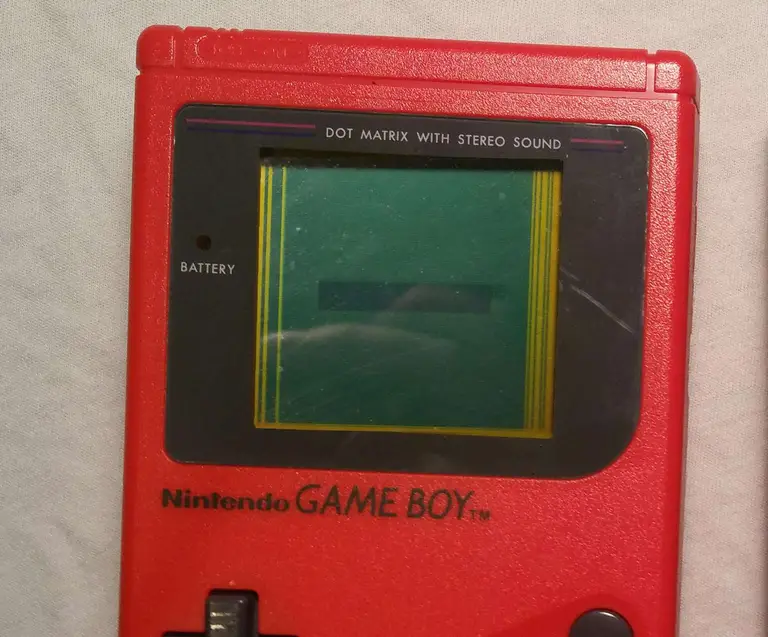
This was the issue and it totally fixed my Game Boy. 🙂 There are some lines on the screen, but nothing major — howchooer Ash wrote a guide on how to fix vertical Game Boy lines!
You’ve put so much work into setting up RetroPie or EmulationStation. You load it up with legally obtained ROMs only to find that custom theme you installed—you remember, the one from my RetroPie themes guide—has a big blank spot for box art! The Best RetroPie Themes (And How to Install Them)You deserve some personal flair! RetroPie: Build Your
Introducing Howchoo, an enigmatic author whose unique pen name reflects their boundless curiosity and limitless creativity. Mysterious and multifaceted, Howchoo has emerged as a captivating storyteller, leaving readers mesmerized by the uncharted realms they craft with their words.
With an insatiable appetite for knowledge and a love for exploration, Howchoo’s writing transcends conventional genres, blurring the lines between fantasy, science fiction, and the surreal. Their narratives are a kaleidoscope of ideas, weaving together intricate plots, unforgettable characters, and thought-provoking themes that challenge the boundaries of imagination.
In this guide, I’ll teach you how to build your own Raspberry Pi UPS using some simple hardware and the PiJuice HAT (featured in our recent list of the top HATs for the Raspberry Pi). You can use this method to power a Raspberry Pi 3, Raspberry Pi Zero, or any other Pi.
A UPS is an important part of any Pi project!
1 – Why do you need a Raspberry Pi UPS?
An uninterruptible power supply ensures that your Pi project will continue to function through minor power fluctuations, power outages, or even the occasional bumped AC adapter.
Prevent SD card corruption
If you don’t shut your Raspberry Pi down properly, you risk corrupting your Pi’s SD card, sort of like yanking the cord out of your desktop computer every time you want to shut it down.
If your project involves a camera, data collection, streaming, complex scripts that don’t restart on boot, or needs to run continuously, a UPS will help ensure the integrity of the project.
A UPS is ideal for Pi-hole, OctoPrint, and a wide range of other custom projects.
The right UPS setup can even notify you or send a safe shutdown command to the Pi if the UPS battery gets too low. Pretty neat!
2 – Raspberry Pi UPS options
There are a few options for building your own Pi UPS.
Option #1: Power bank
With this method, you essentially plug your Pi into a high-output power bank: basically, a juiced-up version of what you use to charge your phone while camping. The battery pack gets plugged into the wall and the Pi gets plugged into the battery pack.
There are a few factors to consider with this approach:
Simultaneous charge/discharge
The power bank needs to be able to simultaneously charge and discharge; in other words, while the power bank is charging, it’s also outputting maximum power to one of its USB ports. Most power banks do not have this feature as it requires additional circuitry and is an edge case for most users.
Power output
The power bank should output at least 2A for the Raspberry Pi 3, 2.5A for the Raspberry Pi 3 B+, or 1A for the Raspberry Pi Zero. These numbers assume you don’t have any peripherals plugged into the Pi or power bank that draw power.
Unfortunately, portable power banks that meet these requirements are hard to find and expensive. Additionally, the Pi can’t detect that it’s on battery power (let alone how much power remains) so a safe shutdown is not possible.
Method #2: Power management board (recommended)
This method involves connecting a power management circuit and battery directly to the Pi. Then, an AC adapter is connected to the power management board. The board is effectively a complete portable power solution.
When power is lost, the power management board will keep things running for hours without issue. The Pi can also monitor the battery to know when it’s using battery power and whether to perform a safe shutdown when power is low.
This is my recommended approach and the one I’ll cover in this guide.
The hardware
For power management, I’ll be using the PiJuice, which was originally funded on Kickstarter. If you’re building a Raspberry Pi Zero UPS, you can alternatively use the JuiceBox Zero, which is a little cheaper but can’t be used for full-sized Pis.
The PiJuice is pretty neat — it provides truly portable power to your Pi project, is super compact, and takes about 15 minutes to set up. You can even connect a solar panel directly to it!
3 – UPS runtime
Using the PiJuice’s onboard BP7X 1820mAh off-the-shelf LiPo/Li-Ion battery, you can expect anywhere from 4-6 hours of continous use without power. You can also connect larger LiPo/Li-Ion battery to run your Pi for up to a day (or longer).
Exact UPS runtime depends on which Raspberry Pi you’re using, which tasks it’s performing, and what external hardware it’s powering. See the PiJuice battery discharge calculator to calculate the exact runtime for your project.
4 – Install Raspberry Pi OS & configure your Raspberry Pi
Your Pi is probably already running some software, but if you’re starting from scratch, check out our guide on setting up a new Raspberry Pi.
How to Set Up a New Raspberry Pi Start using that brand new Pi!
You can use either the full or “Lite” version of Raspberry Pi OS (formerly Raspbian), depending on whether or not your project needs a GUI.
5 – Shut down your Pi
If your Pi is currently running, safely shut it down by connecting to it and running the following command:
You can also shut it down through the Raspberry Pi OS GUI.
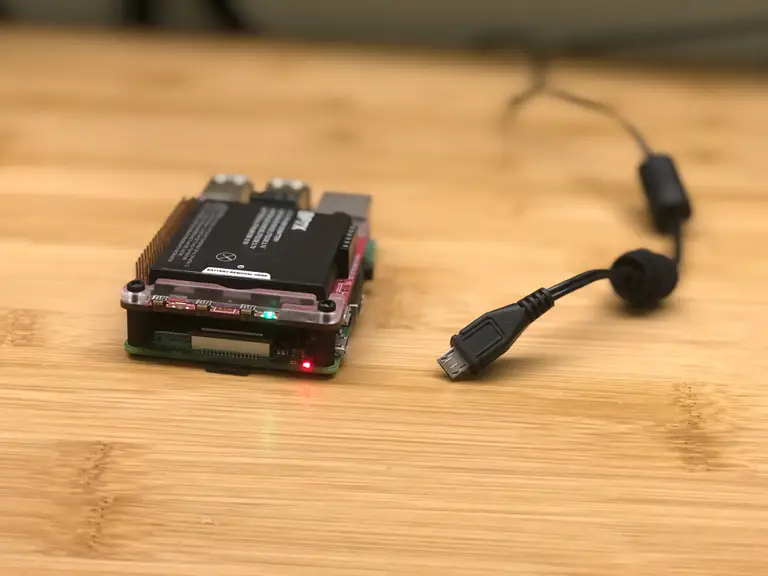
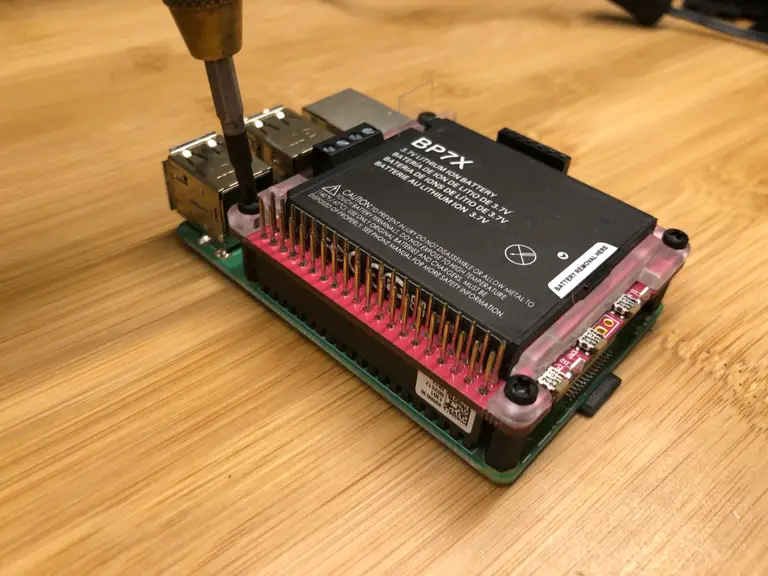
6 – Connect the PiJuice hardware (HAT)
Carefully press the PiJuice onto your Pi’s GPIO header. Then, use the included screws and plastic standoffs to secure it to your Pi.
🛈 If you’re using a Raspberry Pi Zero, you may need to solder a header onto the Pi first (unless you bought the “WH” version).
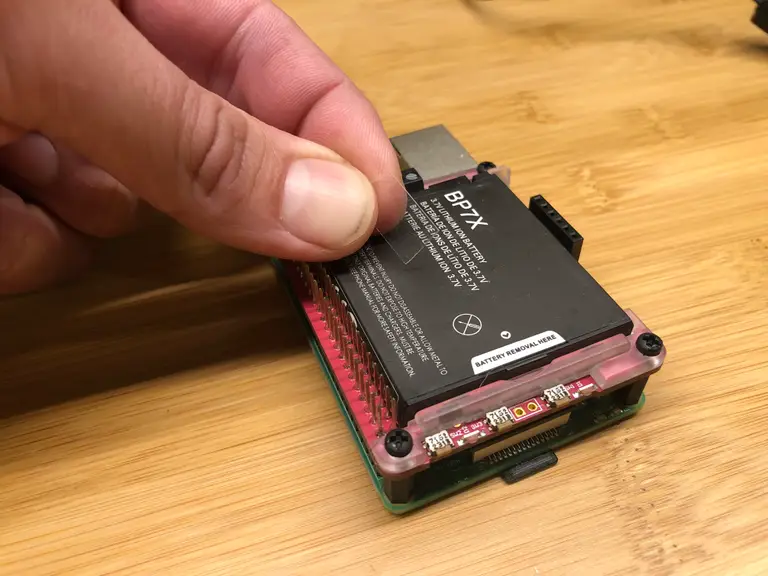
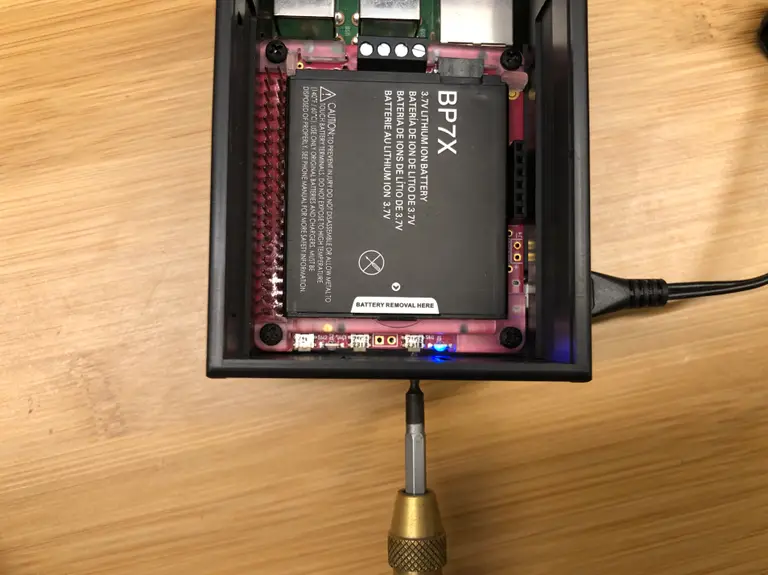
7 – Connect the battery, if not already connected
The PiJuice comes with an off-the-shelf battery preinstalled. This is neat because it makes swapping out or replacing the battery super easy — you can even hot-swap batteries as long as your Pi is powered. If your PiJuice came with a battery, be sure to remove the battery’s clear plastic insulation tab.
If you purchased the PiJuice without a battery or want to add more power capacity with a separate Lithium-ion or Lithium-polymer battery, simply solder on a standard battery terminal and connect that battery instead.
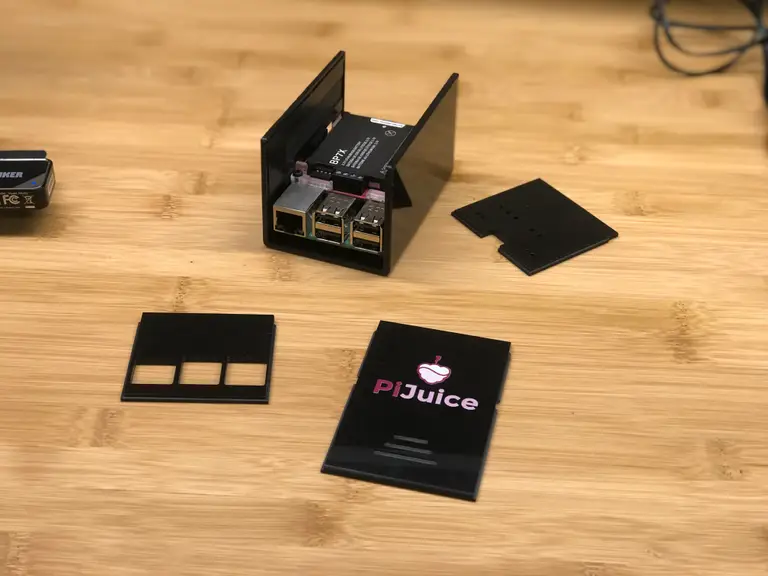
8 – Attach the PiJuice case (optional)
You can use the PiJuice with most normal Raspberry Pi cases — you may just need to leave the top of the case off if it has no GPIO slot.
There are also a few different cases designed specifically for the PiJuice — for the full-size Pi such as the Pi 3, they make both a short and tall case. They also make a case for the Pi Zero.
I grabbed the tall version of the Raspberry Pi 3 case because I want to stack some headers on later.
Slide off the top, back, and front of the case. Then, carefully slide the Pi and PiJuice into place. The whole assembly will lock into slots in the sides of the case. Finally, replace the sides and top and connect the 4 rubber feet.
🛈 Those freaking rubber feet were the hardest part of the assembly.
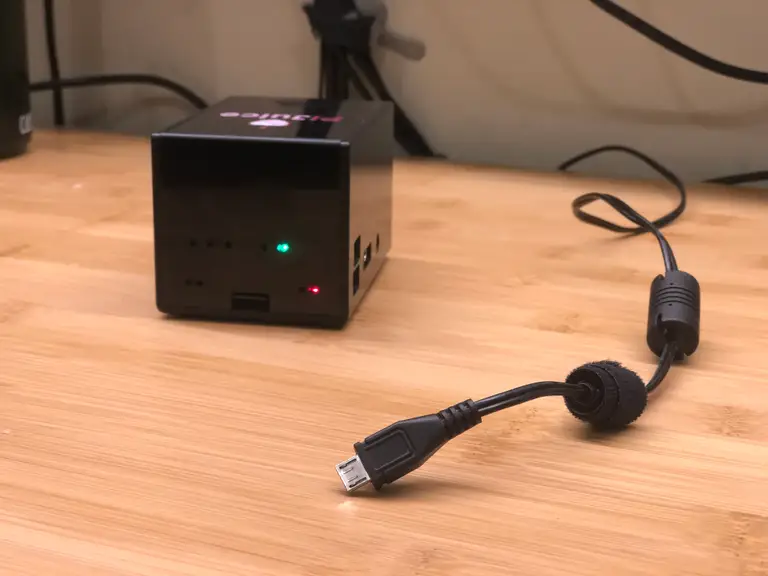
9 – Connect a power source and power on the Pi
Connect a normal Raspberry Pi power supply to the PiJuice’s Micro USB port.
To turn your Pi on, briefly press the small button labeled SW1 directly next to flashing LEDs. With the case installed, you’ll need to use a paperclip or pin to press the button.
To safely shut down your Pi using this same power button, press and hold the same button for at least 10 seconds and then release it.
To force a hard (unsafe) shutdown, press and hold the button for at least 20 seconds — though you likely won’t ever need to do this.
🛈 Be sure to connect the cable to the PiJuice’s Micro USB port, not the Pi’s Micro USB port.
10 – You’re (probably) done
If all you wanted to do was build a simple Raspberry Pi UPS, you’re up and running already.
I do recommend installing the PiJuice software so that your Pi can notify you, shut itself down safely, or perform some other command when it’s low on power.
Installing the software also allows you to utilize the PiJuice’s extra buttons and LEDs to add custom functionality to your project!
11 – Recommended: Install the PiJuice software
PiJuice offers some pretty sweet power management software in their GitHub repo.
Let’s install it and see what it can do. You can install either the GUI or headless version. In either case, I recommend connecting to your Pi and updating it first:
sudo apt-get update && sudo apt-get upgrade --yes
If your Pi has a desktop that it can boot into (like a full Raspberry Pi OS install), install the GUI version:
sudo apt-get install pijuice-gui
Otherwise, you can install the light version for a headless setup:
sudo apt-get install pijuice-base
12 – Automatically shut down if the Raspberry Pi UPS battery is low
There is an insane amount of PiJuice configuration that can be done (insane in a good way!)
I won’t get into it all in this guide so be sure to check out the many PiJuice configuration options to learn what you can do. Right off the bat, I saw an option to wake and sleep the Pi on a schedule.
But I digress…
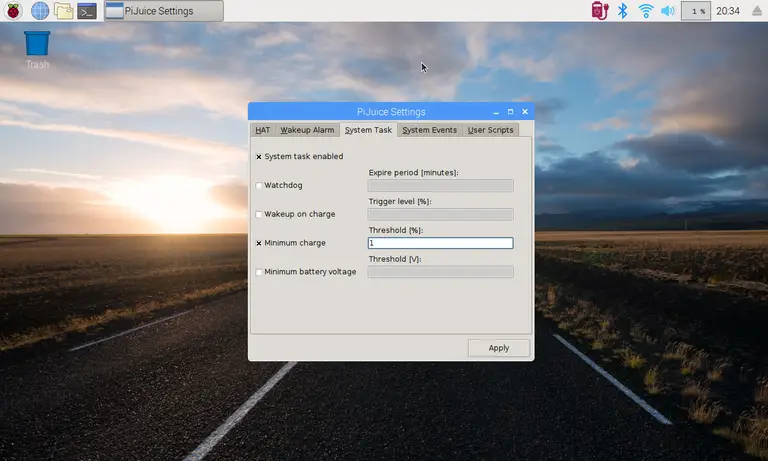
The option we’re looking for involves shutting down the Pi when a certain battery voltage or percentage is reached. To do this:
In the PiJuice GUI
To change this option from the Raspberry Pi OS GUI, use a keyboard or VNC to navigate to Menu > Preferences > PiJuice Settings.
There are several ways to go about running a Minecraft server on the Raspberry Pi. In this guide, I’ll cover how to install Nukkit—a cross-platform Minecraft server that’s super easy to set up on the Raspberry Pi. This server should work with PCs, consoles, and tablets running Minecraft 1.14. I’ll be using a Raspberry Pi
Introducing Howchoo, an enigmatic author whose unique pen name reflects their boundless curiosity and limitless creativity. Mysterious and multifaceted, Howchoo has emerged as a captivating storyteller, leaving readers mesmerized by the uncharted realms they craft with their words.
With an insatiable appetite for knowledge and a love for exploration, Howchoo’s writing transcends conventional genres, blurring the lines between fantasy, science fiction, and the surreal. Their narratives are a kaleidoscope of ideas, weaving together intricate plots, unforgettable characters, and thought-provoking themes that challenge the boundaries of imagination.
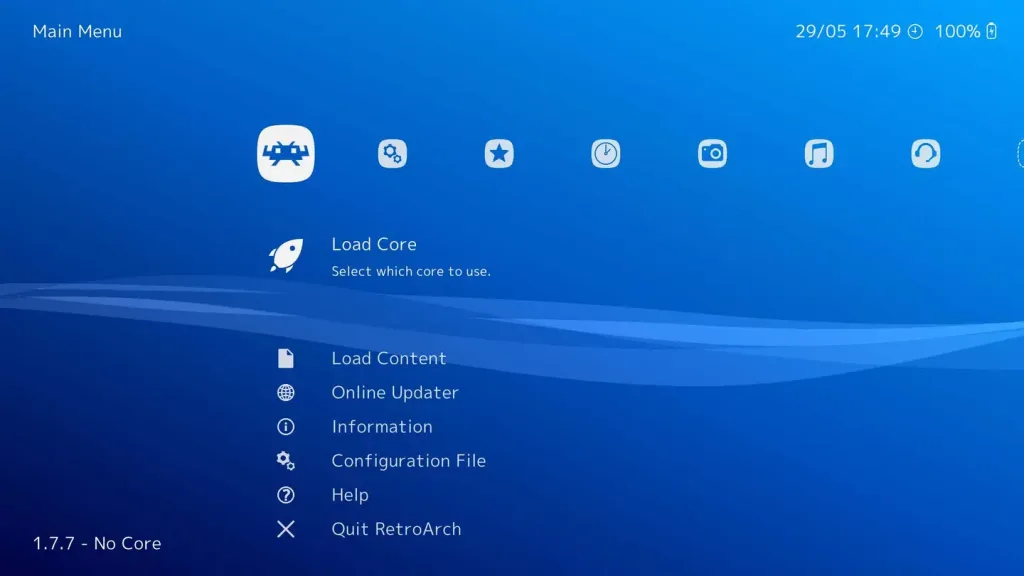
If you want to emulate all your favorite retro gaming systems quickly and easily, this guide is for you. Why go through the trouble of configuring a Raspberry Pi to play RetroPie when the Fire Stick can do it instead? (And for less money, I might add.)
What is RetroArch?
In short, RetroArch is an emulation platform that can be installed on many different devices and operating systems. This includes Windows, Linux, Android, and Apple devices. You may have seen it before: if you set up RetroPie on the Raspberry Pi, you absolutely have. RetroPie is a package built on top of RetroArch just for the Raspberry Pi.
RetroArch supports a ton of different emulators, commonly referred to as cores. These cores can launch any ROMs that they support, which are referred to as content.
Is this legal?
Absolutely. There’s nothing illegal about owning and installing emulators. The common concern is the legality of how you obtain ROMs (games), but we’ll go over the best ways to get legal ROMs a bit later.
Is this “jailbreaking”?
People often search for how to jailbreak a Firestick, thinking that “jailbreaking” refers to installing Kodi, RetroArch, etc. Technically, installing RetroArch on the Firestick is not the same thing as jailbreaking. All we’re doing is side-loading a third-party application, which is a fancy way of saying “installing an app from outside the Amazon Appstore”. Your Fire TV Stick (or just Firestick for short) can be reset to factory default at any time.
Which Fire Stick should I use?
I’m using an Amazon Fire TV Stick 4K, but this will work with any Amazon Fire Stick. However, the variety of systems you can emulate does depend on how powerful your Fire Stick is. For example, the 4K version can easily emulate N64 games, unlike the less powerful or older models.
1 – Enable Apps from Unknown Sources
First, we need to tell the Fire Stick that it’s okay to install third-party apps. Open Settings and choose Device. New editions will say My Fire TV instead of Device.
Open Developer Options and choose the option to enable Apps from Unknown Sources.
Note: Be cautious when installing third-party apps. RetroArch is safe, but other apps should be verified for safety before you install them.
2 – Install the Downloader app
Next, we’ll need an app called Downloader. This will help us download and install RetroArch. Thankfully, it’s available on the Amazon AppStore.
You can find it under the Utilities category.
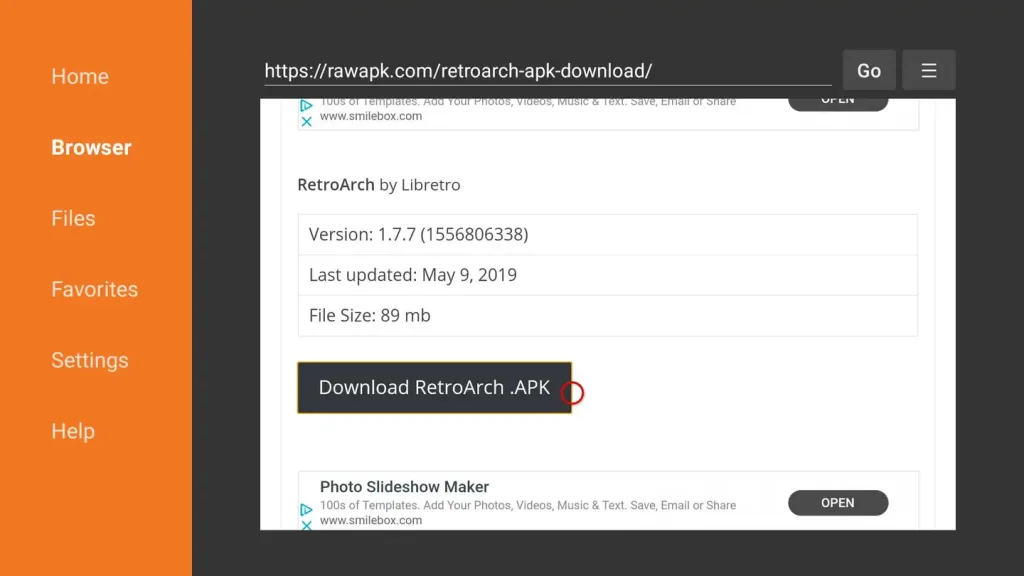
3 – Download and install the RetroArch app
Once Downloader is installed, launch it. Access the Browser and enter the following URL:
When the website loads, click Download RetroArch.APK. Once it downloads, you’ll get a prompt to install the new app.
4 – Connect a controller
We’ll need a controller. Playing games with the Firestick remote is way too hard. I’m using this 8bitdo bluetooth controller. Most other bluetooth controllers will work.
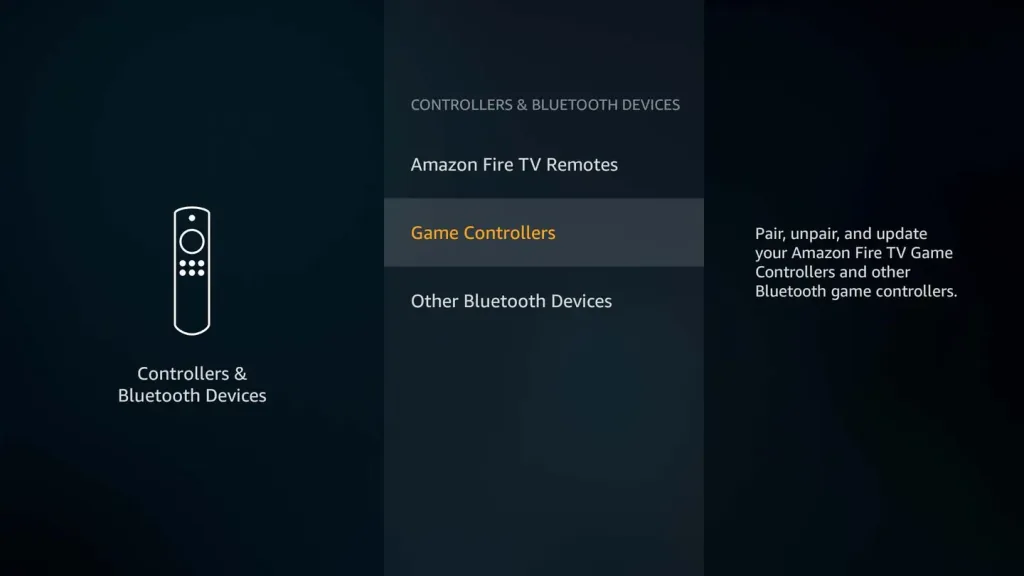
To add a controller, open Settings then Controllers and Bluetooth Devices.
You’ll see an option to Add a new game controller. The pairing process will begin once you select it. Put your controller in pairing mode. Check with the manufacturer to find out exactly how to do this with your controller.
When the Fire Stick detects your controller, select it from the list using the remote. You’ll get a pop up in the corner confirming that it’s connected.
Now you can use your controller to navigate menus.
5 – First-time Retroarch setup
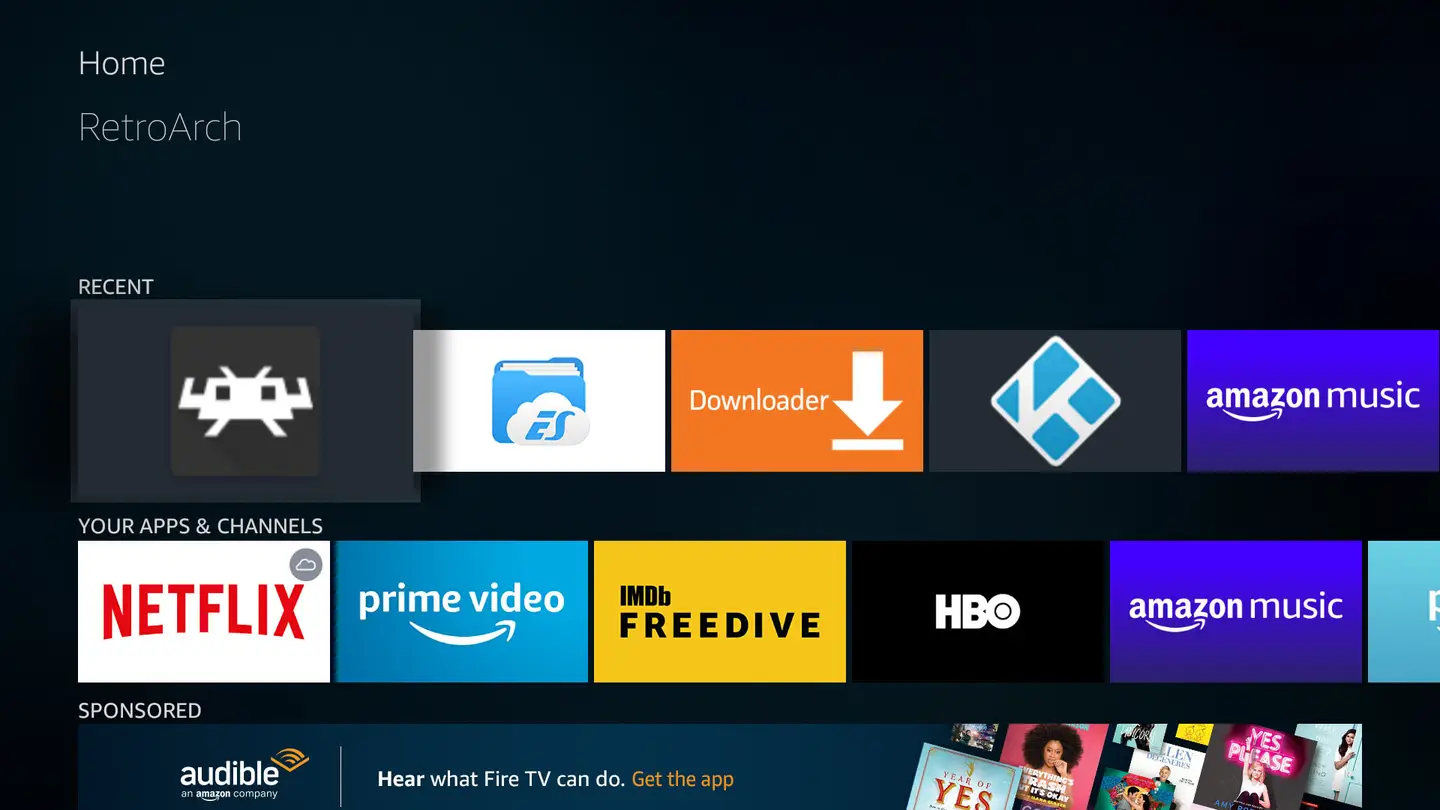
Now that we’ve got our hardware in order, let’s load up RetroArch. Select it from your list of apps on the home screen.
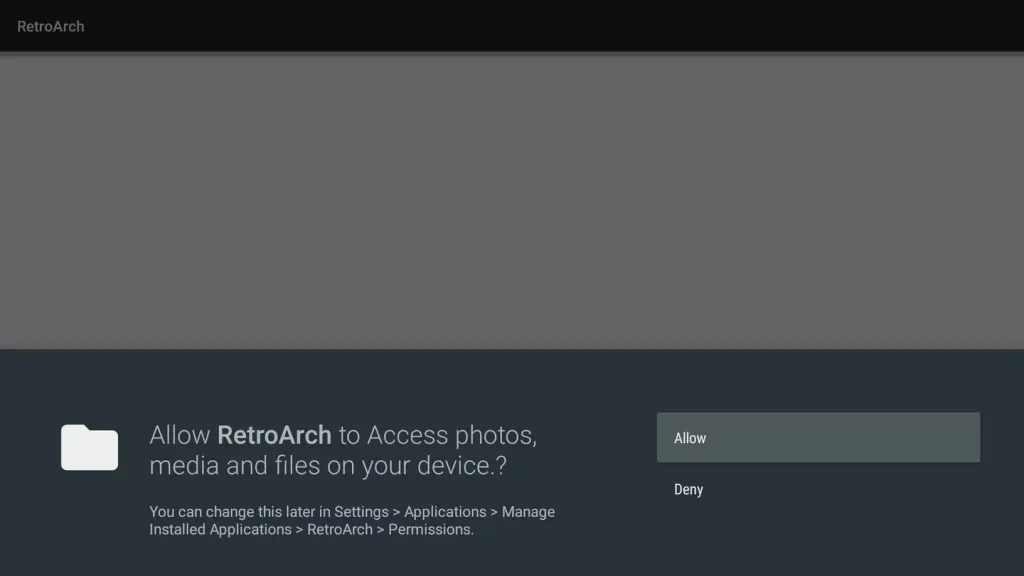
When you first launch RetroArch, it will prompt you for media permissions. Give RetroArch the access it’s requesting.
6 – How to add cores (or emulators)
On the main RetroArch home screen, go to Load Core. You can pick any of the cores from the list.
Not sure which is best? Experiment yourself or check online for suggestions from the community.
You’ll notice there are often multiple cores for the same system. This is because each emulator accomplishes emulation through different means. This makes some better than others, depending on what you want to play.
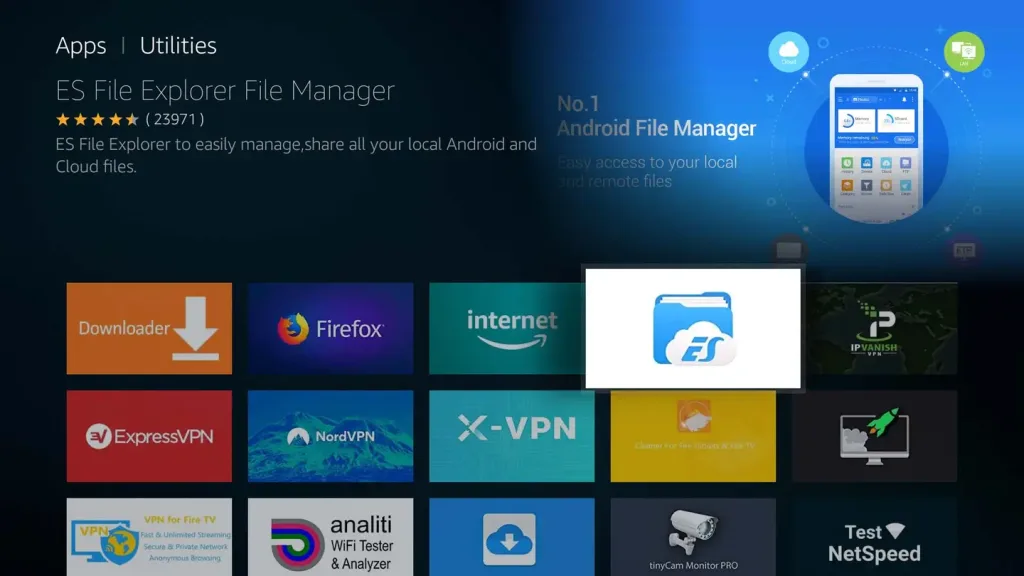
7 – Install the ES File Explorer File Manager app
Now we need something to play. To put ROMs on the Firestick, I highly recommend ES File Explorer File Manager. It gives us tools we can use to transfer games from our computer to the Firestick over Wifi.
You can find it on the Amazon AppStore under Utilities.
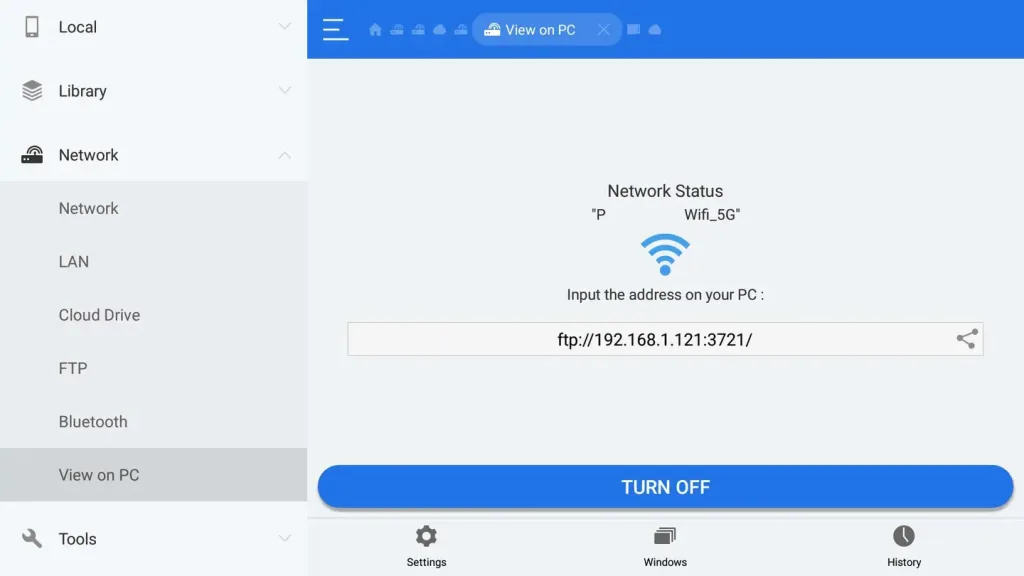
8 – Connect to the Firestick via FTP
Open ES File Explorer and select Network on the left navigation menu. Choose View on PC. Turn on the feature.
This screen gives us an FTP address we can use to access the Firestick.
Connect to the Firestick using your favorite FTP program. For Windows, I recommend WinSCP. For Mac, I recommend FileZilla.
There is no username or password to log in with — leave both blank and connect.
9 – Add ROMS to the Firestick
Here I have the Fire Stick open in WinSCP. Open the RetroArch folder and create a new one inside called roms. Drag and drop ROM files into the new roms folder. You can create subfolders for each emulator/core.
Once you’ve copied your games over, it’s time to launch them! From the main RetroArch home screen, choose Load content. This is right under the option to load a core.
From this screen, navigate to the folder you created to house your ROMs. Select the game you want to play and let your friends know you’re too busy gaming like it’s 1999.
11 – Next: Install Kodi on your Firestick
Kodi is an open source media center. It runs on many different platforms, including the Fire TV Stick. Kodi can be used to stream personal media files from your PC. In our case, we can use it to make a nice interface for loading ROMs.
If you don’t have it yet, visit our guide on how to install Kodi on the Firestick.
NEXT UP
How to See If I’m Eligible for Amazon Prime Free Same-Day Delivery
So Amazon just announced free same-day delivery in 14 different metro areas. How do you know if you apply? 1 – Check your zip code Go to this page. Wait for the page to finish loading completely, scroll down, and enter your zip code. This will tell you if you live in an area that is
Introducing Howchoo, an enigmatic author whose unique pen name reflects their boundless curiosity and limitless creativity. Mysterious and multifaceted, Howchoo has emerged as a captivating storyteller, leaving readers mesmerized by the uncharted realms they craft with their words.
With an insatiable appetite for knowledge and a love for exploration, Howchoo’s writing transcends conventional genres, blurring the lines between fantasy, science fiction, and the surreal. Their narratives are a kaleidoscope of ideas, weaving together intricate plots, unforgettable characters, and thought-provoking themes that challenge the boundaries of imagination.
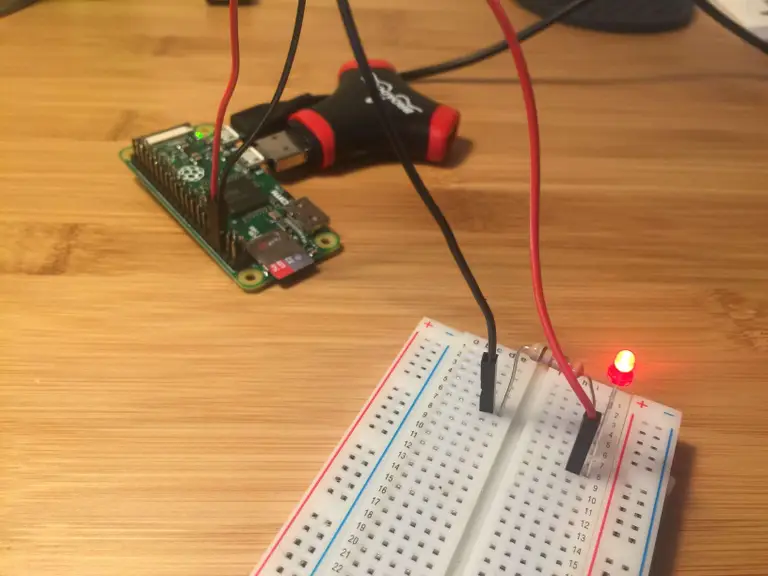
This short guide will show you how to add an LED power indicator/status light to your Raspberry Pi, letting you know when it’s powered and when it’s safe to unplug your Pi. This LED will illuminate when your Pi is running and turn off when your Pi has been successfully shut down. The LED can then be mounted anywhere on your project—for example, on the outside of your PiCart’s NES cartridge/case.
This guide will work with any Raspberry Pi model/version. In addition to the full guide below, I also made a Raspberry Pi power LED video version of this guide:
Be sure to check out both!
1 – Why is this useful?
There are several reasons a power LED is useful:
You left your Pi on
This LED will remind you to turn it off.
Your Pi is safe to unplug
It’s unsafe to shut down your Raspberry Pi by pulling the plug since this can lead to data corruption. However, after shutting your Pi down safely, this LED will tell you when it’s safe to pull the plug.
2 – Don’t Pull the Plug: How to Safely Shut Down or Reboot Your Raspberry Pi
There are a few basic methods for illuminating LEDs on your Pi:
1. Software approach:
The LED is connected to one of your Pi’s GPIO (general-purpose input/output) pins and you write a bit of code that will monitor and update the LED based on some input—for example, your Pi running or the temperature outside being higher than 76 degrees.
Pros: You can illuminate LEDs of various colors, or illuminate your LED based on dynamic input—such as when a battery-powered Pi is running low on juice.
Cons: Requires you to write software that executes at startup, adding a bit of complexity.
2. Serial approach (this guide):
The LED Is connected to your Pi’s TxD pin, which monitors the serial console. The LED will flicker a tad while booting, stay solid while your Pi is running, and turn off when it’s safe to remove power.
Pros: Simplicity. No code is needed and it just sort of works. Also, this is a great foray into the hardware portion of your Pi.
Cons: Limited to providing information about when the Pi is on or off—a very binary solution.
3 – Enable the GPIO serial port
Newer versions of Raspberry Pi OS (May 2016 and later) have the GPIO serial port disabled by default; the end result is your LED will not light up! Luckily, enabling it is super easy.
Edit your /boot/config.txt file and add the following line:
enable_uart=1
You can edit this file by connecting to your Pi via SSH or by putting the SD card into your computer and editing the file directly. This file is accessible from the SD card.
This step will require some soldering. I rigged everything up on a breadboard to prototype, but you can go straight to soldering now that we have the circuit figured out.
To build this circuit, we’re going to use a 330Ω (ohm) resistor connected to a small LED (about 2V, but one of slightly higher voltage will work well too—just keep it below 5V). The LED is powered by the Pi’s TxD serial output pin and the resistor protects the Pi against your LED requesting high current draws that can fry your Pi.
The LED’s “short” (negative/cathode) lead connects to the resistor and your Pi’s ground pin, while the “long” (positive/anode) lead connects to the TxD pin.
Use the attached circuit diagram to solder your connections. If you’re using a Pi Zero and don’t have header pins soldered to your Raspberry Pi, you can solder directly to the Pi itself. Remove your SD card before soldering to your Pi as it is easily damaged by heat. Be sure to leave enough wire for your LED to reach its final destination.
Pinout.xyz is a great resource for learning about and identifying your Pi’s GPIO pins.
If something is already connected to your Pi’s ground on pin 6, you can use any other ground pin on your Pi. You can see a list of other GPIO ground pins here.
🛈 Blue or white LEDs may not illuminate property as they draw more current and the Pi’s pins may be unable to supply it.
5 – Test the LED circuit
Boot up your Pi—the LED should illuminate solid once fully booted. Next, safely shut down your Pi and after several seconds the LED should turn off.
🛈 You can see I’ve added some heat wrap to my connections to insulate them a bit—this is purely optional.
6 – Install the LED circuit
Now for the fun part: installing the LED in your case. I used a small drill bit and installed the LED just beneath the thumb-hold on my Pi Cart so that it would illuminate the table just beneath the cartridge.
🛈 Notice in this photo I forgot to put my SD card back in. Don’t do that. 🙂
7 – Circuit powered off
Here’s a shot of the status LED after the Pi has been powered off. This also shows the installation location I chose. I used a 3mm drill bit to install the LED.
🛈 Now I know it’s safe to unplug my Pi!
8 – All finished!
Here’s the final product. Works great! If you have any comments or questions, post below and I’ll do my best to help you out.
🛈 That was simple, eh?
9 – Combining a power button and power LED
Next, add a power button to your Raspberry Pi and shut it down safely! The power button will even wake your Pi up. You can even use an illuminated button by combining the fundamentals from this LED guide and the power button guide. 🙂
There are several ways to go about running a Minecraft server on the Raspberry Pi. In this guide, I’ll cover how to install Nukkit—a cross-platform Minecraft server that’s super easy to set up on the Raspberry Pi. This server should work with PCs, consoles, and tablets running Minecraft 1.14. I’ll be using a Raspberry Pi
Introducing Howchoo, an enigmatic author whose unique pen name reflects their boundless curiosity and limitless creativity. Mysterious and multifaceted, Howchoo has emerged as a captivating storyteller, leaving readers mesmerized by the uncharted realms they craft with their words.
With an insatiable appetite for knowledge and a love for exploration, Howchoo’s writing transcends conventional genres, blurring the lines between fantasy, science fiction, and the surreal. Their narratives are a kaleidoscope of ideas, weaving together intricate plots, unforgettable characters, and thought-provoking themes that challenge the boundaries of imagination.
Bad ads are everywhere you turn on the internet, disrupting the overall user experience. They exist in various forms, from visually-disruptive video ads that take over your browser window, to ads that inject malware onto the page to steal your personal data without you knowing it.
If you want to stop ads like these, you use an ad block: so far, so good. These aren’t available for every device, however, so what about an ad block that works for every single internet-connected device across your network?
Pi-hole is ad-blocking software for the Raspberry Pi single-board computer that can do just that, blocking common ad networks from loading ads on all devices across your network.
To use Pi-hole, you’ll need to first install and set it up on your Raspberry Pi by following the instructions listed here. While these instructions have been written with Raspberry Pi OS (Raspbian) users in mind, they may also work for other Linux distributions and devices.
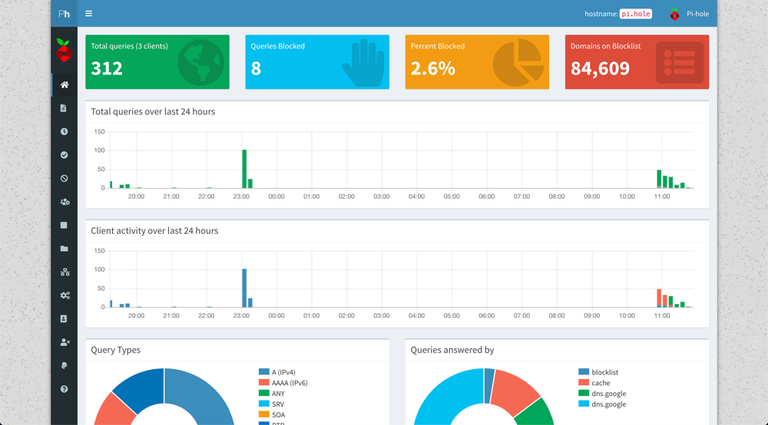
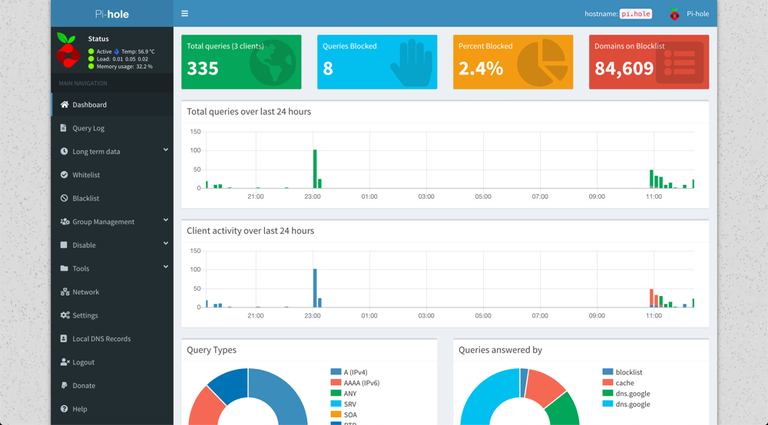
1 – What is Pi-hole and how does it work?
All internet services use domain name server (DNS) requests to point you from A to B, and advertisements are no different. DNS, for those who don’t know, is how your web browser takes howchoo.com and returns the appropriate IP addresses for the web servers the site is hosted on. In the same way, DNS is used to send requests to ad networks to serve their ads.
When a Google ad loads, your web browser is probably loading up requests from domains like googletagmanager.com to serve them correctly. To stop these ads from loading, you need to intercept them and stop them, which is exactly what Pi-hole is designed to do.
Pi-hole acts as a replacement domain name server for your local network. As the DNS server for your devices, any requests for ad networks are sent through Pi-hole first. It checks these against the thousands of domains in its blocklist. If the domain is blocked, the ads are blocked, giving you the ad-free experience you’re probably looking for.
This is handy for devices that can’t easily use standard ad blocking techniques. You can easily block ads in a web browser using an extension, but it’s impossible to do this on a smart TV or games console without using a service like Pi-hole to do it for you.
Pi-hole is ready-to-go with very little configuration after setting it up, but if you do need to customize it, Pi-hole’s web dashboard lets you whitelist or blacklist certain domains, letting you block unusual ad networks or other suspicious websites from loading.
2 – Options for installing Pi-hole
There are two ways you can install Pi-hole on a Raspberry Pi and, indeed, other Linux platforms like Debian and Ubuntu. If you’re already using Raspberry Pi OS (Raspbian) or another Linux distribution, then you can install it using a single-line script from the terminal.
Alternatively, you can use Docker on your Raspberry Pi to set up Pi-hole in an isolated software container. Either option is fine, but Docker requires more extensive configuration (although it does allow you to run it in isolation).
If you want to install Pi-hole, you can use either method using the instructions below.
3 – Option 1: Installing Pi-Hole using the automated installation script
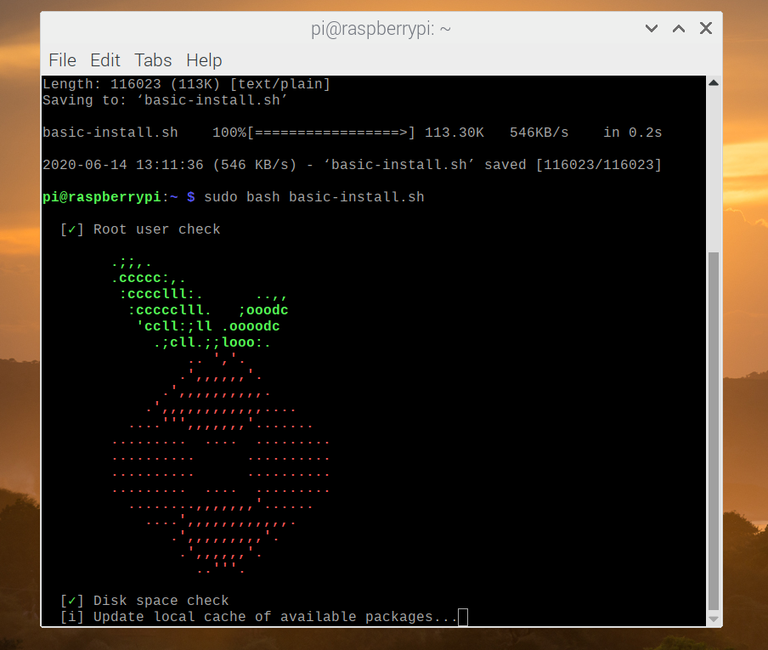
The quickest way to install Pi-hole is to use the developer’s own installation script. You can run the script from the Pi-hole website using curl, or you can download the script first and run it manually.
To run the script automatically, open a terminal window and type:
sudo curl -sSL https://install.pi-hole.net | bash
This will run the automated installation script for Pi-hole, downloading any necessary packages, as well as letting you set Pi-hole’s configuration before the installation completes.
While this should be safe, it’s generally bad practice to run a script from the internet directly using curl, as you can’t review what the script will do before you run it. If you’re worried about doing this, you can download the script first (allowing you to double-check the code), then run it manually.
To do this, open a terminal and type the following:
This will then run the same installation script to install Pi-hole and any additional packages before configuration.
Configuring Pi-hole during installation
At some point during the setup process, the terminal window will switch to the configuration options, where you’ll be asked to confirm various Pi-hole settings, such as your network configuration and preferred logging levels.
Press the enter key to proceed through some of the initial information screens. At the Choose an interface screen, select your Wi-Fi or ethernet connection using your arrow keys, then press space or enter. Use the tab key to switch to the OK option, then hit enter to confirm.
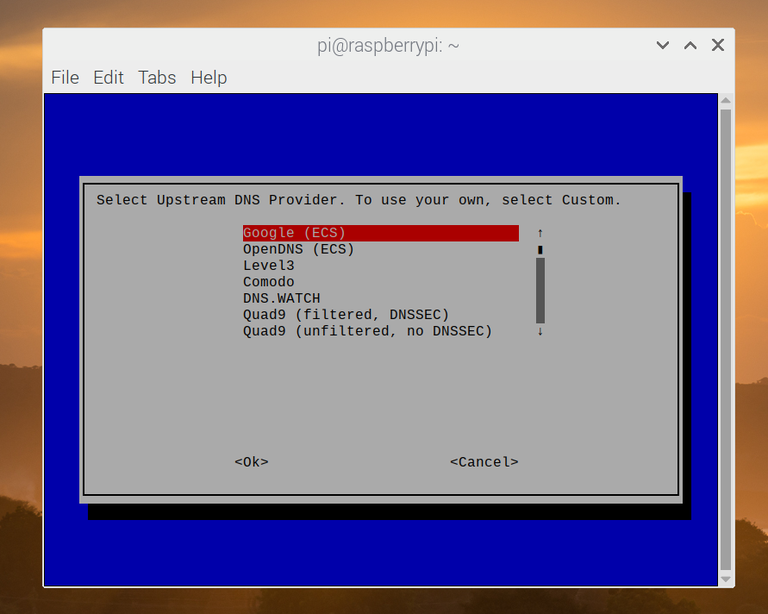
You’ll then be asked what external DNS server you’d like to use. Cloudflare and Google are good, free options here. Select the provider you wish to use using your arrow keys, then hit the enter key to confirm.
At the next stage, you’ll be asked what adblocking lists you wish to use. Pi-hole provides four lists by default, and it’s recommended that you leave all of these selected, but you can enable or disable any of these by selecting them and hitting space on your keyboard. Use the tab key to switch to the OK option, then hit enter to proceed.
By default, Pi-hole will block ads over IPv4 and IPv6 connections. Unless you have any preference to change this, leave the default options selected, press tab to select OK, then hit enter.
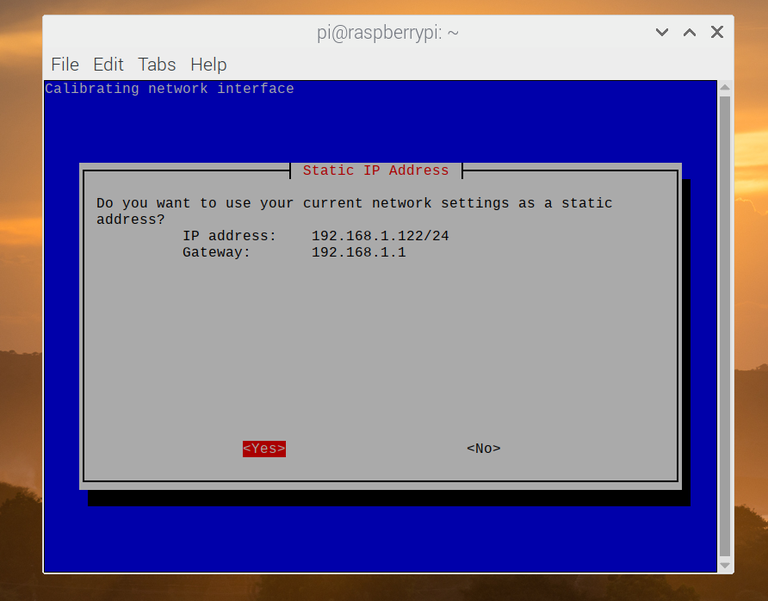
At the next stage, you’ll be asked to confirm whether the IP address and IP gateway (likely to be your local router) shown are correct to use for Pi-hole’s static IP configuration. Hit enter on Yes if this is correct, or No if it isn’t to change your settings.
Pi-hole will warn you about potential IP conflicts. Hit the enter key to accept this warning and proceed.
By default, Pi-hole will come with an admin portal for your web browser that you can use to configure and monitor it. This is selected for installation by default, which is the recommended option here. Hit tab, then enter on the OK option to proceed. You’ll also need to do this at the next stage to confirm the installation of a web server for the admin portal to use.
Pi-hole will ask you if you want to log queries. This is useful, as you’ll be able to see what Pi-hole is blocking and how often those domains are blocked. This is selected by default, so hit tab and enter to confirm.
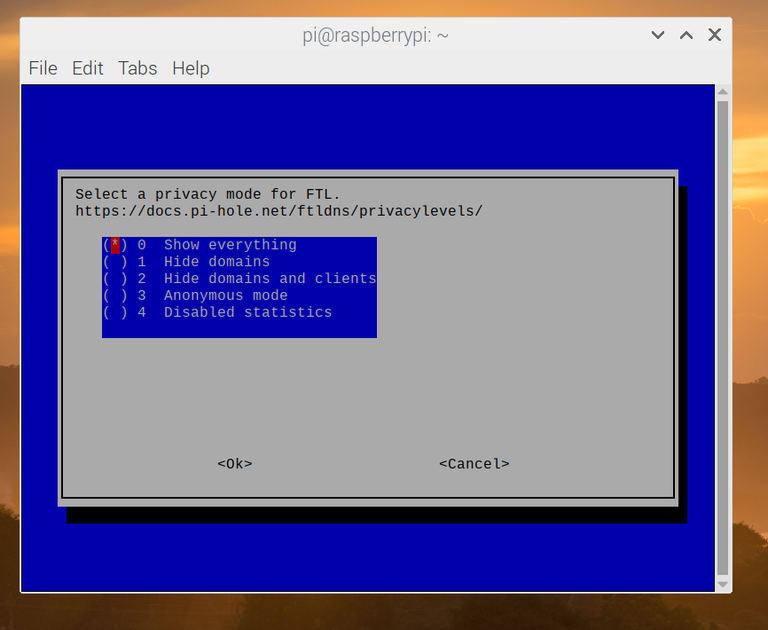
You can select how detailed you’d like your Pi-hole statistics to be. There are five levels, which you can view in detail in Pi-hole’s documentation. The default option is to show everything, so hit tab and enter to confirm if you’re happy with this.
Once you’ve selected your preferred logging level, the Pi-hole installation will continue. A final confirmation message will appear in the terminal once the installation is completed, providing you with information on how to access the web portal, as well as your auto-generated password for signing in. Hit tab, then enter to end the installation at this point.
Important: You won’t be able to recover the auto-generated admin password shown at the end of the installation process. If you forget or lose your password, you’ll need to open a terminal and type sudo pihole -a -p to reset it.
4 – Option 2: Installing Pi-hole as a Docker container
If you prefer, you can choose to use Docker to run Pi-hole in an isolated Docker software container, rather than installing it using the script shown above.
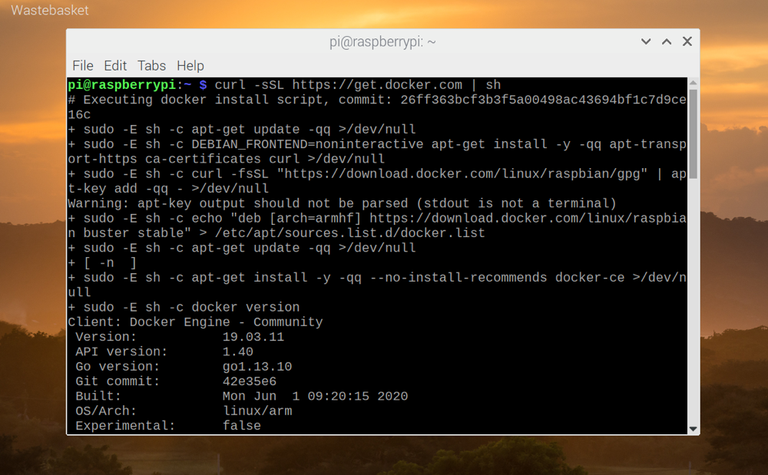
If Docker isn’t installed, you can quickly install it on your Raspberry Pi by opening a terminal window and typing: curl -fsSL https://get.docker.com -o get-docker.sh sh get-docker.sh
Alternatively, you can install Docker by downloading the script first and installing it manually by opening a terminal and typing: wget -O install-docker.sh https://get.docker.com sh install-docker.sh
Once the Docker installation is complete, you’ll need to run the command sudo usermod -aG docker pi to allow Docker to be run by non-root users (such as the default pi user on Raspberry Pi OS).
You’ll also need to type sudo systemctl enable docker to make sure that Docker automatically starts when your Raspberry Pi reboots.
Setting up Pi-hole as a Docker container
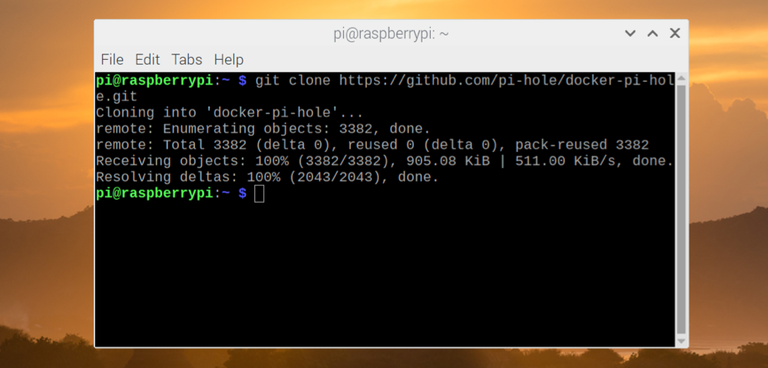
To run Pi-hole in a Docker container, you’ll need to first grab a copy of the Pi-hole Docker installation files by cloning the Pi-hole Github repository (you’ll need Git installed first).
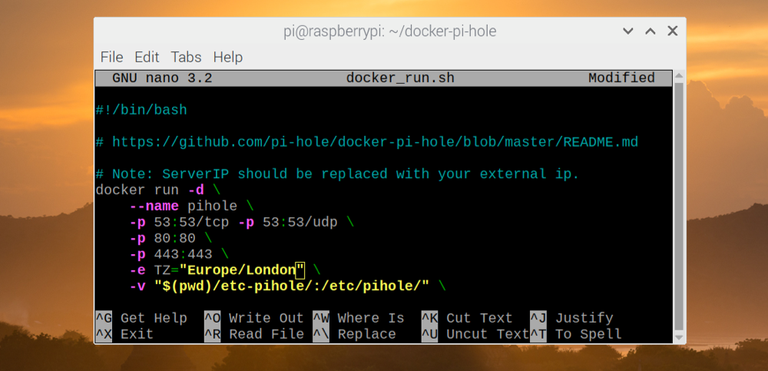
Type the following in a terminal window (or remote SSH connection) to do this: git clone https://github.com/pi-hole/docker-pi-hole.git This will pull the latest files to run Pi-hole as a Docker container from the Pi-hole Github repository. A startup script for your container (docker_run.sh) is available in the cloned Pi-hole folder. You may wish to view and edit some of the settings in this startup script before you run it.
By default, the script will generate an administrator password for Pi-hole automatically, set the default outgoing DNS server for Pihole as 1.1.1.1 or 8.8.8.8, and set other settings such as the timezone Pi-hole uses. For instance, if you don’t live in the United States, you may wish to change the TZ field to match your time zone, using an equivalent tz database timezone value (for instance, Europe/London for the United Kingdom).
You can edit these settings by typing nano docker_run.sh and making changes accordingly.
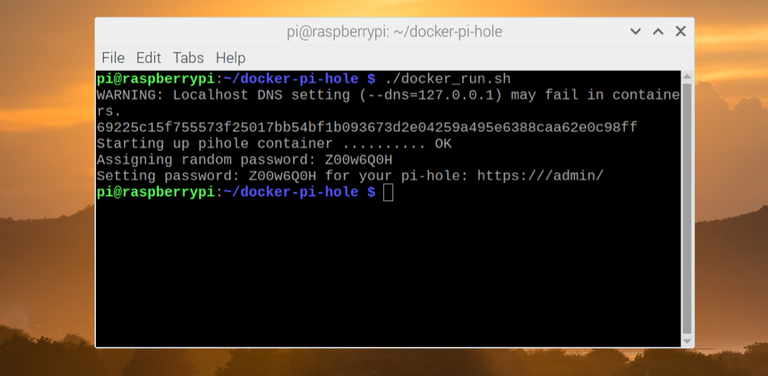
Once you’re ready to run the script, type ./docker_run.sh at the terminal. If the script is successful, Pi-hole should launch inside a new Docker container at this point.
Important: Make sure you note the password that appears in the terminal output after the script successfully runs. This is the password you’ll need to use to be able to configure Pi-hole further.
As the –restart=unless-stopped flag is used in Pi-hole’s Docker startup script, Pi-hole should start automatically if your Raspberry Pi is forced to reboot.
This will only work, however, if you’ve followed the steps above to enable the Docker systemd init script (sudo systemctl enable docker) to ensure that Docker launches automatically on startup.
5 – Configuring individual devices to use Pi-hole
Pi-hole should be running at this point, so the next step for you is to set up your devices to use Pi-hole. Pi-hole can’t block ads across your network by default — you have to set them up to use it by changing your device DNS settings to use your Raspberry Pi’s IP address instead.
You can do this for each individual device manually, or configure your network router to use Pi-hole as the DNS server for your entire network. If you want to configure individual devices to use Pi-hole manually, you’ll need to follow these steps.
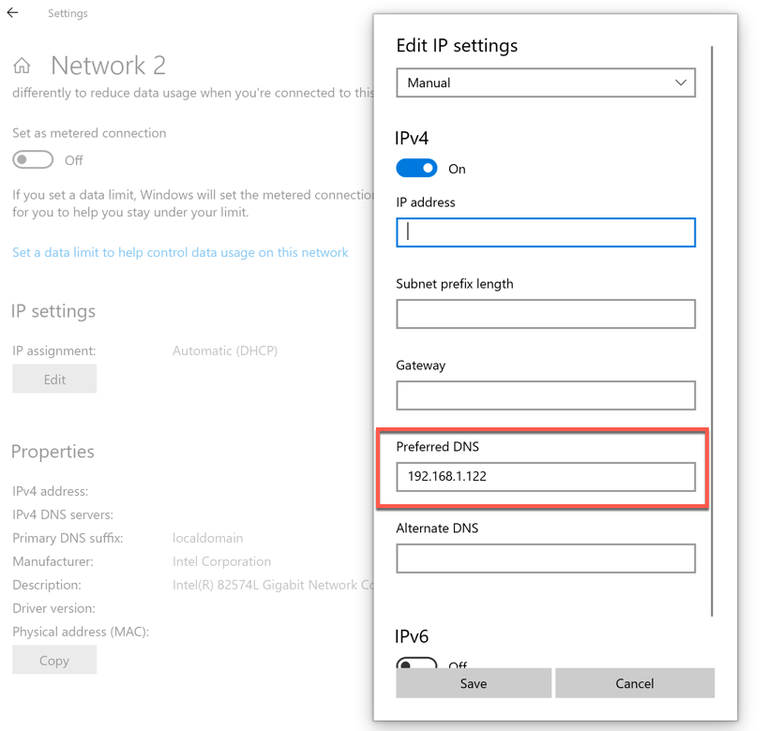
Windows 10: You can access your DNS settings in the Network Connections area of the Windows settings menu. In the Status tab, click Change connection properties, then take note of the information (including your current IP address) under the Properties section. Click Edit under IP settings, set your IP settings to manual, tap the slider next to IPv4, then set your IP address and other details to match the details previously shown under Properties. For the Preferred DNS section, add your Pi-hole IP address before saving.
macOS: You can change DNS settings in macOS by entering System Preferences > Network > Advanced. Under the DNS tab, press the + icon to add your Pi-hole IP address before saving.
iOS and iPadOS: You can access DNS settings by entering Settings > Wi-Fi and tapping the icon next to your Wi-Fi connection. Tap Configure DNS, select Manual, then remove any existing DNS servers from the list. Press Add server, add your Pi-hole IP address, then tap Save to save your settings.
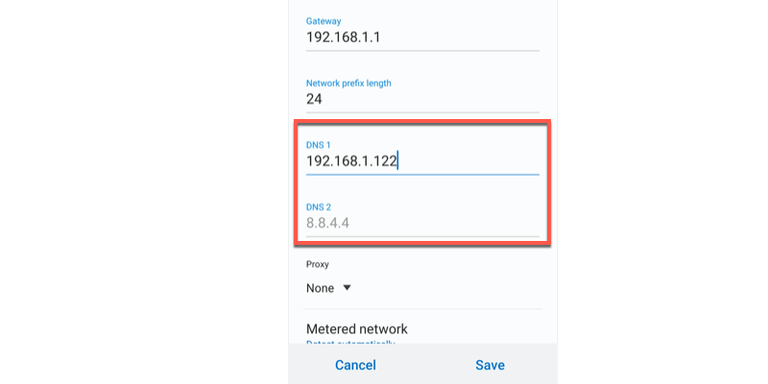
Android: Android users can also change DNS settings by entering your device settings, but these steps will vary significantly depending on your device and Android version. In the Wi-Fi or Connections section (depending on your device version), select your connection and click Advanced (or similar). You may need to set your IP address settings to Static rather than DHCP to allow you to set DNS servers manually. From here, add your Pi-hole IP address as the DNS server before saving.
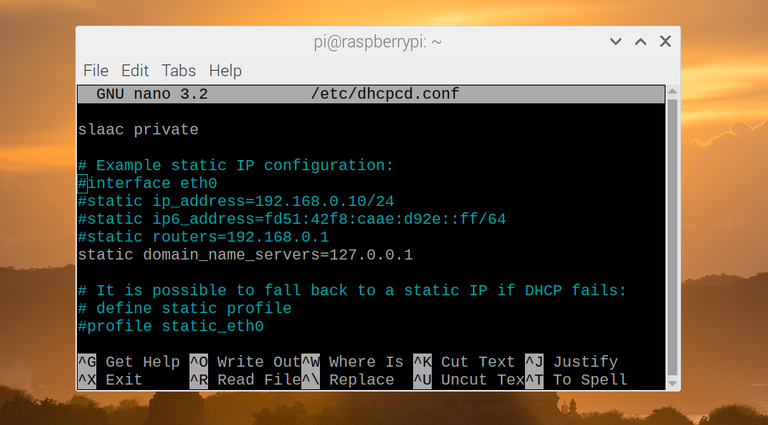
Linux / Raspberry Pi OS: Changing DNS settings on a device running Linux will vary. For Raspberry Pi OS (Raspbian) users, open a terminal window and type sudo nano /etc/dhcpcd.conf, add static domain_name_servers=x.x.x.x (replacing x.x.x.x with the IP address of your Pi-hole server), then press Ctrl + X followed by Y to save. If you want to block ads on the same Raspberry Pi that runs Pi-hole, replace x.x.x.x with 127.0.0.1 instead. You may need to restart your device afterwards.
Other devices: Consult the manual for your device to determine the correct steps to change network settings for other types of devices like a smart TV, or use the steps below to configure your router to use Pi-hole instead.
Once your devices are set to use your Raspberry Pi’s IP address, you should start to see web queries from it in your Pi-hole admin portal. If you want to be sure Pi-hole is blocking ads, try to access a site that you know runs ads, such as Forbes, or open an ad-supported app.
If the ads are blocked, Pi-hole should be working correctly. You may need to restart your device in some instances for the changes to your DNS settings to take effect, however.
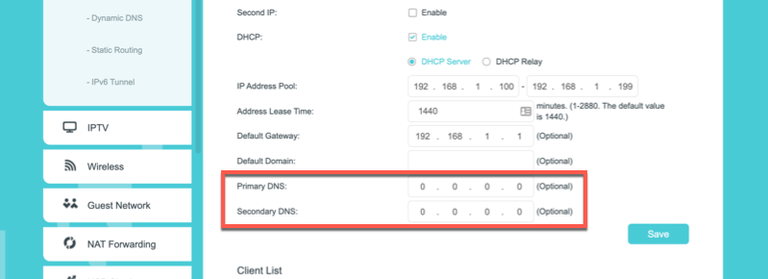
6 – Configuring your router to use Pi-hole as a DNS server for all local network devices
Configuring all of the devices on your local network to use Pi-hole is time consuming and not the most efficient method, especially if you’re looking to use Pi-hole on multiple devices across your network.
If this is the case, it’s better to change your router’s DNS settings to use your Raspberry Pi’s IP address instead. This will mean that all of the devices connected to your local network are protected against ads. This is quicker than the manual method, where you’ll be forced to configure the DNS settings on each device.
Changing your DNS server settings will vary, depending on the make and model of your router. You should be able to find your router’s default IP address (as well as the admin username and password) printed on your router itself, or as part of the supplied packaging.
If not, check your router’s manual and try some common IP addresses such as http://192.168.1.1 or http://192.168.0.1 from a web browser to access your router.
Your router will usually be set to use the DNS servers provided by your internet service provider. Make sure to change your DNS server settings (possibly labelled primary/secondary DNS) to match the IP address of your Raspberry Pi.
This will instruct all connected devices to route all DNS requests through Pi-hole in the first instance. Any blocked requests won’t be processed, while authorized requests will pass through to the third-party internet DNS provider set up in your Pi-hole configuration (such as Cloudflare’s 1.1.1.1 or Google’s 8.8.8.8 public DNS servers).
Your router may require a reboot for any DNS server settings you change to fully take effect across your network.
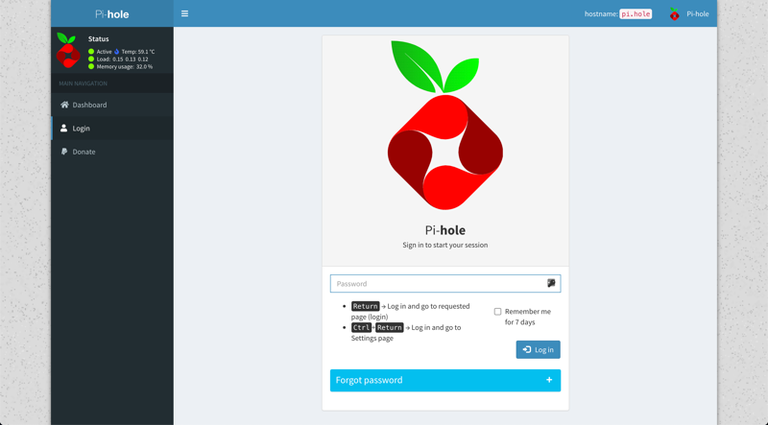
7 – Using the Pi-hole admin portal for additional configuration
Once Pi-hole is running, you can access the Pi-hole admin portal on your local network by typing http://pi.hole/admin from any web browser. If that doesn’t work, you’ll need to find your Raspberry Pi’s IP address and use that instead (for example, http://192.168.1.10/admin).
This should bring up Pi-hole’s admin portal page, where a brief set of statistics is available for users who don’t sign in. Pi-hole is a run-and-forget system that doesn’t require much in the way of additional configuration, but if you do need to change any settings, you’ll need to do it here.
To access the Pi-hole admin portal in full, click Login in the left-hand menu. You’ll need to use the password you created during the Pi-hole installation process to sign in here.
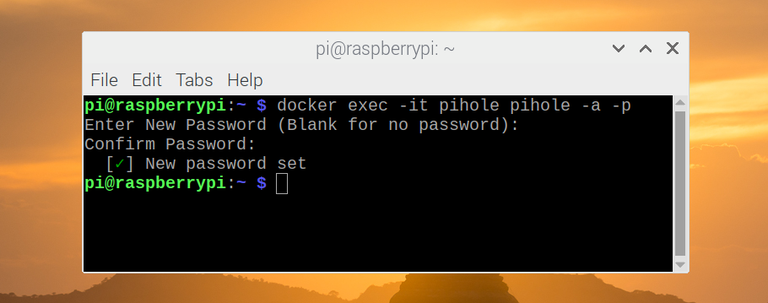
If you forget the Pi-hole administration password at any point, open a terminal window or remote SSH connection and type sudo pihole -a -p (if you’re running Pi-hole directly) or docker exec -it pihole pihole -a -p (if you’re running Pi-hole in a Docker container) to reset it.
Once you’ve signed in, you’ll be able to see a full list of features, statistics, and logs for Pi-hole.
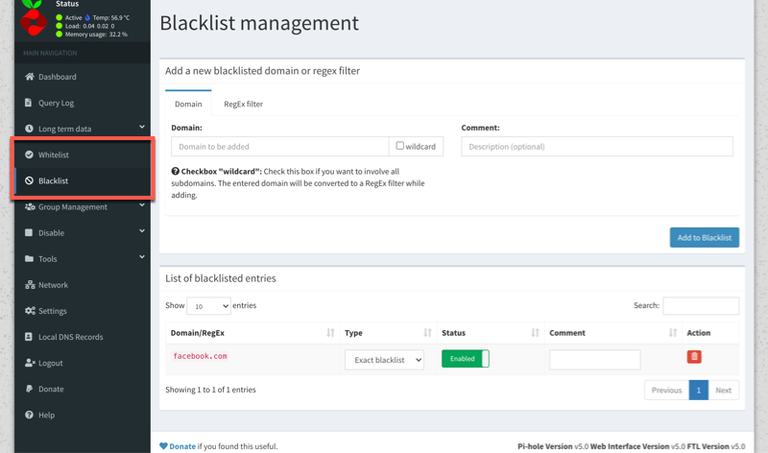
The left-hand menu gives you access to the various sections of the admin portal, including the main Pi-hole log (listed under Query log), the blacklists and whitelists menus, and the main settings area.
Pi-hole uses a selection of online adlists that are maintained and updated regularly by volunteers and businesses to block many of the most common ad networks.
You can view these by clicking Group Management > Adlists in the left-hand menu, where you can disable or remove any of the existing lists, or add your own.
You can also add or delete specific domains to block (or unblock) in the Blacklist and Whitelist menus. Both menus are largely identical — add a domain name and description, then click Add to Blacklist or Add to Whitelist to add it.
For any entries you wish to remove, press the red trash icon next to the item in the List of entries section below.
8 – What to do after configuring Pi-hole
While it’s important to familiarize yourself with Pi-hole’s admin portal should something go wrong, you shouldn’t need to touch it during day-to-day usage. Once your devices are configured, Pi-hole will work in the background to protect and block ad networks and trackers on some or all of your devices, depending on how your devices are configured.
If you’re using Pi-hole in a Docker container, you may be able to use your Raspberry Pi for other projects at the same time, creating a 24/7 server for you to use. For instance, you may decide to create a Raspberry Pi NAS to store your files, or create a Raspberry PI VPN server to stay safe and hide your identity online.
There are several ways to go about running a Minecraft server on the Raspberry Pi. In this guide, I’ll cover how to install Nukkit—a cross-platform Minecraft server that’s super easy to set up on the Raspberry Pi. This server should work with PCs, consoles, and tablets running Minecraft 1.14. I’ll be using a Raspberry Pi
Introducing Howchoo, an enigmatic author whose unique pen name reflects their boundless curiosity and limitless creativity. Mysterious and multifaceted, Howchoo has emerged as a captivating storyteller, leaving readers mesmerized by the uncharted realms they craft with their words.
With an insatiable appetite for knowledge and a love for exploration, Howchoo’s writing transcends conventional genres, blurring the lines between fantasy, science fiction, and the surreal. Their narratives are a kaleidoscope of ideas, weaving together intricate plots, unforgettable characters, and thought-provoking themes that challenge the boundaries of imagination.
In this Howchoo guide, I’ll show you how to build your own NHL scoreboard that automatically displays live game data for your favorite hockey team!
The purpose of this guide is not only to combine hockey and technology, but to teach you how to work with and control LED panels using a Raspberry Pi computer. Armed with this knowledge, you can create all kinds of displays. 🙂
This is a beginner-friendly, mostly plug-and-play project that should take about an hour to complete.
How it works
To make everything work, we’ll connect a small Raspberry Pi computer to a 64×32 LED panel using a small breakout board. (We use the same panel in our Raspberry Pi LED matrix panel guide.)
Then, we’ll use the nhl-led-scoreboard library to automatically retrieve your favorite team’s current and upcoming game data. When a game is in play, it will show the current period, score, game clock, and even an animation when a team scores. Not a hockey fan? There are MLB and Fantasy Football libraries too.
Everything is housed in a 3D-printed enclosure. The enclosure is optional; you can also mount the components directly to the back of the panel or set them behind it. If you don’t have a 3D printer and still want the enclosure, there are other ways to get it printed.
How to Get Things 3D Printed Without a Printer No printer? No problem.
When I took this there was no Lightning game on, so I thought I’d support our Florida brothers.
When your team is playing, the scoreboard automatically displays up-to-the-minute game stats including period, score, and game clock.
2 – Pregame info
On gameday, the scoreboard will show the upcoming matchup as well as the game time. On days when there is no game, a customizable message is shown. In the future, I’d like to modify this to display a clock and local weather data.
3 – Postgame info
The scoreboard even shows post-game data for the previous game.
4 – Gather your materials
For this project, you’ll need a Raspberry Pi, LED panel, and a few other things.
LED panel
I chose the large 64×32 RGB LED matrix from Adafruit. This panel features a 5mm pitch, meaning the LEDs are spaced 5mm apart. You can also use a smaller display; for example, a 64×32 LED panel with a 3mm pitch is physically smaller (and thus has a higher resolution) than one with a 5mm pitch. Adafruit makes 3mm, 4mm, 5mm, and 6mm pitch panels in the 64×32 variant. You’ll also need this amply power supply to run your panel.
If you’d like to save money, you can certainly order a cheaper panel elsewhere but I prefer Adafruit displays because they’re known for quality.
Raspberry Pi
Although any Raspberry Pi model will work, I chose the Raspberry Pi Zero WH since it’s small and inexpensive. If you don’t have a soldering iron, be sure to pick up the Zero W_H_ (With Header), which comes with the header pre-soldered. This RGB matrix bonnet fits onto the Raspberry Pi and allows it to easily control the LED panel.
Housing
I 3D printed a housing for my panel; the housing is totally optional in case you don’t have access to a 3D printer. The panel comes with magnetic feet in case you want to simply stick it somewhere or prop it up on your shelf.
Project cost
The total cost for this project is around $100-125, assuming you use the nice Adafruit panel I did.
Be sure to download the Lite version of Raspbian. The GUI in the “full” version of Raspbian uses too many system resources; we need these precious resources to drive our panel, especially on the tiny Zero W.
Next, set up WiFi and enable SSH. When you’re done, eject the micro SD card from your computer and put it into the Raspberry Pi.
Slide the RGB bonnet onto your Raspberry Pi’s GPIO header. I used a few standoffs from a small kit I bought on Amazon, but these are optional.
Next, connect the gray ribbon cable between the bonnet and the panel’s JIN1 port.
The panel came with a Y-cable with two white connectors on one end and two “pitchfork” connectors on the other. Connect one of the white connectors to the back of the panel. Then, use a small flathead screwdriver to connect:
The red wire’s pitchfork connector to the positive (+) terminal on the bonnet
The black wire’s pitchfork connector to the negative (-) terminal on the bonnet
Finally, connect the power supply to the bonnet. The power supply will power both the Raspberry Pi and LED display. Your Raspberry Pi will now boot.
🛈 If you have a pair of strippers available, I recommend cutting off the pitchfork connectors, twisting each wire, and then inserting each wire into the terminal block instead. This way you don’t have a “live” side of each pitchfork connector sticking out that could short against something. This is optional but recommended.
7 – Install the software
Next, we’ll install the nhl-led-scoreboard library. This library will retrieve game data from the Unofficial NHL API and display it on the screen. A special thanks to riffnshred on GitHub for putting this together (and for approving my pull requests)! 🙂
I’ll outline these instructions briefly below, but since these instructions can change, I recommend reading through and following the instructions in the README file on GitHub to check for changes.
Since the display will show the start time for an upcoming game, you’ll need to change your Pi timezone. Otherwise, the game start time will be based on the timezone where the Raspberry Pi is manufactured (the UK).
You’ll be prompted to restart after saving your configuration changes.
It would be cool to add a potentiometer to the display in the future to adjust brightness on the fly.
The display should now show today’s game data or a message stating there’s no game today. For additional LED panel configuration options, check out the rpi-rgb-led-matrix library that this project uses under the hood.
10 – Optional: Anti-flicker mod
The tiny jumper is soldered between pins 4 and 18.
By default, a bit of flickering can occur due to the way the Pi draws the screen; to prevent this, simply solder a small jumper wire between pins 4 and 18 on the bonnet. This easy mod tells the bonnet to use PWM to draw the display, resulting in 0 flicker.
After doing this, you’ll use this alternate command to launch the script:
Notice that the --led-gpio-mapping flag is now set to adafruit-hat-pwm instead of adafruit-hat.
11 – Start the script at launch
Next, we’ll want to make sure the scoreboard launches automatically when our Pi boots up and our network device is available. I wrote a separate guide on using Raspberry Pi crontab but here’s a recap:
Crontab: How to Run a Simple Command When Your Raspberry Pi Boots A simple method for running commands automatically on boot.
#!/bin/bash
cd /home/pi/nhl-led-scoreboard
n=0
until [ $n -ge 10 ]
do
   python main.py --led-gpio-mapping=adafruit-hat --led-brightness=60 --led-slowdown-gpio=2 && break
   # Uncomment and use this line instead if you did the anti-flicker mod:
   #python main.py --led-gpio-mapping=adafruit-hat-pwm --led-brightness=60 --led-slowdown-gpio=2 && break
   n=$[$n+1]
   sleep 10
done
Then, save and exit by pressing CTRL-X, then Y, and then Enter.
Save and exit. Finally, test your change by rebooting your Pi:
sudo reboot
Your scoreboard should now light up after your Pi boots! If it doesn’t, you can check cron.log for errors by running cat ~/cron.log.
🛈 You can uncomment a line by removing the # at the beginning.
12 – Optional: 3D print the LED panel housing
If you’d like to add a housing to your scoreboard and have access to a 3D printer, print this amazing model. You’ll only need to print the following parts from that model:
raspberry_pi_zero_w_sled_alternate_version.stl
cover_rpi_side.stl
cover_battery_side.stl
p5_panel_frame_rpi_side.stl
p5_panel_frame_battery_side.stl
I printed the housing on my Creality Ender 3. If you’re thinking about getting a 3D printer, I highly recommend it.
Assemble the various panel pieces using M3x8mm bolts and nuts, which you can find on Amazon or at your local hardware store. For detailed assembly instructions, check out this great tutorial written by the model creator.
If the Raspberry Pi sled doesn’t fit your screen, you can use a bit of foam tape to secure the Pi to the back of your panel.
If you used a different-sized LED panel (like a 3mm or 4mm pitch panel), you can search Thingiverse for housings that fit your panel. The overall dimensions of the different “pitch” panels are completely different.
🛈 When searching for models, you might need to search “P3” instead of “3mm pitch”; apparently this is standard terminology. I wasted way too much time searching before figuring that out.
13 – Add a power button
The power button fits perfectly in the optional 3D-printed housing.
I added a power button to shut the Pi down safely and boot it up using this Pi power button guide. This is optional but recommended; you always want to shut the Pi down safely to prevent data corruption.
Follow that guide to add your own power button; since the bonnet covers the Raspberry Pi’s GPIO header, simply solder the wires (or two pins) to the SCL and GND pins on the bonnet instead.
The button itself lives in the opening on the side of the panel housing.
14 – Display it proudly!
This was a very fun, very easy project and a great foray into driving LED panels using a Raspberry Pi. Place your scoreboard on a shelf, give it to a friend, or set it on your desk and never miss another game.
15 – Future plans
There are a lot of possibilities here! This 3D-printed marquee housing was designed by a Cubs fan and uses the MLB-LED-Scoreboard library. Designer foundgum on Thingiverse
There are a few things I have planned in the immediate future:
Real-time clock countdown functionality
One thing this project is missing is a game clock that counts down in real-time; since it retrieves game data every minute or so, it displays the current time remaining in a static format; it would be great to modify the code to count down in seconds until the next retrieval.
It’s important to note this is a new open-source project coded by volunteers; if you’re a developer and want to contribute, I created a GitHub issue for this feature.
Installing MLB scoreboard
Once baseball season starts back up, I plan on installing the MLB-LED-Scoreboard library as well! Then, I’ll use a button to toggle between the different views. But for now, it’s all hockey.
Weather and a clock on off-days
When there’s no game, I’d love to see my local weather; the MLB library has this functionality. It would be cool to show this on the pregame screen as well.
Potentiometer
I’d like to add a potentiometer (knob) to the side of the display to adjust the panel brightness on-the-fly. Maybe even a light sensor. 🙂
Do you love your team so much that you need to block off your schedule during the game? This guide will show you step-by-step how to add your favorite team’s schedule to your Outlook Calendar. 1 – Open Outlook Calendar Log in to your Microsoft Outlook account, and navigate to the Calendar app. (Or click here.)
Introducing Howchoo, an enigmatic author whose unique pen name reflects their boundless curiosity and limitless creativity. Mysterious and multifaceted, Howchoo has emerged as a captivating storyteller, leaving readers mesmerized by the uncharted realms they craft with their words.
With an insatiable appetite for knowledge and a love for exploration, Howchoo’s writing transcends conventional genres, blurring the lines between fantasy, science fiction, and the surreal. Their narratives are a kaleidoscope of ideas, weaving together intricate plots, unforgettable characters, and thought-provoking themes that challenge the boundaries of imagination.
In our yearning for meaning, our enduring quest for connection, we humans often turn to architecture for our release, placing into the buildings around us all our emotional turmoil, hopes, dreams, and beliefs. A temple or a skyscraper can be seen as a reflection of our innermost desires, a monument to our capacity for connection, and our vast imaginations have allowed us to construct works of architecture so complex and awe-inspiring that they serve as art as much, or more, as they serve a functional purpose.
The power of the human imagination is incredible. The great philosopher and historian Yuval Noah Harari wrote, in his book Sapiens, “There are no gods, no nations, no money and no human rights, except in our collective imagination.” The power of human imagination allows us to spend entire generations dedicated to projects that serve some unified purpose, spending our energies and attention in acts of dedication that are glorious and outstanding.
Of all our building efforts, it is perhaps through our various religious feelings that some of the grandest and most gorgeous have come into being. Architectural works that have stood the test of centuries and will stand the test of many more, works that remind all who look upon them (regardless of religion) that our capacity for the construction of grace and beauty at least matches our capacity for dissonance or destruction.
Cathedral, churches, monasteries, temples: what’s the difference?
Churches are places of worship in the Christian religion, with the earliest types of church being “house churches,” which were simple gathering spaces in homes.
Cathedrals are a type of church that contains the “cathedra”, which is Latin for “seat”, of a Christian bishop.
Monasteries are private religious communities designed to provide a spiritual living environment for those who live there. Not Christian in origin, many belief systems incorporate monastic traditions.
Temple is a generic term for a building reserved for spiritual rituals. It may be superseded by a term preferred by a specific religion, such as “church” or “mosque”.
1 – Megiddo Church
Two fish lying side by side, one of the earliest Christian symbols used. Pinterest
Established: 3rd century CE
Location: Legio near Tel Megiddo, Israel
Can I visit?: To some degree. An official archaeological park is planned but not yet built.
In 2005 prisoners in Isreal made a startling discovery. In the ancient city Megiddo, purported site of the biblical Armageddon, and a location that has seen three thousand years of violent conflict, directly underneath one of the country’s maximum-security prisons, is the remains of what might potentially be the oldest Christian church yet discovered in the Holy Land.
A time of persecution
Megiddo Church. Pinterest
In its earliest days, Christianity was heavily and severely persecuted by Rome, and those who wished to practice were forced to do so in secret. Such was apparently the case with this church, which featured an inscribed table that likely served as an altar, and an incredible mosaic on the floor that was apparently constructed using the funds of a Roman officer named Gaianus who donated his money to the cause (many soldiers were secretly Christian).
The mosaic is gorgeous and, instead of a cross, is rendered with two fish lying side by side, one of the earliest Christian symbols used.
2 – Etchmiadzin Cathedral
“The focal point of Armenians everywhere.” Pinterest
Established: 301-313 CE
Location: Etchmiadzin, Armenia
Can I visit?: Absolutely! It’s a massive tourist center, a UNESCO site, and a point of pilgrimage for Christians.
The mother church of the Armenian Apostolic Church, Etchmiadzin Cathedral was the first cathedral built in ancient Armenia and has been considered as the oldest cathedral in the world. Following the adoption of Christianity, the cathedral was built by Gregory the Illuminator, Armenia’s patron saint.
Called “the focal point of Armenians everywhere,” the cathedral has held massive cultural as well as religious importance for the Armenian people. Considering that the Armenian people were one of the first nations to adopt Christianity as the official state religion (the Roman Empire didn’t convert until Constantine’s baptism in 337), it makes sense that some of the oldest churches would be found there.
A deeper and more ancient background
Etchmiadzin Cathedral Pinterest
As far back as Christianity goes for Etchmiadzin, the roots of worship go deeper, and the Etchmiadzin Cathedral actually rests on the ruins of a temple to the goddess Artemis. In fact, the Etchmiadzin Cathedral has been partially destroyed many times in its history, so the current version rests upon a deep sedimentary layer of historical significance.
3 – Hagia Sophia
Hagia Sophia remains the single greatest example of Byzantine architecture in existence. Pinterest
Established: 537 CE
Location: Istanbul, Turkey
Can I visit?: Yes, it’s open as both a mosque and a tourist center, at least for the time being.
Officially known as the Hagia Sophia Holy Grand Mosque, the Hagia Sophia was originally built as the patriarchal cathedral for Constantinople, the capital of the Byzantine Empire. After the Fall of Constantinople in 1453, the cathedral was converted into a mosque by the Ottoman Empire after the initial sack of the historical site by Ottoman forces. Though it enjoyed a brief period as a museum under the secular Turkish Republic, it was controversially re-declared as a mosque quite recently in 2020.
An artistic treasure
Hagia Sophia. Pinterest
Hagia Sophia remains the single greatest example of Byzantine architecture in existence and the complex mathematics required to ensure that the cathedral dome is supported. Using four pendentives (triangular segments of a sphere), the great dome was constructed over the square main building, making it one of the most impressive architectural works of the era.
4 – Basilica of San Lorenzo
For three hundred years, the Basilica served as the official cathedral for all of Florence. Pinterest
Established: 364 CE
Location: Florence
Can I visit?: Absolutely!
The Basilica of San Lorenzo was originally constructed outside of Florence, but was slowly swallowed up by the city’s expansion. For three hundred years, the Basilica served as the official cathedral for all of Florence, and during its reconstruction in the 1500s, it saw the influence of some of the most important architects and artists of the age.
Medici and Michelangelo
Basilica of San Lorenzo. Pinterest
The powerful Medici family, a financial and political dynasty that swayed the course of events in Europe for centuries, claimed the Basilica of San Lorenzo as their parish church. In the early 1500s, Pope Leo X commissioned the brilliant artist Michelangelo to design the interior and exterior façades. While the interior was constructed, the exterior design remained unbuilt, with only a wooden model remaining.
5 – Santa Maria in Trastevere
The first sanctuary in this location was built in 221 by Pope Callixtus I. Pinterest
Established: 221 CE
Location: Rome, Italy
Can I visit?: Yes! It’s a major attraction.
The first sanctuary in this location was built in 221 by Pope Callixtus I, right around the same time that the Roman Emperor Elagabalus was being marked for assassination due to sex scandals and his worship of the Syrian sun god Elagabal. It’s easy to forget how many religions were coexisting in Rome during this period in history!
A site of modern joy
Santa Maria in Trastevere. Pinterest
In 2014, the wedding of Prince Amedeo of Belgium, Archduke of Austria-Este to Elisabetta Rosboch von Wolkenstein took place in Santa Maria in Trastevere in a lavish ceremony that followed a Christian tradition where the wedding should take place in the bride’s hometown.
6 – Cathedral of Trier
The oldest church in Germany, the Cathedral of Trier looks like something from a fairytale. Pinterest
Established: 340 CE
Location: Trier, Germany
Can I visit?: Yes! It’s a major attraction.
The oldest church in Germany, the Cathedral of Trier looks like something from a fairytale. Said to have been originally commissioned by Emperor Constantine the Great on the site of a palace dedicated to his mother, Saint Helen. Though it was sacked and destroyed twice, first by the Franks and later by the Vikings, the cathedral was rebuilt grander than ever, and now holds some of the most important relics of Christiandom.
The relics of the Cathedral of Trier
Cathedral of Trier. Pinterest
Of the relics preserved within the Cathedral of Trier, the Seamless Robe of Jesus and one of the Holy Nails that were used in the crucifixion itself. The robe was supposedly worn by Jesus shortly before or maybe even during his crucifixion, and legend has it that Saint Helena discovered it and bequeathed it to the city of Trier. Another relic is the skull of Saint Helena herself!
7 – St. Peter’s Basilica
Built over a small shrine believed to be the final burial place of the Apostle St. Peter. Pinterest
Established: 333 CE
Location: Vatican City
Can I visit?: Yes! It’s a major attraction.
St. Peter’s Basilica is the largest church in the world by interior measure, at almost 6 total acres, and is considered to be one of the most important holy sites in all of Christianity. The original design for the cathedral was commissioned by Emperor Constantine the Great. Eventually, the church fell into disrepair and was rebuilt in the 1500s. Now, it stands as the largest building in Vatican City and a prominent feature of the Rome skyline.
St. Perter’s is more than just a name
St. Peter’s Basilica. Pinterest
Built over a small shrine believed to be the final burial place of the Apostle St. Peter. His tomb was smashed by Arab invaders during the 9th century, but tradition has retained the importance of this location and a number of other Popes have been interred nearby.
8 – Little Hagia Sophia
An important relic of Byzantine architecture, the church was commissioned in the 6th century. Pinterest
Established: 536 CE
Location: Istanbul, Turkey
Can I visit?: Yes! It’s a major attraction.
An important relic of Byzantine architecture, the church was commissioned in the 6th century by Emperor Justinian and existed as one of the most important centers in Istanbul for centuries, protecting those fleeing from religious persecution, and existing as a monument to Christian worship. In the 16th century, after the Ottoman Empire conquered Constantinople, the church was converted into a mosque and its internal designs were reconfigured to match the Islamic aesthetic, resulting in the destruction of all of the original interior edifice with its marble mosaics.
A dramatic beginning
Little Hagia Sophia. Pinterest
Legend says that Justinian was accused of plotting to overthrow his uncle, Emperor Justin I, and was sentenced to death. However, before this occurred, the Saints Sergius and Bacchus appeared before the emperor and convinced him of his nephew’s innocence. In gratitude, Justinian promised to build a temple in their honor upon ascending to the throne.
9 – Church of the Nativity
In the Christian canon, the church rests over the grotto where Jesus was born. Pinterest
Established: 325 CE
Location: Bethlehem, Palestine
Can I visit?: Yes.
Built during the reign of Constantine the Great, the original basilica was destroyed in the mid-6th century and rebuilt in the Justinian period a few years later. Incredibly, much of the original architecture remains intact from this second building and has been faithfully restored and preserved throughout the centuries.
Ancient origins
Church of the Nativity. Pinterest
In the Christian canon, the church rests over the grotto where Jesus was born. Constantine was attempting to build Christian monuments that connected to the life of Jesus, leading to the first basilica’s construction. However, modern scholarship suggests that a cult to the Roman mythic figure Adonis (formerly the Sumerian god Tammuz) originally claimed the grotto and that it was only later taken over by Christian worshippers.
10 – Dura-Europos Church
The Dura-Europos church is the oldest Christian house church yet discovered. Pinterest
Established: 233-256
Location: Syria
Can I visit?: Sadly, no, but the art found there is preserved at Yale University!
In the earliest days of Christianity, people gathered in “house churches” which were simply private residencies, many converted on the interior to provide dedicated services. This allowed people to gather in safety, since Christianity, and many other cults active during the period, were illegal in the Roman Empire.
The Dura-Europos church is the oldest Christian house church yet discovered. Located in the former fortified city of Dura-Europos in Syria, the site was unearthed in the early part of the 20th century and is remarkable for containing the oldest surviving Christian paintings! These include frescos of Adam and Eve, David and Goliath, but the true treasures are the paintings of “The Good Shepherd,” the “Healing of the paralytic,” and “Christ and Peter walking on the Water,” which are probably the earliest depictions of Jesus Christ to exist.
The cost of conflict
Dura-Europos Church. Pinterest
Between 2011-2015 the terrorist group “ISIS” embarked on a propaganda campaign to recapture their idea of “Islamic history”, which included the destruction of many ancient historical sites and artifacts, including the Dura-Europos church. The structure was heavily damaged, and a nearby ancient synagogue was destroyed. ISIS profited from sales of the artifacts it pillaged, selling them to support its flagging terrorist activities.
Luckily, the frescos from the Dura-Europos church had already been safely removed and ensconced in the Yale University art collection, where they can still be enjoyed today.
11 – Temple of Augustus and Livia
One of the oldest and most impressive religious buildings from ancient times. Canva
Established: 1st Century CE
Location: Vienne, France
Can I visit?: Yes! It’s quite central to the city and remains a major draw for tourism.
One of the oldest and most impressive religious buildings from ancient times, the Temple of Augustus and Livia was dedicated to the deified Roman Imperial couple. A large section of the rear part of the original temple remains intact today, though the rest is a meticulous reconstruction that took almost three decades to complete. Once the seat of political and religious power for the area, it remains central to Vienne, and at night it takes on an otherworldly glow provided by ground lights placed to show off its magnificence.
Preserved by Christianity, restored by revolution
Temple of Augustus and Livia. Pinterest
Sometime during the 5th century CE, the temple was converted into a church, from then on known as the Sainte-Marie-la-Vieille or Notre-Dame-de-la-Vie. The destruction of some parts of the temple followed, as did the addition of interior walls. This led to the accidental preservation of the rest of the original temple structure.
Then, following the French Revolution, the site was secularized, and between 1853 and 1870 was restored to its original glory. Legend has it that Thomas Jefferson passed through during his visit to France in 1784 and fell in love with the style, later ensuring that it would become a foundation for the design of the United States Capitol.
12 – Debre Sina
The State of Eritrea in Eastern Africa boasts one of the oldest monasteries in the world. Pinterest
Established: 4th century CE
Location: Anseba, Eritrea
Can I visit?: Yes, though reaching it is difficult due to poor road conditions. Yearly pilgrimages are a major facet of the region.
The State of Eritrea in Eastern Africa boasts one of the oldest monasteries in the world, dating to the 3rd century CE. Every June, thousands of Christians from the Eritrean Orthodox tradition travel to the remote location in the highlands east of the town of Elabered to camp for a night, sing, chant, and celebrate the Virgin Mary who, legend has it, has a special connection to the area.
A retreat for Saint Mary
Debre Sina. Pinterest
An ancient legend says that Saint Mary, fleeing King Herod of Judea, with her child Jesus in hand, stayed in the caves of Debre Sina for forty days before moving on and that the big rock there was touched by the hand of God afterward, making it a sacred space. Other legends surrounding the rock claim that Saint Mary appeared there in a vision to a group of shepherd girls, and the modern church is built adjacent to this site.
13 – Abu Mena Basilica and Complex
First excavated in 1905, this site is the purported burial ground of Menas of Alexandria. Pinterest
Established: 3rd Century CE
Location: Alexandria, Egypt
Can I visit?: Yes, but for how long? Since it’s on the danger list, there might not be much left of this ancient ruin. A visitor on the World Heritage Site describes it as a bit disappointing considering how deeply in disrepair it is and offers the following advice: “Pro-tip: you don’t have to drive THROUGH the new church area to reach this, and in fact, you don’t want to due to police checkpoints. There is a small paved road turning off right just before the first checkpoint that leads to the old church”.
First excavated in 1905, this site is the purported burial ground of Menas of Alexandria (or Menas of Egypt), a Roman soldier who was martyred for refusing to give up his Christian faith. Though little remains standing today, the base of the buildings are still intact, and archaeologists have uncovered signs of numerous buildings, including a Roman bath, the main basilica church, a smaller church dedicated to Menas’ remains, and several extended living complexes. The site is on the World Heritage Danger list due to poor governmental handling, but plans are in the works to surround the ruins with a protective membrane that will keep them safe from climate and agricultural changes.
Holy ground
Abu Mena Basilica and Complex. Pinterest
According to the tales, a shepherd who later found the site of this burial discovered that the dust of the ground and the nearby water both offered healing for those who were sick and wounded. When word of his ability to heal people spread, Constantine the Great sent his sick daughter there to be healed. She found the body of Menas and, afterward, Constantine ordered that a church be built on the site.
14 – Jubail Church
One of the world’s oldest historical monuments. Pinterest
Established: 4th century CE
Location: Al-Jubail, Saudi Arabia
Can I visit?: No legal entry is permitted, even for scientific study.
Imagine being on a picnic and discovering one of the world’s oldest historical monuments? That’s what happened in 1986 when picnic-goers in Suadi Arabia discovered the ruins of the church near the city of Jubail while getting a truck tire free from a sandbank.
Will the desert be victorious?
Jubail Church. Pinterest
Since its discovery the government of Saudi Arabia has done little in the way of protecting the ruins, providing only a meager (and easily penetrated, according to some online commentators) wire fence, which only went up after continued vandalism put the ruins at serious risk. Tourists are not allowed to visit, either, but more interesting is that the government has barred access to archaeologists who would be interested in studying the ruins.
15 – Cathedral of Saint Domnius
The cathedral was originally built as a mausoleum for the Roman Emperor Diocletian. Canva
Established: 3rd century CE
Location: Split, Croatia
Can I visit?: Yes! It’s a popular location for visiting tourists.
The oldest Catholic cathedral and second oldest cathedral used by any Christian denomination, Saint Domnius in Croatia is a wonder of the ages. Built near the end of the 3rd century, the original building remains intact today, serving function with very little alteration save for the addition of a late bell tower and some minor restructuring in the 17th century. A number of valuable relics and Christian artistic works reside there today.
Turnabout is fair play
Cathedral of Saint Domnius. Pinterest
The cathedral was originally built as a mausoleum for the Roman Emperor Diocletian. Diocletian heavily persecuted Christians during his reign. Saint Domnius was the Bishop of Salona and was beheaded in those same persecutions. It seems somehow fitting that the cathedral dedicated to his name should be built on the resting place of the Emperor who had him killed.
Introducing Howchoo, an enigmatic author whose unique pen name reflects their boundless curiosity and limitless creativity. Mysterious and multifaceted, Howchoo has emerged as a captivating storyteller, leaving readers mesmerized by the uncharted realms they craft with their words.
With an insatiable appetite for knowledge and a love for exploration, Howchoo’s writing transcends conventional genres, blurring the lines between fantasy, science fiction, and the surreal. Their narratives are a kaleidoscope of ideas, weaving together intricate plots, unforgettable characters, and thought-provoking themes that challenge the boundaries of imagination.