Do you work in Clip Studio Paint? Are you feeling some artblock? Do you want to expand your toolkit and/or experiment with your art?
Clip Studio Paint’s Assets portal is the best place to go! CSP users upload tons of downloadable assets, including many different brushes to work with! Whenever I’m feeling a bit in an art rut, I like to play with new brushes. I find that being able to experiment with new tools can sometimes lead to new inspiration. CSP Assets has a range of tools and materials, costing from free to requiring in-application currency. This article will focus on the free tools since there are plenty of great ones that you can download! If you want to learn how to download and install new assets, read this article first!
Downloading and Adding Assets in Clip Studio Paint
Now, onto my top ten favorite free brushes in Clip Studio Paint!
1 – Good pen (いいろペン)
Sometimes, what you get is exactly what it says on the tin. Japanese user いいよいいよ (allgood) created the self-named Good Pen (いいろペン), which is highly appropriate. This is genuinely one of the best lineart pens I’ve come across on CSP. It has that traditional manga-esque ink style to it, a thin grittiness, and is very responsive when it comes to pen pressure. Nine times out of ten, I’m using this pen to ink my lineart. I cannot recommend this one enough.
2 – Legend Sai Pen (PC version)
If you’re like me and are someone who moved to CSP from PaintToolSAI, then this is the brush for you! One of the reasons I frequented PaintToolSAI over Photoshop was because the brushes felt more natural and blended easier in PaintToolSAI. If you’re a SAI user looking for something familiar, then this brush is as close as you can get. CSP user Okanu created this brush (and an iPad version!) to have the same feel and texture of the original PaintToolSAI brush. I did find that the initial download felt too light and airy for me (which is akin to SAI’s style), so I upped the opacity and paint thickness to 100%. It still has that SAI smoothness, and works just fine even with the settings tweaked.
3 – DAE Pen 12345 Set
If you’re looking for more options in terms of lineart, CSP user 대 (dae) has a full set of lineart pens. When you download this asset, you get five free pens (I know, I’m cheating the whole ‘top ten’ thing)! Dae’s pens range from varied line thickness to a smoother, lighter texture. Having a full set can be beneficial if you’re looking to vary up the lines or are illustrating a piece entirely by inking. Dae also has several other sets, such as a sketch and paint set, so definitely check those out too!
4 – Lineart Pencil
This lineart pencil by Escente has a bit more grit than some of the lineart brushes listed so far. It definitely airs more on the ‘pencil’ side and has great sensitivity, allowing the artist to shade more effectively. It takes a bit of practice using, but it feels really nice to draw and sketch with.
5 – Qamala’s Graphic Marker
This marker truly feels like a graphic marker! It’s inky, has a flatter head, and is perfect for shading. If you want to use it for some chunky lineart, I suggest following Qamala’s tips regarding turning down the opacity and/or duplicating the inking layer.
6 – Illustrator Pen
Ranked #2 on CSP Asset’s popular search under free brushes, Imo86’s Illustrator Pen is a great starter tool for both lineart and shading. It’s more akin to a modern brush pen with just enough tooth to vary your lines.
7 – Watercolor marker and texture set
Okay, so this is another cheat on the top ten rule, but this watercolor marker and texture set by CSP user ×ェ× is absolutely gorgeous. Not only do you get thirteen brushes ranging from watercolor markers to blending brushes, you also get three texture and layer sets and an additional three tools, including a water stain brush. Using this set effectively requires practice and learning to layer the textures properly, but the end result looks like a watercolor painting on watercolor paper.
8 – Color Ink Wind Brush
If the last set seems a bit too complicated to start out with, try 摩耶薫子 (Mayakaoruko)’s Color Ink Wind Brush instead. This brush feels like a cross between a watercolor brush and painting with ink. It has a really nice texture to it already, and is a simple tool for creating a piece with a more watercolor or brushed ink look.
9 – Color Changing Brush!
This brush slightly changes the tone of whatever color you’re using. It’s super fun! This can be helpful if you have a hard time picking out colors or shades within the same color family. It feels a bit like working with oils or acrylics. If you’re looking to craft a piece with a more painterly feel, try PokiHan’s brush out!
10 – Copic Texture Brush
Have you ever worked with copic markers? Then, this copic texture brush is a great digital option! CSP user AcidKeyLime created this brush to not only imitate the texture of a copic marker but also the intensity of one. AcidKeyLime recommends building up the saturation for darker colors, just like using real copic markers! See further notes on this brush on AcidKeyLime’s page.
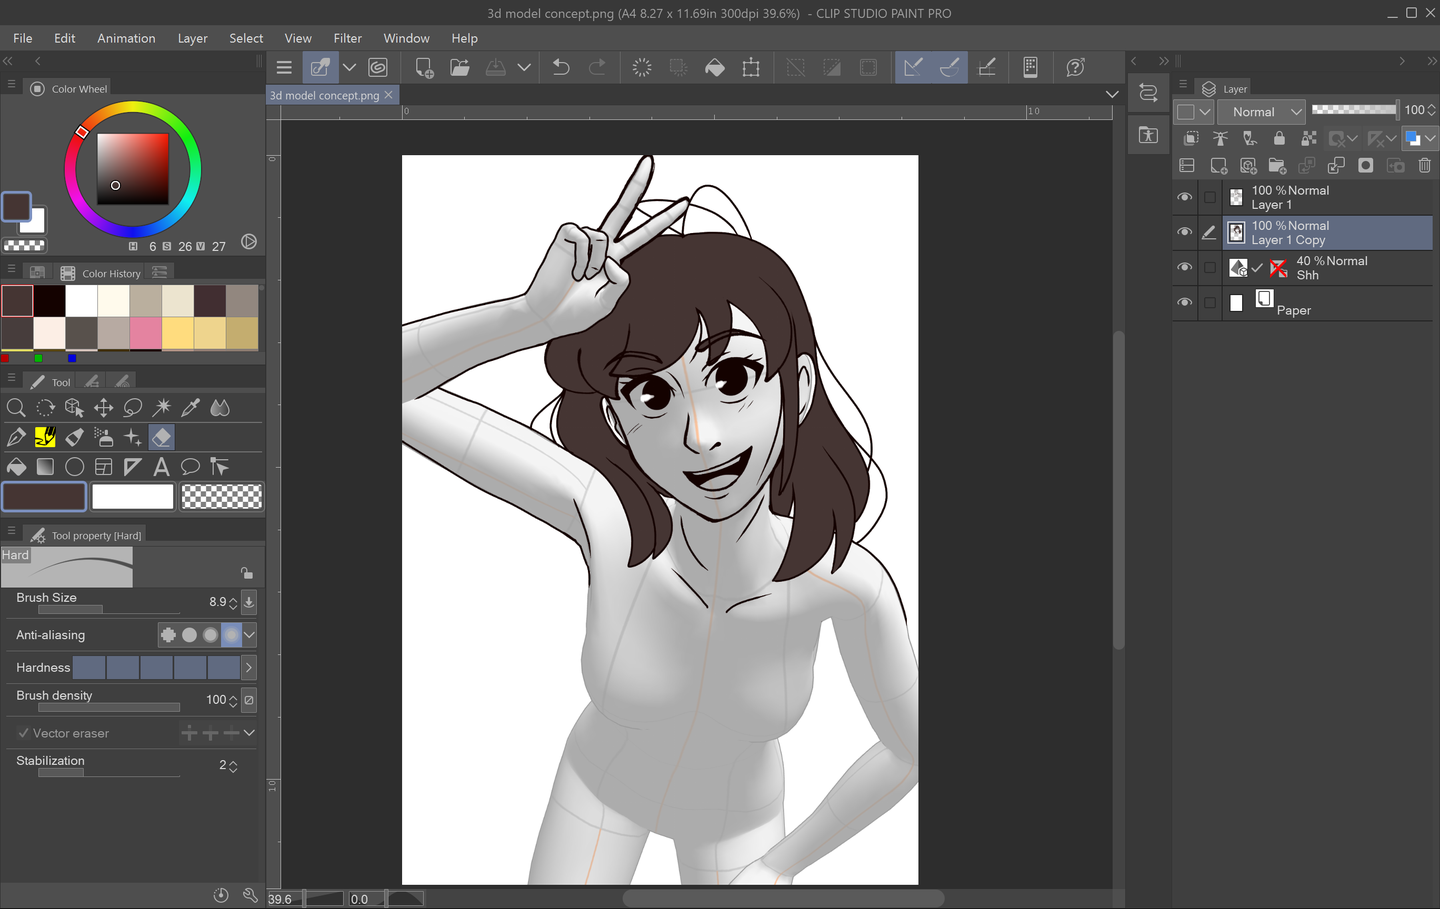
Have you ever struggled with dynamic poses or trying to find a precise reference photo? Having good references is an important part of the prep process when it comes to drawing. Traditionally, many art classes have students practice figure and anatomy drawing by studying a real life model in class. Thankfully, now, there are other ways to
Introducing Howchoo, an enigmatic author whose unique pen name reflects their boundless curiosity and limitless creativity. Mysterious and multifaceted, Howchoo has emerged as a captivating storyteller, leaving readers mesmerized by the uncharted realms they craft with their words.
With an insatiable appetite for knowledge and a love for exploration, Howchoo’s writing transcends conventional genres, blurring the lines between fantasy, science fiction, and the surreal. Their narratives are a kaleidoscope of ideas, weaving together intricate plots, unforgettable characters, and thought-provoking themes that challenge the boundaries of imagination.
If you’re like me and check cryptocurrency prices throughout the day, every day, then you’d probably benefit from a dedicated cryptocurrency price ticker. This will save you from having to pull out your phone to check prices on Ifttt, which always leads to undesired distractions. Plus it’s just awesome.
This project uses a Raspberry Pi Zero WH (wireless, with pre-soldered headers), an LED Matrix Panel, and RGB Matrix Bonnet, and a few miscellaneous cables that I’ll link to in the Tools and Materials section of this guide. Altogether this project costs just over $100, but you can definitely take some steps to cut costs. Time-wise it took me about 10 hours, but since I’ve done the leg work and written the software, it should only take you about an hour to assemble and configure (minus the time to print the case, if you choose to do so).
In this guide, you’ll learn how to set up the LED panel, install the crypto-ticker library, and configure it to show the cryptocurrencies you’re tracking. Let’s get started!
1 – Install Raspberry Pi OS
The first step of every great project is to install Raspberry Pi OS. Fortunately, we’ve written a guide that shows you how to install Raspberry Pi OS on your Raspberry Pi. Follow the steps to flash Raspberry Pi OS on your micro SD card, then jump back to this guide to continue.
Refer to this guide if you need help setting up the LED panel hardware. Since we’re going to use Docker to run the application, you won’t need to install the dependencies yourself. So please use the above guide to get your hardware set up only.
What you need
For this step, you’ll need the LED Panel, the RGB Matrix Bonnet, and the Pi Zero WH.
This is one area where you can save a little bit of money. We referred you to a reliable panel made by Adafruit. There are cheaper alternatives on Amazon if you’re willing to experiment.
Optional case
Keep in mind that the 3D-printed case is optional. If you’ve got a 3D printer and want to give it a shot, great! It will certainly make the project look more professional.
3 – (Optional) Add a power button
Since the Raspberry Pi doesn’t ship with a physical power button, you may want to add your own. This isn’t required, but it is a good (and safe) way to shut down your Pi when you’re not using it (like if your spouse gets tired of the Bitcoin price glowing at night).
We’ve written a solid guide that shows you how to add a power button to your Raspberry Pi. I’m linking to the guide here because we need to do some work before wrapping up the hardware portion of this guide.
If you’re not going to add the power button, skip ahead to the next step.
Solder male header pins
The RGB Matrix Bonnet attaches to the entire GPIO header on the Pi, but it does expose some GPIO holes that you can solder pins or wires to. In this case, you only need to solder pins to the SCL and GND holes, but for simplicity, I soldered a 2×2 pin square that covers both of the pins I need (see the image below).
Drill a hole in the case
If you’re not using a case, you can skip this piece and just let the button dangle! But if you’re using the case we recommended, you’ll need to drill a 1/2″ hole to attach the power button. Again see the image for details.
The location of the button doesn’t matter as long as you’ve got male-to-female jumper cables to extend the leads to the Pi. I put my power button on the Pi-side at the very top.
It’s worth noting at this point that the power button we sell does not fit in the hole that the case provides. If you’d like to buy a smaller button, you can skip drilling the hole. But I do recommend using the power button we sell because it comes from a reputable source and you get to support your favorite DIY site 🙂
Connect to the leads to the bonnet
When you’re ready to close up the case, attach the leads (or the jumper wires) from the button to the SCL and GND pins on the bonnet.
4 – Secure the case
If you’re using the case, now is the time to secure it. To do so, you’ll need to place the panel face down. Then drop two M3 nuts into the brackets on each side of the panel.
Now place the case on top of the panel, and use the M3 screws to secure it.
5 – SSH into your Pi
Now it’s time to log in to your Pi and install the software. To begin, you’ll need to open your Terminal application and SSH into your Raspberry Pi.
If you’ve got multiple Pi’s on your network, or the hostname doesn’t work for some reason, you’ll need to find your Raspberry Pi’s IP address and use it instead.
# Install docker
curl -sSL https://get.docker.com | sh
# Add the pi user to the docker group (so you don't have to use root to use docker)
sudo usermod -aG docker pi
# Install docker-compose
sudo pip3 -v install docker-compose
Why Docker?
Docker allows us to run our application as a software container. For the purpose of this project, it allows us to define all of our dependencies in a Dockerfile and build the application as an image. This saves you from having to run a bunch of commands to install packages directly (among other advantages).
7 – Clone the crypto-ticker repository
Git should already be installed on your Raspberry Pi, but if it’s not you can install it using apt-get install git.
Clone the crypto-ticker repository with the following command:
To run the application, you’ll need to add your custom settings.env file. This file will be mounted onto the running container and provide the application with any settings you wish to provide.
You’ll need to cd into the crypto-ticker directory:
cd crypto-ticker
Then use your favorite text editor to create the settings.env and add any of the following settings:
Name
Default
Description
SYMBOLS
btc,eth
The asset symbols you want to track.
API
coingecko
The API you want to use to fetch price data. Currently supported APIs are “coingecko” and “coinmarketcap”.
REFRESH_RATE
300
How often to refresh price data, in seconds.
SLEEP
3
How long each asset price displays before rotating, in seconds.
CMC_API_KEY
The CoinMarketCap API key, required if you specified API=coinmarketcap.
SANDBOX
Used for CoinMarketCap only. Set SANDBOX=false if you’re developing and want to use the sandbox API.
Example:
SYMBOLS=btc,eth,ltc,xrp
API=coingecko
9 – Run docker-compose up
With your settings.env file in place, you’re ready to start the application. Run the following:
docker-compose up -d
This command will take a few minutes because it needs to read from docker-compose.yml, build the image, install the dependencies, and start the application.
It’s worth noting that the ticker service in the docker-compose file specifies that we want to restart the container “always”. This means that if the container dies, it will be restarted automatically. It also means that when the machine restarts, the container will start up as well. This is an easy way to run the crypto-ticker application on boot.
10 – Enjoy your work!
The application takes a few seconds to get started, but once it does you should see your crypto prices flash before your very eyes. The panel will scroll through the crypto symbols you specified in your settings.env file, and it will update prices every five minutes.
Attention developers
If you’re a software developer and want to contribute to this project, I’d be happy to have you participate. Feel free to fork the repository and submit a pull request.
Here are some ideas for improvements:
Add cryptocurrency icons to the display
Add a “Loading” screen when the Pi is booting
Add some animation to transition between screens, maybe even allow the user to specify the transition
Share and comment
If you like this project, please share it on Facebook and Twitter. If you have any questions or feedback, feel free to leave a comment below.
11 – Troubleshooting
This project is new and there’s still work to be done. With that said, you might run into errors that aren’t properly handled. If this happens, I recommend the following.
Many of these steps should be performed from the crypto-ticker directory on the Pi. So perform the following in advance, when required:
ssh pi@
cd crypto-ticker
Check the logs
Use the docker-compose command to check the logs for the ticker service:
docker-compose logs ticker
If there was an error in the program, the exception should be printed out here.
Restart the ticker
As a quick fix, you might have luck just restarting the ticker. To do so, you can use the docker-compose restart command:
docker-compose restart ticker
Pull the latest code
Over time, I do try to fix bugs and make the error handling more robust. To pull the latest code, you can use the following:
git pull origin master
Then you’ll want to rebuild and take the application back up, like this:
docker-compose down
docker-compose up --build
Create an issue
If you run into issues that can’t be resolved, feel free to submit an issue here.
You can also hit me up on Twitter if you have questions.
There are several ways to go about running a Minecraft server on the Raspberry Pi. In this guide, I’ll cover how to install Nukkit—a cross-platform Minecraft server that’s super easy to set up on the Raspberry Pi. This server should work with PCs, consoles, and tablets running Minecraft 1.14. I’ll be using a Raspberry Pi
Introducing Howchoo, an enigmatic author whose unique pen name reflects their boundless curiosity and limitless creativity. Mysterious and multifaceted, Howchoo has emerged as a captivating storyteller, leaving readers mesmerized by the uncharted realms they craft with their words.
With an insatiable appetite for knowledge and a love for exploration, Howchoo’s writing transcends conventional genres, blurring the lines between fantasy, science fiction, and the surreal. Their narratives are a kaleidoscope of ideas, weaving together intricate plots, unforgettable characters, and thought-provoking themes that challenge the boundaries of imagination.
OctoPrint provides features and tools that help optimize and control your 3D printer. With OctoPrint, you can control your printer remotely, send gcode files to print, and even monitor the progress with a camera.
2 – What is OctoPi?
OctoPi is the name of an OctoPrint image created for the Raspberry Pi. The image is built on top of Raspberry Pi OS (formerly Raspbian) and comes with OctoPrint pre-installed. OctoPi provides tools to control your 3D printer remotely, send new files to print, and more.
In a nutshell, it removes much of the manual work by packaging up OctoPrint into an easy-to-deploy package.
You can find more details and official download instructions on the OctoPrint website.
3 – How do I access OctoPrint remotely?
The Spaghetti Detective plugin allows you to access your OctoPrint server over the internet. You can connect to OctoPrint using your computer or phone. The plugin is compatible with OctoPi builds. To get started, visit our guide on how to access OctoPrint remotely.
How to Access OctoPrint Remotely With the Spaghetti Detective Access OctoPrint from anywhere with this OctoPrint Anywhere replacement.
4 – How do I log into OctoPrint?
OctoPrint is accessed via your favorite web browser. There are two ways to navigate to your OctoPrint server. The default login address is:
http://octopi.local
If that doesn’t work, you can try to access it using the IP address of the OctoPrint server. Enter the following into a browser, replacing the IP address with the proper one for your Raspberry Pi.
OctoPrint can be installed on desktop clients but is most commonly installed on a Raspberry Pi using OctoPi. Check out our guide to set up OctoPrint on a Raspberry Pi. The process is like flashing any other SD card for the Pi.
You can find desktop client instructions on the official OctoPrint download page. Supported systems include Windows, Linux, and Mac.
6 – How do I use OctoPrint?
First and foremost, you’ll need a Raspberry Pi with OctoPi installed and connected to your 3D printer. This is the most common OctoPrint setup. Check out our OctoPi setup guide to control your 3D printer via Raspberry Pi and OctoPrint.
OctoPrint is accessed via web browser. Navigate to octoprint.local while on the same network. Once you’ve logged in, use the navigational menu to choose the OctoPrint features you need. You can send gcodes directly to the 3D printer from your PC. Queue up a list of things you want to print and edit that list through OctoPrint. Once a print job has started, you can watch the progress using the live camera feed.
For more details on OctoPrint and its full capability, visit this official OctoPrint documentation.
7 – What do I need for OctoPrint?
To use OctoPrint, you’ll need a 3d printer. The server needs to be installed on a computer, often Raspberry Pi. You’ll need a 4GB minimum SD card for the installation.
3D Printer
Raspberry Pi / Computer
4GB SD card
Network Connection
8 – Which Raspberry Pi is best for OctoPrint?
OctoPi can be installed onto any Raspberry Pi. However, the recommended model is the Raspberry Pi 3 B+. While OctoPrint can run on the Raspberry Pi Zero W, it isn’t recommended due to significant performance issues. If you aren’t sure about the compatibility of your current Pi, try installing OctoPi for a test run.
9 – Can I run two printers with OctoPrint?
You can only run one printer at a time with OctoPrint. Running multiple printers at the same time isn’t officially supported and would require running multiple instances of OctoPrint on the Pi.
You can, however, control multiple printers with OctoPrint — just not at the same time. When one print finishes, select the printer you want to use and start printing!
10 – How do I update the OctoPrint OS?
OctoPrint is updated from within the browser window. It’s always best to back up your current server before starting the update. You can find more details on this process using our guide on how to update OctoPrint and OctoPi.
The OctoPi image is under 1GB, but you need some wiggle room to use the software. It’s recommended to use a 4GB card minimum. The bigger the card, the more storage you can use for print files. I’m sure you know how big some gcode files can get!
12 – How do I connect a camera to OctoPrint?
Connect your camera to the Raspberry Pi. USB cameras can be connected using the USB ports on the Raspberry Pi. Most USB cameras are automatically detected by OctoPrint and work immediately. The official Raspberry Pi camera can be connected to the camera port on the Raspberry Pi.
Once your camera is connected, you can access the video feed under the Control tab. Adjust camera settings under Settings > Webcam. You can use multiple cameras using the MultiCam plugin. If you’ve never set up a plugin for OctoPrint before, check out our guide on how to install OctoPrint plugins.
You can use almost any USB camera with OctoPrint, including webcams. You can also use the official Raspberry Pi camera which connects directly to the Raspberry Pi. Although, we do recommend this long ribbon cable to give your camera additional slack. The camera is automatically detected by OctoPi and can be accessed in the OctoPrint browser interface.
OctoPrint Anywhere is a plugin for OctoPrint servers. It gives you the ability to monitor your 3D printer from any place that has an internet connection. It can be accessed via a computer, tablet, and even phone. The plugin is easy to install and is part of the approved plugins list.
While you can open a port on your own router to run your own server, it’s often more secure to route through OctoPrint Anywhere’s servers. Your first printer is completely free. For additional printers, you can find the latest pricing information on the OctoPrint Anywhere website.
Note: OctoPrint Anywhere is being deprecated and replaced by the developer with a new service called The Spaghetti Detective.
How to Access OctoPrint Remotely With the Spaghetti Detective Access OctoPrint from anywhere with this OctoPrint Anywhere replacement.
16 – How do I set up the OctoPrint Anywhere plugin?
OctoPrint Anywhere can be installed from the built-in plugin manager. You’ll first need to access the web interface for your OctoPrint server. Open the plugin manager and search for OctoPrint Anywhere. Visit our OctoPrint Anywhere set up guide for more details and thorough instructions.
Note: OctoPrint Anywhere is being deprecated and replaced by the developer with a new service called The Spaghetti Detective.
How to Access OctoPrint Remotely With the Spaghetti Detective Access OctoPrint from anywhere with this OctoPrint Anywhere replacement.
17 – Which printers does OctoPrint support?
OctoPrint works on many commercial 3D printers. This is by no means a complete list, but it does give you an idea of how many machines work with OctoPrint. Some printers won’t be able to use all of the OctoPrint functions and some will only work with specific settings in place. The best way to see if your printer will work is to check the OctoPrint supported printers list and check for others online who use the same printer as you.
There are several ways to go about running a Minecraft server on the Raspberry Pi. In this guide, I’ll cover how to install Nukkit—a cross-platform Minecraft server that’s super easy to set up on the Raspberry Pi. This server should work with PCs, consoles, and tablets running Minecraft 1.14. I’ll be using a Raspberry Pi
Introducing Howchoo, an enigmatic author whose unique pen name reflects their boundless curiosity and limitless creativity. Mysterious and multifaceted, Howchoo has emerged as a captivating storyteller, leaving readers mesmerized by the uncharted realms they craft with their words.
With an insatiable appetite for knowledge and a love for exploration, Howchoo’s writing transcends conventional genres, blurring the lines between fantasy, science fiction, and the surreal. Their narratives are a kaleidoscope of ideas, weaving together intricate plots, unforgettable characters, and thought-provoking themes that challenge the boundaries of imagination.
This guide will show you how to add a touchscreen to any 3D printer for use with OctoPrint, a popular application for controlling your printer.
A touchscreen will allow you to manage your prints without needing to open up your computer or phone. As a bonus, this project will also make OctoPrint responsive (i.e. mobile-friendly), making things even easier to do from your phone. If you need help selecting a touchscreen, check out our list of the best touchscreens for the Raspberry Pi for inspiration.
I also made an OctoPrint touchscreen video version of this guide — check it out and then read on for the full guide below!
1 – Final photo
Just as the prophecy prophecized, here’s a final photo of my setup. I chose a touchscreen housing that mounts directly to my printer.
2 – Choose your touchscreen
Adafruit
Any touchscreen that will work for the Raspberry Pi will work with OctoPrint, but some are easier to work with than others.
Here are some considerations when choosing a touchscreen:
Size and connectivity
I recommend choosing a small screen that connects directly to your Raspberry Pi’s GPIO header. You don’t need a large screen since the OctoPrint TouchUI plugin we’ll be using is designed for very small screens. Additionally, we’ll still be uploading new prints from our computer; this screen will primarily be used to start and pause prints, control extruder temps, display print status, etc.
I used this 3.5″ screen from Adafruit; if you prefer a larger screen, the official Raspberry Pi 7″ screen would work great too. Some larger displays require a separate HDMI and USB connection which makes configuration and setup more difficult.
Cost
The Adafruit touchscreen I used costs $45; this is slightly more than other screens, but the benefit is the quality and ease-of-use Adafruit is known for. You can find cheaper, generic 3.5″ touchscreens in the $30 range on Amazon, but configuring the screen may be more difficult—and many require the use of a stylus.
3 – Print a touchscreen housing
You’ll need to print a case for your touchscreen. In general, there are a few different types of 3D-printable touchscreen housings:
Touchscreen housings that mount to the printer
Freestanding (tabletop) touchscreen mounts
Housings of either type that also hold your Raspberry Pi (recommended)
Choosing a housing
The exact housing you choose will depend on the size of your touchscreen, the screen manufacturer (in some cases), your printer, and how you want to attach it to your printer. Search Thingiverse for touchscreen models to find one that fits your needs.
My choice for the Ender 3
For my Ender 3, I’m using an excellent model made by designer Tronnic. It mounts directly to the printer for maximum awesomeness and also houses the Raspberry Pi. You can download the Ender 3 touchscreen model on Thingiverse. If you’re using the Raspberry Pi 4 for OctoPrint, be sure to print this remix as well.
If you haven’t already, install OctoPrint. OctoPrint allows you to control your 3D printer using an intuitive interface.
If you’re using an existing OctoPrint installation, skip this step.
5 – Back up OctoPrint
I’m using the free MacOS application ApplePi-Baker to back up my card.
Before proceeding, I recommend backing up your Raspberry Pi’s SD card—this way if something goes wrong it’s easy to revert without needing to reconfigure everything. Use our Windows or Mac guide to back up your SD card.
6 – Connect the touchscreen to your Raspberry Pi
If your touchscreen mounts directly to the Raspberry Pi’s GPIO header (as mine does), you’ll need to connect and configure it.
If your OctoPrint setup uses a camera, attach the camera’s ribbon cable to the Pi before connecting it to the screen.
Then, carefully push the screen onto the Raspberry Pi’s GPIO header. Some screens don’t take up the entire Raspberry Pi header; this is okay, it just means they’re compatible with older Raspberry Pi models too.
Your screen might have 4 small, perforated tabs that are meant for mounting the screen using screws. If your case won’t fit with these tabs in place, carefully snap the tabs off with a pair of pliers or wire cutters.
🛈 If your touchscreen uses HDMI (for display) and USB (for touch), connect both directly to your Raspberry Pi and continue to the next step. Most touchscreens do not use this setup.
7 – Update OctoPrint and install the TouchUI plugin
We’ll use an OctoPrint plugin called TouchUI to make OctoPrint mobile-friendly and responsive, allowing it to display properly on our small screen.
Put your SD card back into your Raspberry Pi and boot it.
Next, open OctoPrint in your browser by navigating to http://octopi.local. If an update message appears, update OctoPrint.
Then, navigate to Settings > Plugin Manager, click Get More, and install the TouchUI plugin.
8 – Update your Raspberry Pi
I recommend updating your Raspberry Pi before continuing.
Open Terminal (Mac) or Command Prompt (Windows) and connect to your Raspberry Pi by running the following command:
If your touchscreen connects via GPIO, you’ll need to tell your Raspberry Pi to a) output video to the touchscreen instead of HDMI, and b) use touchscreen input as a mouse.
If your touchscreen came with configuration instructions, use those instructions to get things working. If you’re using the same touchscreen as me—or a similar one—you can use Adafruit’s touchscreen configuration script by following the steps below.
Connect to your Pi once again and run the following commands to launch Adafruit’s setup wizard:
cd ~
wget https://raw.githubusercontent.com/adafruit/Raspberry-Pi-Installer-Scripts/master/converted_shell_scripts/adafruit-pitft.sh
chmod +x adafruit-pitft.sh
sudo ./adafruit-pitft.sh
Update 2/1/20: It appears Adafruit is converting many of their Shell setup scripts to Python so the script in this step was 404ing. Ive updated it for now to reference the new Shell script location so things should continue to work. In the near future, I’ll update this step with Python setup instructions. If you run into issues, please post in the comments section below.
Select the appropriate option for your screen. In my case, I selected PiTFT 3.5″ resistive touch (320×480).
For rotation, select 270 degrees (landscape). If you choose 90 degrees (landscape), your screen might be upside down.
When asked “Would you like the console to appear on the PiTFT display?”, select No. When asked “Would you like the HDMI display to mirror to the PiTFT display?”, select Yes.
When you’re finished, accept the reboot prompt to restart your Pi.
🛈 These setup instructions (and most you’ll find) will only work with Raspbian Jessie and newer. If you installed OctoPrint on Raspbian Wheezy, I recommend reinstalling OctoPrint on a newer OS.
10 – Configure the Raspberry Pi to boot to a browser
Next, we’ll need to configure the Raspberry Pi to launch a browser and load the OctoPrint/OctoPi interface on boot using the TouchUI boot to browser setup scripts.
Once you’re prompted for autologin, enter your OctoPrint username (not your Raspberry Pi username). When you’re finished, reboot and test out your touchscreen.
For some reason, there was a conflict between the screen and touch rotation after setting up TouchUI. In other words, the screen rotation displayed correctly, but tapping the bottom-right of the screen would result in a tap in the top-right of the screen; the screen was rotated 90°. After hours of troubleshooting, it turns out it was a simple fix.
If you have this issue, simply do the following:
Install xinput and get your device name
Run the following commands:
sudo apt-get install xinput
FRAMEBUFFER=/dev/fb1 & DISPLAY=:0.0 xinput list
If you’re using HDMI or the official Raspberry Pi touchscreen, you may need to substitute /dev/fb0 above.
The second command will show a list of device names. In my case, the device name for Virtual core pointer (slave) was stmpe-ts.
Create a TouchUI calibration file
nano ~/TouchUI-autostart/calibration.sh
Paste one of the following lines into that file, substituting stmpe-ts with your device name, if it’s different. These vary based on how you want to rotate your screen.
Otherwise, assemble your housing using the instructions provided by the designer.
🛈 Some of the housing is super thin, so be careful when assembling it!
13 – Mount the touchscreen housing
Be sure your wiring doesn’t interfere with anything such as your Z-axis limit switch.
After assembling everything, mount the housing to your printer and reroute your wiring. If you’re using your 3D printer to power the Raspberry Pi, you may need to solder a longer USB cable onto your buck converter (or run a micro USB extension cable such as this one).
A fan isn’t completely necessary unless you’re using a Raspberry Pi 4 or if you print in a hot location like a garage. I still recommend adding one to ensure you always get the highest quality prints.
I recommend buying a small USB fan such as this one and connecting it to one of the Raspberry Pi’s USB ports. Normally you could power such a fan directly from the Raspberry Pi’s GPIO header, but the header is now in use by the touchscreen. Mount the fan so that it sucks air away from the Pi and use a bit of Kapton tape to prevent the fan’s screws from shorting against the Raspberry Pi board.
Now that your screen is up and running, you can mess around with some of its features! At the top, you’ll find the same tabs that you find on the desktop version of OctoPrint.
🛈 Of course, you’ll still want to upload files to start prints from your desktop computer!
16 – You’re all done!
Behold your latest 3D printer upgrade! With your shiny new touchscreen, you can 3D print all the things.
Next up:
Access your 3D printer from anywhere by setting up The Spaghetti Detective!
How to Access OctoPrint Remotely With the Spaghetti Detective Access OctoPrint from anywhere with this OctoPrint Anywhere replacement.
Questions? Comments?
I’d love to hear from you! If you run into any issues, post in the comments section below and I’ll do my best to help you out.
There are several ways to go about running a Minecraft server on the Raspberry Pi. In this guide, I’ll cover how to install Nukkit—a cross-platform Minecraft server that’s super easy to set up on the Raspberry Pi. This server should work with PCs, consoles, and tablets running Minecraft 1.14. I’ll be using a Raspberry Pi
Introducing Howchoo, an enigmatic author whose unique pen name reflects their boundless curiosity and limitless creativity. Mysterious and multifaceted, Howchoo has emerged as a captivating storyteller, leaving readers mesmerized by the uncharted realms they craft with their words.
With an insatiable appetite for knowledge and a love for exploration, Howchoo’s writing transcends conventional genres, blurring the lines between fantasy, science fiction, and the surreal. Their narratives are a kaleidoscope of ideas, weaving together intricate plots, unforgettable characters, and thought-provoking themes that challenge the boundaries of imagination.
The Ender 3 is an amazing 3D printer. For the money, it’s hard to find one that will give you better prints right out of the box. However, it’s far from perfect.
In this guide, I’ll show you the top must-have upgrades and mods for the Ender 3 and Ender 3 Pro—both 3D-printable and purchased upgrades/mods.
A note on this guide:
In researching this guide, I found a lot of others with massive lists containing every upgrade and mod under the sun—unfortunately, many of those upgrades are pointless wastes of time and money. So, in this guide, I’ll cut through the BS and cover the most impactful items that will give you better prints while also improving your overall printing experience.
1 – Upgrades and mods to 3D print
Also visible in this photo are my Raspberry Pi enclosure and camera for use with OctoPrint.
Below are the top 3D-printable Ender 3 mods and upgrades you can perform. Tons of other printable mods exist, but this is the core list that will give you the best bang for your print time.
Board fan guard
Before you print anything else, print this mod. The location of the mainboard fan is directly beneath the build plate, meaning bits of filament can fall in and damage the fan or board. The model is available on Thingiverse.
Filament guide
This filament guide holds the filament away from the feeder, allowing for a more consistent feed rate and less skipping. It snaps directly into the side of the upper support.
Cable chain
This cable chain is a must-have for preventing dangerous cable snags when the bed moves along the Y-axis.
Display PCB cover
This simple screen cover protects your Ender 3 display’s PCB (printed circuit board) from damage.
Bowden tube fitting fix
If your Bowden tube has popped out of place or if you’re having print quality issues, you might want to print these pressure fitting shims that will prevent your Bowden tubes from shifting or popping out during printing.
Beeper silencer
You’ve probably noticed how loud the Ender 3 beeps when navigating the menu interface. This beep can level villages and knock satellites out of orbit. This 10-minute print mutes the beep quite a bit, getting rid of that annoyance and protecting our countrysides and space assets.
🛈 If you’re using a 3D printer enclosure, I recommend printing these mods using ABS or PETG filament; ambient enclosure temperatures can cause PLA to warp and deform over time.
2 – BLTouch auto bed leveling
How many times have you grabbed a piece of paper and slid it back and forth between your print bed and the extruder? Is it more than a hundred? What if I was to tell you that one upgrade could make it so you’d never have to manually level the bed again? Sound good to be true?!
With a BLTouch kit specifically for the Ender 3, Ender 3 V2 or Ender 3 Pro, you can have a perfectly level print each time without having to manually level the bed. Because it’s supported directly by Creality, installing the BLTouch is a fairly easy process, even for 3D printing novices.
What is BLTouch?
The BLTouch by Antclabs is an add-on electrical component for a 3D printer that uses a sensor stem to detect any tilt in the bed surface. It’s built to use very little power at idle and use so that it can be installed directly in the Ender 3’s mainboard, without any heat issues.
What about other auto-leveling sensors?
Other sensors like optical or proximity sensors do have some upsides, but we’ve found them to be expensive to repair and not compatible with certain print bed surfaces.
With the BLTouch, you can use any type of bed and need only swap out the plastic nozzle if it’s damaged. There’s also a ton of support and articles that can help you if you run into trouble using your BLTouch.
There are two main sources of noise on your printer: 1) fans, and 2) the drivers (chips) that run your stepper motors. The “whirring” noise you associate with printing is caused by the cheap stepper motor drivers used on the stock Ender 3 board.
Enter the Creality Silent Mainboard (v1.1.5). This board directly replaces your existing Ender 3 mainboard, upgrading your printer to the silent TMC2208 stepper motor drivers. This is the biggest “sound” upgrade you can make. It reduces your printer’s noise from approximately 48dB to 36dB, with the remaining sound coming from the Ender 3’s fans (which can also be upgraded to quieter fans).
If I had to choose a single upgrade from this guide (other than OctoPrint), it would be this one. Combined with the MeanWell PSU upgrade also mentioned in this guide, I often forget my printer is running since it now generates so little noise.
Of course, in addition to decreasing noise, this board and its upgraded stepper motor drivers improve the quality of your prints.
4 – OctoPrint
OctoPrint is the #1 upgrade for making the overall 3D-printing experience easier and more enjoyable. While this upgrade doesn’t relate directly to print quality, it will save you a ton of time and headaches. With OctoPrint, you won’t need to load and start prints from an SD card ever again.
In a nutshell, OctoPrint is a library that runs on the small Raspberry Pi computer. When you want to print something, you’ll log into a slick interface from your computer. This interface will allow you to control your printer, start and stop prints, and more. You can even monitor your printer remotely using a small camera!
Compared to the stock PSU whose fan runs continuously, the MeanWell PSU only runs when it needs to—usually less than 20% of the time. This means a much quieter printer, especially when paired with the silent board upgrade. This reason alone made the upgrade worth it to me. I work in the same room as my printer, so noise is a huge issue.
Safety
MeanWell PSUs use higher quality components than the cheap stock unit, providing cleaner power with fewer of the electrical spikes and sags that could pose a safety hazard.
Reduce auto-bed-leveling issues
If you’re using an auto-leveling sensor such as the BLTouch or EZABL, the MeanWell PSU’s consistent, clean power reduces issues related to power ripples and grounding.
Form factor
The MeanWell PSU is noticeably thinner than the stock unit, which is handy if you’re using an enclosure and need to relocate it.
Which one to buy (and where)
The MeanWell LRS-3500-25 PSU is the correct 24V MeanWell power supply for the Ender 3, and this upgrade takes about 20 minutes to perform, excluding PSU housing print time.
🛈 The Ender 3 Pro already ships with this upgrade.
7 – Glass print bed
There are tons of different build plate surfaces out there: metal, magnetic, BuildTak, painter’s tape, and tons more. But after printing for many years on several different printers, I’ve always had the best experience with glass.
Glass beds are supremely flat, fixing the all-too-common “warped Ender 3 bed” issue that many of us experience. Glass beds also save on prep time, are easy to clean, and offer effortless print removal with a semi-glossy print finish.
Choosing a bed
I wrote a comprehensive guide to 3D printing on a glass bed if you’d like to dive into the details. tl;dr; Choose a thin borosilicate glass bed, and adhere it directly to the existing build plate using small binder clips. This 235x235mm glass bed is the one I recommend for the Ender 3.
Proper print illumination allows you to identify issues with your prints early—it’s also nice to be able to see what’s happening clearly. There are tons of methods for adding an LED strip to your 3D printer. I prefer one that places the light source as high as possible in order to illuminate the entire print bed, not just the current print area.
I wrote a comprehensive guide on adding an LED strip to your 3D printer, featuring the Ender 3 specifically. Using the method outlined there, you can even power your LED strip directly from your Ender 3 by regulating the voltage using this buck converter in conjunction with this XT60 splitter cable.
Check out that guide for step-by-step instructions on what to print and how to wire everything up!
Easy LED version
If you’d prefer an easy-version LED strip, Creality makes an official LED strip kit, as well.
9 – Bed springs
Your bed springs might seem like an insignificant part of your 3D printer, but they’re actually quite important to bed leveling and stability.
The stock Ender 3 bed springs are terrible and can lead to print issues and frequent bed leveling. These issues are largely caused by:
The cheap metal used to manufacture the springs, and
The rounded design of the springs themselves
In fact, if you compare the stock and upgraded springs side by side, you can see only the upgraded ones feature a flat surface on the top and bottom. This leads to less shifting compared to the stock springs.
Upgraded Ender 3 springs take minutes to install and mean less frequent bed leveling between prints. This upgrade costs about $10, making it one of the least expensive Ender 3 upgrades out there.
The plastic metal feeder assembly on the Ender 3 leaves something to be desired, and improper tension can even cause feeder gear skips, leaving gaps in the layers of your print. Installing an all-metal feeder assembly such as this one will add durability and stability to your printer.
11 – Stepper motor dampers
Yet another noise mod—adding these dampers to your X- and Y-axis stepper motors decreases the noise they generate by 5-10dB. This is a simple, inexpensive mod with a measurable noise reduction impact.
12 – Firmware upgrade
Most Ender 3s ship with an outdated version of the Marlin firmware, which lacks mandatory safety features such as thermal runaway protection. Thermal runaway is a condition where a failure in the thermocouple (temperature sensor) can cause your extruder to continue heating, forever, until your extruder block melts and a fire occurs.
Here’s a video demonstrating thermal runaway in action:
Thankfully, newer versions of Marlin have thermal runaway protection, a software-level safeguard that polls periodically for an increase in temperature and shuts things down if something isn’t right.
I wrote an in-depth guide to updating your Ender 3 firmware that you can follow to perform this mod. You’ll need any kind of Arduino to perform the firmware update, such as this inexpensive Arduino clone. This is a safety upgrade that you shouldn’t skip.
🛈 If you’re using Octoprint, you should see a warning appear upon logging in if your printer’s firmware lacks mandatory thermal runaway protection. This is an easy way to check.
13 – Other mods and upgrades
Did I miss a mod or upgrade that you think is a must-have? Let me know in the comments section below!
Blender is one of the most popular open-source 3D creation suites today. It doesn’t cost a dime to use and everything you create is yours to own for good. The community is robust and the dev team still releases new updates on the regular. If you want to get the latest version, you may have
Introducing Howchoo, an enigmatic author whose unique pen name reflects their boundless curiosity and limitless creativity. Mysterious and multifaceted, Howchoo has emerged as a captivating storyteller, leaving readers mesmerized by the uncharted realms they craft with their words.
With an insatiable appetite for knowledge and a love for exploration, Howchoo’s writing transcends conventional genres, blurring the lines between fantasy, science fiction, and the surreal. Their narratives are a kaleidoscope of ideas, weaving together intricate plots, unforgettable characters, and thought-provoking themes that challenge the boundaries of imagination.
This guide will show you how to power a Raspberry Pi using your 3D printer’s power supply. This is especially useful if you’re using OctoPrint and only want to run your Pi when your 3D printer is running.
In a nutshell, we’re going to connect our printer to a small voltage regulator, also known as a “buck converter” or “step down converter”, to reduce the printer’s higher voltage to the 5V needed by the Pi.
This guide will work for any Raspberry Pi model, including the Raspberry Pi 4.
Important note: This guide involves electricity. Take proper precautions even when working with low voltages.
1 – Determine your connections
Before we can connect the LM2596 voltage regulator, we’ll need to determine where the connection should take place.
There are basically two methods of tapping into your 3D printer’s power supply:
Method #1: Run a new power supply line from your PSU
For this method, open up your printer’s power supply unit (PSU) and run a new positive (+) and negative (-) wire from one of the available slots. If you’re lucky, your PSU might have a separate 5V power output terminal.
In this unlikely case, no voltage regulator is needed! You can skip forward and connect these lines directly to your Pi. However, be sure that at least 2A is being output, or else you’ll need to use another supply line.
Note: Before opening your power supply, disconnect your printer’s power and wait for any capacitors in the PSU to discharge.
Method #2: Splice into the printer’s existing (external) wires
For this method, we can splice into one of the wires already coming out of your power supply. By splice, I don’t mean strip and use electrical tape. I recommend using some kind of Y-splitter cable to split the power out.
This method takes less time because no PSU disassembly is required. Additionally, it takes only seconds to revert the change if you’d like to undo your modifications. For these reasons, this is the method I’m going with.
My printer is the Creality Ender 3 and uses common XT60 connectors, so I used this extension cable. Some printers use other connectors, however; thus, be sure to choose a Y-splitter cable that will work with your printer.
The rest of this guide will work for you regardless of which approach you choose!
2 – Solder the buck converter INPUT wires
Now we’re going to connect the INPUT side of the LM2596 voltage regulator/buck converter to the printer’s power supply.
Since I’m using method #2, this means soldering my Y-splitter cable directly to the converter. I recommend printing a small enclosure for your LM2596; you can find tons of these on Thingiverse. The exact enclosure I used is included with this printer-mounted Pi enclosure.
First, Cut and strip one “leg” of the Y cable.
Then, solder the red positive (+) wire to the positive (+) INPUT terminal.
Finally, solder the black negative (-) wire to the negative (-) INPUT terminal.
Be sure to thread the wires through the enclosure opening before soldering them.
3 – Solder the buck converter OUTPUT wires
The Raspberry Pi 1, 2, 3, and Zero use a Micro USB port for power, so we’ll need to solder one to the output terminals of our buck converter. To do this, we’ll cannibalize an old Micro USB cable or AC adapter.
The Raspberry Pi 4 uses a USB-C port for power. If you’re using a Pi 4, you’ll need to cannibalize a USB-C cable or adapter instead.
Cut open and strip the cable. Locate the red positive (+) and black negative (-) wires, and solder these to the OUTPUT terminals of the buck converter.
Again, if you’re using an enclosure, thread the cable through the enclosure hole first.
🛈 Keep in mind how far your Pi will be mounted from the step down converter and don’t cut your cable too short!
4 – All soldered!
Lookin’ good.
5 – Adjust the buck converter output voltage
Next, we need to adjust the buck converter’s output voltage to 5V. For my printer, the line I’m tapping into is 24V, so I’ll be stepping this 24V down to 5V.
To do this, we’re going to connect a multimeter to the buck converter’s output, power on the printer (input), and turn a small potentiometer on the buck converter using either a small screwdriver or your fingernail.
If you don’t have a multimeter, you should think about picking one up. Check out our list of the best multimeters. Alternatively, you can alternatively purchase a buck converter that shows the output voltage on a built-in LCD display (though these are more expensive).
With your printer’s power cord disconnected, connect your buck converter to your printer’s power supply using either the wires you connected directly to your PSU (method #1) or the Y-splitter cable (method #2). Make sure neither the buck converter or any of your wires are touching any metal.
Then, set your multimeter to DC and connect it to the output terminals of the buck converter. I recommend using alligator clip leads if you have them; if you don’t, a second set of hands helps.
After you’re sure all hands and wires are free from any contact, connect your printer’s power cable and power it on. Turn the small potentiometer until your multimeter reads 5V. Then, turn off and unplug your printer.
🛈 Be EXTRA careful when working around live power so that you don’t electrocute yourself or your electronics.
6 – Secure the buck converter
Secure the LM2596 enclosure to your printer using foam tape, taking care not to mount it in the way of any moving parts.
7 – Secure all wires and power on the Pi!
Connect the USB cable to your Pi. Use zip ties to secure your wires away from any moving parts and power on your Pi.
Pat yourself on the back, you’re all done! If you’re working on an OctoPrint setup, be sure to check out my comprehensive OctoPrint setup guide.
There are several ways to go about running a Minecraft server on the Raspberry Pi. In this guide, I’ll cover how to install Nukkit—a cross-platform Minecraft server that’s super easy to set up on the Raspberry Pi. This server should work with PCs, consoles, and tablets running Minecraft 1.14. I’ll be using a Raspberry Pi
Introducing Howchoo, an enigmatic author whose unique pen name reflects their boundless curiosity and limitless creativity. Mysterious and multifaceted, Howchoo has emerged as a captivating storyteller, leaving readers mesmerized by the uncharted realms they craft with their words.
With an insatiable appetite for knowledge and a love for exploration, Howchoo’s writing transcends conventional genres, blurring the lines between fantasy, science fiction, and the surreal. Their narratives are a kaleidoscope of ideas, weaving together intricate plots, unforgettable characters, and thought-provoking themes that challenge the boundaries of imagination.
A Raspberry Pi enthusiast, Jeff Geerling, released a pretty cool video showing how to add a fan to the Raspberry Pi to help keep the temperature under control. That project was pretty great but I wanted to take it to the next level and add the ability to only turn the fan on when needed by monitoring the core temperature. This way, a noisy fan isn’t running all the time.
In this guide, I’ll cover the whole project from start to finish. First, we’ll install the fan onto the official Raspberry Pi case and wire it up so it can be activated by a GPIO pin. Then we’ll write some Python code to monitor the temperature and activate the Pi when the temperature reaches a certain threshold.
Requirements
In order to complete this guide, you’ll need a Raspberry Pi 4 with the latest version of Raspbian installed. The scripts I’ve included are written for Python 3.7, which is the default Python 3 version in the September 2019 version of Raspbian. Newer Raspbian versions will work as well 🙂
Update 11/30/20:An official Raspberry Pi 4 case fan was recently released. This is ideal for anyone who wants to cool their Pi with name-brand hardware. It’s specifically designed to fit the official Raspberry Pi 4 case.
1 – Install the fan onto the case
The fan installation is pretty simple, and we’ve covered it in more detail elsewhere. In this guide, I’ll cover the basics, but if you need more detailed instructions head on over to our guide on installing the fan onto your Raspberry Pi 4.
There is plenty of room for the fan as long as you keep it away from the USB ports. See the image for reference. Place a mark on the Pi case where you want the center of the fan to be. Then drill a hole using a 1-1/8″ hole saw. I was fortunate enough to have access to a drill press, but if you don’t, a handheld drill will work. After the hole is drilled, smooth out the rough edges with sandpaper or a file.
Drill screw holes
With the fan hole drilled, place the fan on the inside of the case, centered in the hole. Then mark the case at the center of each screw hole. For this you can use a center punch, small screwdriver, or pencil. Then, remove the fan and carefully drill the screw holes using a 7/64″ drill bit.
Mount the fan
I’m going to add this step here but I actually recommend doing this after the fan is wired up. When you’re ready, mount the fan inside the case with the Pi-FAN sticker facing up. Use the included nuts and bolts to secure the fan inside the case.
2 – A explanation of the circuit
In this step, I’ll provide a breakdown of the circuit. We’re only using a few components: the 5V fan (represented by the big DC motor in the image), a 680Ω resistor, and an NPN transistor (2N2222).
Fan power needs
The transistor is the most interesting piece of this circuit. It’s necessary because the fan requires 5V to operate but the Pi’s GPIO pins are only capable of supplying 3.3V. GPIO pins could power something small, like an LED, but they shouldn’t be used for anything more. Likewise, the Pi’s 5V pins are connected directly to the power supply and cannot be controlled via software. Therefore, we need a way to power the fan using the 5V pin, but switch it on and off using a GPIO pin. Enter the transistor.
Transistor
The transistor is an interesting electrical component used to switch or amplify power. In our case, we’re using it as a switch. There are many types of resistors, but we’re using an NPN transistor. So the “base” pin of the transistor is connected to the BCM 17 (a GPIO pin) with a 680Ω resistor in between. The positive lead on the fan is connected to the 5v pin, and the ground is connect to the “collector” pin in our transistor. Lastly, the “emitter” of the transistor is connected to the ground.
So when pin 17 is switched to HIGH, it will send some voltage to the base of the transistor, which closes the circuit and turns on the fan.
3 – Build the test circuit
Before soldering anything, it’s wise to test the circuit using a breadboard. I will avoid another explanation of the circuit but I hope that, between the previous step and this image, you’ll be able to reconstruct the circuit. We won’t be able to test the circuit until the software is written, so let’s move on to the next step!
4 – Use the install script
I created the fan script and published it to a public Howchoo repo called pi-fan-controller.
The easiest way to install the fan controller scripts is to use our install script. To do so, SSH into your Pi and clone the repository:
If you don’t already have git installed, you’ll need to install git first using sudo apt-get install git.
Next, install the requirements:
# If pip is not already installed run:
sudo apt install python3-pip
# Install requirements globally
sudo pip3 install -r pi-fan-controller/requirements.txt
Now, run the install script:
./pi-fan-controller/script/install
This script installs fancontrol.py which monitors the core temperature and controls the fan. Also, it adds a script called fancontrol.sh to /etc/init.d and configures the script to run when the system boots.
🛈 The next two steps describe the manual installation of these scripts and covers how they work in more detail. Feel free to skip the next two steps if you just want to get on with it.
5 – Write the fan controller code (optional)
Skip this step if you used the install script above.
We’re going to need code that continuously monitors the core temperature and turns on the fan when the temperature reaches a certain threshold.
So we’ll connect to the Pi via SSH and create a file called fancontrol.py. To create this file, run:
nano fancontrol.py
Add the following to the file, save, and exit:
#!/usr/bin/env python3
import subprocess
import time
from gpiozero import OutputDevice
ON_THRESHOLD = 65 # (degrees Celsius) Fan kicks on at this temperature.
OFF_THRESHOLD = 55 # (degress Celsius) Fan shuts off at this temperature.
SLEEP_INTERVAL = 5 # (seconds) How often we check the core temperature.
GPIO_PIN = 17 # Which GPIO pin you're using to control the fan.
def get_temp():
"""Get the core temperature.
Run a shell script to get the core temp and parse the output.
Raises:
RuntimeError: if response cannot be parsed.
Returns:
float: The core temperature in degrees Celsius.
"""
output = subprocess.run(['vcgencmd', 'measure_temp'], capture_output=True)
temp_str = output.stdout.decode()
try:
return float(temp_str.split('=')[1].split(''')[0])
except (IndexError, ValueError):
raise RuntimeError('Could not parse temperature output.')
if __name__ == '__main__':
# Validate the on and off thresholds
if OFF_THRESHOLD >= ON_THRESHOLD:
raise RuntimeError('OFF_THRESHOLD must be less than ON_THRESHOLD')
fan = OutputDevice(GPIO_PIN)
while True:
temp = get_temp()
# Start the fan if the temperature has reached the limit and the fan
# isn't already running.
# NOTE: `fan.value` returns 1 for "on" and 0 for "off"
if temp > ON_THRESHOLD and not fan.value:
fan.on()
# Stop the fan if the fan is running and the temperature has dropped
# to 10 degrees below the limit.
elif fan.value and temp < OFF_THRESHOLD:
fan.off()
time.sleep(SLEEP_INTERVAL)
Now we’ll move the script to /usr/local/bin, which is the ideal location for scripts that normal users can run. Then we’ll make it executable.
6 – Execute the fan controller code on boot (optional)
Skip this step if you used the install script above.
We’ll want to run this script when the Pi boots, otherwise it won’t do us much good. To do so, we’ll create a shell script that will execute on boot and launch our script.
Create a file called fancontrol.sh and add the following:
#! /bin/sh
### BEGIN INIT INFO
# Provides: fancontrol.py
# Required-Start: $remote_fs $syslog
# Required-Stop: $remote_fs $syslog
# Default-Start: 2 3 4 5
# Default-Stop: 0 1 6
### END INIT INFO
# Carry out specific functions when asked to by the system
case "$1" in
start)
echo "Starting fancontrol.py"
/usr/local/bin/fancontrol.py &
;;
stop)
echo "Stopping fancontrol.py"
pkill -f /usr/local/bin/fancontrol.py
;;
*)
echo "Usage: /etc/init.d/fancontrol.sh {start|stop}"
exit 1
;;
esac
exit 0
Move this file to /etc/init.d, and make it executable:
Now, you can either restart your machine, or kick this off manually since it won’t already be running:
sudo reboot
or
sudo /etc/init.d/fancontrol.sh start
7 – Wire up the fan
With everything working, let’s wire up the fan!
Use the schematic and breadboard photo to build the circuit. In this step, I’ll provide a photo of the fan fully wired and connected to the Pi. If you need more detailed help with step, please let me know in the comments section below.
Here are the basic steps (always refer to the diagram for help):
Strip the ground (black) lead on the fan.
Grab a female jumper wire (or multiple if you want different colors), cut it in half and strip the ends.
Solder the resistor(s) to one female jumper wire, then to the “base” pin on the transistor.
Solder the other jumper wire to the “emitter” pin on the transistor.
Solder the ground lead from the fan to the “collector” pin on the transistor.
🛈 Make sure to use heat shrink to cover the connections and place it on before soldering!
8 – Testing our work
I wanted to visualize my work, so I rigged up a demo. This required two scripts:
outputtemp.py outputs the time and core temperature every second.
cpuload.py runs a busy process on each core.
So during my test window, I measured the core Pi temperature every second, and at some point during the window increased the cpu load, hoping to increase the core temperature. At 65° C, I expected the fan to kick on and start cooling off the Pi. Then when I stopped the load test, I expected the temperature to drop quickly. And once it reached 55° C, I expected the fan to turn back off.
Measure the Core Temperature of Your Raspberry Pi Hot pie is delicious, but a hot Pi is not.
And sure enough, as you can see from the graph, it worked as expected!
9 – Make your own modifications
In the script above, you may have noticed two variables at the top:
These variables can be configured to your liking. ON_THRESHOLD and OFF_THRESHOLD are the temperatures at which the fan will turn on and off (respectively), and SLEEP_INTERVAL is how often the program checks the core temperature. If you need to change the GPIO pin, you can do that here as well.
Feel free to customize either of these variables, but keep in mind that the max temperature is 85°C, and the CPU will be throttled at around 80°C, so we’ll want to keep the temperature well below that.
10 – Conclusion
I hope you enjoyed this guide. If you have any comments, questions, or even recommendations for improvement, please let me know in the comments below. And be sure to check out the GitHub repo for this project!
There are several ways to go about running a Minecraft server on the Raspberry Pi. In this guide, I’ll cover how to install Nukkit—a cross-platform Minecraft server that’s super easy to set up on the Raspberry Pi. This server should work with PCs, consoles, and tablets running Minecraft 1.14. I’ll be using a Raspberry Pi
Introducing Howchoo, an enigmatic author whose unique pen name reflects their boundless curiosity and limitless creativity. Mysterious and multifaceted, Howchoo has emerged as a captivating storyteller, leaving readers mesmerized by the uncharted realms they craft with their words.
With an insatiable appetite for knowledge and a love for exploration, Howchoo's writing transcends conventional genres, blurring the lines between fantasy, science fiction, and the surreal. Their narratives are a kaleidoscope of ideas, weaving together intricate plots, unforgettable characters, and thought-provoking themes that challenge the boundaries of imagination.
Tablets that use electronic ink (or “e-ink”) displays win big over the sort of screens used in iPads or other multi-use tablets, especially when it comes to reading and writing.
Studies have suggested that, because reading on an e-ink screen is more like reading on paper, heavy use causes significantly lower levels of eye strain, as well as better levels of recall for the information being read!
This is because e-ink displays work differently than traditional screens. Rather than individual glowing pixels that beam light to your eyes, an e-ink screen uses special bubble-like capsules that have different micro-particles within them, of different colors on different sides of the capsule sphere.
By applying an electrical charge, the capsule flips, and the color it displays can be switched. This technology means that an e-ink display reads like ordinary paper by reflecting ambient light, uses zero power when not updating, and can hold an image more or less indefinitely!
Because of these features, e-ink devices generally have incredible battery life and work far better than devices like iPads for extensive reading or note-taking. With the latest designs improving on e-ink technology, with increased durability and greatly reduced cost, it seems likely that this technology will be the way of the future for many types of devices across the market.
What matters
Confused? We make it easy to figure out which product has the features you need. Canva
What matters most to me when I’m looking at buying a new piece of tech is how well it functions for daily use. It doesn’t really matter how awesome the hardware is if the design and the implementation don’t follow through. I try to focus on the specifics that matter most to me, offering a user-eye view of the products on the market.
Table of Contents
1 – Supernote A5X & A6X
The Supernote is one of the best products on the market.
The Supernote products by Ratta have remained at the top of my list for two simple reasons: communication and innovation. Supernote provides extremely robust community interaction through their Reddit community, and their devices are extremely solid both in physical design and in terms of the feature progression of the software.
Ratta has continued to develop new software features for its older, Linux-based Supernote series at the same time as they’ve forged ahead with the more powerful and feature-dense products in the “X” line, such as the Supernote A5X and Supernote A6X (which feature their own Android build). What I want, when I buy a device, is to know that the company stands behind that device, and that’s what Ratta has shown they can do.
Main features
The Supernote is a powerful tool. Canva
The Supernote offers a plethora of powerful features, but the highlights are the following:
“Paperlike” sensation while writing. There’s a special film on the screen that creates resistance and really gives a pleasant writing experience. It’s not really like writing on paper, but it’s a thousand times better than writing on an iPad screen.
Ceramic pens, which means that the pen nib never runs down.
Physical page refresh bar that clears ghosting with a flick of your thumb.
Full support for Dropbox integration (with manual syncing).
Advanced features like handwritten note searching, bookmarking, and more.
Supports Amazon Kindle (and also has its own in-built eReader software). This is cool because you can read library books through Kindle’s Overdrive and Libby integration.
Supports Microsoft Word documents! What originally sold me on the Supernote. It’s great being able to work on important documents wherever I am, then I can quickly sync when I get home and keep working on my desktop. Even more exciting is that Word Documents can be proofread using pen strokes!
Bluetooth keyboards are supported (just make sure to get a higher-end one that supports low-latency BT 5.0.
Pressure-sensitivity, low-latency writing and drawing, and layers for drawing.
Full PDF support and good annotation features, including functional highlighting (that is colored when transferred out).
Handwriting to type conversion.
4+ days of battery life with moderate to heavy usage.
Honestly, the feature list is superb, and their team is still actively working to improve and expand what this little device can do.
Differences between the Supernote A6X and Supernote A5X
The Supernote has a lot of awesome accessories and pen types. Canva
The biggest difference between the two models is size: the A6X is 7.8 inches and the A5X is 10.3. But the technology behind the A5X screen is also better, using a more modern plastic screen design that dramatically increases the durability of the device. This isn’t to say that I fear for the well-being of my A6X — it’s a sturdy build, with a strong plastic frame that feels robust, especially inside its leather folio. This is an important thing to be aware of, however. For both ease of access to larger documents and better device longevity, I recommend grabbing the A5X. If you really want the smaller A6X, you’ll be happy, as long as smaller really is what you want.
Cons?
There are only a few cons to this device from my perspective. – It’s not cheap, coming in at around $400 for the A6X and $600 for the A5X. That’s a bit pricey. And since the return policy doesn’t allow for open returns there is no way to send it back if you try it and find that you don’t like it. – Some features need improvement, especially the Anti-aliasing (how smooth the drawing looks) and further filtering. It’s fine on the device but printed out the edges look blocky. As of July 2021, the team was aware of this and had major updates planned to fix this in the future. – It would be nice if the device had an unlimited canvas feature. – More Android apps will be supported in the future, but aren’t yet integrated.
2 – Quirklogic Papyr
The Papyr is one of the best collaborative tools around. Pinterest
The Quirklogic Papyr is an absolutely brilliant device by a company that has long had its feet in the e-ink industry, albeit with a professional-scale product that, at 44 inches, isn’t going to be finding a home outside of a business.
The Papyr, however, at a perfect 13 inches, is ideal for anyone who needs a digital canvas on which to work and collaborate. And that’s where Papyr shines; collaboration.
The Papyr utilizes innovative software to bring the collaborative experience to life through the following major features: – Unlimited canvas. Documents in the Papyr can be placed onto an endless canvas that’s perfect for large-scale collaboration. Toss in whatever you want, write, draw, add images and documents, and see it all on one gigantic whiteboard. This space can be a collaborative project as well, viewable by others through the Papyr app. – Cross-platform real-time annotation that functions forwards and backwards. You can add a comment (or drawing, or whatever) in the Papyr and anyone with access to the document will see it instantly. They can also add to the document and their additions will be instantly viewable. This is a multi-platform option, so users with an iPad, for instance, can collaborate with the Papyr user. – Linked to Google Drive. With easy syncing options, it’s possible to maintain your workflow through the Google suite without having to deal with proprietary roadblocks. This is a huge win for modern teams. – Claims that it offers up to four weeks of battery life, actual under heavy usage is a lower, but still impressive.
How does it hold up?
We love the functionality and collaborative power of the Papyr. Pinterest
This is absolutely my recommendation if you’re working on collaboration-specific projects, where the need to interface with teams and work on shared documents is paramount. If you don’t need to prioritize that, you should probably go for either the Supernote if you want something better for e-reading as well as writing, or the reMarkable if you basically want a digital paper replacement.
The Quirklogic Papyr also has incredible quality when it comes to exporting drawings and text, something you don’t get from the Supernote (at least not yet).
3 – reMarkable 2
The reMarkable 2 outperforms the original and offers the best writing feel. Pinterest
The reMarkable made huge waves for being an e-ink device that gave buyers an experience that really felt like writing on paper.
With the reMarkable 2, major design updates provide a writing experience that is so crisp it’s hard to believe and a slowly evolving feature set that makes this one of the best paper journal replacements on the market.
The main thing to be aware of with the reMarkable 2 is that “paper journal replacement” is the most accurate descriptor. reMarkable wanted to create a note-taking experience that provided the benefits of technology without any of technology’s normal distractions. That means that it does what it was designed to do very, very well, but it doesn’t really do that much else.
The reMarkable 2 is a great device for writing but its reading features lag behind, and so far it only supports PDF files that are manually imported into the device. With no other connectivity features to speak of, it’s aiming to be the top of a very select and specialty market, ruling the roost of its own small kingdom.
The big takeaway?
There is no better paper journal replacement than the reMarkable 2. Pinterest
I wanted to love the reMarkable 2 so much when I first learned about it, but the steep price tag doesn’t come with an equally steep feature list, nor does it come with the sort of interaction from the company that you see from Ratta with Supernote or with QuirkLogic for the Paypr.
I’d still highly recommend this product for those who want the specific writing experience that reMarkable 2 offers which is, pardon the pun, remarkable. It’s about as close to actually writing on paper as you can get, and the response time and incredibly slick physical design are a treat.
It is, certainly, not a tablet replacement, and it’s hard to say how likely it is to take off since it necessitates carrying around yet another object on top of the normal electronics, but it does represent the current peak in digital paper technology.
4 – BOOX Nova 3 Color
Boox is a trusted designer and the Nova 3 Color is sure to pave the way for more color devices!
BOOX is known for creating excellent e-readers and e-notebooks, but they’re the first modern company to release a colorized e-ink tablet that allows for writing. It’s incredibly exciting because the color screen is the future of e-ink devices since most devices on the market are grayscale only.
The pros of the BOOX Nova 3 Color are obvious: – Color e-ink screen – Wide range of features and apps. BOOX has consistently tried to offer a traditional tablet replacement, with this color model being their largest step toward that goal.
But the cons are clear as well. The pen is somewhat simplistic and the overall experience of drawing and writing isn’t that special. It’s definitely not a paper-like writing experience, offering little to recommend it over more traditional tablets. Some of the physical design elements are likewise behind the curve of modern e-ink devices. There are also some general issues with the way the new screen functions and how well it works with its underlying hardware.
But should I buy it?
The best color e-ink product on the market. Pinterest
It depends. Do you really want a color screen? If that’s what matters most to you, and you need it now, this is worthwhile. But if it’s that important, looking outside e-ink is still probably your best bet. The BOOX Nova 3 (non-color) is a more solid option that handles the resources of the hardware better than its colorized cousin.
But, that said, what BOOX has done is offer the first step in revolutionizing modern e-ink expectations, and this device isn’t “bad”. I wouldn’t go for it necessarily on the fact that it’s color alone, but it does seem to promise the color screen may become a more normal part of this industry in the near future.
NEXT UP
How to Set Up Quick Connect on a Synology NAS
Get Synology’s powerful Quickconnect running in minutes on your NAS!
Synology is one of the most popular creators of Network Attached Storage devices on the market today, and for great reason — they’re really good at what they do. They consistently make devices that stand the test of time and feature top-notch software that makes the process of running a home server as easy as
In the base game, Minecraft encourages players to farm and become self-sustaining. However, it can get quite boring to keep planting the same crops over and over again. That’s where this list of Forge farming or food mods come in!
This guide will go through mods available for Minecraft Forge that adds either new crops, food, or farming mechanics to Minecraft. While most add a multitude of new culinary treats, there is one mod below that lets you create your own custom food items. If you’re craving a challenge, then read below for a mod that rewards you for having a diverse diet! So whether you’re hosting a survival multiplayer server or you’re playing alone, you’ll find a mod that opens up your world even more!
Note that the game versions available may change since the time of publishing. Most photos were taken using BSL Shaders and Optifine in 1.16.5.
By default, hunger and saturation is hidden, but with AppleSkin that changes. The main features of this mod are the addition of food value information to tooltips and visualization of saturation, hunger, and exhaustion on the player HUD.
If you’d like to add more farming to the world but don’t want to include a multi-file mod (see below), then try Croptopia. This mod adds over 200 new food items, plus plantable crops and trees. Paired with the Patchouli mod, a multiplayer server can also have a recipe book for their culinary adventures!
Unlike the mod above, this one is hefty and in many parts. However, not all add-ons are required, so you can customize how many food mods you want to add to the server. I do recommend it because of how much variety of food items and crops there are!
Have you ever needed a resource but just didn’t want to have to go mining for it? That’s where Mystical Agriculture comes in. Now you can just grow resources with crops! This mod adds a bunch of resource crops, tools, armor, and fun blocks to add a unique mechanic to Minecraft. There’s even Mystical Agradditions which adds a tier of crops and integrates with Tinkers’ Construct!
Whether you want to create a medieval market within a city or simply make finding farming staples easier, this mod is a perfect addition. It adds a market block that allows you to buy seeds, saplings, and other farming related items! It also adds a feeding trough, a chicken nest, and fertilizer to let you live out your farming lifestyle with ease.
If you’re a farmer who prefers the vanilla game experience, but also crave slight variety, then Farmer’s Delight is for you. This mod expands on Minecraft’s farming and food items with the addition of more meals, a way to improve soil, and even some decoration blocks!
Even with the aquatic update, Minecraft’s oceans and lakes still seem empty. This mod not only adds in over 30 new fish, but better tools with which to fish them with! Certain fish will spawn in specific biomes, and you can upgrade your basic fishing rod to have a better chance to catch them. There’s even more trash and loot you can end up hooking!
Rather than punish players for failing to have a diverse diet in game, this mod rewards them for it! It keeps track of how many unique foods the player has eaten and, after certain milestones, rewards them by permanently increasing their maximum health. It even has a custom config, so players start with a specific number of hearts. In fact, everything is customizable, so you can create unique gameplay for yourself or a multiplayer server!
This is the perfect mod for culinary artists in Minecraft. While other food mods add in pre-designed food items, Culinary Construct lets you create any sandwich or bowl item you can think of. You want a burrito bowl from Bubbakoo’s? This mod lets you create it!
Just like in Stardew Valley or Terraria, you can now go fishing in lava! With three new fish available, take your upgraded fishing rod and find fish, junk, or even treasure. Be wary of the combustive cod and searing swordfish, however, as they both are dangerous.
The longer you play Minecraft, the more you realize that early-game tools just won’t cut it. Exploring the enchantment feature of Minecraft can be exciting, but also intimidating. Rather than worry about researching enchantments, below are the best enchantments in Minecraft! To learn how to enchant items, check out this guide! In this guide, you’ll see
Introducing Howchoo, an enigmatic author whose unique pen name reflects their boundless curiosity and limitless creativity. Mysterious and multifaceted, Howchoo has emerged as a captivating storyteller, leaving readers mesmerized by the uncharted realms they craft with their words. With an insatiable appetite for knowledge and a love for exploration, Howchoo’s writing transcends conventional genres, blurring the lines between fantasy, science fiction, and the surreal. Their narratives are a kaleidoscope of ideas, weaving together intricate plots, unforgettable characters, and thought-provoking themes that challenge the boundaries of imagination.