Printing invoices and receipts for your customers should be a built-in Shopify feature, but it isn’t. Luckily, there’s a free Shopify app for generating and printing invoices and receipts called Order Printer.
The Order Printer app is 100% free, always, and is made by Shopify themselves!
1 – Install the Order Printer app
Install the completely free Order Printer app from the Shopify app listing by clicking the “Add app” button.
You’ll be prompted to log in to your store using your store admin URL. For example, howchoo.myshopify.com.
Finally, you’ll be prompted to grant access to the specific features that the app needs.
ð? If you don’t have correct user permissions to install apps, contact your Shopify store admin.
2 – Print an invoice in Shopify
Navigate to Apps > Order Printer. You’ll see a list of your most recent orders.
Select an order from the list. In the Templates section, check the Invoice checkbox. You can also print packing slips from this page if you so wishâthough packing slips are already a built-in Shopify feature.
Click the Print button to print the invoice.
ð? Users have reported issues using this app in Safari. If you’re using Safari and the app does not work, try visiting the page in Chrome.
3 – Customize the Shopify invoice
To look more professional, I recommend customizing the invoice with your company logoâsimilar to what you probably already did for packing slips.
To do this, you’ll need to upload a logo for use in the template and then edit the invoice template to use it.
Upload your logo
From the Shopify admin, navigate to Settings > Files and upload an image. I recommend a .png file with a white or transparent background. After uploading, copy the file URL somewhere.
Use the logo in your invoices
Next, change the following line in your template:
{{ shop_name }}
To:
Of course, change https://cdn.shopify.com/s/files/1/2391/4483/files/logo-100.png?v=1506290081 to the file URL for your image, not ours.
4 – Print a receipt in Shopify
Generally, invoices are the same things as receiptsâand the customer is emailed a receipt upon purchasing. However, if for some reason you’d like to generate a different template for the receipt, click the Add template button, paste in the HTML from the Invoice template, and customize it as you wish. Then, name it “Receipt” and save it.
Introducing Howchoo, an enigmatic author whose unique pen name reflects their boundless curiosity and limitless creativity. Mysterious and multifaceted, Howchoo has emerged as a captivating storyteller, leaving readers mesmerized by the uncharted realms they craft with their words.
With an insatiable appetite for knowledge and a love for exploration, Howchoo’s writing transcends conventional genres, blurring the lines between fantasy, science fiction, and the surreal. Their narratives are a kaleidoscope of ideas, weaving together intricate plots, unforgettable characters, and thought-provoking themes that challenge the boundaries of imagination.
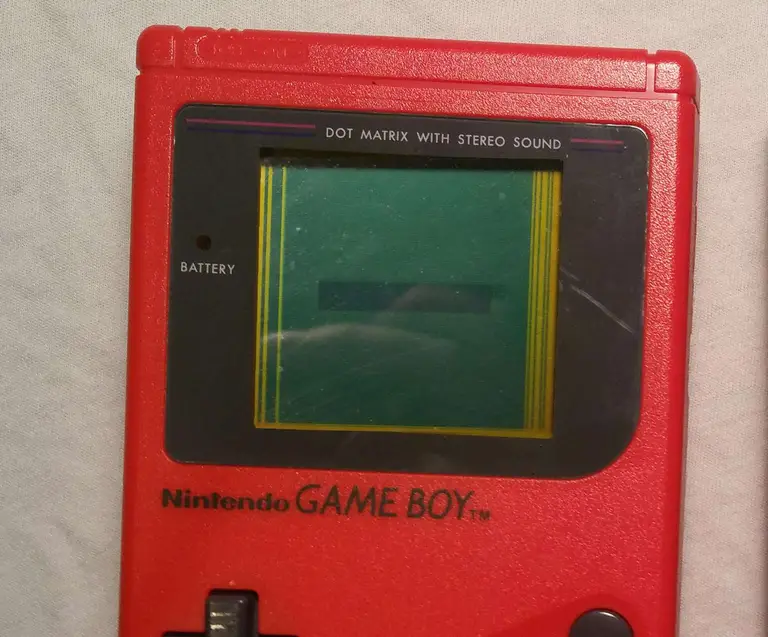
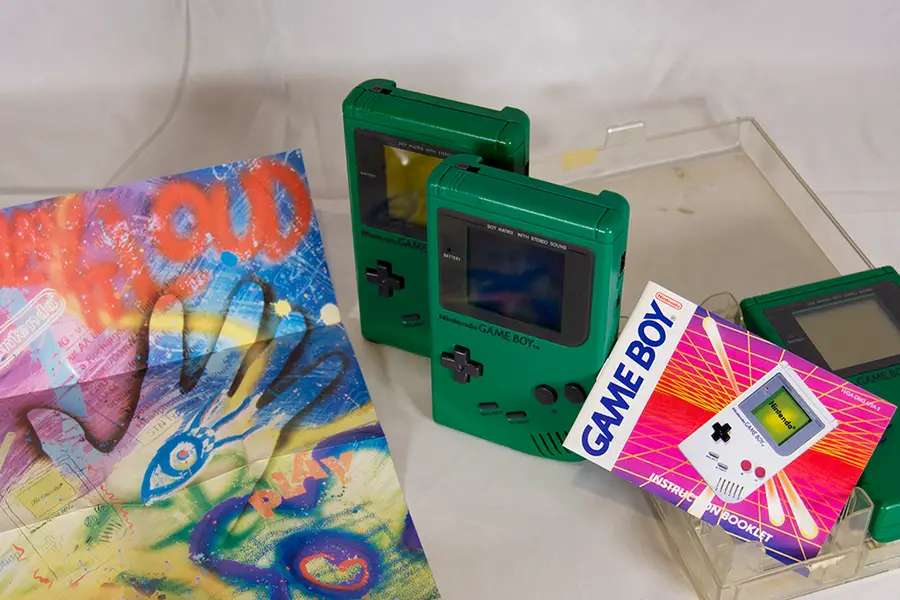
Finding your old Game Boy can produce a wave of nostalgia like no other. But nothing fades that feeling faster than finding vertical lines on the screen. Many retro consoles are prone to wear and tear and the Nintendo Game Boy from 1989 is no exception.
The Game Boy is comprised of two motherboards that connect with a ribbon cable. Over time, the wires in this cable can deteriorate causing vertical lines to appear on the display. In this guide, we’ll be repairing the vertical lines on a classic red Game Boy.
1 – Turn off and examine the Game Boy
Turn off the Game Boy, there’s no way we’re going to play it like this. It’s time for a thorough examination.
Look for any missing screws, there are six used to hold the shell together. Take note of the screw type used—many Game Boys are opened with a tri-wing screwdriver. However, a few early models are made with phillips screws.
Be careful of battery acid damage which may affect internal components but is often repairable.
If everything looks good, then it should be safe to proceed.
2 – Open the Game Boy
Using an appropriate screwdriver, remove all the screws from the back of the shell. You will need to remove the battery cover and batteries to reach the final screws. There are 6 total.
The Game Boy should open with ease, be mindful of the ribbon cable used to connect the boards.
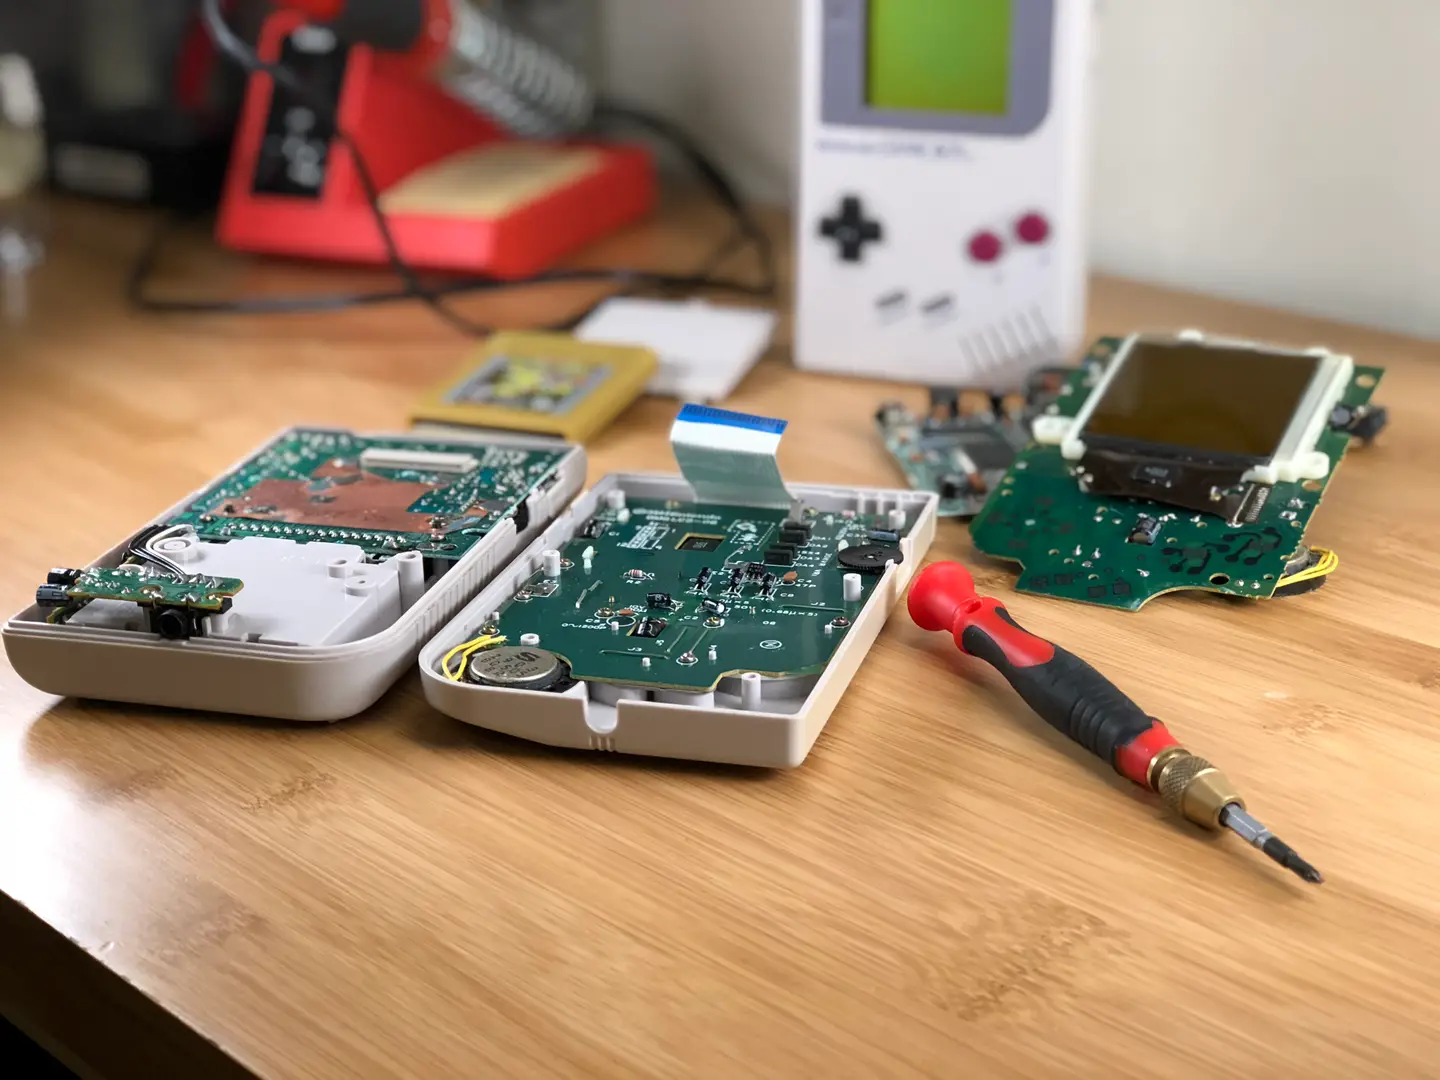
3 – Unmount the front motherboard
Using a Phillips number 1 screwdriver, unscrew the front motherboard from its shell. There will be 10 screws total.
The motherboard can be removed without disconnecting the ribbon cable. This cable is fragile, even the act of disconnecting and reconnecting can cause damage to the display. Exercise extreme caution when handling this cable.
4 – Remove the front shell
Carefully pull the motherboard from the shell.
The front half of the Gameboy is responsible for many things, one of which is housing the buttons. As such, there will be a few components to account for during this step:
A Button
B Button
A/B Buttons Silicone Pad
D-Pad Button
D-Pad Button Silicone Pad
Start/Select Buttons (One Piece)
5 – Remove the black foam strip
Once the front shell is removed, you will need to locate a small black strip of foam under the screen. This strip covers wires from the ribbon cable and will need to be removed. The strip is held on with a thin layer of glue.
Using a flat head screwdriver or something equally flat, pry the foam piece from the Game Boy. Be sure there is no glue residue on the wires. It should peel from the hardware as one piece.
Set the strip aside.
6 – Heat the soldering iron
It’s time to whip out the power tools! Does a soldering iron count as a power tool?
If you haven’t already, heat up the soldering iron. We’ll be using the heat to reform the deteriorated connection in the ribbon wires.
7 – Turn on the Game Boy
With the soldering iron set aside and warming up, it’s time to prep the Game Boy. The screen will need to be on during the repair. This is to ensure each wire is properly fixed.
Insert four—preferably charged—AA batteries into the back of the Game Boy. Snap the battery cover in place and set the power switch to on. Adjust the contrast until the lines are easily visible.
8 – Apply heat to affected wires
Do not touch the soldering iron to the wires.
Wave the soldering iron over the wires that line up with the unwanted vertical lines. Do not hold the soldering iron in one place for long, it’s best to keep the soldering iron moving throughout the repair.
Be patient and carefully sweep over the wires until the vertical lines have disappeared. When finished, place the foam strip back into place.
9 – Turn off the Game Boy
When the vertical lines are completely gone, it’s time to turn off the Game Boy. Set the power switch to “off” in the upper left corner.
10 – Install the front components
The buttons should fit gently into the front shell. There will be a silicone pad to place behind the A/B buttons and D-pad. Each silicon pad is seated into place using a small notch.
To install the front board, fit the speaker into its slot. The speaker uses a small notch to guide it into place. The rest of the board should fall into place with a gentle push, no force should be necessary.
11 – Mount the front motherboard
Using a Phillips number 1 screwdriver, screw the motherboard into place. There will be 10 screws used during this step.
12 – Screw the shell together
Remove the battery cover and any batteries used earlier.
Place both halves of the shell together. Everything should fit together nicely with no force. If the shell doesn’t fit together, investigate the source to ensure the motherboards are flush and level.
Once both halves are aligned, screw the shell together. There will be 6 screws used during this step.
13 – Time for a test run
Congratulations! It’s time to install the batteries for a test run. Find a nice lamp, get comfortable, and enjoy the experience with a nice clean display.
NEXT UP
RetroPie scrapers: what they are and how to use them
You’ve put so much work into setting up RetroPie or EmulationStation. You load it up with legally obtained ROMs only to find that custom theme you installed—you remember, the one from my RetroPie themes guide—has a big blank spot for box art! The Best RetroPie Themes (And How to Install Them)You deserve some personal flair! RetroPie: Build Your
Introducing Howchoo, an enigmatic author whose unique pen name reflects their boundless curiosity and limitless creativity. Mysterious and multifaceted, Howchoo has emerged as a captivating storyteller, leaving readers mesmerized by the uncharted realms they craft with their words.
With an insatiable appetite for knowledge and a love for exploration, Howchoo’s writing transcends conventional genres, blurring the lines between fantasy, science fiction, and the surreal. Their narratives are a kaleidoscope of ideas, weaving together intricate plots, unforgettable characters, and thought-provoking themes that challenge the boundaries of imagination.
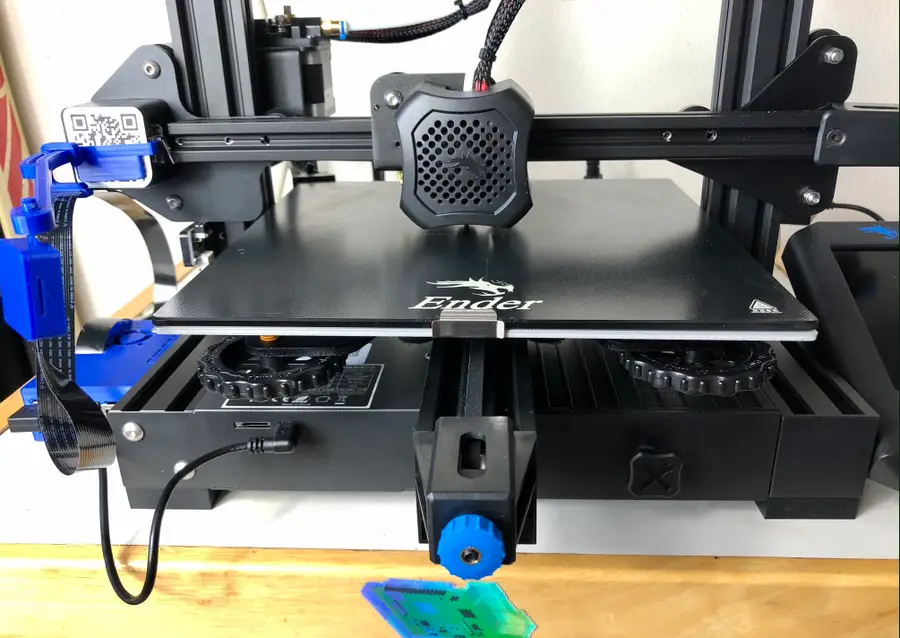
Ah…bed leveling. It’s the first thing you absolutely need to learn how to do with your Ender 3 V2. And don’t feel bad if you get this wrong at first. I did.
The directions for bed leveling that come with the Creality Ender 3 V2 instructional booklet are stupefyingly subpar and definitely will not make sense to those with little to no experience with 3D printers. And getting this wrong could not only mess up your 3D prints but also cause some damage to your beautiful new Ender 3 V2, which you definitely don’t want.
That’s why I’m here to make sure you don’t make the same mistakes that I did, and, say…scratch the printing surface. You haven’t done that already, have you?
Why you need to level the bed
Really what you’re doing when you’re leveling the bed is ensuring that—as the extruder nozzle moves along the x and y-axis of your printing bed—it’s neither too close nor too far away from the printing surface.
If it’s too close, it will either scratch your printing bed or stop the nozzle from extruding any filament.
If it’s too far away, the plastic filament will not stick to the bed and your 3D print will be—well—it won’t be.
Auto-bed leveling with the BLTouch
We highly recommend you install the BLTouch on your Ender 3 V2 to avoid having to repeat the process of manually leveling your bed. It’s an easy to install upgrade that’s going to make your life a million times easier.
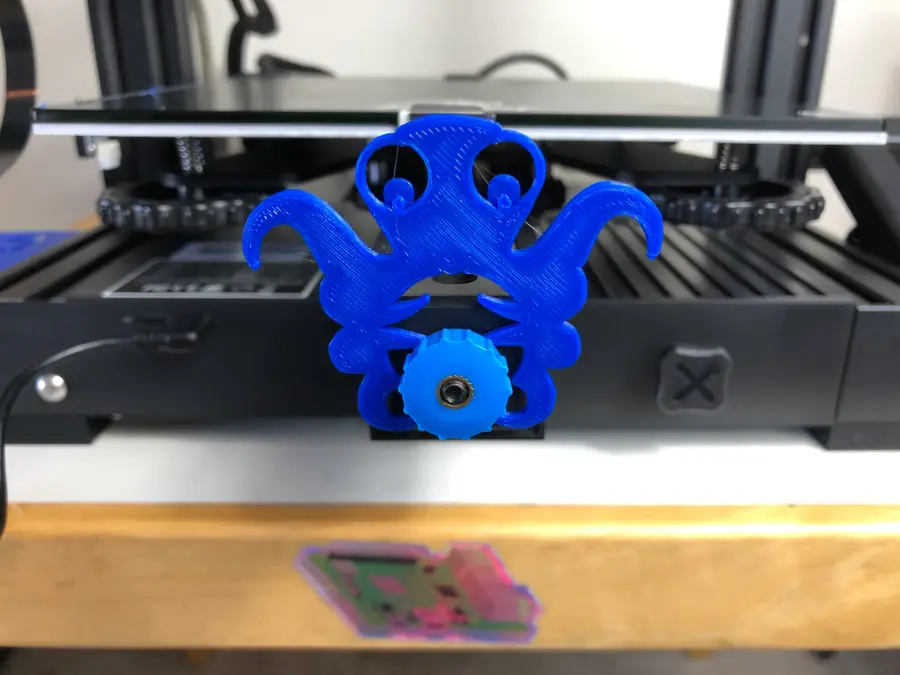
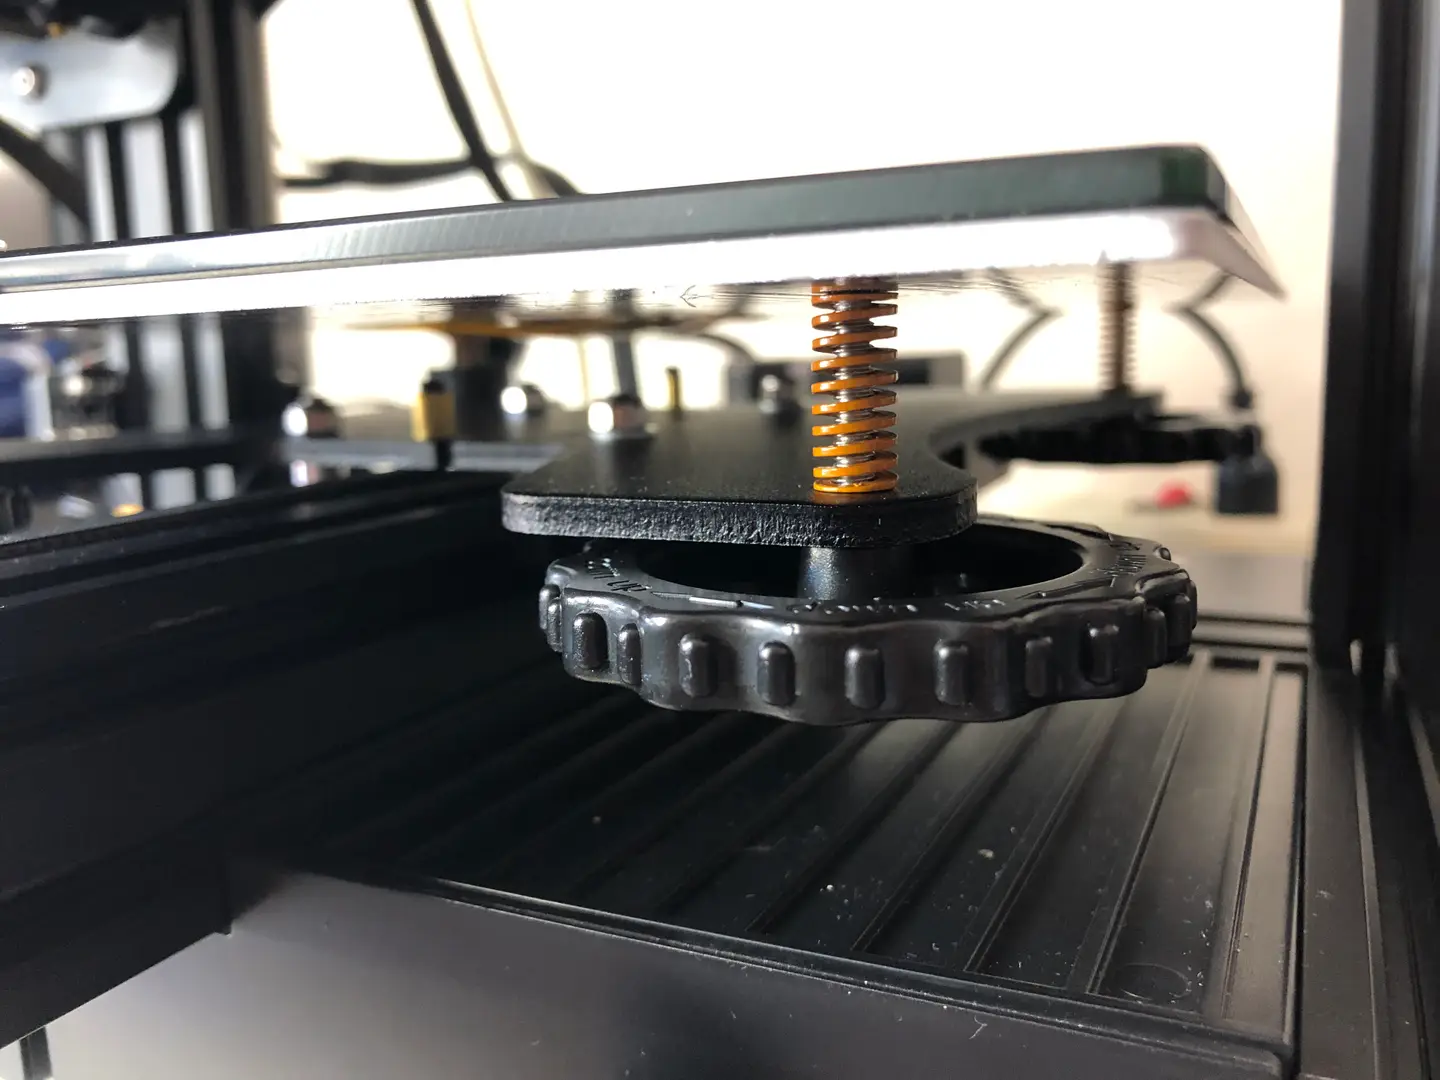
Turn the bed adjustment wheel counter-clockwise a few times or until you’re sure that the nozzle will not hit the surface as it lowers.
🛈 If you’re unsure how low this is, then just lower it completely at first until you get a better sense of it.
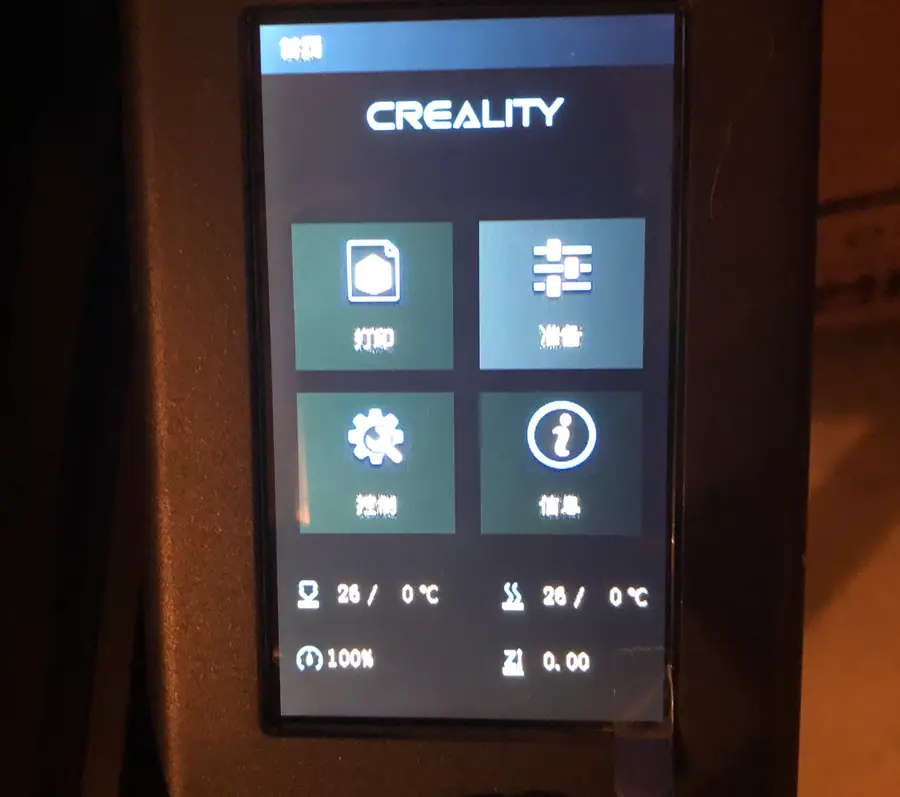
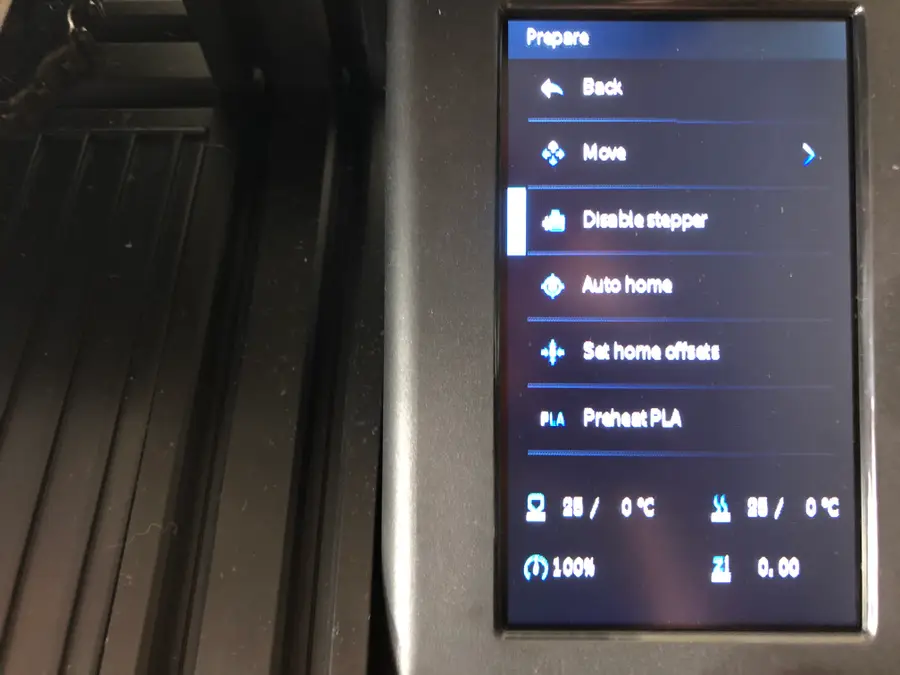
2 – Run “Auto home”
On your Ender 3 V2 screen, go to Prepare > Auto home.
This will run an automatic program that will move the print bed until the nozzle aligns with the left corner.
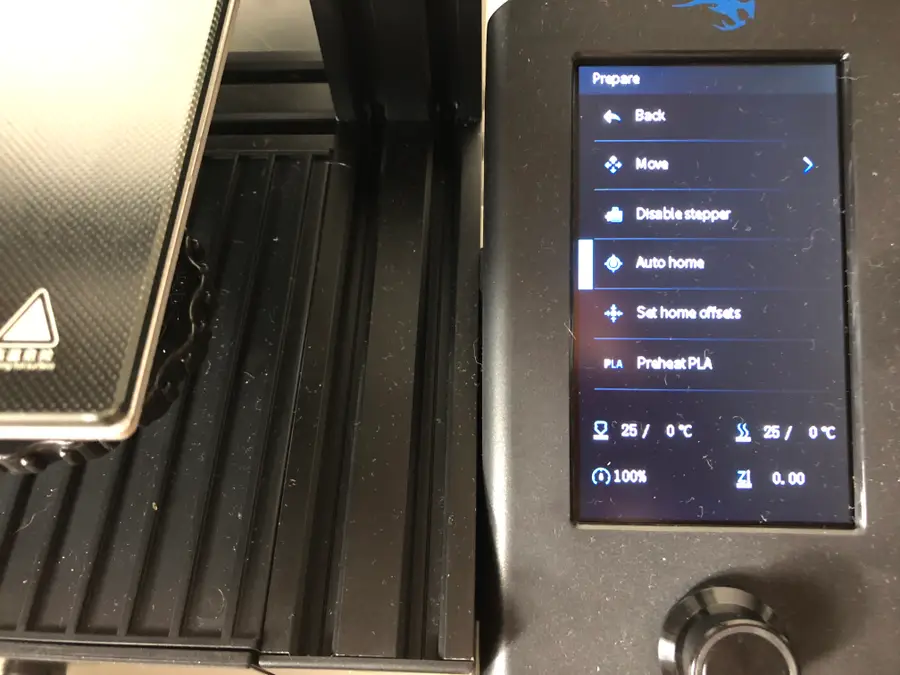
3 – Disable stepper
On your Ender 3 V2 screen, select Disable stepper.
This will allow you to move the print bed freely while you level it.
4 – Use sheet of paper to find the right level
This is the trickiest part of bed leveling and certainly one that you’ll get better at with practice.
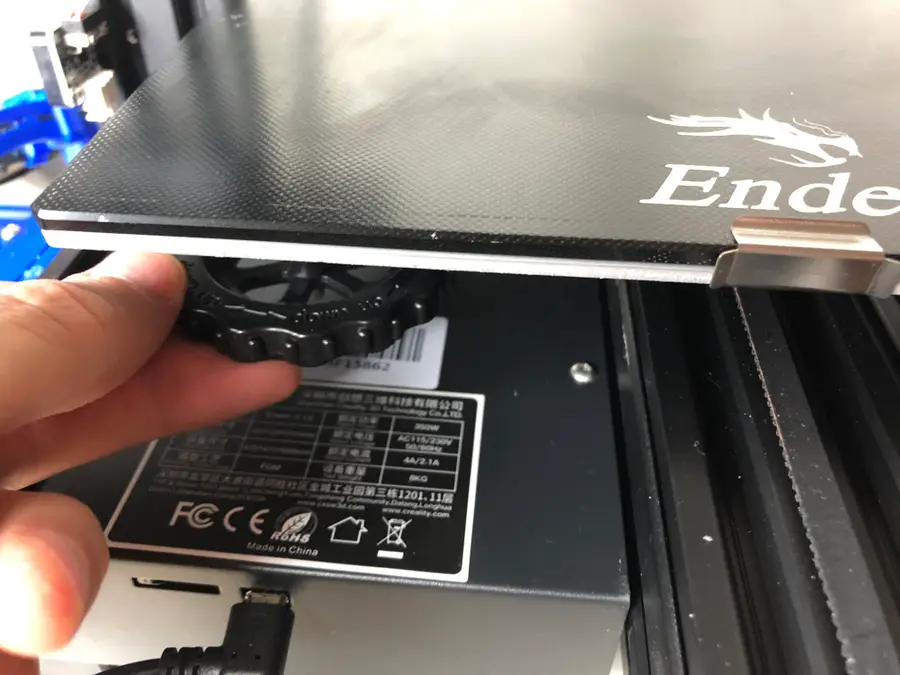
Slide a sheet of paper between the printing nozzle and the print bed.
Simultaneously raise the print bed toward the nozzle by rotating the wheel clockwise, while sliding the sheet of paper back and forth.
When you feel the slightest tension on the paper, stop. It feels almost like the paper is vibrating.
Repeat this process two times around, on each corner of the print bed, moving to the bottom-right, top-right, and top-left.
You’ll need to move the print bed to get the nozzle on the different corners of the printing surface. Make sure you’re not scratching the surface with the nozzle as you move the print bed.
Did you manage to level the bed on your Ender 3 V2? Any suggestions or tips for others looking to level their beds? We’d love to hear more suggestions!
Troubleshooting tip: Z-offset
Many people are running into an issue with an improperly aligned Z-offset. This means that your extruder sits too close or too far away from the print bed when trying to level it.
Blender is one of the most popular open-source 3D creation suites today. It doesn’t cost a dime to use and everything you create is yours to own for good. The community is robust and the dev team still releases new updates on the regular. If you want to get the latest version, you may have
Introducing Howchoo, an enigmatic author whose unique pen name reflects their boundless curiosity and limitless creativity. Mysterious and multifaceted, Howchoo has emerged as a captivating storyteller, leaving readers mesmerized by the uncharted realms they craft with their words.
With an insatiable appetite for knowledge and a love for exploration, Howchoo’s writing transcends conventional genres, blurring the lines between fantasy, science fiction, and the surreal. Their narratives are a kaleidoscope of ideas, weaving together intricate plots, unforgettable characters, and thought-provoking themes that challenge the boundaries of imagination.
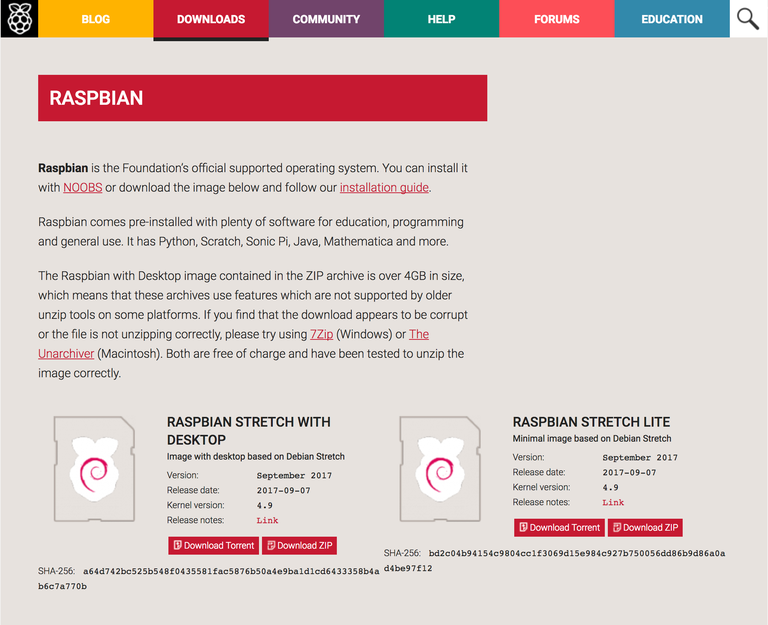
Raspbian is a free Debian-based operating system optimized for the Raspberry Pi, and Stretch is the development code name for Debian 9. In this guide, we’ll download and install Raspbian Stretch for use on the Raspberry Pi.
Since Stretch is no longer the latest version of Raspbian, it’s been removed from the Raspbian Downloads page. But you can still download Raspbian Stretch using our guide that contains links to the Raspbian Archive.
Either full or lite will work for this guide, but the version you choose depends on your project.
Choose Raspbian Stretch with Desktop if you want to have access to the Raspbian GUI; in other words, if you want to log in and be able to access a desktop, icons, etc. like you would with Windows or MacOS.
Choose Raspbian Stretch Lite if you only need to boot to the command line. For simpler Raspberry Pi projects, this is often a good choice since the Lite version uses less power and fewer resources.
2 – Put your micro SD card into your computer
You’ll likely need to use an adapter if your computer has a full-sized SD card slot or no SD card slot.
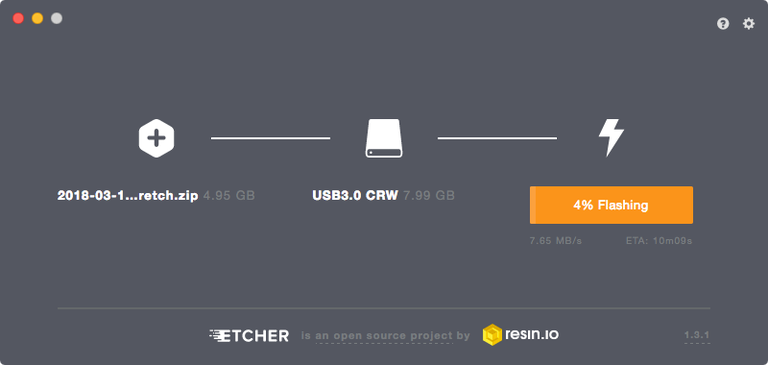
3 – Use Etcher
The easiest way to flash Raspbian Stretch to your SD card is to download and install Etcher. After opening Etcher, select the Raspbian disk image, your SD card, and click Flash. After Etcher finishes running, you’re good to go!
If you prefer to install Raspbian manually and learn a bit more, read on for alternate methods!
4 – Using MacOS
If you’re using MacOS, use the following instructions. Windows instructions are located below.
5 – Open the Disk Utility and find your SD card
To open Disk Utility you can type cmd + space bar and search. Or you can use Finder to navigate to Applications > Utilities > Disk Utility.
6 – Format the SD card
You’ll need to format the SD card to FAT-32. To do so you’ll need to click on the “Apple SDXC Reader” (or the name of whatever adapter you used) in the left column of Disk Utility.
Click the “Erase” tab.
Choose a name for the card (something like “Stretch” will do). For the format, choose MS-DOS (FAT).
Click “Erase” when you’re finished.
7 – Determine the mount point
Using the df command we’re going to determine the mount point.
Type:
df -h
In the output, under the Mounted on column look for the name of your SD card. I named my STRETCH so I’m looking for /Volumes/STRETCH.
Then take note of the filesystem name in the first column. Mine is /dev/disk2s1. This is actually the partition name, but what we’re really concerned with is the device name which is disk2. Copy this device name.
8 – Unmount the volume
For this step you can use either Disk Utility or Finder. In either case look in the left column for the name of your SD card. In my case it’s STRETCH and click the eject symbol.
9 – Locate the disk image
Navigate to the Downloads folder and pen up the Terminal application and type:
cd ~/Downloads
To locate the img type:
ls -lha | grep -i stretch
You should see some output like this:
[Downloads]$ ls -lha | grep -i stretch
-rw-r--r--@   1 tyler  staff   346M Nov  8 14:51 2017-09-07-raspbian-stretch-lite.zip
Now unzip the image. Make sure to use the name of your file.
unzip 2017-09-07-raspbian-stretch-lite.zip
This will create the file 2017-09-07-raspbian-stretch-lite.img.
10 – Flash the disk image
Still in the Terminal, type:
sudo dd bs=1m if=DISK_IMAGE_NAME of=DEVICE_NAME
Make sure to replace the values for DISK_IMAGE_NAME and DEVICE_NAME. Mine looks like this:
Enter your password, wait until it finishes, and you’re done.
Note: You may have noticed that we’re using rdisk2 instead of disk2. You can actually use either, but rdisk2 is significantly faster.
11 – Using Windows
If you’re using Windows to format the Disk you can use the following steps.
12 – Format the SD card
Open Windows Explorer and find your SD card. Right click on the icon and click Format…. Make sure Fat 32 (default) is selected and hit enter.
13 – Download and launch the Win32 Disk Manager
Go here and download the app called Win32 Disk Imager. After downloading the program, click to uncompress the files, and then click Win32DiskImager.exe to launch.
14 – Flash the SD card
In the Win32 Disk Imager, click the blue folder icon and locate the Jessie image you downloaded. Then in the Device box make sure the drive letter for your SD card is selected.
Click the Write button to begin.
15 – Boot your Pi!
Safely eject the SD card from your computer and insert it into your Raspberry Pi. Then, connect your Pi’s power supply to boot it.
There are several ways to go about running a Minecraft server on the Raspberry Pi. In this guide, I’ll cover how to install Nukkit—a cross-platform Minecraft server that’s super easy to set up on the Raspberry Pi. This server should work with PCs, consoles, and tablets running Minecraft 1.14. I’ll be using a Raspberry Pi
Introducing Howchoo, an enigmatic author whose unique pen name reflects their boundless curiosity and limitless creativity. Mysterious and multifaceted, Howchoo has emerged as a captivating storyteller, leaving readers mesmerized by the uncharted realms they craft with their words.
With an insatiable appetite for knowledge and a love for exploration, Howchoo’s writing transcends conventional genres, blurring the lines between fantasy, science fiction, and the surreal. Their narratives are a kaleidoscope of ideas, weaving together intricate plots, unforgettable characters, and thought-provoking themes that challenge the boundaries of imagination.
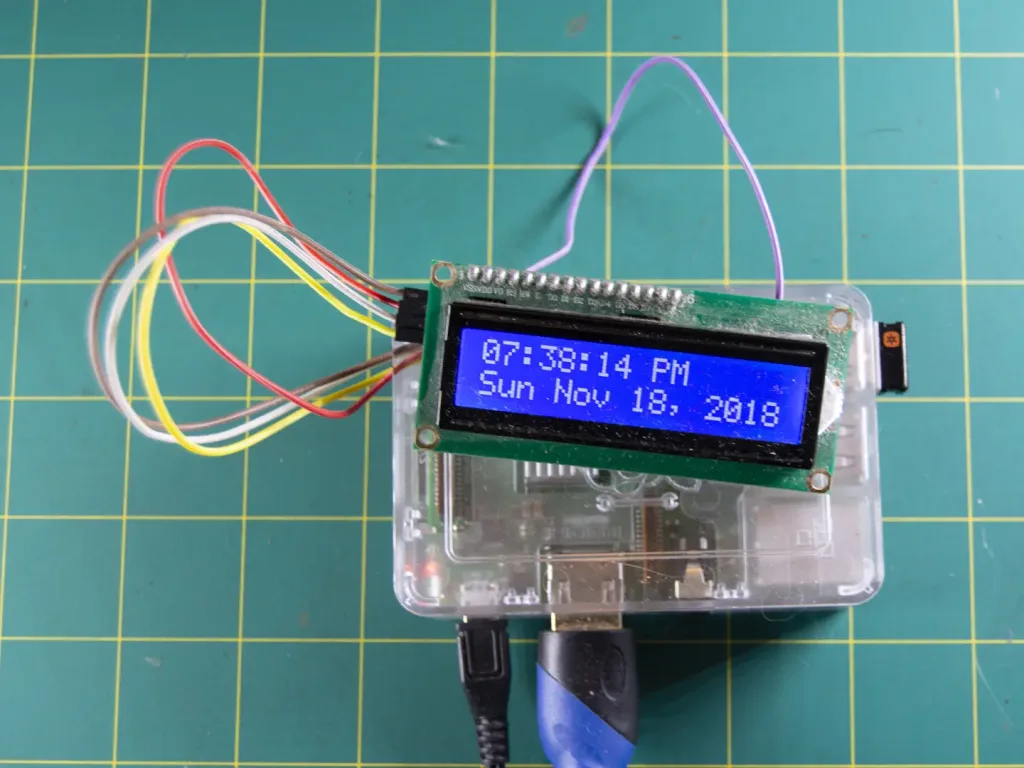
If you don’t know what time it is—this is the project for you! In this guide, I’ll be covering all the basics you need to start your Raspberry Pi smart alarm clock project. We’ll go over the parts we need, how to connect them, and programming the alarm clock functions into the Raspberry Pi.
Which Raspberry Pi will work? This project will work with any Raspberry Pi, including the Raspberry Pi Zero. I have a Raspberry Pi 3 B+ handy, so I’ll be using it throughout this guide.
Note: This guide includes a few python scripts that can be found in this Github repository.
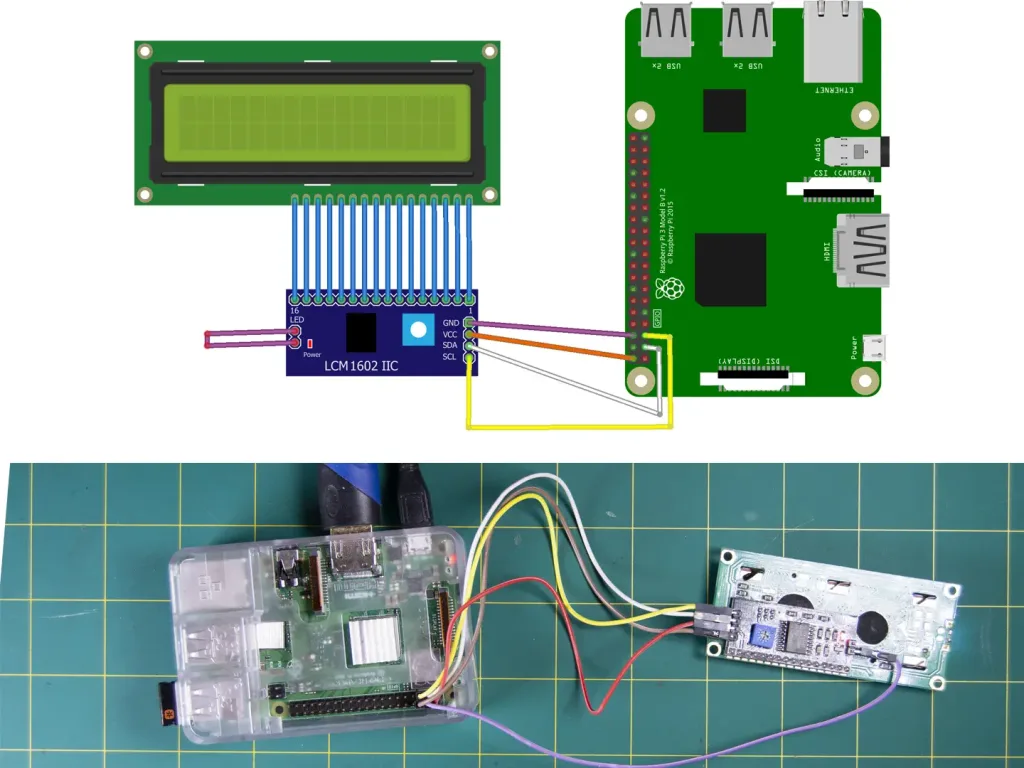
1 – Connect LCD to Raspberry Pi
Pi
LCD
SDA
SDA
SCL
SCL
5V
VCC
GND
GND
5V
LED
Use the table above and diagram reference to connect your i2c LCD screen to the Raspberry Pi. Note: I’m using a backpack module to make the process a little easier. You can connect the LED to either the LCD itself or the Pi for custom control options.
2 – Install and update Raspberry Pi OS
We’ll be creating our Raspberry Pi alarm clock on top of Raspberry Pi OS (formerly Raspbian). Make sure Raspberry Pi OS is installed—visit our Raspberry Pi OS installation guide to get started.
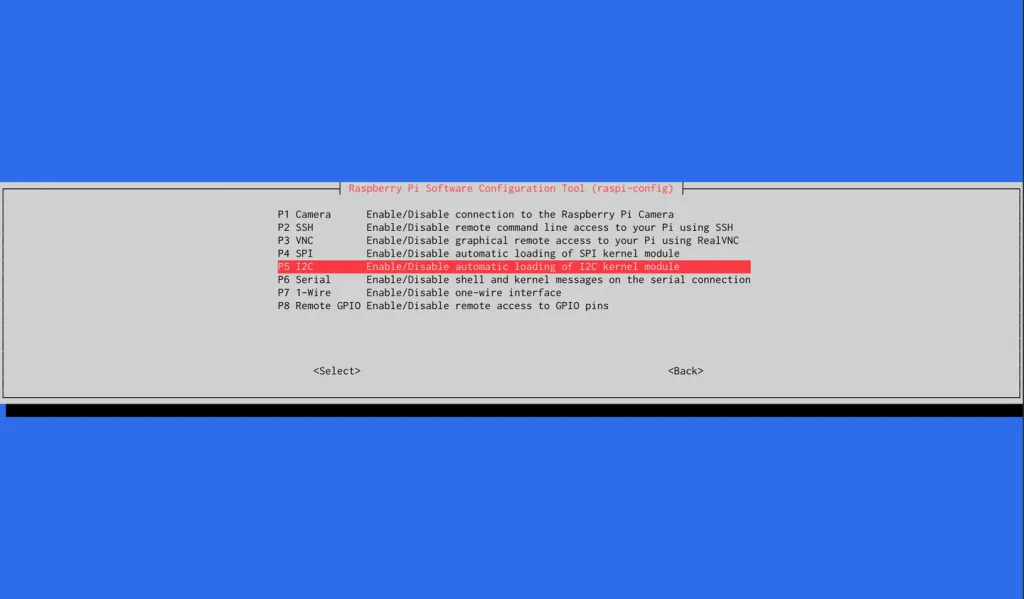
To use our LCD screen, we’ll need to enable i2c. Access the Raspberry Pi configuration menu:
sudo raspi-config
Under Interfacing Options, select the option to enable I2C. Confirm the change and restart your Raspberry Pi.
4 – Download I2C tools package for LCD screen
We need to see which I2C address our LCD is using. To do this, we’ll be installing a package called I2C Tools. Run the following command:
sudo apt-get install i2c-tools
Install the following SMBUS Python library:
sudo apt-get install python-smbus
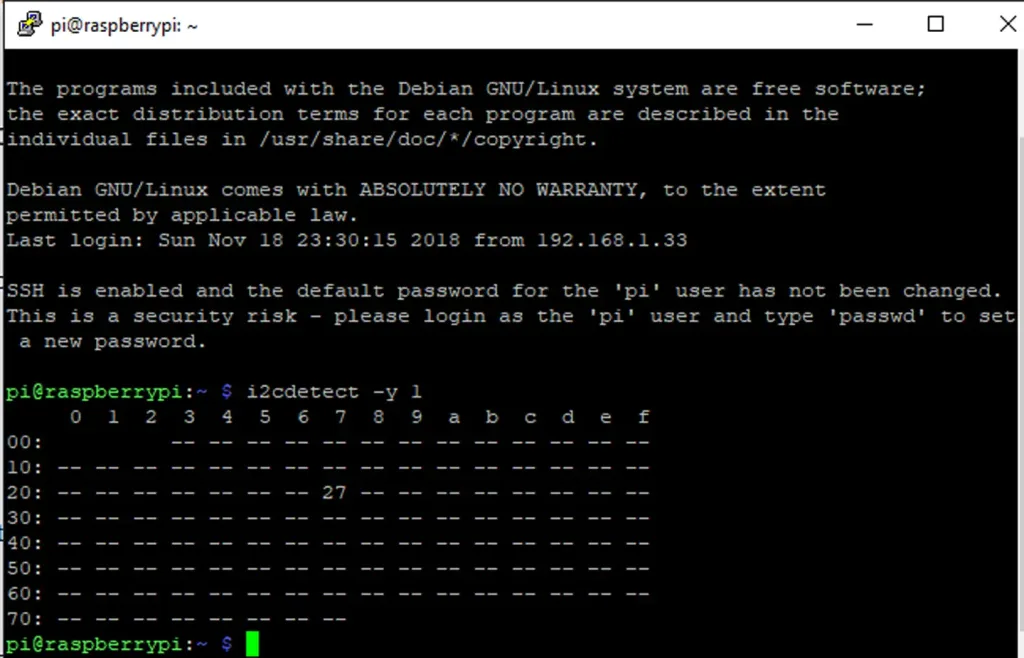
Restart the Pi and run this command to find the I2C address.
i2cdetect -y 1
This will return a table full of addresses. Jot down the number used by your LCD screen, mine happens to be 27. Update i2c_driver.py with the address number your screen is using on line 6.
5 – Install the Python i2c driver
Next we’ll need to install this Python i2c driver. On the GitHub repository for this project, we’ve added a driver that you can use! It’s basically just a refactor of a driver provided by DenisFromHR on GitHub.
Installing the driver is pretty simple. Just make sure you’re in your home directory and use wget.
cd ~
wget https://raw.githubusercontent.com/Howchoo/smart-alarm-clock/master/i2c_driver.py
6 – Install the RPLCD library
Now it’s time to set up the RPLCD library. Begin by installing PIP:
sudo apt-get install python-pip
Once complete, install the RPLCD library package. Run the following:
sudo pip install RPLCD
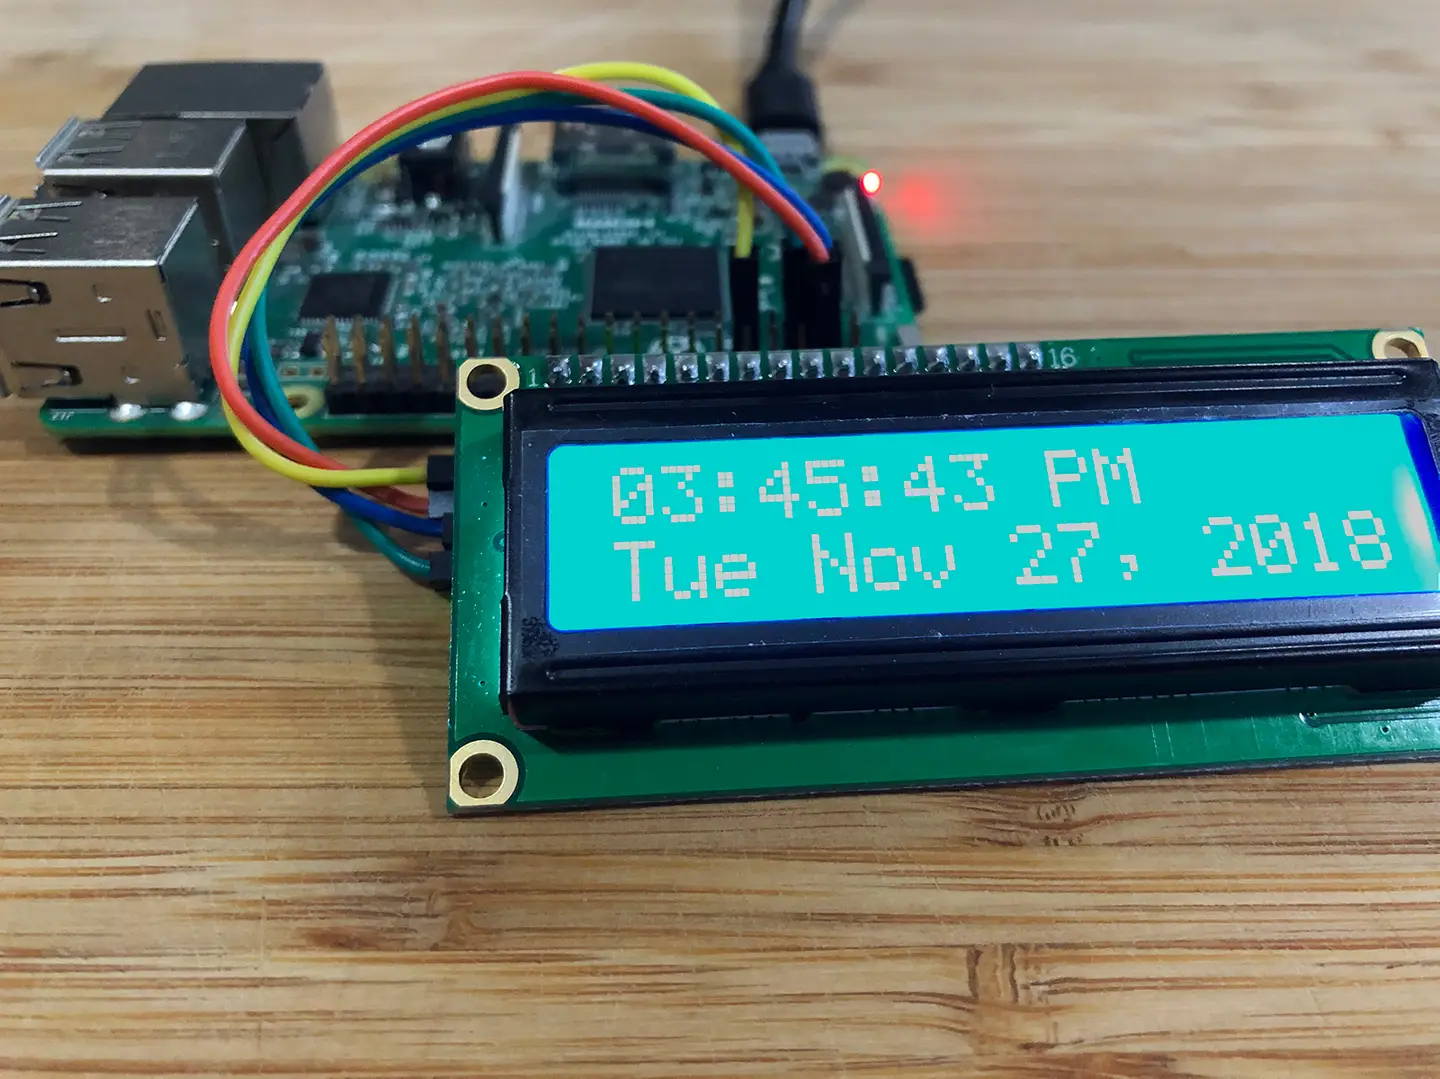
7 – Create a python script to display time
It’s time for the fun part! We need our LCD screen to give us some kind out output. The following script will display the time and date on our LCD screen. You can get creative with output settings.
display.py
#!/usr/bin/env python

import I2C_LCD_driver
import time


mylcd = I2C_LCD_driver.lcd()


while True:
    mylcd.lcd_display_string(time.strftime('%I:%M:%S %p'), 1)
    mylcd.lcd_display_string(time.strftime('%a %b %d, 20%y'), 2)
Save this python script to a file and drop it in /home/pi. I’ve named my file display.py.
Note: I’m from America so I prefer my date with the Month in front. However, you can use this opportunity to adjust the output however you like. Visit this Ubuntu page for more information on clock output customization.
8 – Set the timezone
In our display.py script, Python’s time module will output the current time in whatever timezone is set on the Raspberry Pi. So, in order to see the time in our local timezone, we’ll need to configure the timezone.
Make sure the alarm script is running the alarm when scheduled. Plug in your speaker and run the following script. Replace alarm.py with the name of your alarm script file.
sudo python alarm.py
Note: If you have trouble when testing your alarm, try scheduling it for at least 5-10 minutes into the future. Sometimes the Pi needs a few minutes before will work.
13 – Setup scripts to launch at boot
Open the crontab file with the following command
crontab -e
At the end of the file, add the following two lines of code. Be sure to replace the ‘display.py’ and ‘alarm.py’ with your custom display and alarm scripts.
Save and close the file. Congratulations! Every time your Pi restarts, it’s going to tell you the time and schedule your custom alarm.
14 – Making a smart clock
Now let’s get to the good stuff. To make our alarm clock a smart alarm clock, we’ll be using AVS. Visit our guide here to learn how to set up AVS on the Raspberry Pi. Using Alexa, you can create commands and even trigger custom python scripts!
If your Pi has an internet connection (see our guide on setting up WiFi on your Pi), the time should remain perfectly in sync. Where you take the project from here is up to you. Congratulations! Your Raspberry Pi is now a completely functional alarm clock.
There are several ways to go about running a Minecraft server on the Raspberry Pi. In this guide, I’ll cover how to install Nukkit—a cross-platform Minecraft server that’s super easy to set up on the Raspberry Pi. This server should work with PCs, consoles, and tablets running Minecraft 1.14. I’ll be using a Raspberry Pi
Introducing Howchoo, an enigmatic author whose unique pen name reflects their boundless curiosity and limitless creativity. Mysterious and multifaceted, Howchoo has emerged as a captivating storyteller, leaving readers mesmerized by the uncharted realms they craft with their words.
With an insatiable appetite for knowledge and a love for exploration, Howchoo’s writing transcends conventional genres, blurring the lines between fantasy, science fiction, and the surreal. Their narratives are a kaleidoscope of ideas, weaving together intricate plots, unforgettable characters, and thought-provoking themes that challenge the boundaries of imagination.
Laptops, smartphones, tablets, even lightbulbs—an endless number of devices now have the ability to connect to your local network and the wider internet. Keeping an eye on network-capable devices is important, especially if you’re worried about network security or you’re trying to troubleshoot bandwidth issues.
This is where a network monitor can prove useful. There are a few ways to do this, but if you want to keep an eye on the devices and data traveling over your network 24/7, then you may want to set up a network monitor using a Raspberry Pi single-board computer.
Running in the background, your Raspberry Pi will log network traffic and performance, allowing you to troubleshoot or monitor certain issues. If you want to set up a Raspberry Pi network monitor, here’s what you’ll need to do.
1 – Creating a Raspberry Pi network monitor using NEMS
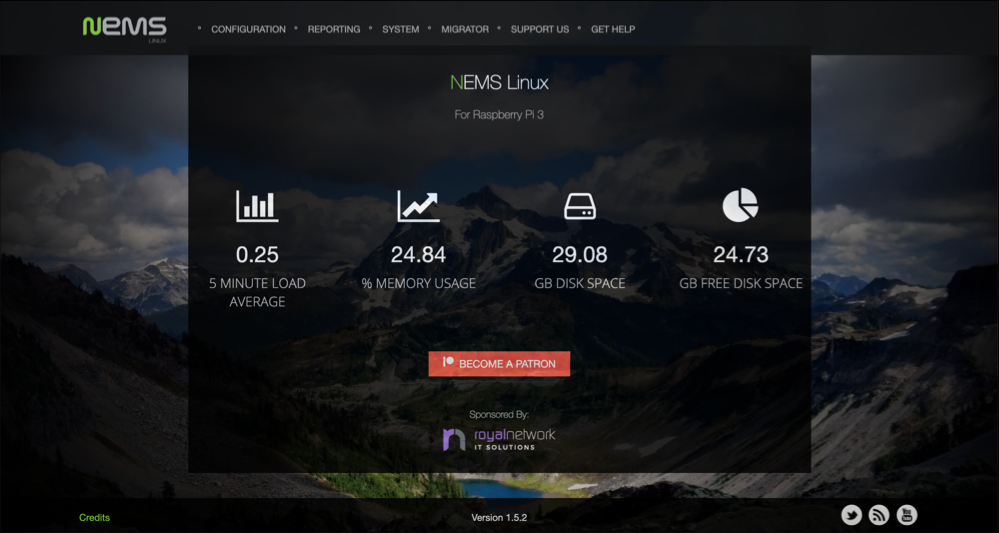
For this project, we’ll be using Nagios, which is an industry-standard, open-source monitoring tool for Windows and Linux PCs and servers. Specifically, we’ll be using NEMS (Nagios Enterprise Monitoring Server), a version of Nagios that you can use on the Raspberry Pi as a replacement for Raspberry Pi OS.
Nagios (on NEMS) has a range of features that make it the ideal option for network monitoring, as we’ll explain further. To run NEMS, you’ll need a Raspberry Pi 3 or 4. Older Raspberry Pi’s may work with some features disabled, but the NEMS development team recommends the newest Pi models for best performance.
To install NEMS on a Raspberry Pi, you’ll also need a microSD card with a minimum size of 16GB, with 32GB preferred.
A keyboard, mouse, and monitor are all unnecessary, as you’ll be able to access NEMS over SSH or by using a dashboard interface that you can access from your web browser.
Before you can use NEMS, you’ll need to first flash a microSD card (16GB and above in size) with the latest NEMS image, which you can download from the NEMS website.
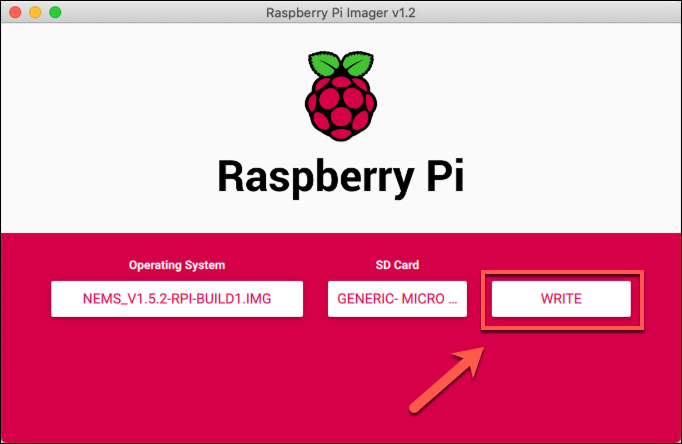
You can then flash the image to your Raspberry Pi using the Raspberry Pi Imager, a tool created by the official Raspberry Pi Foundation for installing new operating systems. The Raspberry Pi Imager works on Windows, macOS, and Linux, and can be downloaded from the Raspberry Pi Foundation website.
Open the Raspberry Pi Imager tool to begin, then click the Choose OS button.
In the Operating System selection menu, press the Use custom option. You’ll need to find and select your NEMS image file (in the IMG file format).
With the NEMS image file selected, click Choose SD Card to select your microSD card.
Once you’re ready to write the image to your SD card, press the Write button. This will take a bit of time to complete.
If the image is written to your microSD card successfully, remove it from your PC and return it to your Raspberry Pi. You’ll now be ready to begin setting up and using NEMS.
3 – Signing in to NEMS on a Raspberry Pi
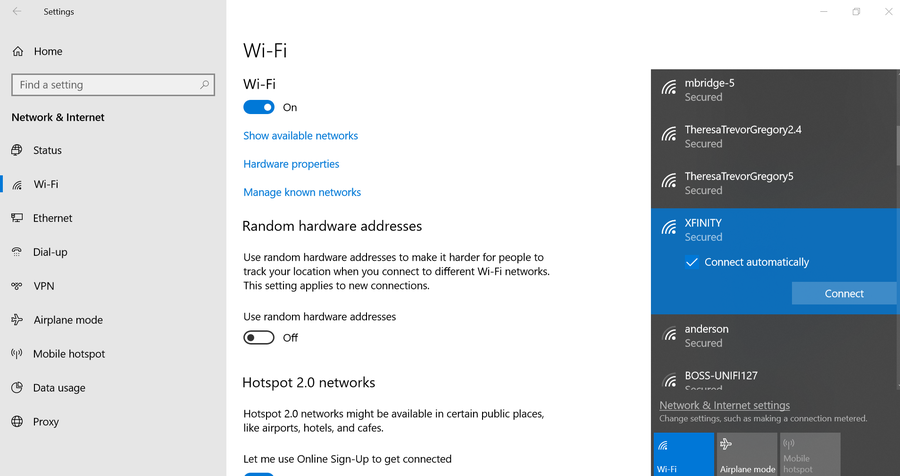
During setup, it’s best to connect your Raspberry Pi running NEMS to your local network using a wired ethernet connection. If that isn’t possible, you’ll need to set up Wi-Fi on your Raspberry Pi by adding a wpa_supplicant.conf file to the boot partition on your microSD card, but this may not work effectively.
You’ll also need to know the local IP address for your Raspberry Pi when you first boot it. You can find this from your local router’s DHCP list, or by using apps like Fing or nmap to scan your local network.
To set up NEMS, power up your Raspberry Pi with your microSD card inserted. Once your Pi is set up, access NEMS from your web browser by typing http://ip-address, replacing ip-address with the IP address for your Raspberry Pi.
Alternatively, you can visit your NEMS web portal at http://nems.local instead. This may or may not work, depending on how your network is currently configured.
You can also follow these instructions by making an SSH connection to your Pi, using the default username and password (nemsadmin for both).
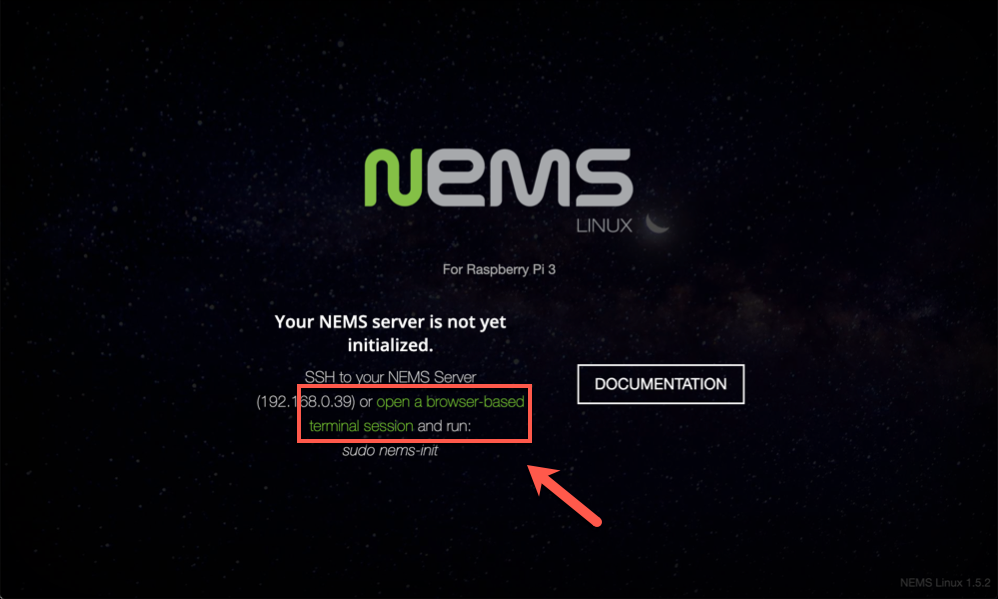
If you decide to use the web interface, you’ll see the Not Initialized screen. Click the open a browser-based terminal session link to open the web-based terminal.
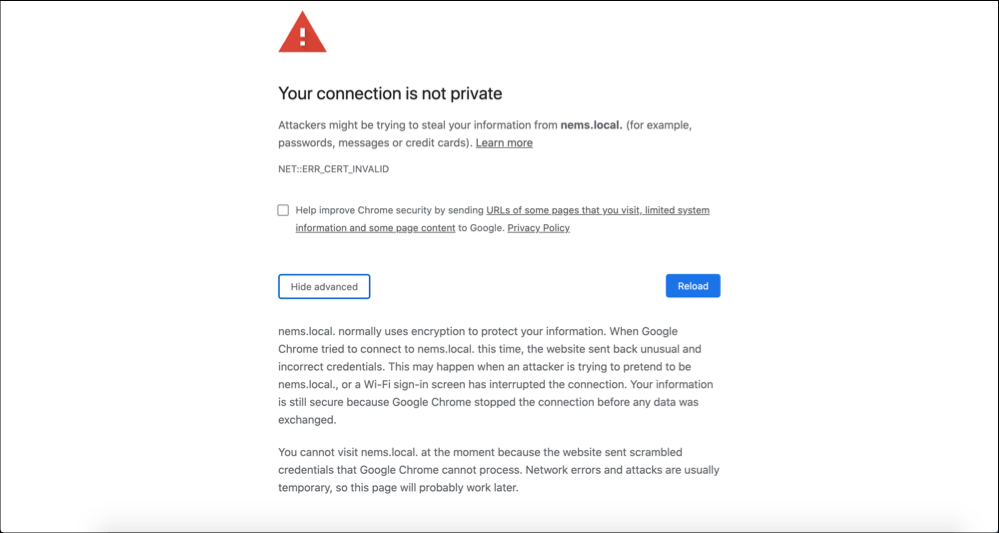
Web browsers like Google Chrome will sometimes block this page due to a slight mismatch with the security certificate issued for NEMS, and you’ll need to bypass this. If you’re using Chrome and you get this error, press the Advanced button, then type thisisunsafe on your keyboard.
Don’t worry—this is safe to do! You can regenerate your SSL certificates at a later stage to overcome this problem once your Raspberry Pi has been correctly configured.
Once the portal loads, sign in using the default username and password (nemsadmin) to access the NEMS admin portal (named Cockpit).
4 – Configuring NEMS on a Raspberry Pi
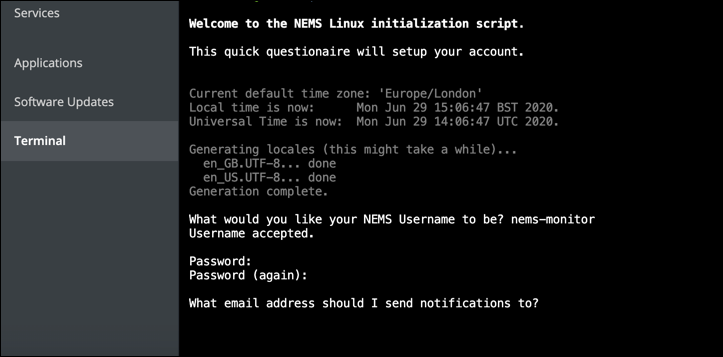
Once you’ve signed in, type sudo nems-init at the web terminal, accessible from the Terminal section. This will begin the initial configuration.
You’ll first need to select your geographical area from the configuration menu using your keyboard arrow keys. Once you’ve selected an option, hit the tab key on your keyboard to select OK, then hit enter to proceed.
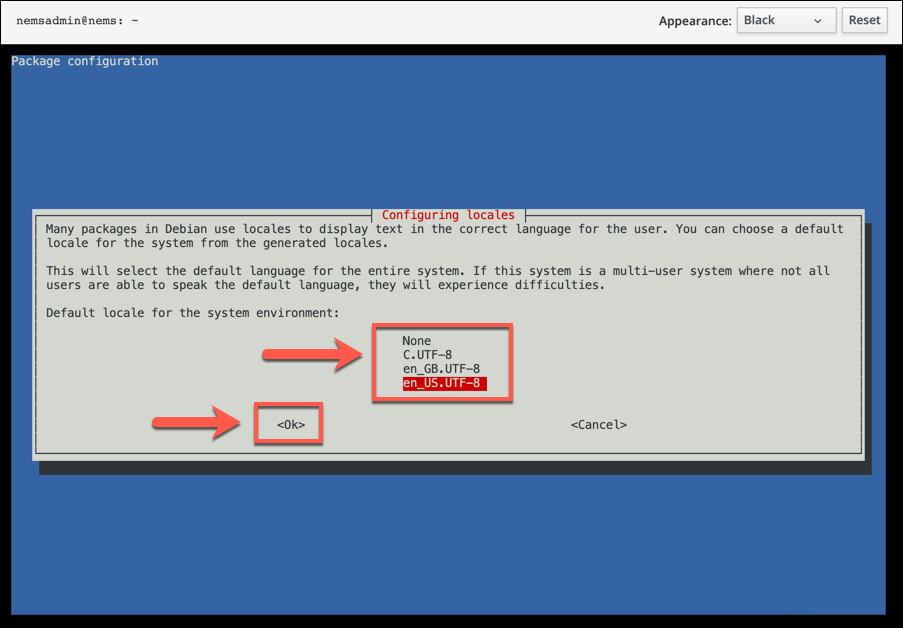
Select your nearest city from the next list, hitting enter (or tab and enter) to confirm. You’ll then need to follow a similar process for determining your locale, which is used to set certain keyboard and language settings.
Find your preferred language (or languages) in the list (eg. en_US.UTF-8). Once your chosen languages are selected, hit tab and enter on your keyboard to proceed. You’ll then need to confirm the default locale from the next menu—use your arrow keys to select your preferred locale, then hit enter (or tab and enter) to confirm.
Your locale settings will be applied at this point, which may take a little bit of time to complete. Once the configuration is complete, you’ll move to the next stage of the setup process.
You’ll need to choose a new username and password to use with NEMS next. Type a username into the terminal, then hit enter to confirm. For security reasons, we’d avoid common usernames like admin or root here.
Repeat the process by providing a secure password for your new user account, which you’ll need to type twice to confirm. If the password is accepted, provide an email address at the next stage, which NEMS will try to use to send you urgent notifications while you’re not actively monitoring the Nagios portal, although this may require further configuration to work.
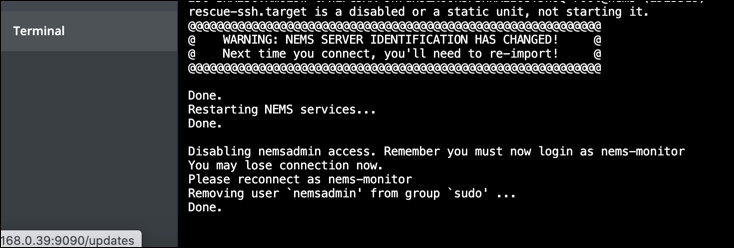
The NEMS initialization script will set up your new account at this stage, applying the correct user privileges and generating secure SSH certificates for remote connections.
You’ll need to sign-out once NEMS confirms the process is complete, as the initial nemsadmin user account you were using will have been disabled.
To do this, press the menu in the top-right and click Log Out. This will return you to the portal authentication page, where you can sign in using your new username and password to make further changes to your NEMS configuration and view performance logs for your Raspberry Pi.
If you encounter any problems, restart your Raspberry Pi to fully load any changes you’ve made to your NEMS configuration.
5 – Available NEMS dashboards for network and system monitoring
You’ll be able to view installed Nagios network plugins and dashboards from the NEMS web portal, accessible at https://nems.local or https://ip-address (replacing ip-address with your Pi’s IP address).
Other plugins you wish to install may come with their own instructions and prerequisite packages, so be sure to check the manpages and documentation for these packages first.
By default, NEMS includes some useful web dashboards and tools for you to use, including:
NEMS Adagios, a configurable web dashboard for your Nagios services (accessible at https://nems.local/adagios/status)
Nagios Core, the original and configurable Nagios web dashboard (accessible at https://nems.local/nagios/)
NEMS Mobile, a basic mobile UI for viewing Nagios data from mobile devices (accessible at https://nems.local/mobile)
NEMS TV Dashboard, a dashboard for Nagios data for display on a large monitor or TV (accessible at https://nems.local/tv/)
NEMS Tactical Overview, an emergency dashboard that will display urgent problems with any of your Nagios monitored devices or services (accessible at https://nems.local/nagiostv/)
Monitorix, a lightweight network and system monitoring dashboard (accessible at https://nems.local/monitorix/)
Cockpit, the NEMS web admin portal with web terminal and other tools and statistics available (accessible at https://nems.local:9090/)
RPi-Monitor, a dashboard to monitor your Raspberry Pi system resources (accessible at http://nems.local:8888/)
Monit, a dashboard to monitor whether services such as Nagios, Samba, Monitorix and others are working or not (accessible at https://nems.local:2812/)
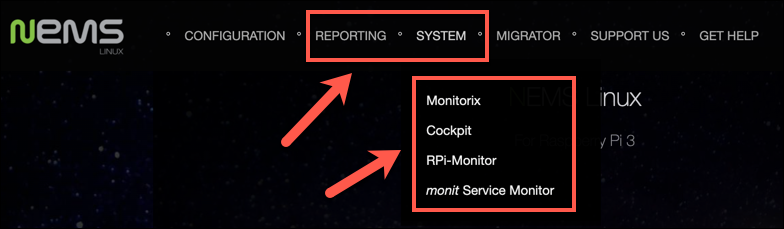
You can access these services from the Reporting and System menus on the NEMS web portal, which you can access at https://nems.local/ or https://ip-address (replacing ip-address with your Raspberry Pi’s IP address),
6 – Using SNMP for general network monitoring with Cacti
The Simple Network Management Protocol (SNMP) is used to share information between network-capable devices on a local network. You can use this protocol on a Raspberry Pi to gain an overview of your network for basic network monitoring.
To do this, you’ll need to use RRDTool and Cacti. RRDTool is used for logging real-time data using SNMP, while Cacti presents it in a dashboard you can use alongside other NEMS dashboards. This will only work with routers that support SNMP, so be sure to check this first.
You’ll need to open the web terminal at https://nems.local:9090/system/terminal or https://ip-address:9090/system/terminal (replacing ip-address with the Raspberry Pi IP address) to begin the download, configuration and installation process.
You can also do this over an SSH connection if you’d prefer.
7 – Downloading and configuring Cacti
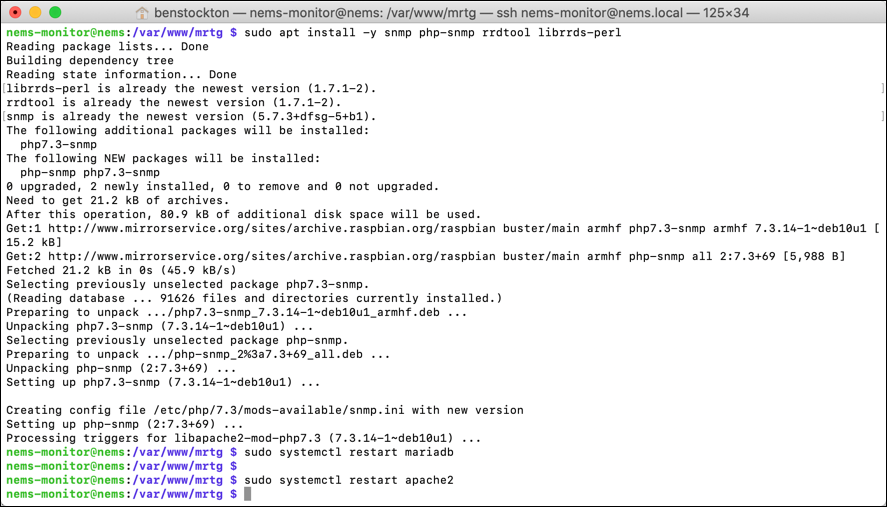
To install the necessary packages, type the following in the open terminal window, typing Y to confirm:
You’ll need to restart your web server (Apache) and database (MariaDB) services to ensure RRDTool loads, as well as add timezone information to your database. Type the following at the terminal to do this, using the password nagiosadmin:
mysql_tzinfo_to_sql /usr/share/zoneinfo | mysql -u root -p mysql
sudo systemctl restart mariadb
sudo systemctl restart apache2
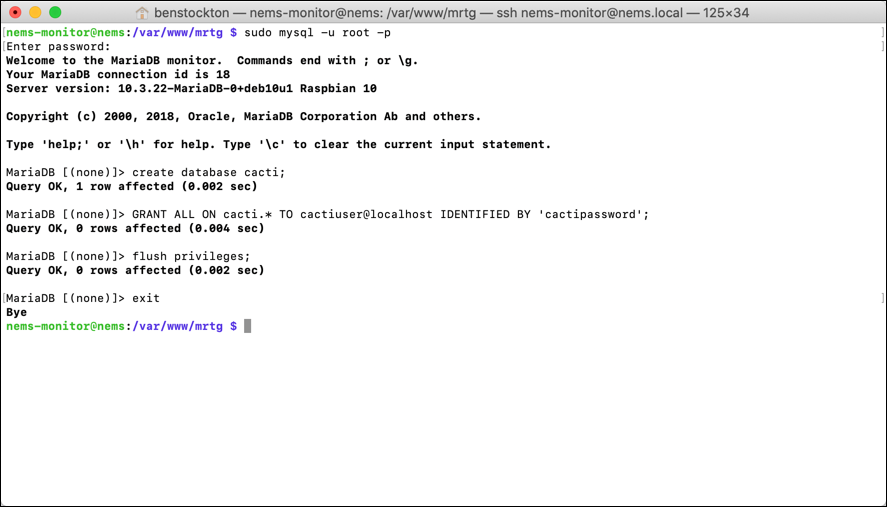
You’ll need to create a new database for Cacti to use. First, sign in to the MariaDB terminal using the username root and password nagiosadmin:
sudo mysql -u root -p
Once you’re signed in, type the following into the terminal window to create your new database:
create database cacti;
GRANT ALL ON cacti.* TO cactiuser@localhost IDENTIFIED BY 'cactipass';
flush privileges;
exit
It’s advisable to replace the default pass listed here (cactipass) with a more secure alternative.
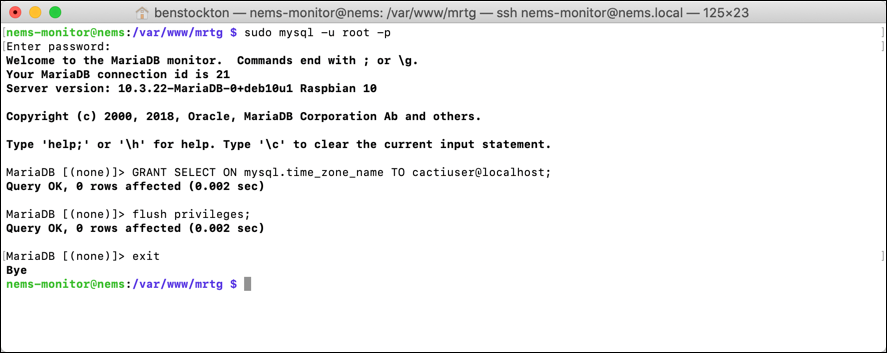
Once you’ve created your new database user (cactiuser), you’ll need to give it access to the MySQL timezone table. To do this, type the following at the terminal:
sudo mysql -u root -p
GRANT SELECT ON mysql.time_zone_name TO cactiuser@localhost;
flush privileges;
exit
With the database for Cacti ready, you can finally install the Cacti dashboard. To do this, type the following into the terminal to update your database, download and extract Cacti, and load the configuration into your new Cacti database:
sudo mysql_upgrade -u root -p
sudo service mysqld restart
cd /tmp
wget https://www.cacti.net/downloads/cacti-latest.tar.gz
tar -zxvf cacti-latest.tar.gz
sudo mv cacti-1* /opt/cacti
sudo mysql -u root -p cacti < /opt/cacti/cacti.sql
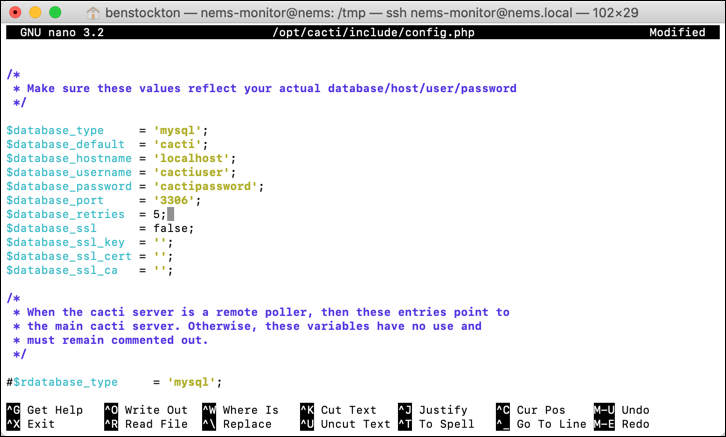
You’ll need to update the Cacti config to use the correct username and password by typing sudonano /opt/cacti/include/config.php to edit the file, adding your new username and password to the $database_username and $database_password sections.
Press Ctrl+O and Ctrl+X to save and exit. Cacti will need to be told to update on a regular basis, which you can do using crontab. The following steps will set Cacti to update every 5 minutes, but you can change this if you would prefer:
Press Ctrl+O and Ctrl+X to save and exit the file. You’ll next need to update your Apache web server configuration, so open the configuration file with sudo nano /etc/apache2/sites-available/cacti.conf at the terminal and adding the following:
Alias /cacti /opt/cacti


      Options +FollowSymLinks
      AllowOverride None
      = 2.3>
      Require all granted
Once this is added, press Ctrl+X and Ctrl+O to save and exit. Finally, you can enable your configuration for Cacti, restart Apache and create a log file for Cacti (useful for troubleshooting) by typing the following:
If these steps complete successfully, you’re now ready to begin installing Cacti.
8 – Installing Cacti
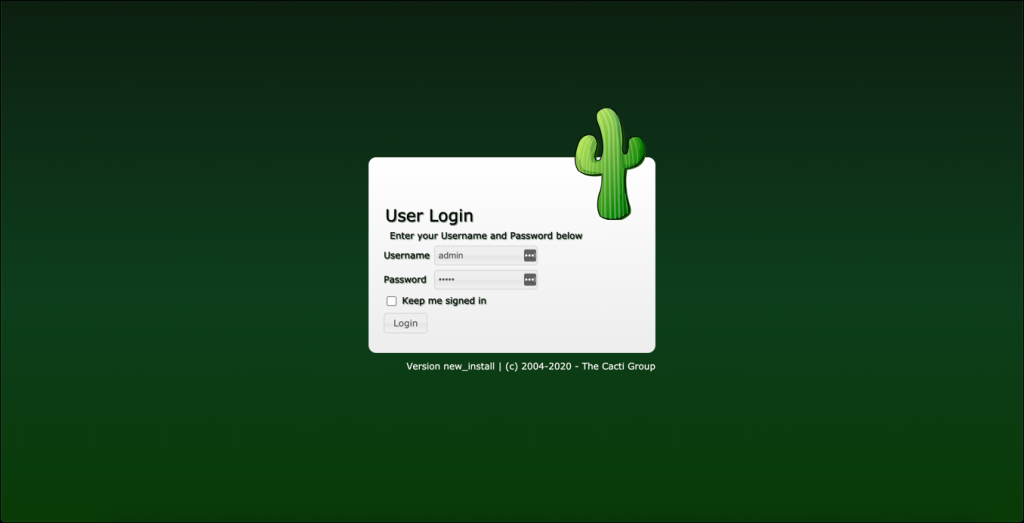
You should now be able to access Cacti by opening your web browser and accessing the installation dashboard at https://nems.local/cacti or https://ip-address/cacti (replacing ip-address with your Raspberry Pi’s IP address).
Sign in using the username admin and password admin to begin the installation.
Cacti will ask you to change the default password. Type the existing password and a new password, then press Save to confirm.
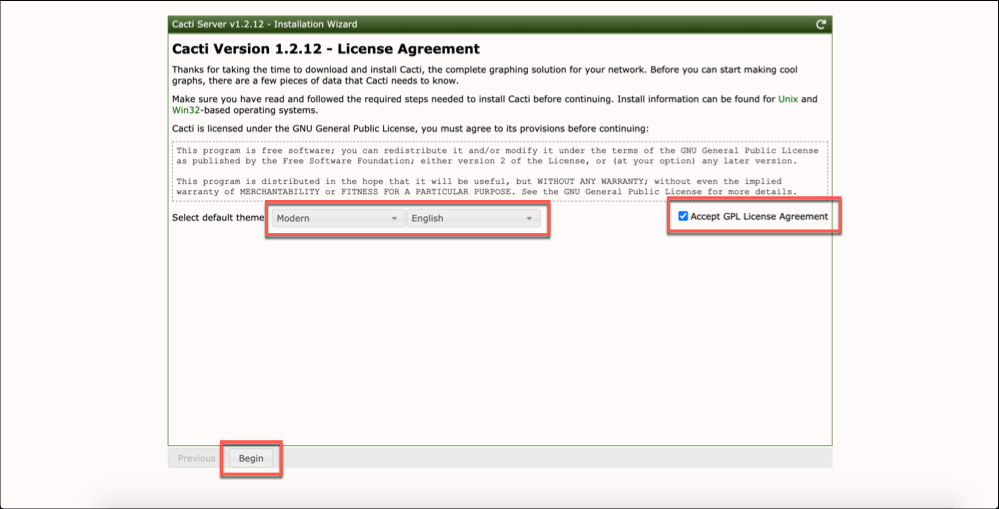
You’ll be required to accept the license agreement next. Press the Accept GPL License Agreement checkbox, then select a theme and language from the available drop-down menus.
Once you’re ready, click Begin to proceed.
Cacti will check that the required PHP and MYSQL modules and databases are ready to use. If there are any warnings or errors, these will be listed here, and you may have to fix these before you can proceed.
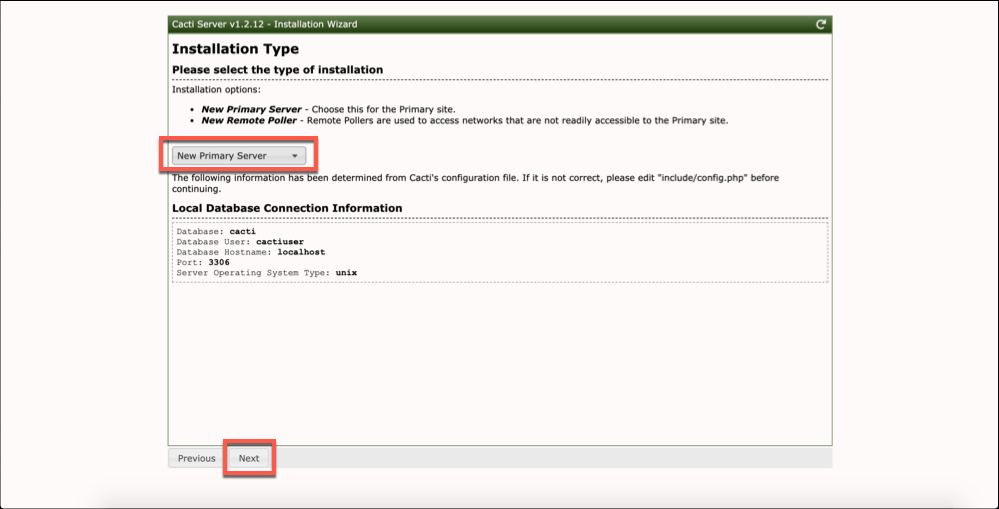
If there are no errors (or only minor warnings), click Next to move to the next stage. You’ll want to leave the Installation Type as New Primary Server, then click Next.
Cacti will perform another check to confirm that it has permissions to write to your microSD card. Assuming no problems, click Next to proceed.
You’ll also be asked to confirm that critical binary locations are correct. These should all be correct with a green tick to confirm next to each option, so click Next to move to the next stage.
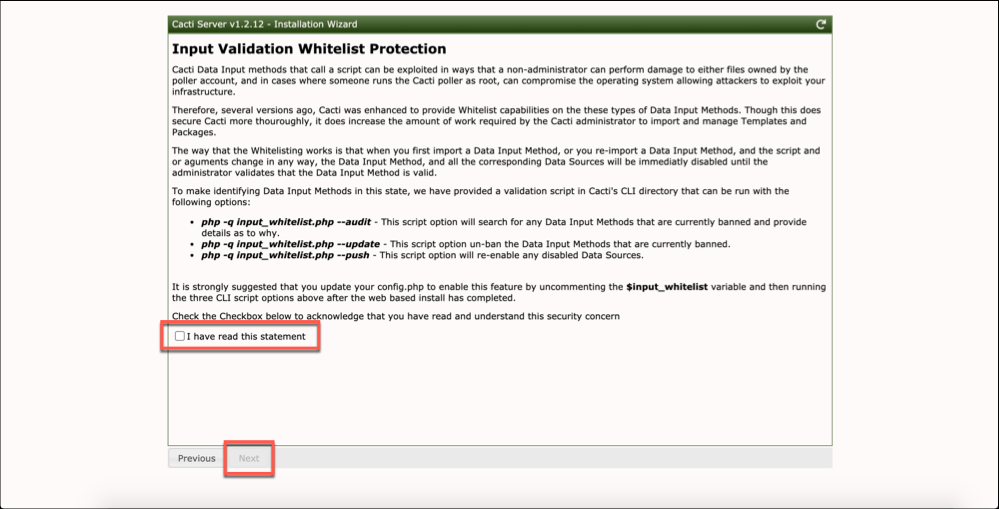
Cacti uses whitelist protection for security, which you can activate using the instructions shown at the next stage. This isn’t strictly necessary, however, so click the I have read this statement checkbox, then click Next.
The default settings at the next stage should be fine to leave, but you can change how often Cacti polls your network for data here. Make sure that the IP address range listed under Network Range matches the IP range on your local network before clicking Next.
Cacti uses default templates to pool data from various different types of devices. It’s recommended to leave all of the templates at the Template Setup stage enabled, then click Next.
Cacti will also check whether your database is compliant and safe to write to. Check this page for warnings (and correct any that appear accordingly), then click Next.
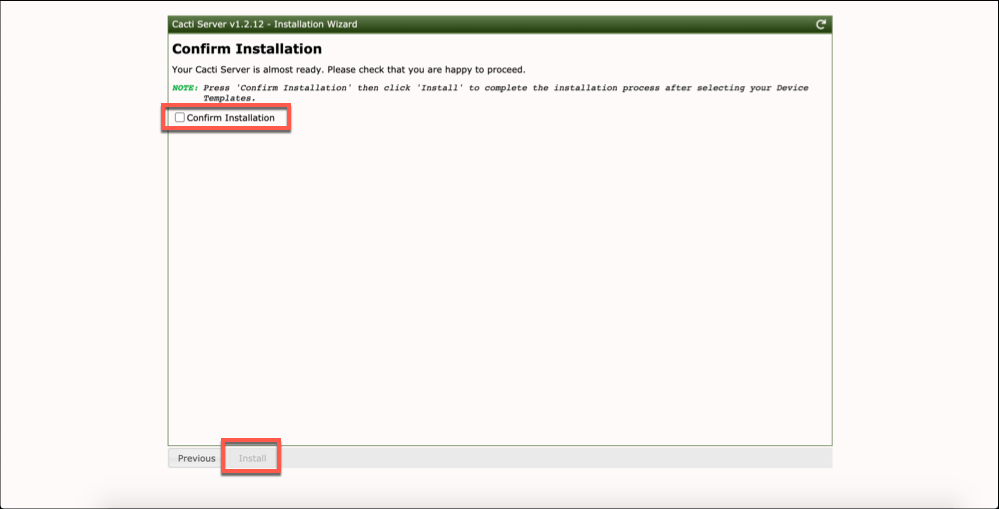
Finally, click the Confirm Installation checkbox, then click Install to begin the installation.
The installation will take a little bit of time to complete. Once it’s done, you can access your network data by clicking the Get Started button at the bottom of the page.
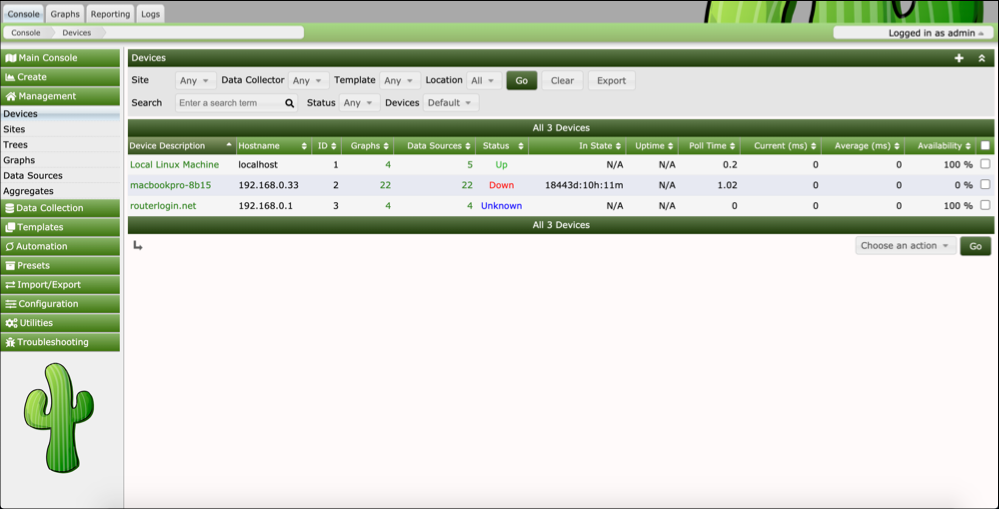
Using SNMP, you can test your network to automatically detect new devices. You can find these under the Automation > Discovered Devices menu, with further configuration available for your network testing under Automation > Networks.
From here, you can add these as saved devices, which will appear under the Management > Devices menu.
Cacti is extremely customizable, allowing you to create your own graphs, reports, and monitoring logs. You may wish to extend and configure it further, depending on your own network and requirements.
9 – Installing additional network monitoring plugins for Nagios (optional)
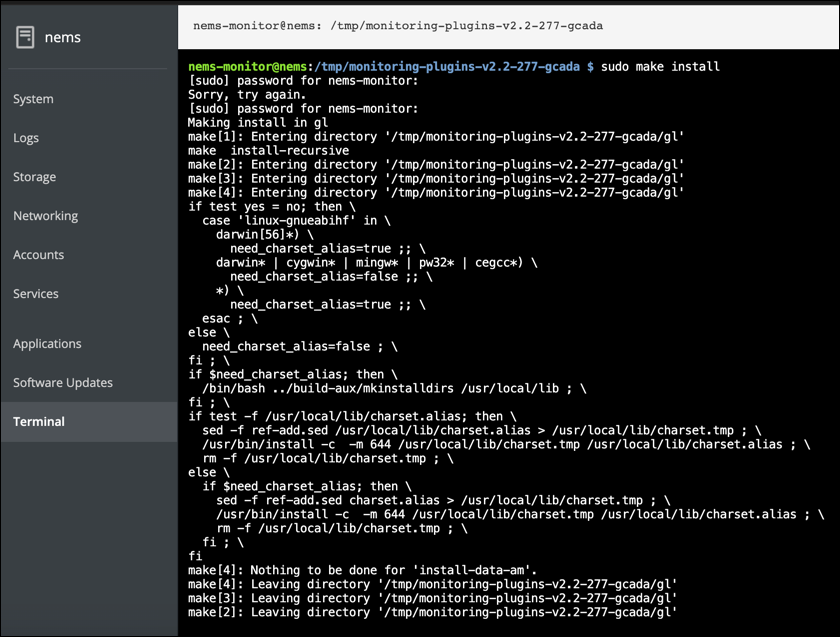
Nagios is a platform that can be extensively configured and adapted to suit your own needs. You may wish to install additional plugins for further network monitoring from sites such as the Nagios Exchange or the Monitoring Plugins project.
The Monitoring Plugins project offers a set of around 50 network monitoring plugins that you can use to log data and import into other dashboards.
If you want to install the plugins from the Monitoring Plugins project, access the NEMS admin portal (Cockpit) by opening https://nems.local:9090/system/terminal or https://ip-address:9090/system/terminal (replacing ip-address with your Raspberry Pi’s IP address) and signing in using the username and password you created earlier. You can also do this using an SSH connection to your Pi.
At the terminal window, type the following to download, compile, and install the plugins:
cd /tmp
wget https://www.monitoring-plugins.org/download/monitoring-plugins-2.2.tar.gz
gzip -dc monitoring-plugins-2.2.tar.gz | tar -xf -
cd monitoring-plugins-2.2
./configure
sudo make
sudo make install
You can replace the tar.gz URL and further references to the file with the latest version, available for download at the Monitoring Plugins project download page. If the Stable release fails to compile or install, repeat the steps using the Development Snapshot release instead.
This will take some time to complete. Once completed, type sudo reboot to reboot your Raspberry Pi and reload your Nagios configuration to support the new plugins.
You can find out more about each individual plugin, including how to execute them and integrate them into your Nagios logging and graphing dashboards, at the Monitoring Plugins project documentation pages.
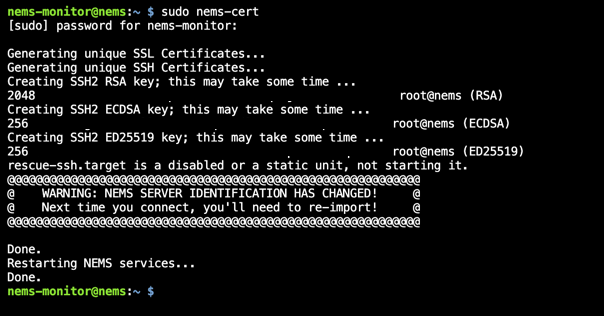
10 – Updating SSL certificates for NEMS web portal (optional)
If you’re having trouble with SSL certificate errors in your web browser when you connect to the NEMS portal, you’ll need to regenerate your certificates to solve the problem.
To do this, open a secure SSH connection to your Raspberry Pi or access the web terminal for NEMS at https://nems.local:9090/system/terminal or https://ip-address:9090/system/terminal, replacing ip-address with the IP address for your Raspberry Pi.
At the remote SSH or web terminal, type sudo nems-cert to regenerate your certificates. The process will complete automatically, and should stop any errors from occurring.
If the errors do reappear at any stage, repeat these steps to solve the problem.
11 – Next steps after basic NEMS configuration
Once you’ve completed basic configuration for NEMS, you’ll probably want to install the Nagios monitoring agent to be able to monitor certain network devices more closely. You can then add and configure these in the Adagios dashboard.
If you’re only looking for more basic and automatic network monitoring, then Cacti should suit your needs. If Cacti is set up correctly, it will continue to poll your network for new devices at regular interviews, which you can then add to specific Cacti graphs and logs for regular monitoring.
If you have resources to spare, you could also think about using Nagios alongside other projects on your Raspberry Pi. At its core, NEMS is simply a lightweight version of Debian Linux, so you should be able to install other packages to create a 24/7 server for your network without too much of an impact on performance.
For instance, NEMS has Samba installed by default, so you could think about creating a very simple file share for your devices. If you’re creating a Raspberry Pi NAS drive, however, you’ll probably want to use a separate Raspberry Pi to ensure adequate system resources are available.
There are several ways to go about running a Minecraft server on the Raspberry Pi. In this guide, I’ll cover how to install Nukkit—a cross-platform Minecraft server that’s super easy to set up on the Raspberry Pi. This server should work with PCs, consoles, and tablets running Minecraft 1.14. I’ll be using a Raspberry Pi
Introducing Howchoo, an enigmatic author whose unique pen name reflects their boundless curiosity and limitless creativity. Mysterious and multifaceted, Howchoo has emerged as a captivating storyteller, leaving readers mesmerized by the uncharted realms they craft with their words.
With an insatiable appetite for knowledge and a love for exploration, Howchoo's writing transcends conventional genres, blurring the lines between fantasy, science fiction, and the surreal. Their narratives are a kaleidoscope of ideas, weaving together intricate plots, unforgettable characters, and thought-provoking themes that challenge the boundaries of imagination.
It’s Friday night. You just invited a friend over so that you could destroy him in Super Mash Bros. You give him the N64 controller with the loose joystick (of course), turn on the game, and your favorite character, Ness, is nowhere to be found.
This is probably because your N64 cartridge battery died long ago and your unlockable characters have gone away.
Why won’t my N64 game save?
Most N64 cartridges store save data in SRAM, or Static RAM, kept alive by a small battery. This was a much cheaper alternative to the flash memory that was much more expensive back when the N64 was being sold.
In this guide, I’ll show you how to replace the battery in your cartridge in about 10 minutes so that you can start saving once again.
List of N64 games that use a battery
1080º Snowboarding
F-Zero X
Harvest Moon 64
Major League Baseball featuring Ken Griffey Jr.
Mario Golf
New Tetris, The
Ogre Battle 64: Person of Lordly Caliber
Resident Evil 2
Super Smash Bros.
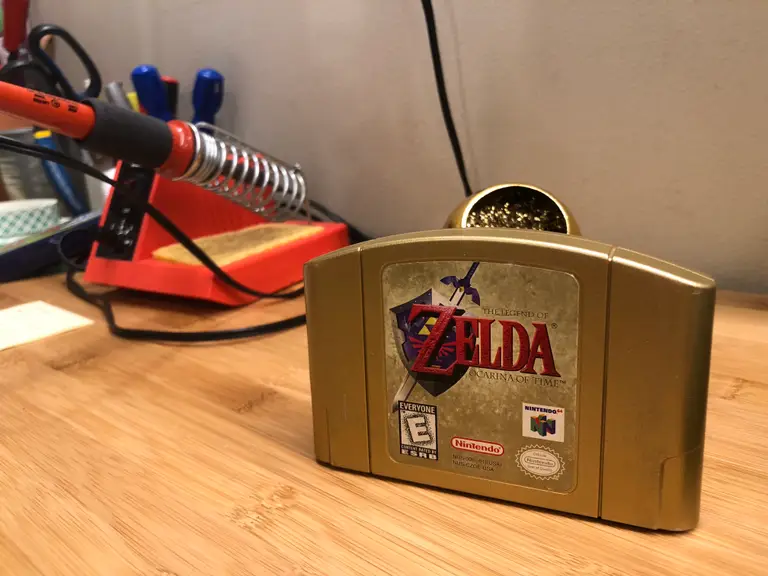
The Legend of Zelda: Ocarina of Time
WCW/NWO Revenge
WWF: Wrestlemania 2000
and Others
Watch the video, or continue below
I made a video tutorial that will walk you through the process. Or, if you prefer, you can continue reading the text and photo-based version of this guide below!
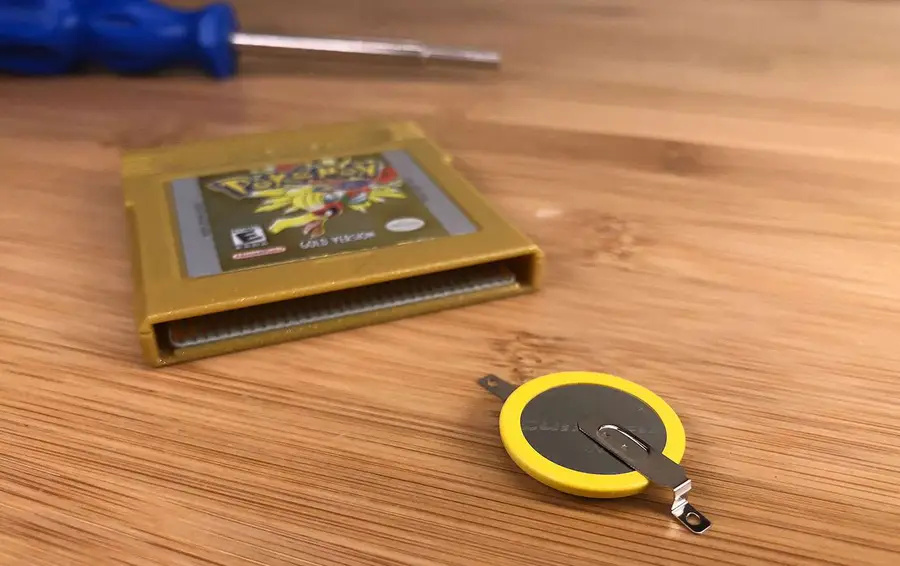
1 – Nintendo 64 replacement battery
For the replacement battery you’ll need a CR2032 battery with pre-soldered tabs. This is the direct replacement for your old N64 cartridge battery. This is the battery I used and it came with a 3.8mm security screwdriver, which you’ll need later.
Unless you have a pulse spot welder laying around, don’t solder anything directly to the battery.
🛈 Just get the one with the tabs already attached.
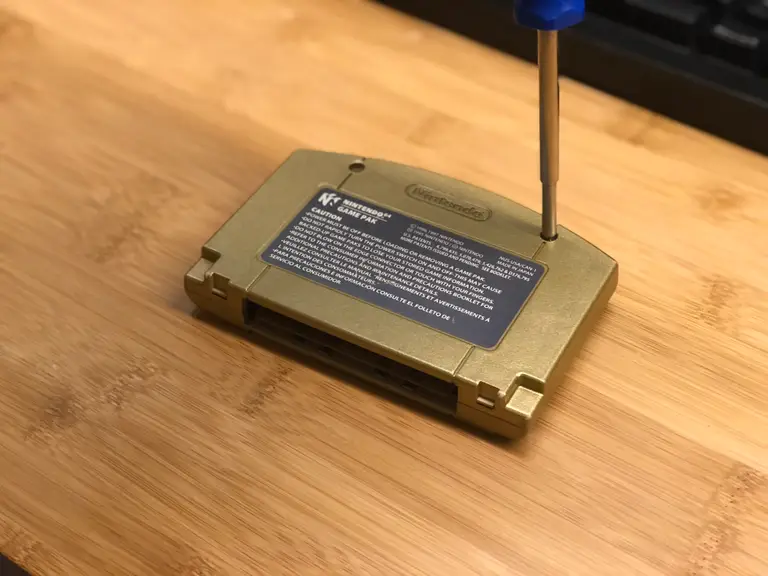
2 – Open the N64 cartridge
As always, Nintendo loves to try and keep us out of their hardware. You’ll need a 3.8mm security screwdriver to open the cartridge. Use it to remove the two screws on the back and open the case.
🛈 Fun fact: the Ocarina of Time cartridge is actually tan inside; probably to make it easier to paint gold. But I digress.
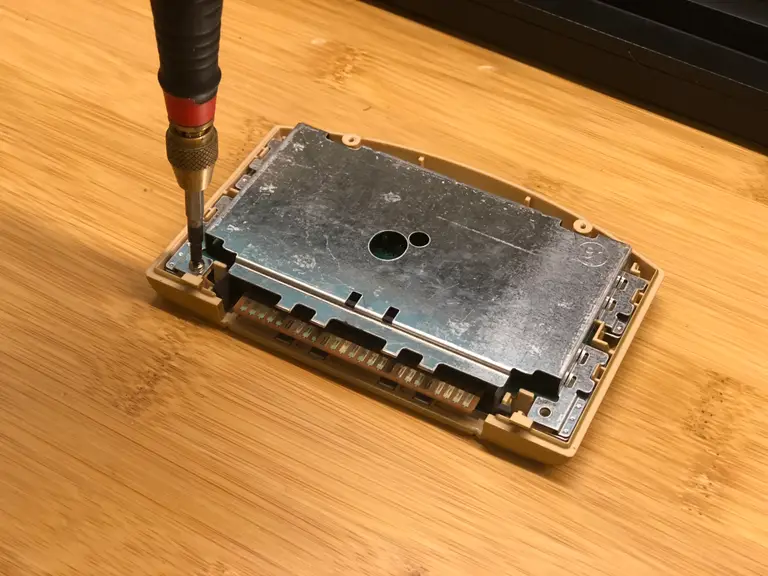
3 – Remove the RF shield
Use a small Phillips screwdriver to remove the electromagnetic shielding.
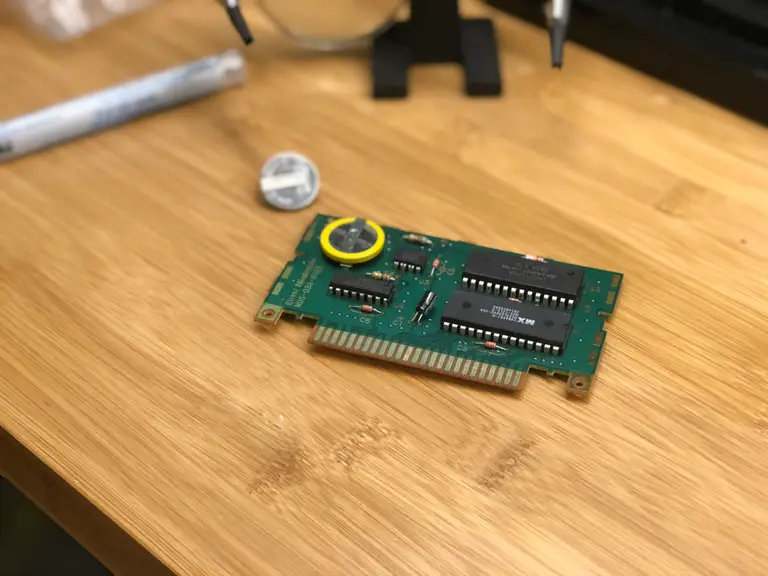
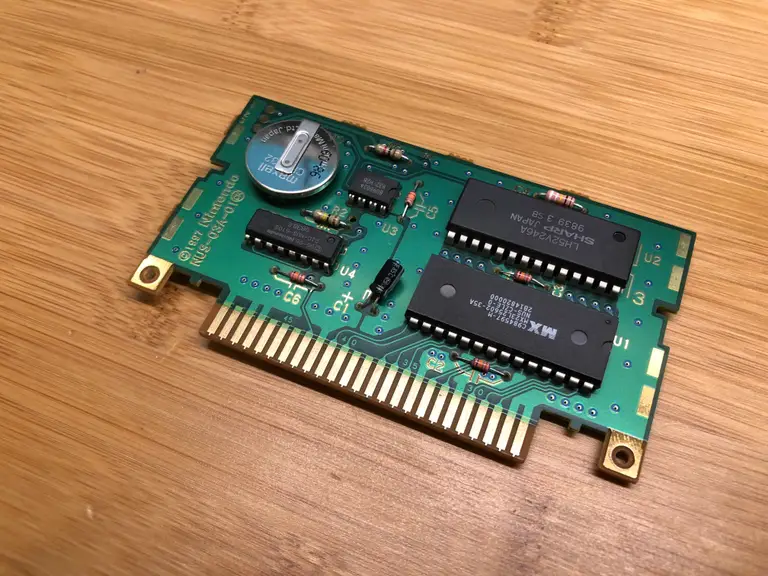
4 – Locate the battery
The battery is located on the same side of the cartridge as the microchips.
My battery is from 1998! That’s over 20 years old.
🛈 No wonder it doesn’t work.
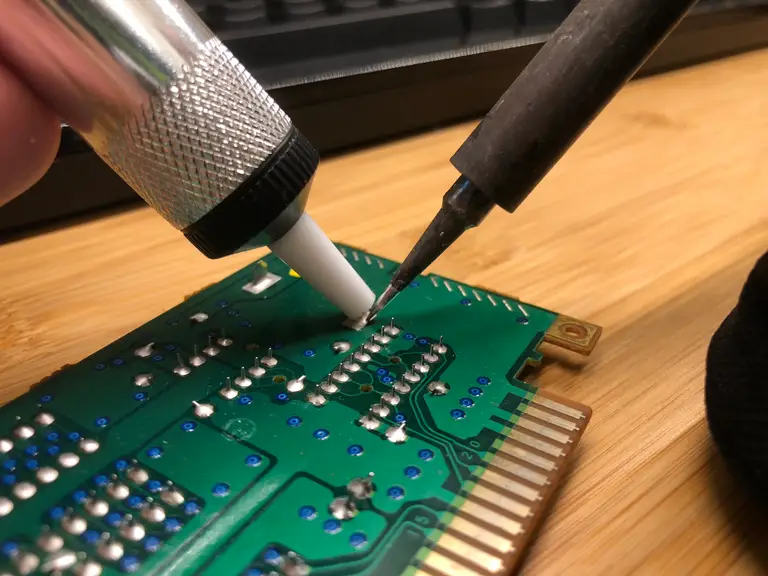
5 – Desolder the battery tabs
Locate the two large tabs on the other side of the board protruding from the battery. Heat each up with your soldering iron and use your solder sucker to desolder them.
6 – Solder the new battery
Your replacement battery has one wide tab and one narrow tab. This makes orientation easier as the battery is not reversible. Solder the new battery in place.
7 – Reassemble everything
As always, assembly is the reverse of disassembly. You’re ready to play!
You’ve put so much work into setting up RetroPie or EmulationStation. You load it up with legally obtained ROMs only to find that custom theme you installed—you remember, the one from my RetroPie themes guide—has a big blank spot for box art! The Best RetroPie Themes (And How to Install Them)You deserve some personal flair! RetroPie: Build Your
Introducing Howchoo, an enigmatic author whose unique pen name reflects their boundless curiosity and limitless creativity. Mysterious and multifaceted, Howchoo has emerged as a captivating storyteller, leaving readers mesmerized by the uncharted realms they craft with their words.
With an insatiable appetite for knowledge and a love for exploration, Howchoo’s writing transcends conventional genres, blurring the lines between fantasy, science fiction, and the surreal. Their narratives are a kaleidoscope of ideas, weaving together intricate plots, unforgettable characters, and thought-provoking themes that challenge the boundaries of imagination.
When it comes to Do-It-Yourself projects, the ultimate expression has to be fan films. The amount of work required to pull off a fan film, from the construction of sets and costumes, to the writing, to the lighting, the camerawork, the acting, the direction, the sound design, the scoring… it’s a fabulously massive undertaking that requires an insane range of skills to even comprehend, let alone pull off with flare.
Engage_ your senses as you travel through time and space on some kind of star “trek”
Star Trek has long encouraged a range of intrepid explorers in the field, however. Fans from all backgrounds and walks of life have come together over the decades to share their love of the magic underlying this incredible setting, trying to share what they themselves love most about Roddenberry’s incredible vision for a socialist future where all people work for the betterment of society as a whole, and their own self-growth, rather than the accumulation of profit.
So, sit back and engage your senses as you travel through time and space on some kind of star “trek” in a bold exploration of the imagination and the power of art.
1 – Digital Ghost (2000)
Digital Ghost (2000)
Digital Ghost is a German-made Star Trek fan-film set within the Star Trek: Generations timeline. The story involves two Enterprise-E crewmembers who are sent on a mission to test Starfleet’s new fully-autonomous starship design, and who soon discover that all may not be as it seems.
There aren’t magnificent sets in this one, but the CGI is surprisingly good, especially when you remember that this was made back in 2000. But, what stands out for me most with this film, is how well-acted it is. The CGI makes it all come alive, and there are some very clever moments in there, but what makes it engaging to watch is the interactions between the two visiting crewmembers and the experimental ship’s computer.
2 – Star Trek: Of Gods and Men (2007-2008)
Star Trek: Of Gods and Men (2007-2008)
There can absolutely be no better example of an incredibleStar Trek fan-film experience than one which uses actual members of the original series cast!. Walter Keong and Nichelle Nichols star in this superb 3-part drama (finally combined into one feature film), and directed by Tim Russ (Tuvok in Voyager).
The story, the acting, the sets, and the CGI all positively glow in this one. The care, dedication, fun, and love of Star Trek is so plainly visible in every aspect of this film that it easily outshines most of the modern Trek material created by big studios.
3 – Star Trek: Axanar (2014)
Star Trek: Axanar (2014)
Here we come to the biggest name on this list, because it was a landmark film in the evil of corporate Hollywood and the further eroding of artistic power in the world. Axanar was an incredible production, providing a powerhouse script, production value far beyond anything seen before, and a huge cast of veteran Star Trek actors (Richard Hatch, J. G. Hertzler, Kate Vernon, Gary Graham, Michael Hogan, and Tony Todd).
The film is a 22-minute documentary-style experience recounting the events of the Battle of Axanar, which was briefly mentioned in the original Star Trek series episode Whom Gods Destroy, and depicted in Axanar as a decisive military engagement between the United Federation of Planets and the Klingon Empire.
The incredible feature film that had been planned for release was killed by the subsequent CBS/Paramount lawsuit, but this gem remains behind.
The film was so good, so popular, and raised such a huge budget on Kickstarter, that CBS and Paramount sued its creators in an attempt to destroy fans’ ability to produce similar work ever again. Sadly, they succeeded.
The resultant lawsuit ended with CBS/Paramount drawing up a restrictive list of rules that all future fan films would need to follow: “be no more than 15 minutes long and have no stories longer than two installments (for a total of 30 minutes); play on YouTube without commercials; and all participants are required to be amateurs who have never worked on Star Trek or another licensee of CBS or Paramount Pictures.”
This effectively killed off all Star Trek fan projects, forcing other planned productions like Star Trek: Renegades to quite literally go renegade and remove all references to Star Trek from their production.
It’s a truly sad example of how dismally copyright laws function in the world today, offering little protection to real creators while allowing mega-corps to demand ever-greater control over all the artistic projects that make it into the public eye.
4 – Star Trek: Renegades (2015)
Star Trek: Renegades (2015)
Something is folding time and space around entire planets, cutting them off from the galaxy. Admiral Pavel Checkov (played by Walter Koenig) enlists the aid of Section 31 chief Tuvok (played by Tim Russ) in an effort to enlist an extra-Starfleet operation to discover the cause, a crew of misfits, even criminals, who can do what Starfleet can not.
Directed by Tim Russ, this was intended as a pilot episode for a new Star Trek series. When the pilot was rejected, a series was planned, but was later scrapped due to the disastrous move by CBS/Paramount to restrict the creative ability of fan productions. Renegades would then go on to live as its own science fiction production, removing all references to Star Trek to escape studio censorship.
A Fan’s Guide to the Top Science Fiction TV Series From one fan to another: the best sci-fi shows of all time.
5 – Star Trek: Horizon (2016)
Star Trek: Horizon (2016)
In a time prior to the United Federation of Planets, a young coalition of worlds led by Earth battle the Romulan Star Empire for their very survival.
This was another masterful little fan production, falling someplace between grand productions like Axanar and Of Gods and Men, and more amateur productions, and offering a first-class homage to the Star Trek universe.
While the planned sequel was annulled by CBS/Paramount due to their ridiculous feud with the Axanar production, we at least have the full feature film original to enjoy.
6 – Chance Encounter – A Star Trek Fan Film
Chance Encounter – A Star Trek Fan Film
A gentle and heart-warming science fiction love story, with all original characters, set within the Star Trek universe.
The Most Underrated Science Fiction Films of the 1970s 1970s scifi films included some of the greatest ever made, but also some unsung gems.
Quite possibly the sweetest little fan film in existence, the team behind this film would later go on to create The Holy Core, another Star Trek fan film that went even farther in the creation of something superb.
I absolutely love the writing of this one, as well as the acting. The special effects aren’t as sharp and polished as other productions, but I found that this doesn’t really matter much given how superb the rest of it is, and how much range of special effects through the many decades of Trek there is anyway!
I spent the entire film immersed, enjoying it as much as I’ve ever enjoyed another Star Trek experience, and I think you will as well.
7 – What We Left Behind (2019)
What We Left Behind (2019)
Ira Steven Behr announced a new Deep Space Nine project in 2017, eighteen years after the series finale, What You Leave Behind, aired. Bearing the same title, this would be an immersive documentary journey into the creation of, and life of, the last great Star Trek series to air on TV.
The documentary is wonderfully potent, drawing back the cats and crew for an in-depth and sometimes harrowing discussion of the show’s making, with stars Alexander Siddig, Avery Brooks, Colm Meaney, Michael Dorn, Nana Visitor, Rene Auberjonois, and Terry Farrell all appearing to speak about their experience making the show.
DS9 was really transformational, managing to bridge all that had come before, with a deeper level of internal exploration than had been seen in Star Trek. Of course, there were downsides as well.
Star Trek: Deep Space Nine is a premise completely ripped off of J. Michael Straczynski’s Babylon 5 series, which he had pitched unsuccessfully to Paramount some time before DS9 was put into production. Everything from the premise, to even at least one character’s name, was pulled from B5 without even a hint of shame.
And yet, however terrible that sin is, the seed of Straczynski’s initial vision, and the hard work of the amazing cast and crew of DS9, ended up providing Star Trek with its own brilliant jewel, something that offered a new type of show that kicks harder than previous iterations while maintaining the optimism, pacing, and theatric reverence that all embodies true Trek.
8 – The Holy Core – A Star Trek Fan Production (2019)
The Holy Core – A Star Trek Fan Production (2019)
A thoughtful and exciting adventure set in the TNG era of the “Star Trek” universe, featuring all original characters. The crew of a Federation starship assist the deeply religious Vitans to restore their polluted atmosphere after centuries of war. Events soon take an unexpected turn, however, and the crew must rely on their courage and principles to prevent disaster…
I love this one for the use of real sets, the style, the lighting… it’s a love-letter to everything great about TNG, and manages to be both exciting and reflective in its story and construction. Proof that, while Paramount/CBS gutted fans’ ability to create work of Axanar level production value, fans will continue to showcase their passion for the source material.
Seriously though, this production uses full sets, and in an age where fan productions frequently rely on less-expensive green screen replacements, the use of real physical sets shows. It makes The Holy Core something unique and very special.
9 – Interlude: A Star Trek Fan Production (Axanar Continuity)
Interlude: A Star Trek Fan Production (Axanar Continuity)
While not officially endorsed by the Axanar team, this little film dives into some of the Axanar continuity and envisions a short scene from one of the crucial battles of that timeline, as the new Klingon D7 cruisers are fielded for the first time.
It has a high-production feeling to it, though perhaps not quite as immerse as the original Axanar was. Still, a work of art, soul, and beauty, and I’m honestly just so impressed with all the great work that went into making this.
10 – Doomsday: A Star Trek Fan Production (2022)
Doomsday: A Star Trek Fan Production (2022)
Tales from The Neutral Zone in association with Avalon Universe presents “DOOMSDAY,” the third Star Trek Fan Film from Neutral Zone Studios in Kingsland, GA Based on the original story by Norman Sprinrad, music by Sol Kaplan, and visual effects by Samuel Cockings, “DOOMSDAY” is an exciting Star Trek adventure!
This feels like TOS and is just frankly incredible, offering up a brief vision of the original series’ brilliance with modern styling.
When I was first offered a beverage flavored with whiskey simple syrup, I was in a coffee shop in San Jose, California. I wasn’t even really interested in drinking coffee. It was later in the day; I was already feeling a little tired; I figured coffee was the last thing I needed. But when the
Introducing Howchoo, an enigmatic author whose unique pen name reflects their boundless curiosity and limitless creativity. Mysterious and multifaceted, Howchoo has emerged as a captivating storyteller, leaving readers mesmerized by the uncharted realms they craft with their words.
With an insatiable appetite for knowledge and a love for exploration, Howchoo’s writing transcends conventional genres, blurring the lines between fantasy, science fiction, and the surreal. Their narratives are a kaleidoscope of ideas, weaving together intricate plots, unforgettable characters, and thought-provoking themes that challenge the boundaries of imagination.
Many video games have rare finds or Easter eggs hidden within them. Minecraft is no different! Minecraft is known for its blocky style and endless possibilities, which is why finding rare or special aspects of it are so impressive. With countless combinations of blocks, aesthetics, and styles, we can all agree that Minecraft’s hidden gems are worth the search. While some games rank their item rarity, Minecraft unfortunately doesn’t have a clear system. Which is why we’ve done the work for you with this list of the rarest spawns in Minecraft!
This list is a compilation of not just rare mobs, but structures, biomes, and resources that aren’t easy to find in the game. These all naturally spawn in the world and don’t require any commands, cheats, or modifications to the game itself. The following was sorted based on information from the developers and gameplay experience. Some of the factors that decided the ranking were: spawn frequency, lack of ease to acquire or find it, and quantity of the blocks.
25 – Pillager Outpost
Rarity: Uncommon
Pillager outposts are a set of structures inhabited by pillagers. Both regular pillagers and pillager captains, totally eight, spawn continuously around the watchtower structure. Other structures that may spawn are cages (some with an iron golem inside), a pile of logs, target scarecrows, and tents.
How do I find a pillager outpost?
Outposts are rarer than villages, but less rare than woodland mansions. They can generate in any village-generating biome, such as plains, savanna, or taiga biomes. Pillager outposts won’t spawn close to, or within, villages. Only pillagers and passive mobs will spawn within a pillager outpost spawn area. Players can pacify an outpost by removing all grass or sand blocks surrounding the outpost, and by properly lighting the area as they normally would to prevent enemy mob spawns.
In the 1.18 update, pillager outposts will be able to generate in mountain grove, snowy slopes, lofty peaks, snow capped peaks, and stony peaks.
24 – Giant Tree Taiga
Rarity: Uncommon
The giant tree taiga encompasses four different variants: giant tree taiga, giant tree taiga hills, giant spruce taiga, and giant spruce taiga hills. Rather than aligning with a colder climate of the normal taiga biome, these four biomes are more like a colder counterpart of the jungle biomes. They are usually generated so that they border dark forests, taigas, and sometimes snowy biomes. Rather than grass blocks, the giant taigas have podzol and coarse dirt. Spruce trees are much larger in these biomes as well. Forest rocks, a structure made of mossy cobblestone, generate in all four variants.
In the upcoming 1.18 update, the following changes will be made:
Giant tree taiga will be named old growth pine taiga
Giant spruce taiga will be named old growth spruce taiga
The giant tree taiga hills and giant spruce taiga hills biomes have been removed.
23 – Gravelly Mountains
Rarity: Uncommon
There are two variations of this biome: gravelly mountains+ and windswept gravelly hills (as of 1.18). Both biomes feature gravel that replaces most grass blocks and fewer trees. Digging upwards in this biome is hazardous, as top layers of gravel can drop and suffocate the player. Both gravelly mountains+ and windswept gravelly hills can be found near mountain biomes or as a border between desert and snowy biomes.
22 – Brown Panda
Rarity: Uncommon
The panda is a rare neutral mob. Pandas can spawn with seven different personalities, the brown panda being the rarest of them all. The brown panda has no difference in personality actions, but have brown and white fur and a frowning face.
How do I find a brown panda?
Pandas will only spawn in groups of 1-2 within the jungle biomes. They spawn with a randomized personality, normal being the most common. You can try and breed pandas to spawn the brown variant, but note that pandas are the only animal in Minecraft to have extra breeding conditions. There must be at least eight bamboo blocks within a five-block radius of both pandas.
Each panda has hidden values, called genes, which determine what personality the panda offspring will have. Weak and brown personalities are recessive traits, which means in order to have a brown offspring, both panda parents must either be brown or weak personalities. There is also a 3% chance for each gene of the baby panda to mutate, and a 12.5% chance of that for the mutated gene to be the brown variant.
21 – Eroded Badlands
Rarity: Rare
The eroded badlands features formations of hoodoos, narrow spires made of terracotta. This biome is meant to resemble the Bryce Canyon in Utah, USA. Eroded badlands is present in 40% of the badlands biomes. Exposed mineshafts will naturally spawn in this biome as well.
20 – Ice Spikes
Rarity: Rare
The ice spikes biome features many packed ice spikes across a snowy landscape. All grass blocks are replaced with snow, and glaciers of packed ice generate instead of lakes. There are two sizes of spikes in this biome: a short, wide spike, and a tall, thin spike. While no buildings or trees generate in the ice spikes biome, polar bears, rabbits, and strays will spawn. The terrain of ice spikes is more erratic and taller than that of the snowy mountains.
19 – Shattered Savanna Plateau
Rarity: Rare
The shattered savanna plateau is similar to the shattered savanna (as of 1.18 known as Windswept Savanna), except it has less dangerous heights and does not have any large lakes. The shattered savanna plateau features steep mountains, cliffs, and overhangs. You can find shattered savanna plateaus near the savanna and windswept savanna biomes.
As of the latest snapshot, the shattered savanna plateau biome will be removed in 1.18.
18 – Jungle Temple
Rarity: Rare, 75% chance
Jungle temples, also known as jungle pyramids, are structures made of cobblestone, mossy cobblestone, and vines. They have three floors, including a puzzle and tripwire traps.
How do I find a jungle temple?
Jungle pyramids only generate in the jungle, bamboo jungle (JE only), and their hill variants. There is a 25% chance a jungle biome will generate without a pyramid. The jungle hills and bamboo jungle hills biomes will be removed in the 1.18 update.
17 – Swamp Hills
Rarity: Rare
The swamp hills variant is a hilly terrain that rises up between the flat marshes of the swamp biome. Some parts of the swamp hills biome sometimes have gravel floor instead of dirt. Swamp huts don’t generate in this biome (except in Bedrock Edition), nor do slimes. Swamps are usually generated beside other lush biomes, such as forests or plains.
As of the latest snapshot, the swamp hills biome will be removed in 1.18.
16 – Ocean Monument
Rarity: Rare, 1 per 32×32 chunk area
Ocean monuments are underwater structures inhabited by guardians and elder guardians. Constructed by variants of the prismarine blocks and lit by sea lanterns, they’re the only place where sponges can be found. Water generates within the monument as part of the structure. Monuments are also the largest structure that doesn’t contain a loot chest.
How do I find an ocean monument?
Ocean monuments spawn in two locations. The first is a deep ocean biome variant within a 16 block square. The second is within an aquatic biome, such as a frozen ocean, within a 29 block square radius. Ocean monuments always contain three elder guardians, but don’t always generate sponge rooms.
15 – Geode
Rarity: Rare, 1.89% chance
A geode is an underground structure containing smooth basalt, calcite, and amethyst blocks/items. An amethyst geode consists of three layers:
Outer layer of smooth basalt
Middle layer of calcite
Hollow layer of amethyst and budding amethyst blocks
How do I find a geode?
Amethyst geodes spawn in any Overworld biome between Y-coordinates 0 to 70 or -64 to 30. There is a 95% chance of a geode generating with a crack that exposes its inside. However, caves, aquifers, and canyons cannot cut into geodes. They can also override caverns and mineshafts.
14 – Mushroom Fields
Rarity: Rare
One of the most famous and rarest biomes in Minecraft, the mushroom fields biome consist of both flat landscape and steep hills. They have a surface layer of mycelium above grass blocks. Brown and red mushrooms cover this biome that is usually generated as an island (or set of islands). Besides swamps and dark forests, it’s the only other biome that spawns huge mushrooms naturally. Mushroom fields are also the only biome where mooshrooms naturally spawn. Because only mooshrooms and bats naturally spawn in this biome, mineshafts, caves, and other dark areas are generally safe.
13 – Fossil
Rarity: Rare, 1.56% chance
The fossil is a skeletal structure that is composed of bone blocks, coal ore, or diamond ore. This is not to be confused with the Nether fossils that spawn in soul sand valleys. There are four variants: pure-bone block fossil, incomplete fossil, coal ore fossil, and diamond ore fossil. Each have their own characteristics and spawn generation.
How do I find a fossil?
Fossils spawn underground in the Overworld biomes of deserts, swamps, and their variants. There is a 1/64 chance for a chunk to generate a fossil in a variant of a skull or spine. Fossils generate between the Y-coordinates of 40 to 49.
12 – Skeleton Horse
Rarity: Rare, 0.75-2.25% depending on difficulty
A skeleton horse is an undead variant of the horse mob. They can be ridden as any other horse and are one of the fastest means of transportation in Minecraft. They can jump up to five blocks heights and be ridden in water of any depth.
How do I find a skeleton horse?
There are two ways to find a skeleton horse. They naturally spawn either by chance (which varies depending on world difficulty) or by lightning striking the ground during a thunderstorm. Players cannot force a skeleton horse to spawn with a trident enchanted with Channeling.
11 – Igloo
Rarity: Rare
Igloos are naturally generated structures made primarily out of snow blocks. An igloo has a carpeted interior containing a bed, furnace, and crafting table. In 50% of spawned igloos, there’s a trapdoor which leads to a basement. Within the basement is a brewing stand, cauldron, chest, and two cages with a villager and zombie villager.
How do I find an igloo?
Igloos only spawn in the snowy tundra, snowy taiga, and snow slopes biomes. They’re identifiable by their round shape and ice block windows.
10 – Witch Hut
Rarity: Rare
Also known as swamp huts, witch huts are small square buildings made of spruce and oak wood. Inside a swamp hut, a witch and black cat will spawn. There is also an empty cauldron (JE only), a crafting table, and a red mushroom inside a flower pot.
How do I find a witch hut?
Huts will only spawn in the swamp biome. In Bedrock Edition, they can spawn in the swamp hills. At times vines and mushrooms may spawn in front or within the witch hut, respectively.
9 – Pink Sheep
Rarity: Rare, 0.164% chance
Sheep are a common passive mob that supplies wool and mutton. While most sheep are white, there is a chance for the rare pink sheep to spawn naturally.
How do I find a pink sheep?
While you can die a sheep’s wool any color, there’s a 0.164% chance of a pink sheep to spawn naturally in the world. Sheep spawn on any grass block with at least two block spaces above them.
8 – Blue Axolotl
Rarity: Very Rare, 0.083% chance
The axolotl is a passive aquatic mob that attacks most other underwater mobs, except dolphins, turtles, and other axolotls. They are passive toward players and can be attached to leads. They also give Regeneration I for 5 seconds in a fight, up to a duration of 2 minutes (JE only), and remove Mining Fatigue when a player kills a mob that is in combat with an axolotl. If an axolotl takes damage underwater, it may play dead, dropping to the ground for 10 seconds while gaining Regeneration I. On land, axolotls move toward the nearest water source because they die outside of water after 5 minutes.
How do I find an axolotl?
In 1.17, axolotls spawn below sea level (Y=63), in total darkness, and where there is an Overworld base stone (stone, deepslate, andesite, etc.) less than five blocks below. In 1.18, axolotls spawn underwater in the lush caves biomes and when there is a clay block less than five blocks below. There is a 0.083% chance of a blue axolotl resulting from breeding, making it the rarest color mutation of the mob.
7 – Snowy Taiga Mountains
Rarity: Extremely Rare
Similar to the taiga mountains, the snowy taiga mountains reach high elevations with steeper terrains than the snowy taiga hills. No structures or buildings generate here, but you can find tall spruce trees, sweet berry bushes, and it has the same mobs as its snowy taigas counterpart.
As of the latest snapshot, the snowy taiga mountains biome will be removed in 1.18.
6 – Modified Badlands Plateau
Rarity: Extremely Rare
The modified badlands plateau features smaller plateaus and harsher terrain than the Badlands Plateau. This biome mimics large plateaus that have weathered more over time. There is about a 20% chance of this biome generating beside a badlands biome. There is a 98% chance of this biome having the eroded badlands bordering its edges.
As of the latest snapshot, the modified badlands plateau biome will be removed in 1.18.
5 – Ancient Debris
Rarity: Extremely Rare
Ancient debris is a rare ore that is the main source of netherite scraps. It has a high blast resistance, making it immune to most explosions and non-flammable.
How do I find ancient debris?
Generating only in the Nether, ancient debris spawns in groups of 1-3, and only up to two groups per chunk. It can only be mined by a diamond pickaxe or better. It is most commonly found in y-levels 13-17 and can replace netherrack, basalt, and blackstone.
4 – Woodland Mansion
Rarity: Extremely Rare
The woodland mansion is a large, three floor, structure where vindicators and evokers spawn. It’s one of the few places where a totem of undying can be obtained, aside from raids. The layout of rooms is randomly generated, meaning each woodland mansion is unique. Some rooms have sealed entrances, while secret rooms have no entrance at all. Below is a list of the secret rooms possible:
“X” room (common)
spider room
fake end portal room
obsidian room
birch pillar room
clean chest room
lava room (rarest)
attic room
How do I find a woodland mansion?
The woodland mansion is the rarest generated structure in Minecraft so finding it is time-consuming. Mansions will only spawn in the dark forest and dark forest hills. They usually generate thousands of blocks from the spawn point. Woodland mansions can be located with woodland explorer maps, which are obtained from cartographer villagers.
3 – Brown Mooshroom
Rarity: Extremely Rare
A brown mooshroom is a brown variant of the regular mooshroom. As the name implies, they are cows covered in mushrooms. When fed a small flower, the brown mooshroom can be milked for a suspicious stew related to that small flower. The mooshroom returns to producing mushroom stew until fed another small flower. Each suspicious stew will have a different effect depending on the flower used. For example, the wither rose will produce a stew with wither effect, while the cornflower will give a jump boosting stew.
How do I find a brown mooshroom?
Brown mooshrooms will not spawn naturally. They are created under a very specific set of circumstances. When a red mooshroom is struck by lightning, they are transformed into a brown mooshroom. Mooshrooms only spawn in the rare mushroom fields biome. Breeding two red mooshrooms has a 0.097% chance of spawning a brown baby variant. While breeding a red and brown mooshroom together has a 50% chance of spawning a brown baby variant.
2 – Modified Jungle Edge
Rarity: Extremely Rare
The modified jungle edge generates in strict conditions. When a jungle biome and swamp hills biome border each other, the modified jungle edge generates to act as a transition. Considering how rare the jungle and swamp hills biomes are rare, this makes the modified jungle edge biome the rarest in the game, so far. The largest length that the modified jungle edge will generate in is a few hundred blocks, sometimes generating as low as ten blocks in length.
Ocelots, parrots, and pandas may spawn in this biome, though no structures or buildings will generate. For perspective, the mushroom fields biome covers around 0.056% of the Overworld, while the modified jungle edge only covers about 0.00027%.
As of the latest snapshot, the modified jungle edge biome will be removed in 1.18.
1 – Emerald Ore
Rarity: Extremely Rare
The emerald ore is a mineral block that drops emeralds or itself when mined with an iron pickaxe (or better). Deepslate emerald ore is a variant that can be found in deepslate and tuff blobs.
How do I find emerald ore?
Emerald ore only spawns in mountains biomes and can replace stone, tuff, and deepslate. In 1.17 and earlier game versions, emerald ore is most commonly found between Y-levels 5-29. In the 1.18 update, emerald ore will still only spawn in mountains biomes, however will commonly appear between Y-levels -16-320.
The longer you play Minecraft, the more you realize that early-game tools just won’t cut it. Exploring the enchantment feature of Minecraft can be exciting, but also intimidating. Rather than worry about researching enchantments, below are the best enchantments in Minecraft! To learn how to enchant items, check out this guide! In this guide, you’ll see
Introducing Howchoo, an enigmatic author whose unique pen name reflects their boundless curiosity and limitless creativity. Mysterious and multifaceted, Howchoo has emerged as a captivating storyteller, leaving readers mesmerized by the uncharted realms they craft with their words.
With an insatiable appetite for knowledge and a love for exploration, Howchoo’s writing transcends conventional genres, blurring the lines between fantasy, science fiction, and the surreal. Their narratives are a kaleidoscope of ideas, weaving together intricate plots, unforgettable characters, and thought-provoking themes that challenge the boundaries of imagination.
Adjusting the volume of your Apple AirPods on the fly is essential when you don’t have time to adjust the volume within the individual streaming service, such as Spotify or Apple Music.
Can you change the volume on AirPods?
Yes. Absolutely.
Unfortunately, however, there is no button on the AirPods or AirPods Pro that allows you to change the volume using just the earbuds themselves. (You use the button on the AirPods Pro to skip songs, answer phone calls, and pause music. The volume must be changed via the device to which your AirPods are connected.
There is a way to change the volume without having to touch anything, however! We’ll introduce you to that method, and show you the other ways that will allow you to easily adjust the volume of your AirPods and AirPods Pro.
1 – Adjust volume with Siri
Apple
Using Siri is the no-hands solution to changing the volume of your AirPods on the fly. This is great for when your exercising, doing chores, running, or otherwise don’t have access to your phone or device—and really need to change the volume of your AirPods.
*By default, Siri is active on your iPhone. If you decided to turn off Siri for some reason, then you’ll need to reactivate Siri. The guide below will walk you through that.
Then, if you want to lower the volume, say “Lower the volume.” If you want to raise the volume, say “Raise the volume.”
You can adjust minutely by saying things like “Lower the volume a little” or “Raise the volume a lot.”
Siri will automatically change the volume of your AirPods.
2 – Adjust volume within an app
Spotify
Most apps, including Spotify, Apple Podcasts, Apple Music, Pandora, etc., include a way to change the volume within the app itself. Changing the volume in the app will change the volume of your AirPods or AirPods Pro.
3 – Adjust volume on your device
Using the device’s volume control, whether it’s a phone or computer, will change the output volume of your AirPods and AirPods Pro. We’ll show you how to do it on both your Mac and iPhone.
Change AirPods volume via Mac
With your AirPods connected to your Mac, click the little headphone symbol in your Mac’s menu bar. (If you don’t see the headphone symbol, look for an audio symbol.)
Drag the slider to adjust the volume of your AirPods.
Change AirPods volume on your iPhone
With your AirPods connected to your iPhone, simply use the button on the left side of your iPhone to turn the volume up and down.
NEXT UP
How to Enable the “Popping” Sound When Adjusting the Volume on Your Mac
Starting with MacOS Sierra and High Sierra, your Mac will no longer play a “pop” sound when you adjust your volume. If you prefer to have this sound when you adjust volume up and down (as I do), this guide will teach you how to reenable it. 1 – Open Sound System Preferences Navigate to System
Introducing Howchoo, an enigmatic author whose unique pen name reflects their boundless curiosity and limitless creativity. Mysterious and multifaceted, Howchoo has emerged as a captivating storyteller, leaving readers mesmerized by the uncharted realms they craft with their words.
With an insatiable appetite for knowledge and a love for exploration, Howchoo’s writing transcends conventional genres, blurring the lines between fantasy, science fiction, and the surreal. Their narratives are a kaleidoscope of ideas, weaving together intricate plots, unforgettable characters, and thought-provoking themes that challenge the boundaries of imagination.