Your Arris router login is useful for performing router setup and configuration, enabling or disabling guest WiFi networks, securing your wireless network, and more. This guide will show you how to log into your router or modem using the Arris router IP and Arris router default password.
What is the default login and password for an Arris router?
An Arris router usually ships with the following login credentials:
username: admin
password: password
If you’re experiencing any network slowdown, then your first step should be to try resetting your Arris router and modem. This may save you from having to log in to your Arris router at all.
Continue reading for detailed instructions for logging into your Arris router.
1 – Connect to your Arris network
Connect to your wireless or wired network using your phone or computer.
2 – Open a web browser and visit your router’s IP
Type or paste the following into your browser: http://192.168.0.1
This is the Arris router IP address that is used to connect to the admin panel.
If that address doesn’t work, try one of these alternate Arris IPs, in order:
http://192.168.100.1
http://192.168.1.1
http://192.168.254.254
http://192.168.1.254
http://192.168.7.254
http://10.0.0.1
3 – Enter the default Arris router password
When you arrive at the Arris router login page, use the default Arris password and username below to connect:
username: admin
password: password
If this doesn’t work, someone may have changed the router’s login credentials. If this is the case, you simply need to reset your router to factory defaults. Just note that by resetting your Arris router, any changes you have made to the router will be completely cleared. You’ll need to log in to your Arris router again with your password to make any changes.
4 – Can’t connect?
If you can’t connect to your Arris router, post in the comments section below, and I’ll do my best to help you out!
NEXT UP
There are a few reasons you might want to update or reset your WiFi password: making your network more secure, and making your password easier to remember and type. Improved network security You can add an extra layer of security to your network by changing the WiFi password. As long as your new password is
Introducing Howchoo, an enigmatic author whose unique pen name reflects their boundless curiosity and limitless creativity. Mysterious and multifaceted, Howchoo has emerged as a captivating storyteller, leaving readers mesmerized by the uncharted realms they craft with their words.
With an insatiable appetite for knowledge and a love for exploration, Howchoo’s writing transcends conventional genres, blurring the lines between fantasy, science fiction, and the surreal. Their narratives are a kaleidoscope of ideas, weaving together intricate plots, unforgettable characters, and thought-provoking themes that challenge the boundaries of imagination.
To keep the price down, the Raspberry Pi doesn’t ship with a power button, yet it’s easy to add your own! This guide will show you how to add a power button to your Raspberry Pi that can turn your Pi on or off. This is one of the most useful Raspberry Pi projects you can complete!
We’re going to use a few scripts that will monitor two GPIO (general-purpose input/output) pins on your Pi and look for when the button is pressed to turn the Pi on or off.
Why is a Raspberry Pi power button important?
You should never “yank” the power cord out of your Pi as this can lead to severe data corruption (and in some cases, physically damage your SD card). You can safely shut down your Pi via a software command or, even better, use a power button or switch (see: this guide). 🙂
Note: When we “shut down” the Pi, it will send it into a halt state, which still consumes a very small amount of power. This is similar to how all modern computers work. In this guide walk through the process of adding a power button that will both halt and wake the Pi up from a halted state. Additionally, after your Pi has shut down, you can safely disconnect the power supply (should you desire) without the worry of data corruption.
Raspberry Pi 4 Support
The version of the bootloader used in early Raspberry Pi 4 units didn’t ship with WAKE_ON_GPIO enabled, meaning you can’t wake the Pi using the method we’ve outlined in this guide. However, the latest version of the bootloader supports this feature.
If you have one of the early Raspberry Pi 4 units and wake functionality doesn’t work after completing this guide, you may need to install the bootloader manually. To do so, download these files and follow the instructions contained therein.
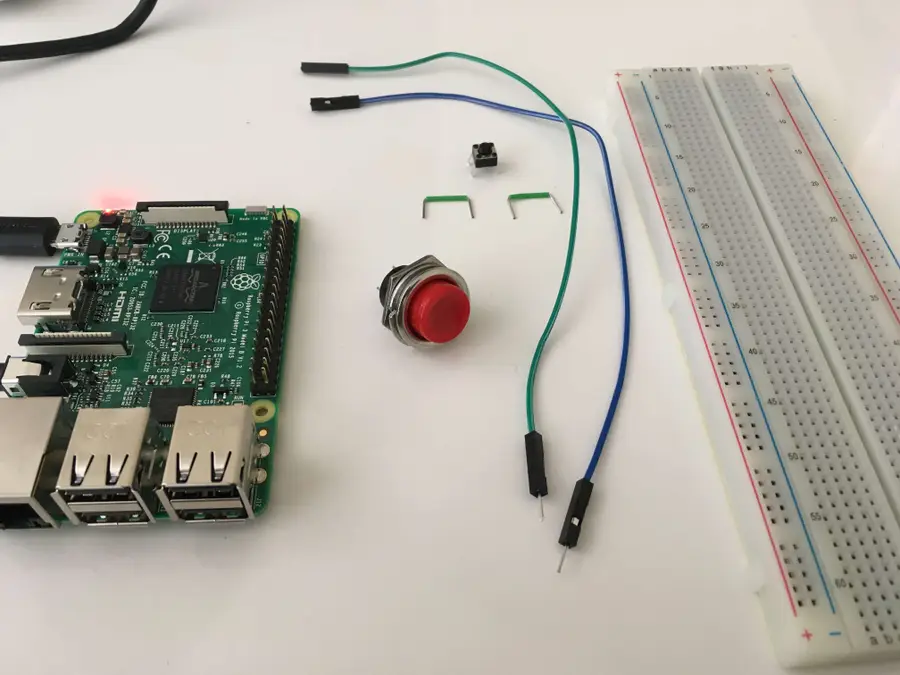
Before we get to work, we should gather the supplies. You’ll need a Raspberry Pi, and any version will do for this project.
If you’re following along with this guide, it’s likely that you’re going to have to choose an appropriate button for your project. I’m going to use a pretty large button, but the important part is that you choose a “normally open momentary push button”.
If you don’t have a soldering iron or don’t want to break it out, you can order a premade Raspberry Pi power button assembly. This option eliminates the need for soldering or breadboarding.
Option 2: Solder your own button assembly
This option is best if you have a soldering iron and have a very specific button size in mind. In this case, reference the tools and materials section above for a complete list of what you’ll need.
2 – Understanding the wake functionality
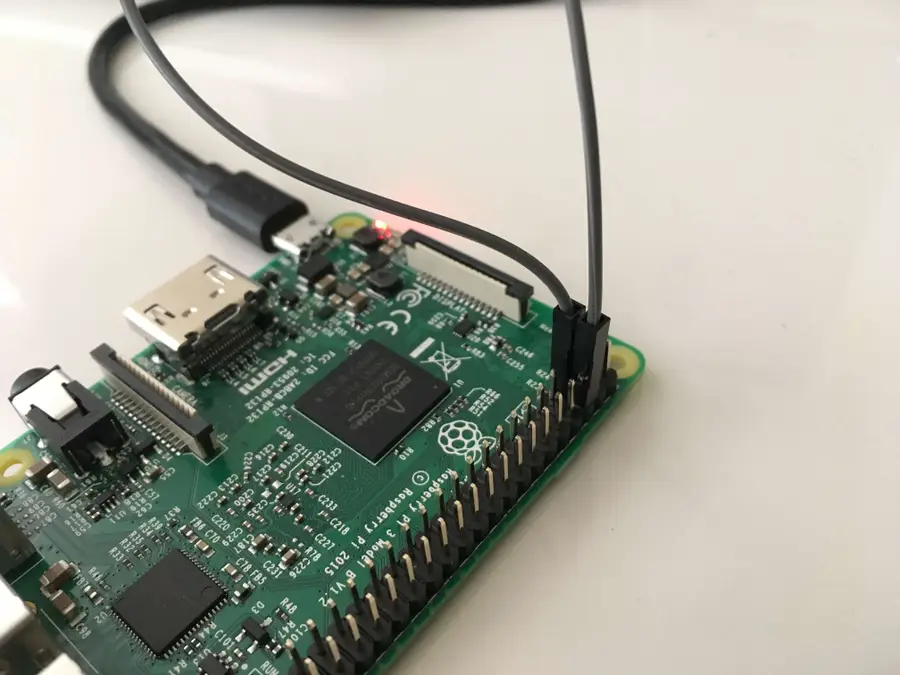
There’s nothing to build here, but we need to understand how to wake up the Pi from a halt state before we build the shutdown functionality. Simply put, shorting pins 5 and 6 (GPIO3 and GND) together will wake the Pi up from a halt state.
An easy way to test this is to shutdown the Pi with sudo shutdown -h now, and connect pins 5 and 6 with a female to female cable. You only need to short them momentarily. Then you should find that the Pi is “awake”.
3 – Building the sleep functionality
There are two options for building the sleep functionality: using our install script or installing everything manually. I recommend using the install script, but the manual approach will help you understand how this works.
Option 1: Use the install script (easiest)
The simplest way to install the required scripts is to clone our power button repository, and run the install script.
SSH into your Pi, install git (if it’s not already), and then run:
Read the next section if you want to understand how these scripts work.
Option 2: Install manually
The wake solution is fairly straight forward, but in order to safely shut down the Pi we’re going to have to use a software solution. Since we know we’re going to use pins 5 and 6 to wake the Pi, let’s also use these pins to shut it down. That way we can wire up our button to those pins and it will both shutdown and wake the Pi.
We’ll have to write a script that listens for a button press and shuts down the Pi. Before we look at the script, let’s discuss a few different approaches. First, we could write a script that starts an infinite loop and waits for a change in the state of the GPIO pin. Using pseudo-code, that might look something like:
while True:
    if GPIO3 is pressed:
        shutdown the pi
While this would work, and probably doesn’t have any real performance concerns, there’s actually a better way. We can listen for an interrupt (edge detection). An interrupt is the change in state from LOW to HIGH or HIGH to LOW. The RPi.GPIO library provides a method called wait_for_edge that will block execution of our script until an interrupt is detected. So we’ll setup GPIO3, and once we detect a FALLING edge we’ll shutdown the Pi.
First, we need to connect to the Pi via SSH. Then, we’ll use a script called listen-for-shutdown.py.
To create the script, we can use the nano editor. After connecting to your Pi, run the following command to create a file called listen-for-shutdown.py:
sudo nano listen-for-shutdown.py
Then, paste the following code into that file, and press CTRL-X to exit, and Y to save when prompted.
Now add another script called listen-for-shutdown.sh that will start/stop our service. To create the script:
sudo nano listen-for-shutdown.sh
Enter the following code in that file and save it:
#! /bin/sh

### BEGIN INIT INFO
# Provides:          listen-for-shutdown.py
# Required-Start:    $remote_fs $syslog
# Required-Stop:     $remote_fs $syslog
# Default-Start:     2 3 4 5
# Default-Stop:      0 1 6
### END INIT INFO

# If you want a command to always run, put it here

# Carry out specific functions when asked to by the system
case "$1" in
  start)
    echo "Starting listen-for-shutdown.py"
    /usr/local/bin/listen-for-shutdown.py &
    ;;
  stop)
    echo "Stopping listen-for-shutdown.py"
    pkill -f /usr/local/bin/listen-for-shutdown.py
    ;;
  *)
    echo "Usage: /etc/init.d/listen-for-shutdown.sh {start|stop}"
    exit 1
    ;;
esac

exit 0
Place this file in /etc/init.d and make it executable.
Since the script won’t be running, we’ll go ahead and start it with:
sudo /etc/init.d/listen-for-shutdown.sh start
Note: These scripts have been added to a Github repo to make them easier to pull down. Feel free to submit pull requests with improvements.
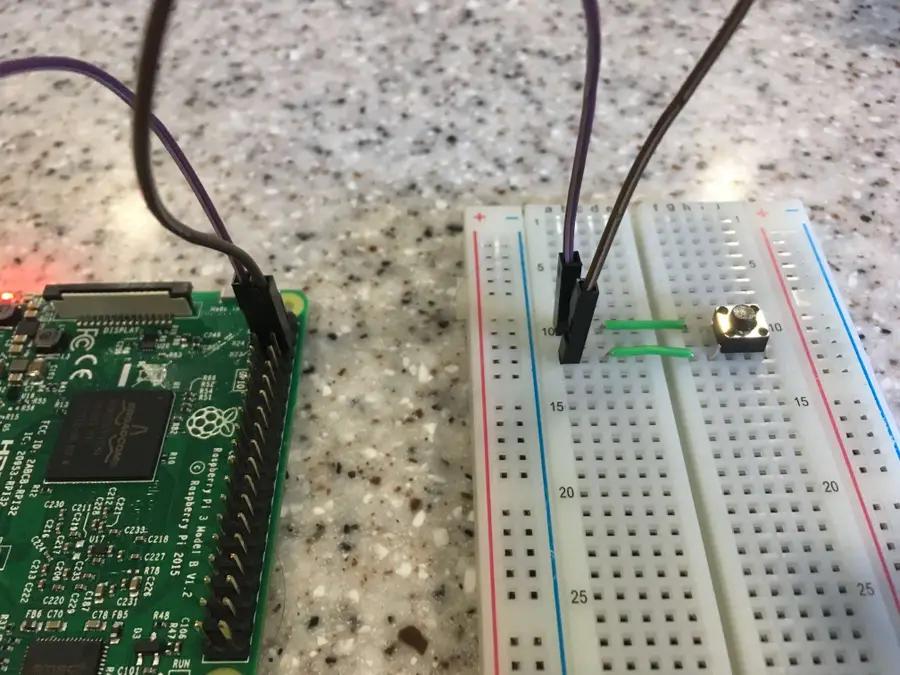
4 – Test the button using a breadboard
The first thing we’ll do is wire up a button and test the functionality using a breadboard. This is a very simple circuit, but it’s good to make sure it works before we move on.
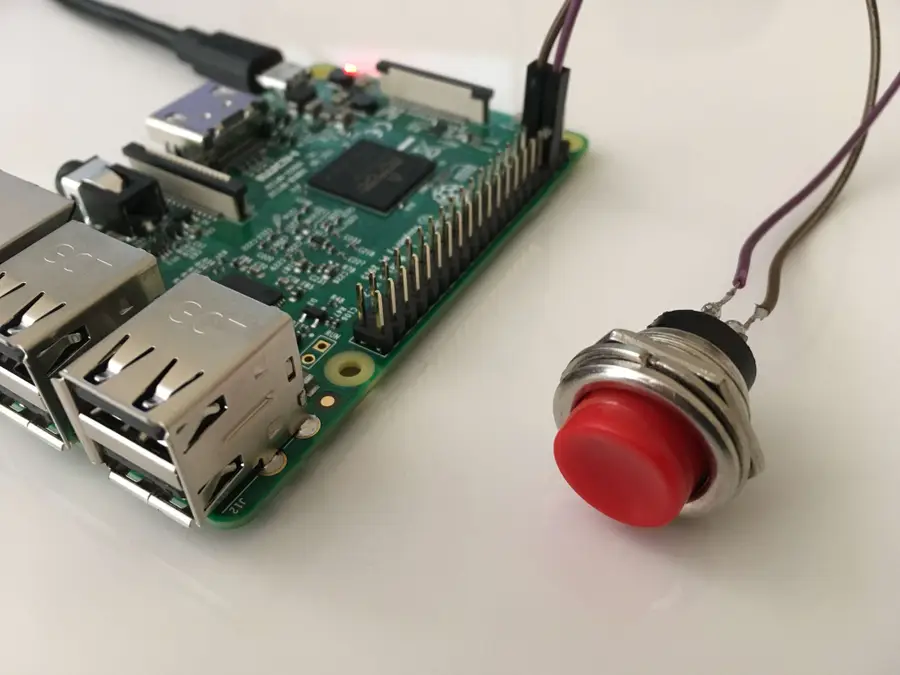
You can see the image below for details, but I’ll explain what’s going on. I’m using two male to female jumper cables. I’m connecting one to pin 5 (SCL) and the other to pin 6 (ground). If pin 6 is already taken by something else, you can use any other ground pin instead.This is a great resource for identifying all your pins!
Then, I’m connecting them to the breadboard with a button in between. Since the button is normally open, the circuit will be open until the button is pressed. Then when the circuit is complete, it will either wake up the Pi if it’s in a halt state, or it will shut it down if it’s awake.
Then when I press the button, I confirm that I’m my session is lost. To get a step further, I can confirm that the network is down on the Pi by using arp-scan.
sudo arp-scan --interface=en0 --localnet
I won’t go into detail about how to use arp-scan in this guide, but if you use the correct interface this should work.
You can check the output of arp-scan and make sure that the Raspberry Pi is not connected to the network.
Then go ahead an press the button again to wake it up. If you wait a few seconds, the Pi should be back up. You can test again using the arp-scan command. If the Pi is up you’ll see output similar to this:
192.168.1.254        20:3d:66:44:c6:70  (Unknown)
192.168.1.181            b8:27:eb:79:49:f2  Raspberry Pi Foundation
192.168.1.251         58:82:a8:7e:66:36 (Unknown)
Now you can connect again via SSH!
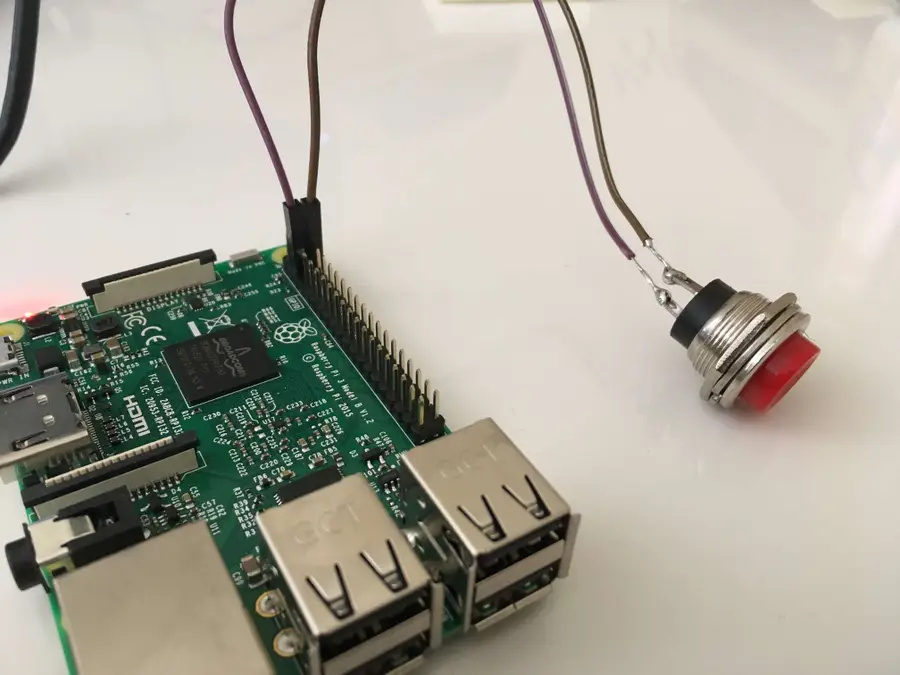
5 – Make our final circuit
Now it’s time to wire up the button we’re going to use for the project. I’m going to use a jumper cable still so the button can be easily detached from the Pi. But I’ll strip the other end and solder it onto the button.
🛈 If you’re using a Pi without a GPIO header (pins) soldered to it, like a Pi Zero, you can solder directly to the Pi Zero’s GPIO through-holes.
6 – Uninstalling
If you want to uninstall and remove the power button functionality—for example, to use GPIO3 for something else—simply remove all the files and remove the shutdown listener.
If you want to see what state your Pi is in (and when it’s safe to unplug) after pressing your power button, you can also add a simple Pi LED status indicator!
There are several ways to go about running a Minecraft server on the Raspberry Pi. In this guide, I’ll cover how to install Nukkit—a cross-platform Minecraft server that’s super easy to set up on the Raspberry Pi. This server should work with PCs, consoles, and tablets running Minecraft 1.14. I’ll be using a Raspberry Pi
Introducing Howchoo, an enigmatic author whose unique pen name reflects their boundless curiosity and limitless creativity. Mysterious and multifaceted, Howchoo has emerged as a captivating storyteller, leaving readers mesmerized by the uncharted realms they craft with their words.
With an insatiable appetite for knowledge and a love for exploration, Howchoo’s writing transcends conventional genres, blurring the lines between fantasy, science fiction, and the surreal. Their narratives are a kaleidoscope of ideas, weaving together intricate plots, unforgettable characters, and thought-provoking themes that challenge the boundaries of imagination.
Program your Pi without a keyboard, monitor, or network connection
We’ve written previously about how to configure WiFi and SSH on your Raspberry Pi without having to connect any peripheral devices (headless). As long as you’re comfortable on the command line, this makes it much easier to work with your Pi.
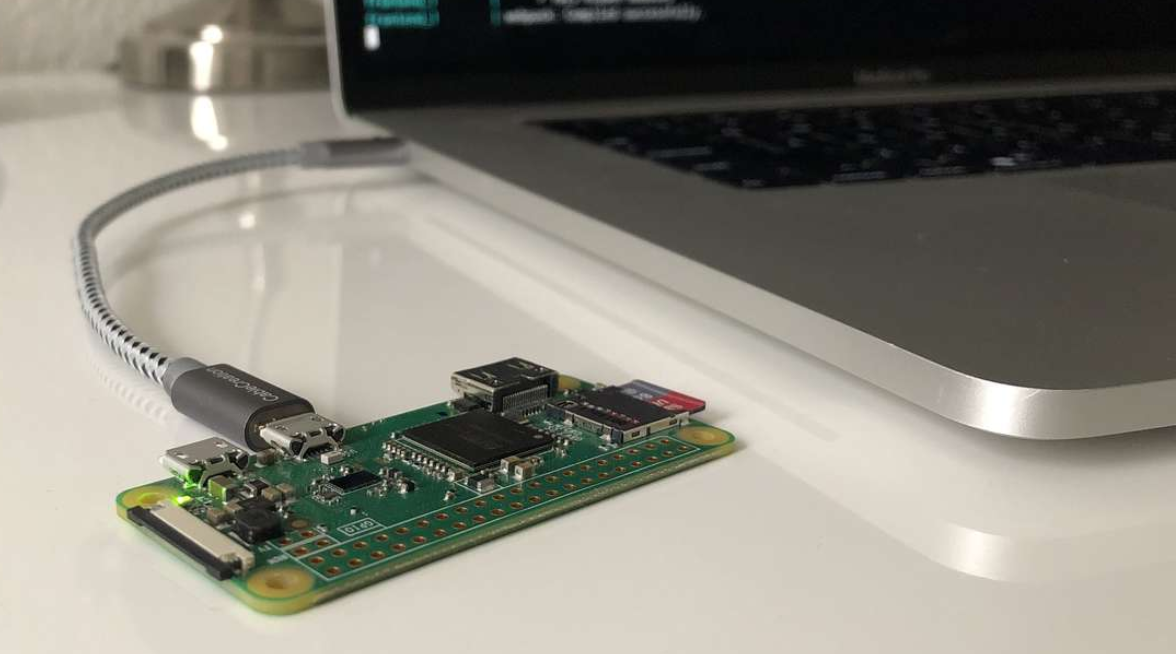
Now, I’ve been doing projects with Raspberry Pi’s since the first version, and I only recently found out about a Linux feature that allows you to connect to the Pi directly over USB: it’s called USB gadget mode. With “gadget mode” enabled, we don’t need to configure the WiFi network or connect any peripheral devices, we simply connect the Pi to our computer with a USB cable, and now we’ve got SSH access.
In this guide, I’ll show you how enable gadget mode and connect to your Pi via USB.
Note: I believe this feature was initially enabled for the Pi Zero, and it does not work on earlier versions of the Pi. I have, however, tested with the Raspberry Pi 4, and it works as long as you connect via the USB-C connector.
With Raspberry Pi OS installed on the SD card (and the SD card still mounted on your computer), you can use Finder or a shell to navigate to the boot directory. Now edit the file called config.txt, and append the following:
dtoverlay=dwc2
Save and exit.
3 – Enable SSH
We can SSH by simply adding an empty file called ssh directly in the boot directory.
On the command line, you can navigate to the boot directory and run:
touch ssh
Note: The file must be called “ssh” not “SSH” or “ssh.txt” or anything other than “ssh”.
4 – Edit cmdline.txt
Now, edit the file called cmdline.txt. Look for rootwait, and add modules-load=dwc2,g_ether immediately after.
Note the formatting of cmdline.txt is very strict. Commands are separated by spaces, and newlines are not allowed.
Here’s an example of what my cmdline.txt file looks like, but you should not copy this. Simply add the required command mentioned above.
That’s it for configuration! Now you can eject the SD card, and insert it into the the Pi. Using a USB cable, connect to the Raspberry Pi from your computer.
After the Pi boots up (this will take a while initially), the Pi should appear as a USB Ethernet device, and you can SSH into it using:
There are several ways to go about running a Minecraft server on the Raspberry Pi. In this guide, I’ll cover how to install Nukkit—a cross-platform Minecraft server that’s super easy to set up on the Raspberry Pi. This server should work with PCs, consoles, and tablets running Minecraft 1.14. I’ll be using a Raspberry Pi
Introducing Howchoo, an enigmatic author whose unique pen name reflects their boundless curiosity and limitless creativity. Mysterious and multifaceted, Howchoo has emerged as a captivating storyteller, leaving readers mesmerized by the uncharted realms they craft with their words.
With an insatiable appetite for knowledge and a love for exploration, Howchoo’s writing transcends conventional genres, blurring the lines between fantasy, science fiction, and the surreal. Their narratives are a kaleidoscope of ideas, weaving together intricate plots, unforgettable characters, and thought-provoking themes that challenge the boundaries of imagination.
If you’ve arrived on this page, you’re probably in the middle of a merge conflict as we speak. To fix conflicts, we often have to open the file and manually sort out each conflicts, but sometimes we’re lucky and we can keep one version and throw out the other entirely. To do this, we can use git checkout with one of two flags: --ours or --theirs.
Convenient, right? Maybe not.
The usage of --ours and --their might be a little confusing at first, so lets dive in and learn by example.
tl;dr
With feature branch checked out.
git merge master
git rebase master
Keep changes from master
--theirs
--ours
Keep changes from feature
--ours
--theirs
Continue reading for an explanation.
1 – Using –ours/–theirs during a merge
Technically speaking, use of git checkout --ours/--theirs is only applicable during a merge. You might be wondering about rebases, and I’ll explain that in the next step.
For simplicity, let’s start with a basic merge conflict. Imagine our git history looks like this:
          A---B---C feature
         /
    D---E---F---G master
The letters signify a commit, and each commit includes changes to our file: myscript.py.
So changes were made to myscript.py in both master and feature branches. A common strategy is to routinely merge changes from master into your feature branch during development to keep the feature branch from getting too far out of date. But when we go to merge master into feature, we’re going to run into trouble:
(feature) $ git merge master
Auto-merging myscript.py
CONFLICT (content): Merge conflict in myscript.py
Automatic merge failed; fix conflicts and then commit the result.
In most cases, you’d want to open myscript.py and sort out the merge conflicts. But in some cases, you’ll want to completely disregard one version and keep the other. This is where git checkout --ours/--theirs comes into play.
Use --ours keep the version in the current branch
Since we have our feature branch checked out, we can use --ours to keep the version of myscript.py that resides in the feature branch, and disregard the version from master.
git checkout --ours myscript.py
Use --theirs to keep the version from the branch being merged in
And --theirs accomplishes the opposite. If we want to discard the version of myscript.py that resides in our current branch and keep the version from master, we can use --theirs.
git checkout --theirs myscript.py
2 – Using –ours/–theirs during a rebase
When we run into merge conflicts during a rebase, we are effectively in the middle of a merge, so the rules for git checkout --ours/--theirs from above still apply. But, the tricky part is identifying the “current” branch. Let me explain what happens during a rebase.
What happens during a rebase?
Again, let’s assume the following history:
          A---B---C feature
         /
    D---E---F---G master
When we rebase master “into” feature, what we are really doing is this:
“Roll back” to the common ancestor and save the diff
In our case, we roll back to commit E, and save the diff of each commit introduce by the feature branch.
    A---B---C (saved in temporary files)

           feature
         /
    D---E---F---G master
Reset the feature branch to the current commit from master
The feature branch now has the same history as master.
    A---B---C (saved in temporary files)

                   feature
                 /
    D---E---F---G master
Apply the saved changes from the feature branch
Now each change from the feature branch (A, B, and C) will be applied to the new feature branch once again. It’s important to note, for the sake of this guide, that this is accomplished through a merge.
The new history looks like this:
                   A---B---C feature
                 /
    D---E---F---G master
Ok, so how do I use git checkout --ours/--theirs during a rebase?
The point of that long winded explanation was to show that when you are fixing merge conflicts in the middle of a rebase, your “current” branch is not longer your original feature branch but rather a new branch that is up to date with master. And the commits being merge into the current branch are the commits from your original feature branch. So --ours and --theirs will appear to be flipped around.
Use --ours to keep changes from the branch being rebased onto (master)
At the beginning of the rebase, we had feature branch checked out, so it may seem backward, but we will use --ours to keep changes from master.
git checkout --ours myscript.py
Use --theirs to keep the changes from the “current” branch (feature)
And naturally, the opposite is true. Use --theirs to keep changes from the feature branch.
git checkout --theirs myscript.py
3 – Conclusion
I know this can be confusing, so please let me know in the comments below if you thought this guide was helpful or if you could use further clarification!
Tab completion, or auto-completion, is essential if you’re using Git on the command line. Tab completion is a nice feature of many shells that allows you to complete a word by hitting tab. In this case, we want to be able to use tab completion for things like branches and tags in git. Fortunately, setting
Introducing Howchoo, an enigmatic author whose unique pen name reflects their boundless curiosity and limitless creativity. Mysterious and multifaceted, Howchoo has emerged as a captivating storyteller, leaving readers mesmerized by the uncharted realms they craft with their words.
With an insatiable appetite for knowledge and a love for exploration, Howchoo’s writing transcends conventional genres, blurring the lines between fantasy, science fiction, and the surreal. Their narratives are a kaleidoscope of ideas, weaving together intricate plots, unforgettable characters, and thought-provoking themes that challenge the boundaries of imagination.
Have you ever wondered how those beautiful Instagram photos of Minecraft builds come to be? Or just what makes the water look so smooth in a let’s play video? Both are courtesy of a mod called OptiFine! OptiFine allows Minecraft to run faster and look better with full support for HD textures, and paired with shaders, can change how your whole Minecraft world feels.
Not only does OptiFine make water move and look realistic, it also adds swaying movement to trees, grass, and lanterns. Plus, it turns grass block dynamic, so you no longer need to see excessive dirt on the side of mountains due to the limitations of the vanilla grass block. Whether you’re using a modpack or playing on a multiplayer server, this guide will go through the steps and to installing OptiFine with CurseForge.
Note: Before beginning, make sure that any mods you’re currently using don’t conflict with OptiFine. Usually the developer states mod incompatibilities on CurseForge, so make sure to read through before downloading.
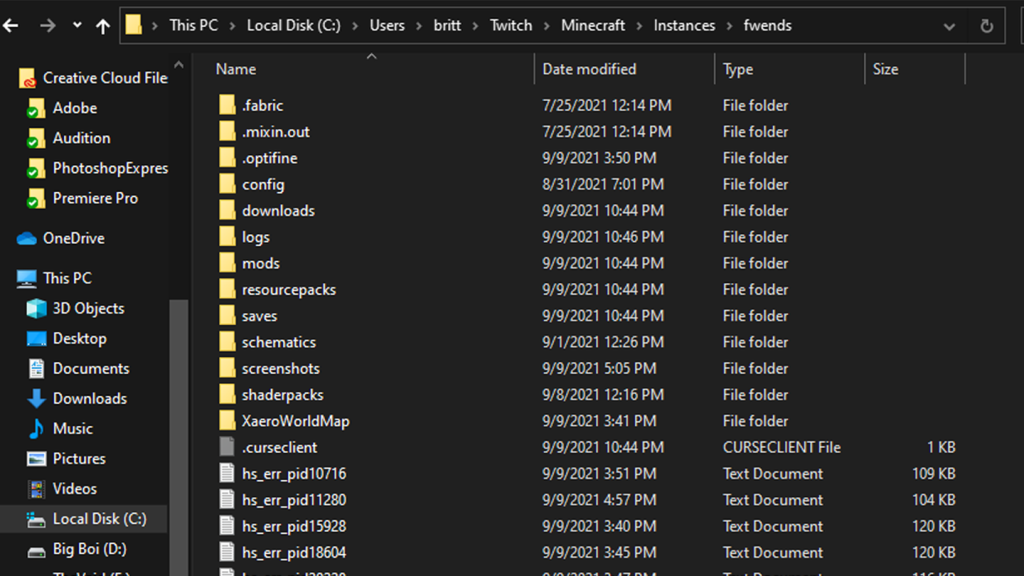
1 – Find the correct file path
Before you can download and install OptiFine, you’ll need to find where in CurseForge your game is!
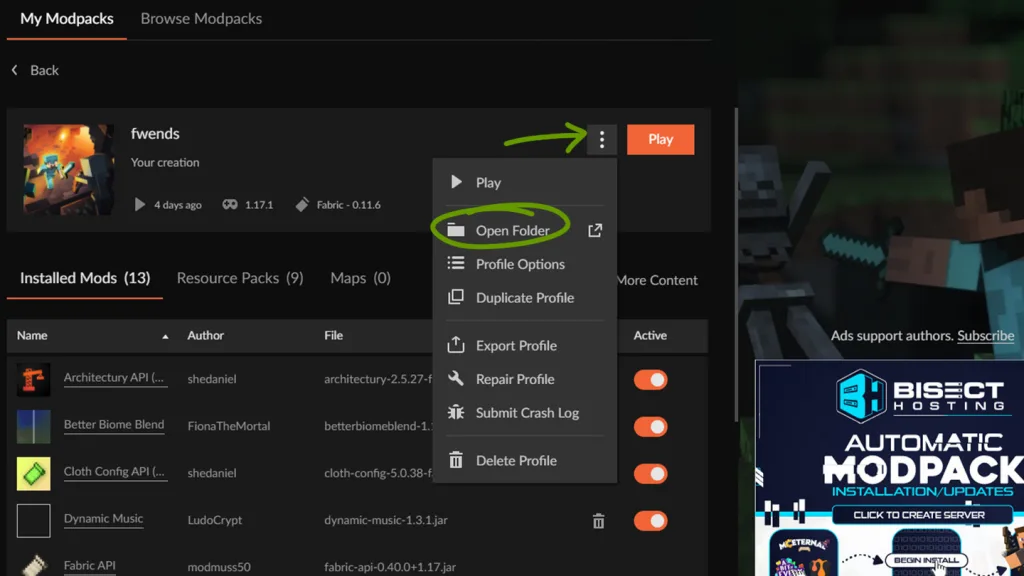
Open CurseForge and navigate to the modpack you’re using.
Click the ... button to the left of the Play button.
In the drop-down menu, click Open Folder.
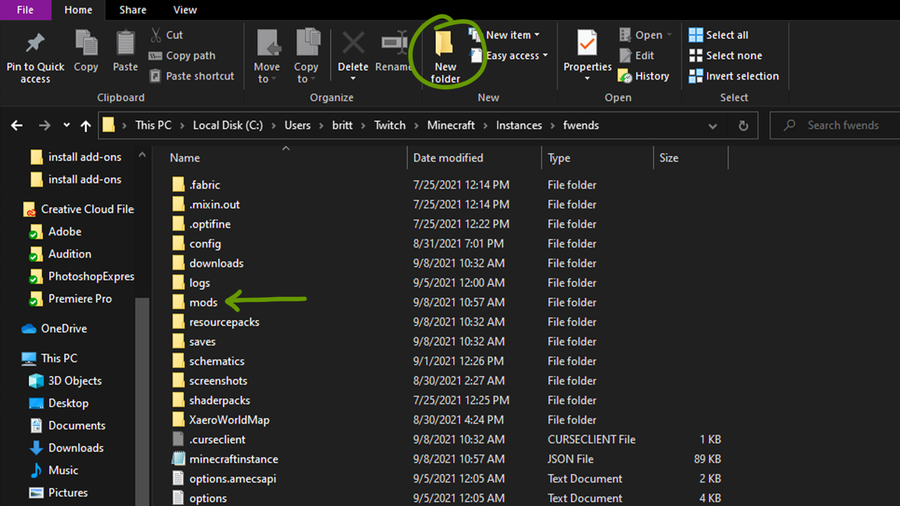
In the window that appears, open the Mods folder. This is where you’ll install OptiFine!
Usually, the file path looks like this: C:UsersUSER_NAMETwitchMinecraftInstancesMODPACK_NAMEmods.
Note (Pre-1.18 versions): If you haven’t already, make sure to download the OptiForge or OptiFabric mod to this folder as well. Otherwise, OptiFine will not work and your game won’t launch.
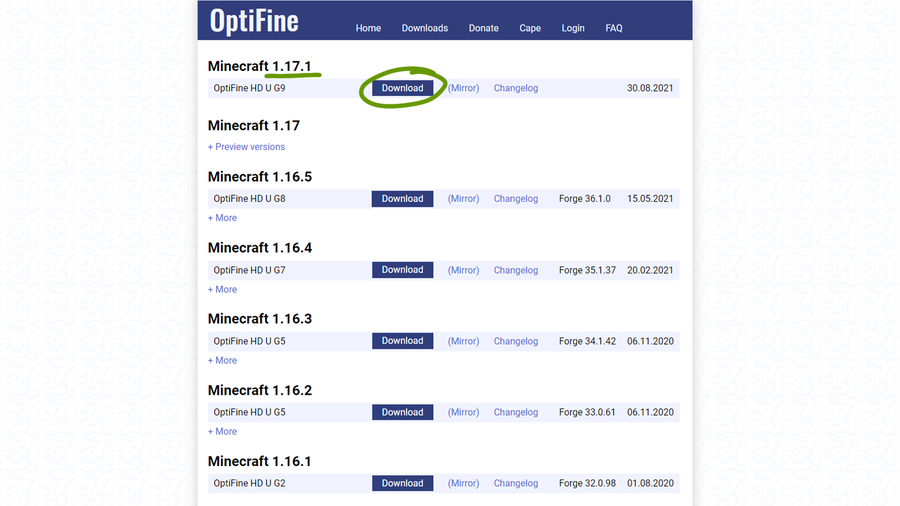
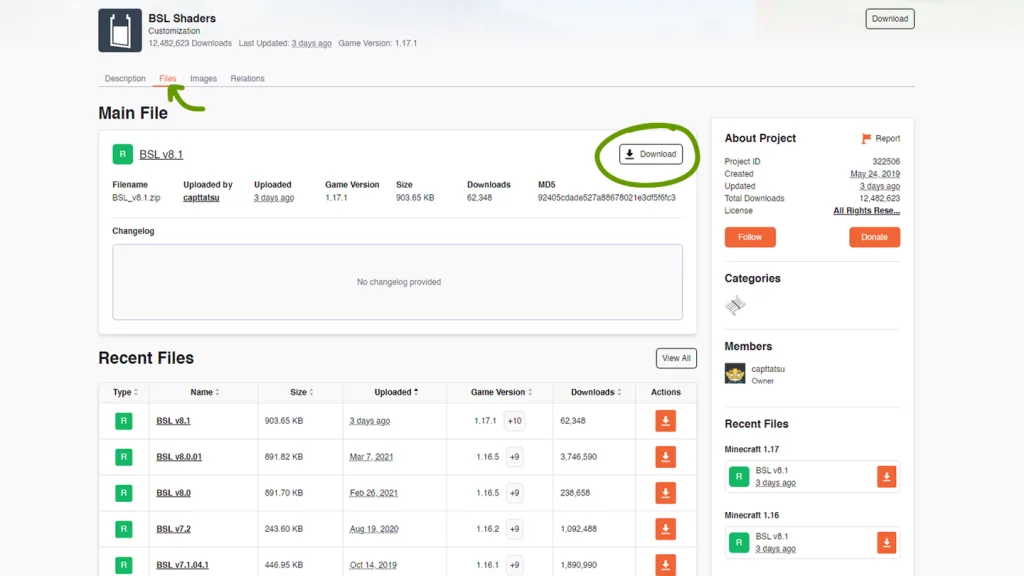
2 – Download OptiFine
To install Optifine, you’ll need to download the OptiFine JAR file from their website. Make sure to choose the latest version of OptiFine that matches your game version.
Click the Download button to the right of the OptiFine version you want.
On the next page, you may need to wait for the Skip Ad button to appear after five seconds.
Click the Download OptiFine link in the middle of the next page.
Navigate to, or copy and paste, the file path you found in the previous step and download OptiFine.
Depending on your browser, you may need to click Keep or Allow if a warning pops up stating that OptiFine might be dangerous. Which, as long as you’re downloading from OptiFine’s official website, it’s not.
That’s it! You’ve successfully installed OptiFine through CurseForge. Make sure to run your game to make sure there aren’t any conflicts with other mods.
If you’re interested in adding more customization to your game, follow our guide on how to install shader packs through CurseForge!
The longer you play Minecraft, the more you realize that early-game tools just won’t cut it. Exploring the enchantment feature of Minecraft can be exciting, but also intimidating. Rather than worry about researching enchantments, below are the best enchantments in Minecraft! To learn how to enchant items, check out this guide! In this guide, you’ll see
Introducing Howchoo, an enigmatic author whose unique pen name reflects their boundless curiosity and limitless creativity. Mysterious and multifaceted, Howchoo has emerged as a captivating storyteller, leaving readers mesmerized by the uncharted realms they craft with their words.
With an insatiable appetite for knowledge and a love for exploration, Howchoo’s writing transcends conventional genres, blurring the lines between fantasy, science fiction, and the surreal. Their narratives are a kaleidoscope of ideas, weaving together intricate plots, unforgettable characters, and thought-provoking themes that challenge the boundaries of imagination.
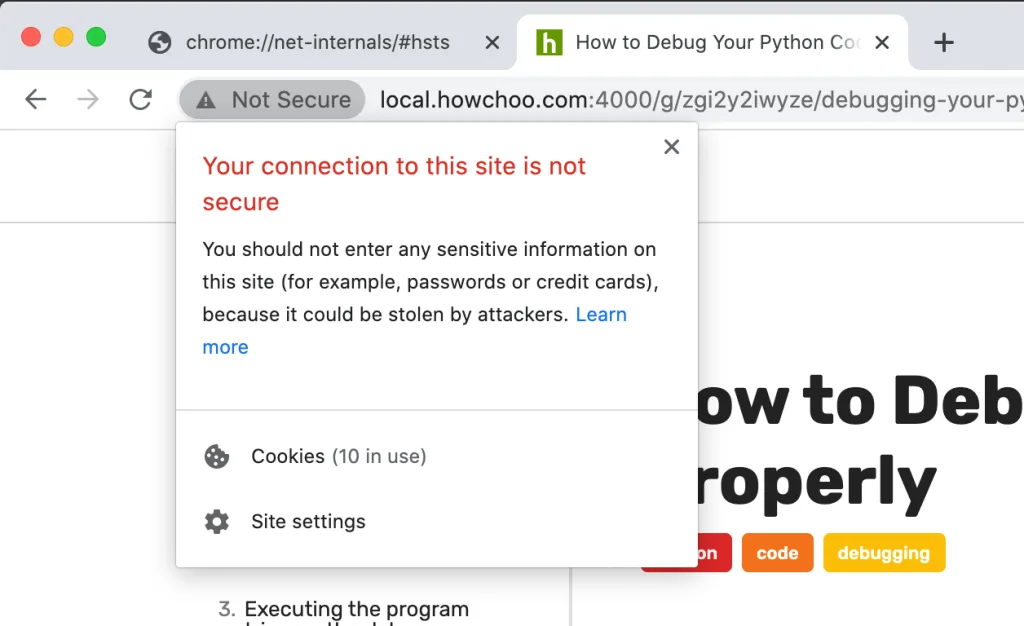
If you ever visited the https version of a website (whether it resolved or not), Google Chrome might repeatedly send you to that version. In other words, http://local.howchoo.com:4000 continually redirects you to https://local.howchoo.com:4000.
Why this happens
This is a secure caching issue where Chrome erroneously caches the redirect the first time you visit the secure version of a site—even if the site doesn’t have a valid SSL/TLS certificate.
This is a major problem in local development where you’re often coding in a non-secure environment.
This short guide will show you how to remove the automatic redirect to https in Chrome, fixing the issue.
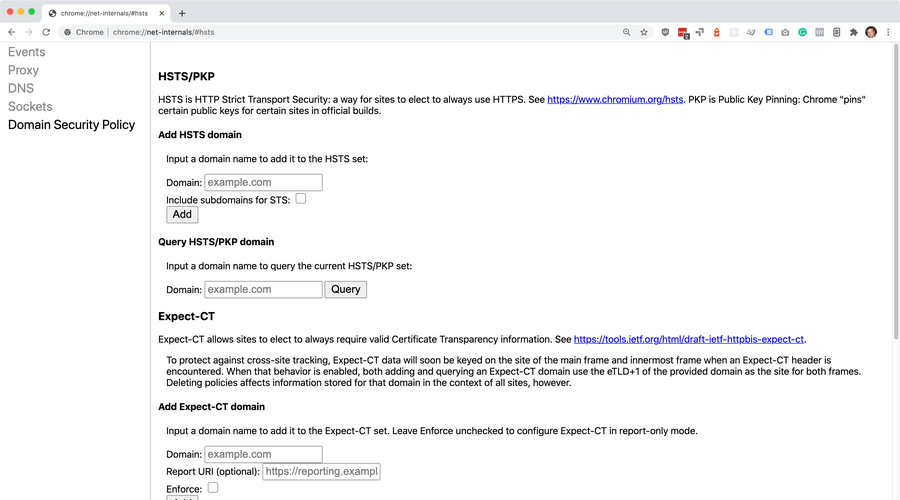
1 – Open HSTS settings in net-internals in Chrome
In a new browser tab, go to chrome://net-internals/#hsts. This is the configuration area for HSTS.
What is HSTS?
According to Google Chrome, an HSTS is HTTP Strict Transport Security—a way for sites to elect to always use HTTPS.
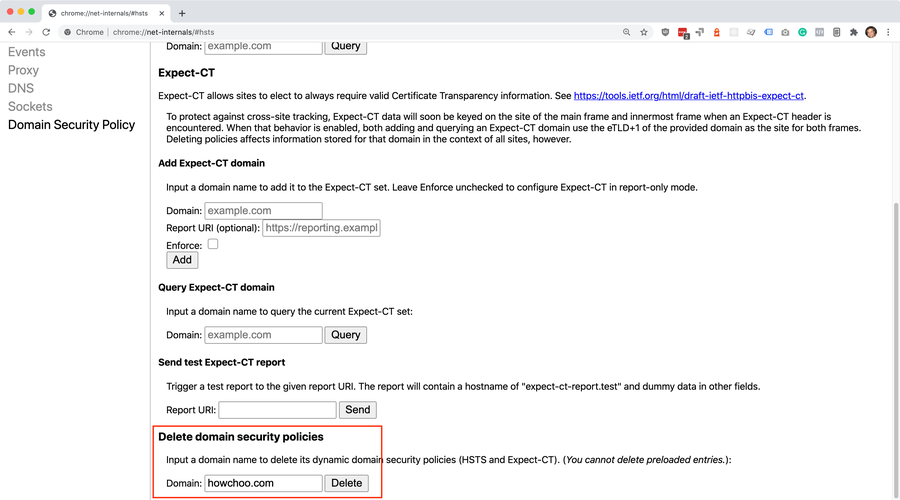
2 – Delete domain security policies for the domain
Scroll down to “Delete domain security policies” and enter the root domain that’s causing you issues. For example, I entered howchoo.com to prevent the domain from automatically redirecting to https.
Then, click the Delete button.
3 – Visit the website to test
Visit the http version of the URL that was giving you problems. You should no longer get redirected.
Still getting redirected?
If you’re still getting redirected, try clearing your browser cache by navigating to Chrome > Settings > Privacy and security (or by visiting chrome://settings/privacy in your browser) and clear your browsing data.
How to Clear Your Browser Cache for Any Browser Trouble loading web pages? Try clearing your cache!
You can also clear data just for the specific domain by visiting the domain in your browser by navigating to View > Developer > Developer Tools > Application > Clear storage and then clicking the Clear site data button.
NEXT UP
How to Clear Your Browser Cache for Any Browser
Trouble loading web pages? Try clearing your cache!
Clearing your browser cache is a great way to solve common internet issues. If a webpage isn’t loading properly, one of the first things you should try is clearing your browser cache. This guide includes steps for the most common internet browsers—Chrome, Firefox, Safari, Internet Explorer, and Edge. If your browser isn’t listed, visit the
Introducing Howchoo, an enigmatic author whose unique pen name reflects their boundless curiosity and limitless creativity. Mysterious and multifaceted, Howchoo has emerged as a captivating storyteller, leaving readers mesmerized by the uncharted realms they craft with their words.
With an insatiable appetite for knowledge and a love for exploration, Howchoo’s writing transcends conventional genres, blurring the lines between fantasy, science fiction, and the surreal. Their narratives are a kaleidoscope of ideas, weaving together intricate plots, unforgettable characters, and thought-provoking themes that challenge the boundaries of imagination.
If you ever visited the https version of a website (whether it resolved or not), Google Chrome might repeatedly send you to that version. In other words, http://local.howchoo.com:4000 continually redirects you to https://local.howchoo.com:4000.
Why this happens
This is a secure caching issue where Chrome erroneously caches the redirect the first time you visit the secure version of a site—even if the site doesn’t have a valid SSL/TLS certificate.
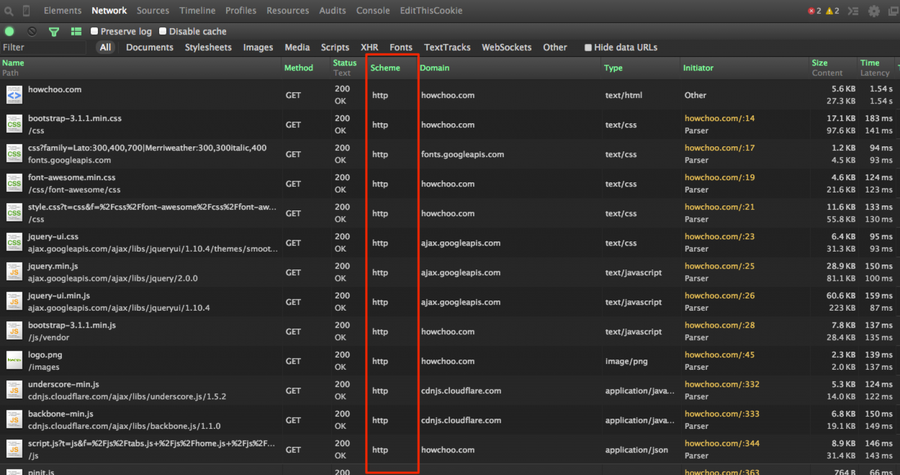
Use Chrome Developer Tools to Check Whether Resources Are Loading over SSL
A pain in local development
This is a major problem in local development where you’re often coding in a non-secure environment.
This short guide will show you how to remove the automatic redirect to https in Chrome, fixing the issue.
1 – Open HSTS settings in net-internals in Chrome
In a new browser tab, go to chrome://net-internals/#hsts. This is the configuration area for HSTS.
What is HSTS?
According to Google Chrome, an HSTS is HTTP Strict Transport Security—a way for sites to elect to always use HTTPS.
2 – Delete domain security policies for the domain
Scroll down to “Delete domain security policies” and enter the root domain that’s causing you issues. For example, I entered howchoo.com to prevent the domain from automatically redirecting to https.
Then, click the Delete button.
3 – Visit the website to test
Visit the http version of the URL that was giving you problems. You should no longer get redirected.
Still getting redirected?
If you’re still getting redirected, try clearing your browser cache by navigating to Chrome > Settings > Privacy and security (or by visiting chrome://settings/privacy in your browser) and clear your browsing data.
How to Clear Your Browser Cache for Any Browser
Trouble loading web pages? Try clearing your cache!
You can also clear data just for the specific domain by visiting the domain in your browser by navigating to View > Developer > Developer Tools > Application > Clear storage and then clicking the Clear site data button.
NEXT UP
How to Clear Your Browser Cache for Any Browser
Trouble loading web pages? Try clearing your cache!
Clearing your browser cache is a great way to solve common internet issues. If a webpage isn’t loading properly, one of the first things you should try is clearing your browser cache. This guide includes steps for the most common internet browsers—Chrome, Firefox, Safari, Internet Explorer, and Edge. If your browser isn’t listed, visit the
Introducing Howchoo, an enigmatic author whose unique pen name reflects their boundless curiosity and limitless creativity. Mysterious and multifaceted, Howchoo has emerged as a captivating storyteller, leaving readers mesmerized by the uncharted realms they craft with their words.
With an insatiable appetite for knowledge and a love for exploration, Howchoo’s writing transcends conventional genres, blurring the lines between fantasy, science fiction, and the surreal. Their narratives are a kaleidoscope of ideas, weaving together intricate plots, unforgettable characters, and thought-provoking themes that challenge the boundaries of imagination.
Shaders, also known as shader packs, are a way to bring your Minecraft gameplay to a new level of beautiful. Minecraft Shaders improve the game’s visual elements, such as color enhancement, improved lighting, and generally make the game look more realistic. Depending on the shader, players can customize their world to their preference. So if you want pink water and purple sky, shader packs are the way to make it happen.
Before you dive into our guide on how to install shaders in CurseForge, make sure you already have OptiFine installed. We have a helpful guide on how to do that here! Without OptiFine, the shaders won’t work, so make sure to do that and return here after!
1 – Find the correct File Path
Before you can download and install a shader pack, you’ll need to find where in CurseForge your game is!
Open CurseForge and navigate to the modpack you’re using.
Click the ... button to the left of the Play button.
In the drop-down menu, click Open Folder.
This is where you’ll install your shaders!
Usually, the file path looks like this: C:UsersUSER_NAMETwitchMinecraftInstancesMODPACK_NAME.
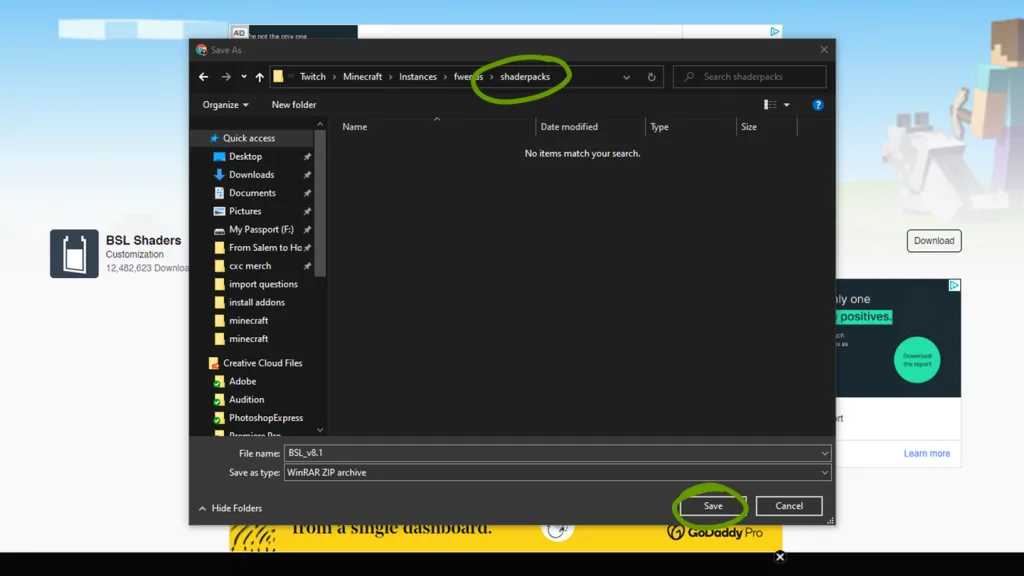
2 – Create a shaders folder
Unfortunately, Minecraft doesn’t automatically create a folder to place shaders into. Inside the Minecraft folder you found in the last step, create a new folder called shaderpacks. Make sure to spell it exactly or else the game won’t recognize where you’ve placed your shaders.
3 – Choose a shader pack
There are plenty of websites out there for finding shaders, but some are safer than most. We recommend CurseForge or Shaders Mods. Alternatively, you can download directly from a developer’s website as well!
Just make sure it’s compatible with your Minecraft game version and then move on to the next step!
4 – Install shaders
Download the correct game version of the shader you’ve chosen and place it within the shaders folder you made in step 2. Make sure you don’t unzip the downloaded file!
5 – Activate shaders
Now it’s time to run Minecraft and activate your shaders!
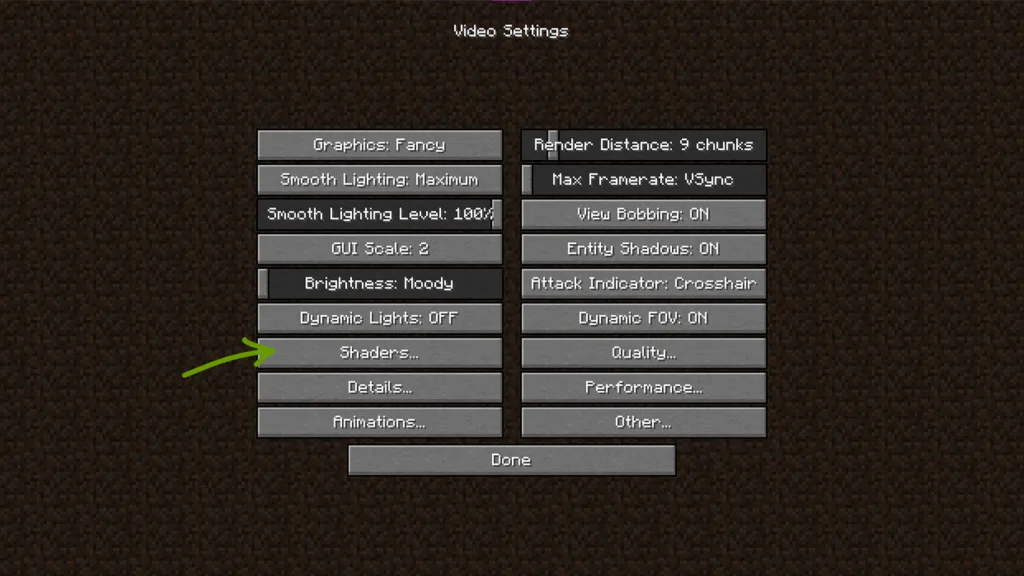
1. Once the game has launched, follow these steps: 2. Click Options then Video Settings. 3. Click Shaders… as shown in the image above.
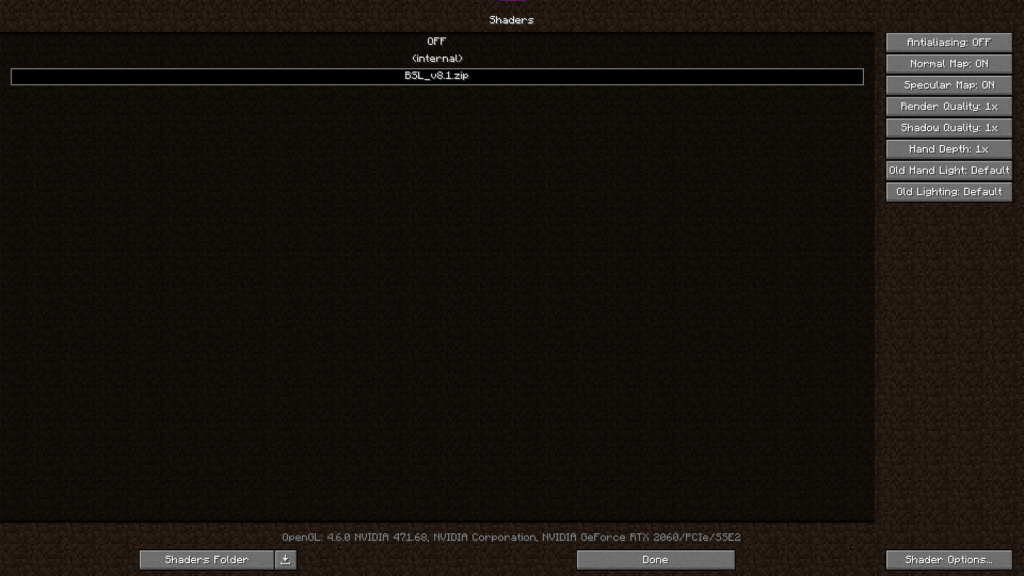
4. In the Shaders menu, choose the shader you want to activate. A loading screen will appear and return you back to the Shaders menu when its finished rendering.
From this menu you can either click the Shader Options button on the bottom right to customize the shader pack or click Done and return to the main menu!
The longer you play Minecraft, the more you realize that early-game tools just won’t cut it. Exploring the enchantment feature of Minecraft can be exciting, but also intimidating. Rather than worry about researching enchantments, below are the best enchantments in Minecraft! To learn how to enchant items, check out this guide! In this guide, you’ll see
Introducing Howchoo, an enigmatic author whose unique pen name reflects their boundless curiosity and limitless creativity. Mysterious and multifaceted, Howchoo has emerged as a captivating storyteller, leaving readers mesmerized by the uncharted realms they craft with their words.
With an insatiable appetite for knowledge and a love for exploration, Howchoo’s writing transcends conventional genres, blurring the lines between fantasy, science fiction, and the surreal. Their narratives are a kaleidoscope of ideas, weaving together intricate plots, unforgettable characters, and thought-provoking themes that challenge the boundaries of imagination.