Minecraft will automatically set itself to the current version for ease of use, but sometimes you need to revert, especially if your favorite map was created with an earlier version. Luckily, it’s easy to change your Minecraft version with a simple launcher configuration. Let’s walk through that, now.
WARNING You absolutely should back up your worlds before changing the game version. If you access one of your current worlds with an older version of the game, you can permanently damage that world! Make sure to keep a copy of your game files safe and separate when rolling back versions.
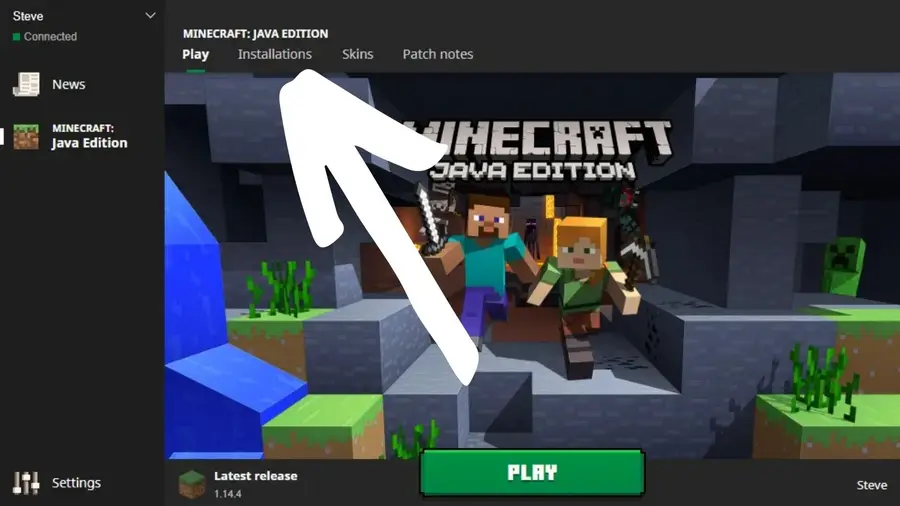
1 – Installations
Installations
Click Installations on the launcher start page, and then click New.
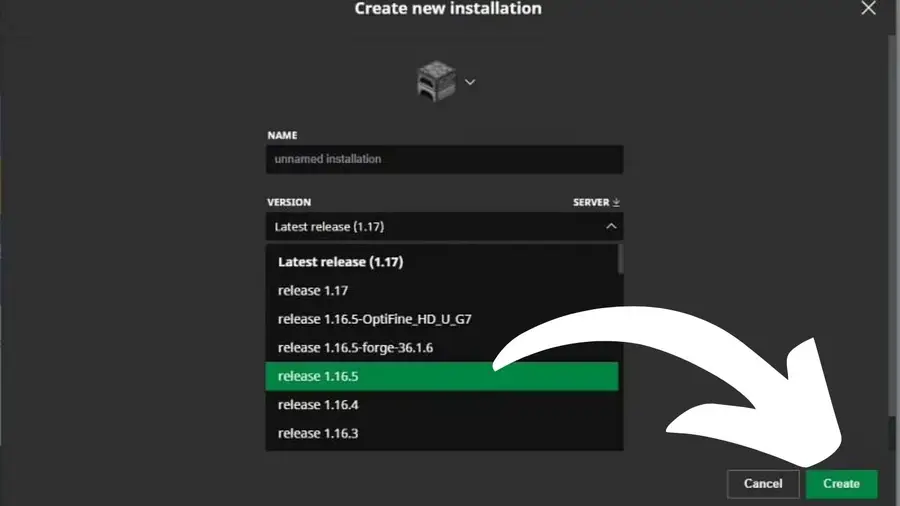
2 – Create new installation
Create new installation
In the Create new installation box, select a name for the installation and choose the game version from the VERSION list.
3 – Finish creation
Finish creation
Click Create to save the change, and then click Play on the top menu.
4 – Find saved installation and change version
Find saved installation and change version
On the launcher landing page, find your saved installation in the list and click it to change to that version of the game.
If you’re interested in exploring Minecraft‘s snapshot versions, check out this guide!
How To Install a Snapshot Version of Minecraft Play a new version before its even released!
The longer you play Minecraft, the more you realize that early-game tools just won’t cut it. Exploring the enchantment feature of Minecraft can be exciting, but also intimidating. Rather than worry about researching enchantments, below are the best enchantments in Minecraft! To learn how to enchant items, check out this guide! In this guide, you’ll see
Introducing Howchoo, an enigmatic author whose unique pen name reflects their boundless curiosity and limitless creativity. Mysterious and multifaceted, Howchoo has emerged as a captivating storyteller, leaving readers mesmerized by the uncharted realms they craft with their words.
With an insatiable appetite for knowledge and a love for exploration, Howchoo’s writing transcends conventional genres, blurring the lines between fantasy, science fiction, and the surreal. Their narratives are a kaleidoscope of ideas, weaving together intricate plots, unforgettable characters, and thought-provoking themes that challenge the boundaries of imagination.
When I turned my computer on this morning, it seems that the menu bar was blocking me from dragging a Google Chrome window from my laptop display to my external display. After much trial and error, I found that I simply needed to drag the window further.
1 – Drag the window further onto the second display
Drag a window from your primary display onto the secondary display until your cursor is at least 75% of the way across the external display. You’ll see the window suddenly jump onto this second display.
NEXT UP
How to Enable the “Popping” Sound When Adjusting the Volume on Your Mac
Starting with MacOS Sierra and High Sierra, your Mac will no longer play a “pop” sound when you adjust your volume. If you prefer to have this sound when you adjust volume up and down (as I do), this guide will teach you how to reenable it. 1 – Open Sound System Preferences Navigate to System
Introducing Howchoo, an enigmatic author whose unique pen name reflects their boundless curiosity and limitless creativity. Mysterious and multifaceted, Howchoo has emerged as a captivating storyteller, leaving readers mesmerized by the uncharted realms they craft with their words.
With an insatiable appetite for knowledge and a love for exploration, Howchoo’s writing transcends conventional genres, blurring the lines between fantasy, science fiction, and the surreal. Their narratives are a kaleidoscope of ideas, weaving together intricate plots, unforgettable characters, and thought-provoking themes that challenge the boundaries of imagination.
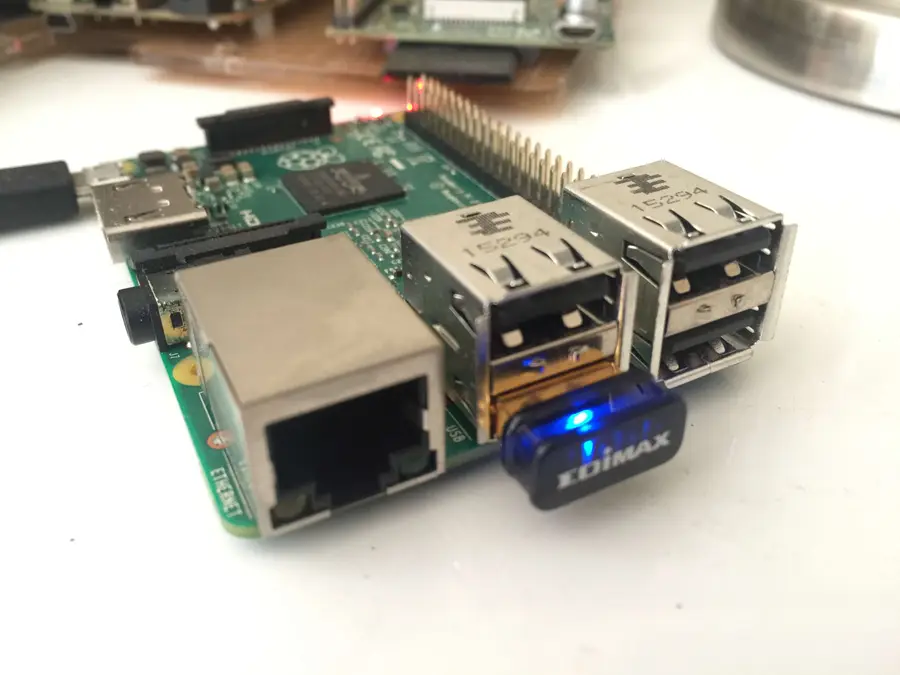
The Edimax WiFi adapter is popular because it’s small, cheap, and most common pi distros come with the drivers already installed. Setting this up via the command line is simple.
1 – Connect your Edimax WiFi adapter and ethernet cable
Before booting up the Pi, plug in the USB WiFi adapter as well as the ethernet cable.
2 – Boot up the Pi
To boot the Pi, simply plug in the power cable.
3 – SSH into the Pi
By default, the raspberry pi uses the hostname “raspberrypi”. So you can SSH using:
4 – Make sure the Pi recognizes the device and the drivers are loaded
Once you’re logged in to the Pi, check to see if the Pi recognizes the USB device using the following command:
lsusb
You should see the following:
Bus 001 Device 004: ID 7392:7811 Edimax Technology Co., Ltd EW-7811Un 802.11n Wireless Adapter [Realtek RTL8188CUS]
Bus 001 Device 003: ID 0424:ec00 Standard Microsystems Corp. SMSC9512/9514 Fast Ethernet Adapter
Bus 001 Device 002: ID 0424:9514 Standard Microsystems Corp.
Bus 001 Device 001: ID 1d6b:0002 Linux Foundation 2.0 root hub
Notice the first line.
Now we’ll check to see if the device drivers are loaded. To list the kernal modules use:
lsmod
You should see something like:
Module                                   Size              Used by
cfg80211
rfkill
8192cu
bcm2835_gpiomem
...
8192cu is what we’re looking for, and it looks like it’s installed.
As a final check, run:
iwconfig
And you should see the wireless adapter here:
wlan0     unassociated  Nickname:""
          Mode:Managed  Frequency:2.462 GHz  Access Point: 20:3D:66:44:C6:70
          Bit Rate:72.2 Mb/s   Sensitivity:0/0
          Retry:off   RTS thr:off   Fragment thr:off
          Power Management:off
          Link Quality=100/100  Signal level=100/100  Noise level=0/100
          Rx invalid nwid:0  Rx invalid crypt:0  Rx invalid frag:0
          Tx excessive retries:0  Invalid misc:0   Missed beacon:0
5 – Configure the wpa_supplicant with your wifi credentials
Now, open the following file to add our network credentials.
There are several ways to go about running a Minecraft server on the Raspberry Pi. In this guide, I’ll cover how to install Nukkit—a cross-platform Minecraft server that’s super easy to set up on the Raspberry Pi. This server should work with PCs, consoles, and tablets running Minecraft 1.14. I’ll be using a Raspberry Pi
Introducing Howchoo, an enigmatic author whose unique pen name reflects their boundless curiosity and limitless creativity. Mysterious and multifaceted, Howchoo has emerged as a captivating storyteller, leaving readers mesmerized by the uncharted realms they craft with their words.
With an insatiable appetite for knowledge and a love for exploration, Howchoo’s writing transcends conventional genres, blurring the lines between fantasy, science fiction, and the surreal. Their narratives are a kaleidoscope of ideas, weaving together intricate plots, unforgettable characters, and thought-provoking themes that challenge the boundaries of imagination.
Tabs are evil. This guide will show you how to convert tabs to spaces in Vim.
1 – Use expand tab to convert new tabs to spaces
The expandtab property will ensure that when you hit tab it will actually use spaces. So first set the number of spaces a tab should be, then set expandtab.
set tabstop=2 shiftwidth=2 expandtab
Tabstop determines how many columns a tab counts for. Shiftwidth determines how many columns text is indented when using reindent operations. Expandtab is what actually uses spaces instead of tabs.
2 – Convert existing tabs to spaces
If you’ve got a file already full of tabs, converting to spaces is super easy. Make sure to follow step one first, then use retab.
Open the file and type:
:retab
This will fix all existing tabs.
NEXT UP
How to Change or Switch the Case of Characters in Vim
Need to change the case of characters to all caps or all lowercase? This is easily done using Vim. This guide will show you how to change the case of characters in Vim. tl;dr Toggle “Hello” to “hELLO” with g~. Uppercase “Hello” to “HELLO” with gU. Lowercase “Hello” to “hello” with gu. 1 – Select the text you’re
Introducing Howchoo, an enigmatic author whose unique pen name reflects their boundless curiosity and limitless creativity. Mysterious and multifaceted, Howchoo has emerged as a captivating storyteller, leaving readers mesmerized by the uncharted realms they craft with their words.
With an insatiable appetite for knowledge and a love for exploration, Howchoo’s writing transcends conventional genres, blurring the lines between fantasy, science fiction, and the surreal. Their narratives are a kaleidoscope of ideas, weaving together intricate plots, unforgettable characters, and thought-provoking themes that challenge the boundaries of imagination.
So you just crushed it on the Peloton Bike, but when you check your Apple Watch no activity has tracked. If you’re into data-driven fitness and tracking, is there anything worse than checking your progress and finding nothing has been recorded?
While your Peloton and Apple Watch are programmed to sync together, follow these quick steps to update your activity right away instead of waiting for your rides and classes to update.
Let’s get started!
1 – Check your Activity rings
Glance at the Activity app on your iPhone or Apple Watch. If your circles are lagging behind the Peloton workout you’ve just completed, you’ll want to do a quick sync to bring everything up to date.
For example, you can see in the screenshot above that after finishing a 60-minute cycling class, my activity rings display no data from my workout.
2 – View your workout in the Peloton app
Next you will need to view each workout you are trying to sync in your Peloton app.
To view your workout, open the Peloton app on your iPhone. Go to your profile to access the workout you’d like to sync. Select “View all” to open your history of completed workouts.
In the list of completed Peloton classes, tap the workout you’d like to sync to open it and view your workout statistics.
3 – Close the Peloton app and Activity app
After you’ve viewed each workout you’d like to sync, close both your Peloton app and your Activity app on your iPhone. This will allow your Activity app to refresh when you reopen it and log your new activity.
4 – Reopen the Activity app
Reopen the Activity app on your iPhone or Apple Watch to see your updated rings. Sometimes it may take a few minutes to see the circles sync with your Peloton, but it will be much faster than waiting for it to track.
Vibram Five Finger shoes are awesome pieces of running gear. But you can also use them for hiking and looking weird around town. Unfortunately, toe shoes start to smell if you don’t wear socks with them every time you wear them. While Vibram claims that the shoes are machine washable, you will ruin them if you wash
Introducing Howchoo, an enigmatic author whose unique pen name reflects their boundless curiosity and limitless creativity. Mysterious and multifaceted, Howchoo has emerged as a captivating storyteller, leaving readers mesmerized by the uncharted realms they craft with their words.
With an insatiable appetite for knowledge and a love for exploration, Howchoo’s writing transcends conventional genres, blurring the lines between fantasy, science fiction, and the surreal. Their narratives are a kaleidoscope of ideas, weaving together intricate plots, unforgettable characters, and thought-provoking themes that challenge the boundaries of imagination.
By default, Django migrations are run only once. But sometimes we need to rerun a Django migration, especially when testing custom migrations during development. This guide will show you how to do just that.
1 – Fake back to the migration immediately before the one you want to rerun
First, imagine the migration history for myapp looks like this:
It’s wise to visualize the migration history before messing with migrations. When we’re finished with this process we can ensure the final migration state matches the original state.
So the latest migration is 0010_the_latest_migration and we want to rerun 0005_the_migration_i_want_to_rerun.
We’ll use the --fake flag to “fake” back to the migration before the one we want to rerun. We’ll also need to specify the target app for the migration, which in this case is myapp.
When learning object oriented programming in Python, there can be a few gotchas when it comes to distinguishing between class and instance variables. In this guide I’ll explain the difference between class and instance variables and provide examples demonstrating various use cases. 1 – Class vs. instance variables First, a quick review if you’re new
Introducing Howchoo, an enigmatic author whose unique pen name reflects their boundless curiosity and limitless creativity. Mysterious and multifaceted, Howchoo has emerged as a captivating storyteller, leaving readers mesmerized by the uncharted realms they craft with their words.
With an insatiable appetite for knowledge and a love for exploration, Howchoo’s writing transcends conventional genres, blurring the lines between fantasy, science fiction, and the surreal. Their narratives are a kaleidoscope of ideas, weaving together intricate plots, unforgettable characters, and thought-provoking themes that challenge the boundaries of imagination.
If you’re not used to this, don’t worry. Its not a big deal at all.
3 – Remove the main connector from the motherboard
This is slightly scarier but only very slightly. There is usually a small clasp on one side that you have to hold open while removing this from your motherboard.
4 – Plug in a case fan or a hard drive
Some PSU’s require at least a small load for this test to work.
5 – Bend the paperclip into a U shape
6 – Bridge the paperclip between the green wire and a ground (usually black) wire
If your PSU is a corsair like mine, then any black wire is a ground wire. This is not dangerous at all, its just basically telling the PSU to power up as soon as its turned on.
🛈 Sorry about the thumb in the way!!!
7 – ATX power cable pinout diagram
Note the small connector tab on the right of the diagram for proper orientation.
The attached ATX pinout diagram identifies the ground pins you can use. This is for the common 24-pin ATX power connector.
8 – Plug in and power on the PSU
If the PSU fan powers on and starts spinning, then your PSU is most likely good! In my case, my PSU didn’t budge so I know its busted and I’ll be ordering a replacement.
If you’re a fan of the original Nintendo GameCube, you’re not alone. But sometimes emulating GameCube games just isn’t the same if the controller doesn’t hit right. And by that we mean—you need the original hardware to make the experience. If you want to use the original GameCube controller on a PC, all you need
Introducing Howchoo, an enigmatic author whose unique pen name reflects their boundless curiosity and limitless creativity. Mysterious and multifaceted, Howchoo has emerged as a captivating storyteller, leaving readers mesmerized by the uncharted realms they craft with their words.
With an insatiable appetite for knowledge and a love for exploration, Howchoo’s writing transcends conventional genres, blurring the lines between fantasy, science fiction, and the surreal. Their narratives are a kaleidoscope of ideas, weaving together intricate plots, unforgettable characters, and thought-provoking themes that challenge the boundaries of imagination.
If you’re a painter, you’ve likely dealt with dried paint left on the bristles on your brush. Which means you’ve also probably wondered: how do I soften my paintbrush?
When left unchecked, dried paint can wreak havoc on the integrity of the brush itself, affecting how well the brush paints, your artistic ability and your art, too. In addition, hardened bristles aren’t malleable, making them impossible to use, which is especially painful if you’ve sunk a good amount of money into your brushes.
Removing dried paint might be an art in itself, but what about restoring those dried bristles to their soft fresh-from-the-package state of being?
That’s where the true art happens.
Here’s everything you need to know about removing dried paint, and how to soften your paintbrushes.
1 – Remove as much paint as you can
Before you work to soften the hardened bristles of your paint-encrusted brush, you’re going to have to remove as much extra paint as you can.
How to remove water-based paint
Soak your brush in warm water.
Put dish soap directly on the wet bristles.
Massage the soap gently into the bristles.
Run bristles beneath warm water, massaging the soap and paint until the water runs clear.
How to remove oil-based paint
Soak the end of your brush in paint thinner or turpentine.
Work the paint thinner/turpentine through the bristles by massaging the liquid into the brush.
Continue working with your fingers until the bristles are cleaner.
Rinse with warm water and dish soap to remove the painter thinner/turpentine.
Now that your bristles are relatively clean, you’re ready to soften them up! There are several ways you can do this, but we’ll focus on the top 3 easiest methods: The moisturizer, the vinegar, and the fabric softener methods.
2 – The moisturizer method
Using moisturizer to soften your dried paintbrushes is a great way to accomplish your goal easily because you don’t have to create your own mixture. Here’s how to use moisturizer to soften your paint bristles.
You can use any lightweight moisturizer or lotion that doesn’t leave behind a greasy residue. Residue can cause buildup in your bristles, negatively impacting your ability to paint in the longrun.
Tip: Look for any moisturizer or lotion that has oil-free written on the packaging.
How to soften your brushes
Squirt a peasize amount of moisturizer into the palm of your hand.
Run the bristles of your brush in a back and forth motion over the moisturizer.
Take care to work as much moisturizer into the bristles as you can, using your fingertips if necessary.
Continue to work in the moisturizer for a minute or until you feel confident as much of the bristles as possible are coated.
Use a clean paper towel to wipe off any excess moisturizer by applying medium to firm pressure on the ferrule and working your way to the tip of your brush.
Repeat until the moisturizer is gone.
Rinse and dry as normal.
Why the moisturizer method works
Moisturizer loosens the dried paint from the bristle, making it easier to slide it off when you run your paper towel over it.
3 – The vinegar method
Certainly the smelliest method for how to soften your paintbrushes, vinegar is a good option if you want to avoid using harsh chemicals.
How to prepare your vinegar
Pour a cup into a pot and place the pot on your stovetop.
Heat your vinegar on high heat until small bubbles start to form on the bottom of the pan (just shy of boiling).
How to soften your brushes
Pour your heated vinegar into a glass.
Submerge your bristles up to the ferrule.
Let your brushes sit for 20 minutes.
Check to see if your bristles are soft. If they’re not yet, submerge them once more for 10 more minutes.
Rinse with warm water and let them dry as normal.
Why the vinegar method works
Vinegar is a unique substance that is known for many things. Not only is it edible, it’s also a disinfectant, too and can be used to strip build-up from surfaces (and bristles!).
4 – The fabric softener method
How to make your fabric softener mixture
You can use the fabric softener of your choice, but I like to use unscented softeners.
If you’re softening a few brushes: mix 1 tablespoon of fabric softener with 1 cup of water.
If you’re softening a dozen brushes: mix 1/4 cup of fabric softener with 4 cups of water.
Make sure you’re using a hard bowl to combine your softener with your water. This will make it easier to work the mixture into your bristles.
How to soften your brushes
Submerge one brush at a time up to the ferrule.
Swirl the bristles through your mixture.
Gently press your bristles against the bottom of your bowl, moving the brush in circular or back and forth motions.
Repeat until the excess paint dislodges from the bristles and falls to the bottom of your bowl.
Once the bristles are clean and soft to the touch, you can set them aside to dry as you normally would.
Why the fabric softener method works
Fabric softener works to coat the individual fibers of whatever it comes in contact with, either clothes, towels, or the bristles of your paintbrush.
It also decreases the amount of surface tension between the liquid and your brush, making it easier for the water to penetrate all those nooks and crannies between the bristles once you work your brush against the base of your bowl.
There you have it! 3 ways to soften your paintbrushes, keeping them as good as new for as long as possible.
NEXT UP
When I was first offered a beverage flavored with whiskey simple syrup, I was in a coffee shop in San Jose, California. I wasn’t even really interested in drinking coffee. It was later in the day; I was already feeling a little tired; I figured coffee was the last thing I needed. But when the
Introducing Howchoo, an enigmatic author whose unique pen name reflects their boundless curiosity and limitless creativity. Mysterious and multifaceted, Howchoo has emerged as a captivating storyteller, leaving readers mesmerized by the uncharted realms they craft with their words.
With an insatiable appetite for knowledge and a love for exploration, Howchoo’s writing transcends conventional genres, blurring the lines between fantasy, science fiction, and the surreal. Their narratives are a kaleidoscope of ideas, weaving together intricate plots, unforgettable characters, and thought-provoking themes that challenge the boundaries of imagination.
I am a huge fan of Obisdian, the free and open-source tool for all your note-taking needs. Obsidian is one of the best tools for knowledge workers, writers, and educators, and I personally use it daily to manage my volunteering across half a dozen different organizations, as well as my personal learning.
Like other similar note-taking tools, it features a simple and powerful design that makes storing your ideas inside your digital “second brain” a breeze. But syncing through Obsidian’s official live sync is expensive. I highly recommend it if you can afford the $10/month charge, as the company deserves your support, but if you, like me, find that the $100/year isn’t doable, try this free method for securely syncing all your Obsidian notes, across all your vaults, for free!
1 – SyncThing
SyncThing is a free and open-source peer-to-peer syncing app, designed to quickly and securely transfer data between your devices. It can sync across multiple devices almost instantly, and can handle syncing between multiple types of devices, including those with different operating systems (Windows to iOS, etc.). Your data is safe and secure with this type of file syncing, and it’s impossible to beat the free price tag!
You need to navigate to the official SyncThing GitHub to download SyncThing. Just follow the instructions on their GitHub page and download the correct installer for your device!
Since I use Windows, I’ll show you how to install the official windows app “SyncTrayzor”, but SyncThing-MacOS will feature much the same steps.
2 – Download SyncTrayzor
Download SyncTrayzor from the list on the GitHub page.
3 – Run the SyncTrayzor .exe file
Find your downloads section and double-click your new SyncTrayzor extension (or just click “run” from the download button on your browser).
4 – SyncTrayzor control panel
Once you have SyncTrayzor installed and opened, you’ll start in the main control panel screen. This is where you’ll be able to see which folders are shared, which are actively syncing, and which devices you have connected.
5 – Check the SyncThing settings
Let’s make sure that your settings are correct.
First go to “File”, then click “Settings”.
On the SyncTrayzor tab, at the bottom, you’ll find two setting checkboxes:
“Automatically start on login”, and “Start minimized”.
This app can also be found on F-Droid and through the AuroraStore privacy-focused version of the Google app store.
7 – Prepare to add a new device to SyncTrayzor
On your SyncTrayzor application on your PC, click the “Action” tab, and then click “Show ID” to bring up a unique QR code that you can use to link your phone to SyncTrayzor.
8 – Add your device
On the mobile app, find the devices tab, then press the “+” sign to add a new device. Now, simply scan the QR code from the SyncTrayzor app on your PC.
Back on the SyncTrayzor app on your PC, you should see a new notification pop up at the top of the SyncTrayzor control panel. Click “Add Device”. Now, under “Remote Devices” in the SyncTrayzor window, you will see your phone!
9 – Sync your Obsidian vault
On your computer, open the folder location of your obsidian vault.
Right-click on the folder. Select “copy as path”. If you’re on Windows 10, you may need to first click “Show more options” to see the full context menu.
Return to the SyncTrazor app and click on “Add folder”.
Paste the folder path and remove the quotation marks (“…”) from the ends of the folder path link.
Add a unique identifier to the “Label” section, such as “Obsidian”.
10 – Enable file versioning and set up on mobile
Click on the “Sharing” tab in the SyncTrayzor window for your folder.
Under “File Versioning” click the “Trash Can File Versioning” checkbox.
Click “Save”.
On your mobile device, a new notification should appear letting you know that a folder wants to be shared.
Tap on this notification and choose the folder on your phone that you want to use as your Obsidian Vault. Make sure “Watch for Changes” is selected.
Tap “Create”.
Your new synced Obsidian folder will be created, syncing everything between your phone and PC! The file versioning will ensure that if there are glitches between the devices, previous iterations of your important files will be saved. It is important to note that I encountered some errors when I had both the Obsidian program on my laptop and the app on my phone running at the same time. The file that would sync would be whichever was the last to close. If I closed my PC app first and then my mobile app, the data on the mobile app would sync to both devices. Versioning captured changes, however, and made sure I didn’t lose anything.
NEXT UP
How to Set Up Quick Connect on a Synology NAS
Get Synology’s powerful Quickconnect running in minutes on your NAS!
Synology is one of the most popular creators of Network Attached Storage devices on the market today, and for great reason — they’re really good at what they do. They consistently make devices that stand the test of time and feature top-notch software that makes the process of running a home server as easy as
Introducing Howchoo, an enigmatic author whose unique pen name reflects their boundless curiosity and limitless creativity. Mysterious and multifaceted, Howchoo has emerged as a captivating storyteller, leaving readers mesmerized by the uncharted realms they craft with their words.
With an insatiable appetite for knowledge and a love for exploration, Howchoo’s writing transcends conventional genres, blurring the lines between fantasy, science fiction, and the surreal. Their narratives are a kaleidoscope of ideas, weaving together intricate plots, unforgettable characters, and thought-provoking themes that challenge the boundaries of imagination.
Today, managing your router is an easy process. In fact, you do not even have to be connected to your home network to manage your router.
With remote access, you can access your router’s features and settings, no matter where you are. If you are wondering how to remotely access your router, keep reading our guide as we take you through the steps.
We will also explain the drawbacks and what you need to know.
1 – What is Remote Access For Your Router?
Essentially, remote access lets you log into your router no matter where you are, as long as you have an internet connection. After you gain remote access, you can do anything you can usually do when you log into your router on your home network.
This includes accessing and making changes to your router’s security and other setup options.
Like anything else, there are certain drawbacks to allowing remote access to your router.
When you enable remote access, you could put your data at risk because now, just like you, anyone else with an internet connection can access your router remotely if they already have some information about your router.
Just like you, they can also see your security settings, change them and even access your network. This is why it is crucial to understand the risks so you can be prepared.
2 – How Remote Access Works
Remote access is established with a combination of network, software, and hardware connectivity.
Years ago, people used traditional remote access before the internet became available to most people.
Back then, this was accomplished using terminal emulation software. The software controlled access over a hardware modem that was connected to a telephone network.
However, with technological advancements today, remote access is accomplished by:
Hardware: Connecting hosts via a hard-wired network interface or WiFi network interface.
Software: Using a VPN which is a more secure option.
Network: By connecting through the internet.
How to Choose the Best Wi-Fi Channel for Your Router
Your first step in the process is to enable remote sharing on the device itself. This is only possible by checking that your router can accept the remote connection. First, navigate to your router’s IP address in your web browser.
If you have forgotten or do not know what your router’s IP address is, check for more information on the device. The IP address should be indicated in the format of 192.168.1.1 or 192.168.0.1, although there will be different numbers depending on your location.
Once your router and browser have been linked, you will be required to enter a user ID and a password. This gives you access to configuration settings.
After logging in, go to the “Remote Management” preferences inside your router’s control panel. The set of features might have been named “Remote Access” but take note that the naming might vary from one device to another. They are mostly located in Advanced Settings.
This is only the setup process and, thus, the initial first step to setting up your router’s remote access. Once done, click on the required button to allow remote access and then begin with the step-by-step process to create a dynamic DNS.
If you have these popular router brands, here is how you can quickly find the Remote Access settings.
Netgear
Log in to your admin console on your router.
Go to Advanced and choose Advanced Setup.
Select Remote Management.
You will see that Turn Remote Management On is checked. Proceed to uncheck it.
Click on Apply to save your settings.
Now, check the box next to Turn Remote Management On.
Look for Allow Remote Access By Section. Proceed to enter the external IP addresses that you want to use to access your router remotely.
Select only one of these options:
Only This Computer – Allow access from a single IP address on the Internet. Enter the IP address.
IP Address Range – Allow access from a range of IP addresses on the Internet. Enter a beginning IP address and an ending IP address to define the allowed page.
Everyone – Allow access from any IP address on the Internet.
Enter the port number you want to use to access the web management interface. Take note that usual web browser access utilizes the standard HTTP service port 80.
For greater security, enter a custom port number from 1024 to 65535 for the remote web management interface, but do not use the number of any common service port.
Click Apply to save your settings.
DLink
First, log in to the admin console.
Navigate to Tools.
Choose Administration.
Uncheck Enable Remote Management.
In the textbox, you need to delete the Remote Admin Port.
Remember to click on Save Settings.
Now, check the box next to Enable Remote Management.
Key in the port in Remote Admin Port. If you want to, you can leave the default port set to 8080.
A dynamic DNS ensures that your remote access connections can seamlessly integrate with your personal router. In addition, a properly set up dynamic DNS ensures that wherever you are, your remote connection can be firmly established.
It will also allow you to access your website if you have one or your server without worrying about changes to your IP address from any location in the world. There are various dynamic DNS providers in the market today, some of which offer these services for free. For example, there is a free-to-use dynamic DNS and Managed DNS service provider known as NoIP.
Once your dynamic DNS is established, you will need to add a new hostname and a new sub-domain. Save this information or record it somewhere since the next step will be to return to your router’s control panel and copy your new DNS and hostname into the DNS settings panel.
Once this process is complete, your router should be accessible remotely. All you need to do is to type in your new domain name and then the remote port number.
4 – Securing Your Router Access Remotely
A router plays a very important role in your home or business. Not only does a router establish a stronger and safer connection, but it also inspects all the traffic and data that is incoming and outgoing.
In this way, it serves as a guard shielding your data so that no harmful data can get through, and at the same time, none of your private information can go out.
To secure your remote access, follow these steps that will help reduce your risk.
Change Your Admin Password
A router usually has a default password that is set for you to use. If you would like to block any access to your router, use WPA2 security. But, for you to do this, you will need each of the new devices to enter a password to connect.
If possible, try changing the WiFi password as regularly as you can. After changing the password, try reconnecting all your devices connected to the router to re-establish the connection.
Similar to phones, routers have firmware that needs to be updated. This firmware is what controls the router’s actions while providing instructions that enable a device’s hardware startup and communication with other devices.
This allows the device to perform basic input/output tasks and sets the security level of the network.
Some modern routers have a feature that allows them to update themselves in the background whenever there’s an internet connection. However, even if your router does not automatically update itself, you should still check that the firmware is up to date.
Check whether you have the latest security patches and bug fixes. This confirms that your router is protected against any security flaws.
New features that are added onto a firmware after an upgrade usually provide an enhanced user experience. Furthermore, a firmware update optimizes the overall performance of the firmware or device driver, thus enhancing the performance of the processor.
Utilize a Guest Network
You can use a guest network to broadcast if you have one. This creates a barrier or protective shield in case someone attempts to access your network without your knowledge.
Consider Your Data’s Security
Any data stored in any device should be kept secure at all times. Most modern routers that have been recently launched a couple of years back have excellent built-in security features.
Manufacturers that make routers have technologically advanced router security and reliability and release new products that are more user-friendly than earlier ones. Now all you need to do is ensure that key security settings are set.
5 – Why Access Your Router Remotely?
You might not want to access your router remotely and might be comfortable working with it as it has been set up. However, some circumstances might force you to change the settings and access it remotely. These include:
Check If Someone Else Is Using Your WiFi
When you gain remote access to your router, you will be able to see who is using your WiFi.
You can even check if your kids back at home are doing their homework or just playing games and watching irrelevant videos or accessing what they should not on their computer.
With remote access, you can even change parental control settings if your router brand has that feature.
Remove Access For Unwanted Leechers
Remote access lets you see what your children are doing online, but it also allows you to find out if your neighbors are leeching on your WiFi without you knowing. When you gain remote access to your router, you can easily remove or even block users who have been accessing your router.
Change your settings and get rid of the guest network so you do not have any leechers taking advantage of your Internet connection. This way, you can be more assured that your private data does not get hacked too.
Convenience
With remote access, you can check on any router issues. Perhaps you are the only person in your family who is familiar with routers and technology in general.
If you happen to be away from home and someone in your family needs you to check up on an issue, you will be able to do it remotely.
It could also be your parents who are experiencing challenges connecting to the internet. If you do not live with them but need to fix the internet for them, remotely accessing their router will help. Overall, with remote router access, you can fix issues and even carry out speed tests.
Access Files From A Hard Drive
You may have connected an external hard drive to your router. When you access your router remotely, you can also access this hard drive.
This makes it so convenient to view your files remotely without having to log in to your computer.
6 – Should You Remotely Access Your Router with Desktop Apps Like Teamviewer?
You can access your router with apps like TeamViewer. But the challenge is that you need to keep the computer you have installed it on turned on all the time.
This is not always practical, especially if you are rarely in one place and are on the move for more than a couple of days. Once you turn off your computer, or if the computer is removed from the network, you will lose access.
This is why it is more convenient to access your router directly since it stays on all the time and is connected, whether you are at home or not. All you need is a web browser to access your router from any location, and you also do not need to install any additional software.
7 – Conclusion
You might not know this, but once you gain remote access to your router, you do not have to go through all the steps again to prepare the DNS and enable remote sharing. Once you have that all set up, you can access your router from anywhere.
However, as a note of caution, just remember that if you do change your router password, the DNS and remote sharing preparation may be reset as well. Overall, it is not too complicated to gain remote access to your router so follow our steps closely, and you will be able to do so.
There are a few reasons you might want to update or reset your WiFi password: making your network more secure, and making your password easier to remember and type. Improved network security You can add an extra layer of security to your network by changing the WiFi password. As long as your new password is
Introducing Howchoo, an enigmatic author whose unique pen name reflects their boundless curiosity and limitless creativity. Mysterious and multifaceted, Howchoo has emerged as a captivating storyteller, leaving readers mesmerized by the uncharted realms they craft with their words.
With an insatiable appetite for knowledge and a love for exploration, Howchoo’s writing transcends conventional genres, blurring the lines between fantasy, science fiction, and the surreal. Their narratives are a kaleidoscope of ideas, weaving together intricate plots, unforgettable characters, and thought-provoking themes that challenge the boundaries of imagination.